
LiftMaster 3255 Support Question
LiftMaster 3255 Support Question
Find answers below for this question about LiftMaster 3255.Need a LiftMaster 3255 manual? We have 1 online manual for this item!
Question posted by Anonymous-59422 on May 15th, 2012
Garage Door Opens Intermittently
Garage door is closed and opens periodically on it's own when nobody activates the interior wall switch or one of the remotes. How do I correct this?
Current Answers
Related LiftMaster 3255 Manual Pages
3255 Manual - Page 1
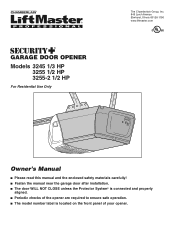
®
GARAGE DOOR OPENER
Models 3245 1/3 HP 3255 1/2 HP 3255-2 1/2 HP
For Residential Use Only
The Chamberlain Group, Inc. 845 Larch Avenue Elmhurst, Illinois 60126-1196
www.liftmaster.com
Owner's Manual
■ Please read this manual and the enclosed safety materials carefully! ■ Fasten the manual near the garage door after installation. ■ The door WILL NOT CLOSE unless the...
3255 Manual - Page 2

... System 25
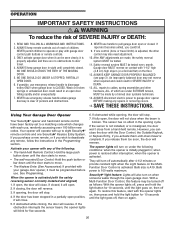
Operation
26-30
Operation safety instructions 26
Using your garage door opener 26
Using the wall-mounted door control 27
To open the door manually 27
Care of damage to your garage door opener 28
Having a problem 29
Diagnostic chart 30
Programming
31-32
To add or reprogram a hand-held remote control 31
To erase all codes 31
3-Button...
3255 Manual - Page 3
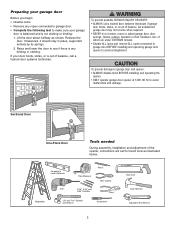
To prevent damage to garage door and opener:
• ALWAYS disable locks BEFORE installing and operating the opener.
• ONLY operate garage door opener at 120V, 60 Hz to avoid entanglement. If balanced, it should stay in place, supported entirely by its springs. 2. If your garage
door is balanced and is any binding or sticking.
Preparing your garage door
Before you begin...
3255 Manual - Page 4
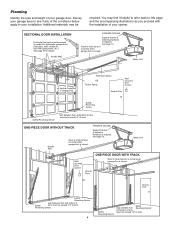
... vertical reinforcement is closed .
Header Wall
FINISHED CEILING
Support bracket & fastening hardware is required. See page 12. Slack in chain tension is normal when garage door is closed . Motor Unit
Wallmounted Door Control
Access Door
ONE-PIECE DOOR WITH TRACK
Slack in chain tension is normal when garage door is closed. You may be
required. Survey your opener.
3255 Manual - Page 5

...
contain the motor unit and all parts illustrated below .
3245 (1), 3255 (1), 3255-2 (2)
LOCK
LIGHT
Multi-Function Door Control Panel
: SECURITY ®
Single-Button Remote Control
Remote Control Visor Clip
Chain
Sprocket Cover Styrofoam
Motor Unit with 2-Conductor White ... which If anything is also listed below .
Carton Inventory
Your garage door opener is packaged in the foam.
3255 Manual - Page 6
...fingers from
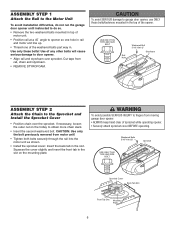
rail, chain and styrofoam. • REMOVE STYROFOAM. To avoid SERIOUS damage to garage door opener, use ONLY those bolts/fasteners mounted in the slot. Use of any other bolts will ... STEP 1
Attach the Rail to the Motor Unit
To avoid installation difficulties, do not run the garage door opener until instructed to do so. • Remove the two washered bolts mounted in top of
motor ...
3255 Manual - Page 7

... only on the floor.
7 Disable ALL locks and remove ALL ropes connected to garage door BEFORE installing opener to garage door control.
11. Install garage door opener 7 feet (2.13 m) or more above floor.
7. Install wall-mounted garage door control:
• within sight of the garage door.
• out of reach of installation, test safety reversal system. Place entrapment warning label...
3255 Manual - Page 8
...Travel
Pivot
One-piece door without track: jamb hardware
One-piece door without track. Open your door.
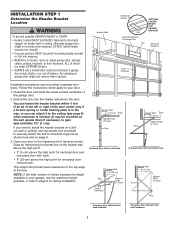
1. INSTALLATION STEP 1
Determine the Header Bracket Location
To prevent possible SERIOUS INJURY or DEATH: • Header bracket MUST be RIGIDLY fastened to structural
support on page 9.
3. Header Wall
Unfinished Ceiling
2x4 Vertical Centerline of Garage Door
2x4
OPTIONAL CEILING MOUNT...
3255 Manual - Page 11
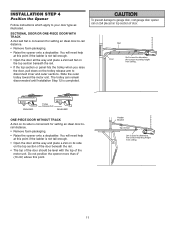
... distance.
• Remove foam packaging.
• Raise the opener onto a stepladder.
SECTIONAL DOOR OR ONE-PIECE DOOR WITH TRACK A 2x4 laid flat is used to -rail distance. • Remove foam packaging. • Raise the opener onto a stepladder. To prevent damage to garage door, rest garage door opener rail on 2x4 placed on its side on the trolley release arm...
3255 Manual - Page 12
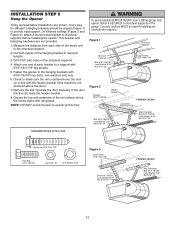
...: DO NOT connect power to make sure the rail is centered over the door (or in the structural supports.
4.
Operate the door manually. Drill 3/16" pilot holes in line with 5/16"-18x1-7/8" lag screws.
5.
Measure the distance from a falling garage door opener, fasten it SECURELY to structural supports of the rail surface where the trolley...
3255 Manual - Page 14
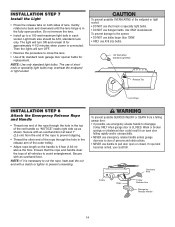
... use halogen bulbs. If rope knot becomes untied, you could result in the top of persons and obstructions. • NEVER use emergency release handle to close the lens.
• Use A19, standard neck garage door opener bulbs for approximately 4-1/2 minutes when power is 6 feet (1.83 m) above the floor.
3255 Manual - Page 15
... the screw on the silver terminal; To prevent possible SERIOUS INJURY or DEATH from electrocution or fire:
• Be sure power is required by your garage door opener has a grounding type plug with ALL local electrical and building codes.
• NEVER use an extension cord, 2-wire adapter, or change plug in ANY way...
3255 Manual - Page 16
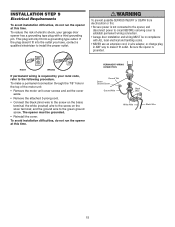
... Reversing Sensor 6" (15 cm) max. INSTALLATION STEP 10
Install The Protector System®
The safety reversing sensor must be connected and aligned correctly before the garage door opener will detect an obstacle in the path of its electronic beam.
Either can be installed on the wall, the brackets must be unobstructed. Be sure power is closing .
3255 Manual - Page 22

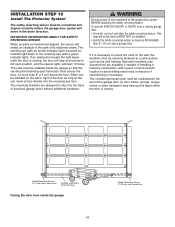
...- It may be adjusted. Figure 5
Inner Trolley
Outer Trolley
Door Arm
Door Arm Connector Hole
Emergency Release Handle
Closed Door
Inner Trolley
Outer Trolley
Correct Angle
Door Arm
Open Door
Door with a ring fastener.
2.
Press the Door Control push button. Connect the door arm to the trolley:
• Close the door and join the curved arm to the trolley. Adjustment procedures...
3255 Manual - Page 25
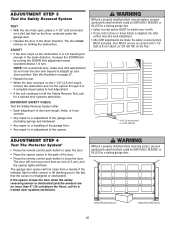
... System®
• Press the remote control push button to open , place a 1-1/2" (3.8 cm) board
(or a 2x4 laid flat) on the floor, centered under the garage door. • Operate the door in the down position. ADJUST • If the door stops on the obstruction, it is misaligned or obstructed).
If the opener closes the door when the safety reversing sensor...
3255 Manual - Page 26
... goes off, then on , then off , press and hold the light button for five seconds.
6. Activate your garage door opener, it can close from a hand-held remote. If open, the door will open position, it will close when the beam is complete. If fully open garage door. The sensor has no obstructions to move. • The Keyless Entry (See Accessories): If provided with...
3255 Manual - Page 29
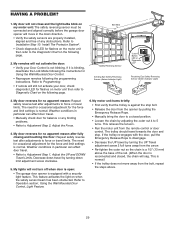
...Using the Wall Mounted Door Control, Light Feature.
6. My remotes will not turn off when door is open: • The garage door opener is ... will not activate the door:
• Verify your door, check diagnostic LED for no apparent reason after fully closing and touching ...aligned correctly before the garage door opener will still not activate your Door Control is equipped with the door,...
3255 Manual - Page 30
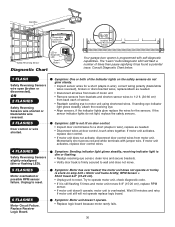
...If motor unit doesn't operate, motor unit is firmly secured to wall and does not move. If sending eye indicator
light glows steadily,...Reversing
Sensor
Your garage door opener is not lit on door control. • Inspect door control/wires for a short (staple in wire), correct wiring polarity (... motor unit activates, replace door control wires.
Symptom: Motor unit doesn't operate. • Replace...
3255 Manual - Page 31
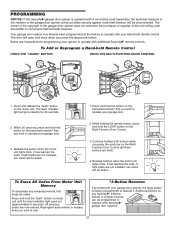
... and release the "learn " button on the hand-held remote* that you wish to operate your garage door.
3.
Below are now erased. Press and hold the "learn " button on any unwanted remote, first erase all three buttons are not installed, two clicks will open and close when you wish to operate other Security✚® garage door openers.
31
3255 Manual - Page 32
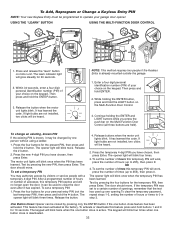
...open the door. The opener light will blink once when the PIN has been learned. The opener light will blink three times.
It has learned the code. To set the number of hours this temporary PIN expires and will be closed by pressing only the ENTER button if the one button close is active..., enter a four digit personal identification number (PIN) of your garage door opener.
Similar Questions

Garage Door Opener Model
How do I know if I have a 3255 or 3255-2M garage door opener?
How do I know if I have a 3255 or 3255-2M garage door opener?
(Posted by ericoster1 3 years ago)

How Much Does A Lift Master 3255 Garage Door Opener Cost
(Posted by cosin 9 years ago)

Liftmaster 3255m Garage Door Opener
i cannot get the keypad programmed to the garage door opener.
i cannot get the keypad programmed to the garage door opener.
(Posted by bwerries 10 years ago)

My Opener Works Fine From The Wall Unit. None Of The Remotes Work.
The wall unit works fine but the remotes just stopped working. I reset the codes and can not reset t...
The wall unit works fine but the remotes just stopped working. I reset the codes and can not reset t...
(Posted by Nelsoneric84 10 years ago)

Liftmaster 3280 Door Closing Problem
my liftmaster 3280 door won't close unless i keep pushing the button on the wall unit. Whati is wron...
my liftmaster 3280 door won't close unless i keep pushing the button on the wall unit. Whati is wron...
(Posted by marktaleff 11 years ago)