

3255 Manual
Page 2
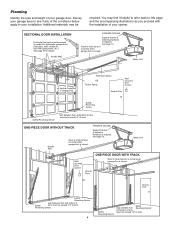
... review 2 Preparing your garage door 3 Tools needed 3 Planning 4 Carton inventory 5 Hardware inventory 5 Assembly 6-7 Attach the rail to the motor unit 6 Attach the chain to the sprocket 6 Tighten the chain 7 Installation 7-22 Installation safety instructions 7 Determine the header bracket location 8 Install the header bracket 9 Attach the rail to the header bracket 10 Position...
... review 2 Preparing your garage door 3 Tools needed 3 Planning 4 Carton inventory 5 Hardware inventory 5 Assembly 6-7 Attach the rail to the motor unit 6 Attach the chain to the sprocket 6 Tighten the chain 7 Installation 7-22 Installation safety instructions 7 Determine the header bracket location 8 Install the header bracket 9 Attach the rail to the header bracket 10 Position...
3255 Manual
Page 4
...Torsion Spring Wallmounted Door Control Access Door --- --- -- Header Wall FINISHED CEILING Support bracket & fastening hardware is required. Slack in chain tension is normal when garage door is needed for details. Motor Unit Wallmounted Door Control Access Door ONE-PIECE DOOR WITH TRACK Slack in... chain tension is normal when garage door is closed . Additional materials may find it helpful to refer back to your installation. See...
...Torsion Spring Wallmounted Door Control Access Door --- --- -- Header Wall FINISHED CEILING Support bracket & fastening hardware is required. Slack in chain tension is normal when garage door is needed for details. Motor Unit Wallmounted Door Control Access Door ONE-PIECE DOOR WITH TRACK Slack in... chain tension is normal when garage door is closed . Additional materials may find it helpful to refer back to your installation. See...

3255 Manual
Page 5
...the packing material. Hardware for installation Accessories will depend on the model purchased. Trolley One-Piece Rail Curved Door Arm Section Chain Pulley Bracket Door Bracket Safety Sensor Bracket (2) The Protector System® (2) Safety Reversing Sensors (1 Sending Eye and 1 Receiving... contain the motor unit and all parts illustrated below . 3245 (1), 3255 (1), 3255-2 (2) LOCK LIGHT Multi-Function Door Control Panel : SECURITY ® Single-Button Remote Control Remote Control Visor Clip Chain Sprocket Cover Styrofoam Motor Unit with 2-Conductor White & White/Black Bell...
...the packing material. Hardware for installation Accessories will depend on the model purchased. Trolley One-Piece Rail Curved Door Arm Section Chain Pulley Bracket Door Bracket Safety Sensor Bracket (2) The Protector System® (2) Safety Reversing Sensors (1 Sending Eye and 1 Receiving... contain the motor unit and all parts illustrated below . 3245 (1), 3255 (1), 3255-2 (2) LOCK LIGHT Multi-Function Door Control Panel : SECURITY ® Single-Button Remote Control Remote Control Visor Clip Chain Sprocket Cover Styrofoam Motor Unit with 2-Conductor White & White/Black Bell...
3255 Manual
Page 6
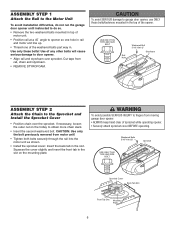
...sprocket. Use of the washered bolts part way in. Use only these bolts! CAUTION: Use only the bolt previously removed from rail, chain and styrofoam. • REMOVE STYROFOAM. USE ONLY THIS TYPE AND SIZE BOLT Rail Hole Washered Bolt 5/16"-18x1/2" Styrofoam ASSEMBLY STEP 2 Attach the... Chain to obtain more chain slack. • Insert the second washered bolt. Washered Bolts 5/16"-18x1/2" Sprocket USE ONLY THIS TYPE AND SIZE BOLT Sprocket Cover Back ...
...sprocket. Use of the washered bolts part way in. Use only these bolts! CAUTION: Use only the bolt previously removed from rail, chain and styrofoam. • REMOVE STYROFOAM. USE ONLY THIS TYPE AND SIZE BOLT Rail Hole Washered Bolt 5/16"-18x1/2" Styrofoam ASSEMBLY STEP 2 Attach the... Chain to obtain more chain slack. • Insert the second washered bolt. Washered Bolts 5/16"-18x1/2" Sprocket USE ONLY THIS TYPE AND SIZE BOLT Sprocket Cover Back ...

3255 Manual
Page 7
...re-tighten the inner nut to the installation section. WARNING Check for proper tension and readjust chain if necessary. Install garage door opener only on wall next to do not re-adjust the chain. READ AND FOLLOW ALL INSTALLATION WARNINGS AND INSTRUCTIONS. 2. Place manual release/safety reverse test ...the risk of garage door. 12. They could result in plain view on inside of SEVERE INJURY or DEATH: 1. ASSEMBLY STEP 3 Tighten the Chain • Spin the inner nut and lock washer down the trolley threaded shaft, away from ALL moving parts of the door. 10. Mount ...
...re-tighten the inner nut to the installation section. WARNING Check for proper tension and readjust chain if necessary. Install garage door opener only on wall next to do not re-adjust the chain. READ AND FOLLOW ALL INSTALLATION WARNINGS AND INSTRUCTIONS. 2. Place manual release/safety reverse test ...the risk of garage door. 12. They could result in plain view on inside of SEVERE INJURY or DEATH: 1. ASSEMBLY STEP 3 Tighten the Chain • Spin the inner nut and lock washer down the trolley threaded shaft, away from ALL moving parts of the door. 10. Mount ...
3255 Manual
Page 10
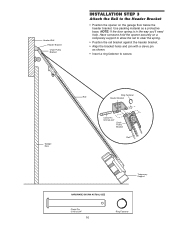
... bracket. Use packing material as shown. • Insert a ring fastener to secure. Garage Door Ring Fastener Rail Header Bracket Clevis Pin 5/16"x2-3/4" Chain Pulley Bracket Rail Temporary Support HARDWARE SHOWN ACTUAL SIZE Clevis Pin 5/16"x2-3/4" 10 Ring Fastener Header Wall Header Bracket... Chain Pulley Bracket INSTALLATION STEP 3 Attach the Rail to the Header Bracket • Position the opener on a temporary support to allow the rail to ...
... bracket. Use packing material as shown. • Insert a ring fastener to secure. Garage Door Ring Fastener Rail Header Bracket Clevis Pin 5/16"x2-3/4" Chain Pulley Bracket Rail Temporary Support HARDWARE SHOWN ACTUAL SIZE Clevis Pin 5/16"x2-3/4" 10 Ring Fastener Header Wall Header Bracket... Chain Pulley Bracket INSTALLATION STEP 3 Attach the Rail to the Header Bracket • Position the opener on a temporary support to allow the rail to ...
3255 Manual
Page 28
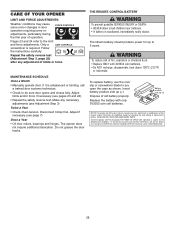
... conditions may cause some minor changes in door operation requiring some readjustments, particularly during the first year of old battery properly. Twice a Year • Check chain tension. THE REMOTE CONTROL BATTERY To prevent possible SERIOUS INJURY or DEATH: • NEVER allow small children near batteries. • If battery is unbalanced or...
... conditions may cause some minor changes in door operation requiring some readjustments, particularly during the first year of old battery properly. Twice a Year • Check chain tension. THE REMOTE CONTROL BATTERY To prevent possible SERIOUS INJURY or DEATH: • NEVER allow small children near batteries. • If battery is unbalanced or...
3255 Manual
Page 29
... 2, Adjust the Force. 4. My motor unit hums briefly: • First verify that the trolley is reconnected and closed position. • Loosen the chain by turning down travel towards the door and stop bolt. • Release the door from the remote control or door control. My remotes will sag...tension. • Run the motor unit from the opener by pulling the Emergency Release Rope. • Manually bring the door to a closed , the chain will not activate the door: • Verify your door, check diagnostic LED for the force and limit settings is normal.) • If the trolley ...
... 2, Adjust the Force. 4. My motor unit hums briefly: • First verify that the trolley is reconnected and closed position. • Loosen the chain by turning down travel towards the door and stop bolt. • Release the door from the remote control or door control. My remotes will sag...tension. • Run the motor unit from the opener by pulling the Emergency Release Rope. • Manually bring the door to a closed , the chain will not activate the door: • Verify your door, check diagnostic LED for the force and limit settings is normal.) • If the trolley ...
3255 Manual
Page 33
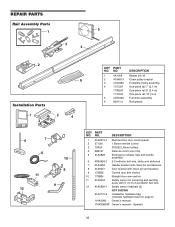
... listed on page 5) 114A3080 Owner's manual 114A3080SP Owner's manual - REPAIR PARTS Rail Assembly Parts 5 1 3 4 2 Installation Parts KEY PART NO. DESCRIPTION 1 4A1008 Master link kit 6 2 41A4813 Chain pulley bracket 3 41A3489 Complete trolley assembly 4 1707LM One-piece rail 7' (2.1 m) 1708LM One-piece rail 8' (2.4 m) 1710LM One-piece rail 10' (3 m) 5 41D3484 Full...
... listed on page 5) 114A3080 Owner's manual 114A3080SP Owner's manual - REPAIR PARTS Rail Assembly Parts 5 1 3 4 2 Installation Parts KEY PART NO. DESCRIPTION 1 4A1008 Master link kit 6 2 41A4813 Chain pulley bracket 3 41A3489 Complete trolley assembly 4 1707LM One-piece rail 7' (2.1 m) 1708LM One-piece rail 8' (2.4 m) 1710LM One-piece rail 10' (3 m) 5 41D3484 Full...


