
User's Guide
Page 14
... settings and schedule print jobs. These applications are also installed with a document open, a Printing Preferences dialog appears. Printer Services dialog • Access the printer utility. • Troubleshoot. • Order ink or supplies. • Contact Lexmark. • Check the printer software version installed on a wireless network. • Change the wireless settings of a memory device inserted into...
... settings and schedule print jobs. These applications are also installed with a document open, a Printing Preferences dialog appears. Printer Services dialog • Access the printer utility. • Troubleshoot. • Order ink or supplies. • Contact Lexmark. • Check the printer software version installed on a wireless network. • Change the wireless settings of a memory device inserted into...

User's Guide
Page 15
Note: Your printer may not come with cartridge installation. • Print a test page. • Print an alignment page. • Clean the print cartridge nozzles. • Order ink or supplies. • Register the printer. • Contact customer support. Lexmark Wireless Setup Assistant Set up the printer on the features of the printer that you purchased. 15 Use the To Lexmark Printer Utility • Get help with these applications, depending on a wireless network.
Note: Your printer may not come with cartridge installation. • Print a test page. • Print an alignment page. • Clean the print cartridge nozzles. • Order ink or supplies. • Register the printer. • Contact customer support. Lexmark Wireless Setup Assistant Set up the printer on the features of the printer that you purchased. 15 Use the To Lexmark Printer Utility • Get help with these applications, depending on a wireless network.
User's Guide
Page 32
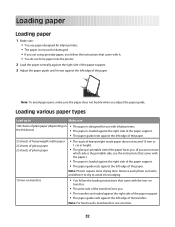
... the left edge of the transfers. Note: For best results, load transfers one at a time. 32 Loading various paper types Load up to avoid ink smudging. 10 iron-on transfers • You follow the loading instructions that came with the iron-on the thickness) • The paper is designed ...for inkjet printers. • The paper is not used or damaged. • If you are using specialty paper, you follow the instructions that came with it. •...
... the left edge of the transfers. Note: For best results, load transfers one at a time. 32 Loading various paper types Load up to avoid ink smudging. 10 iron-on transfers • You follow the loading instructions that came with the iron-on the thickness) • The paper is designed ...for inkjet printers. • The paper is not used or damaged. • If you are using specialty paper, you follow the instructions that came with it. •...
User's Guide
Page 33
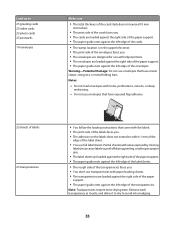
Remove each transparency as it exits, and allow it to dry to avoid ink smudging. 33 Do not load envelopes with holes, perforations, cutouts, or deep embossing. - Do not use envelopes that have exposed flap adhesive. 25 sheets of ... guide rests against the left edge of the label sheets. • The rough side of the transparencies faces you. • You don't use with inkjet printers. • The envelopes are loaded against the right side of the paper support. • The paper guide rests against the left edge of the transparencies...
Remove each transparency as it exits, and allow it to dry to avoid ink smudging. 33 Do not load envelopes with holes, perforations, cutouts, or deep embossing. - Do not use envelopes that have exposed flap adhesive. 25 sheets of ... guide rests against the left edge of the label sheets. • The rough side of the transparencies faces you. • You don't use with inkjet printers. • The envelopes are loaded against the right side of the paper support. • The paper guide rests against the left edge of the transparencies...

User's Guide
Page 40
...to set by missing labels) may cause labels to peel off during printing, resulting in the Printer Margins area. 40 b Customize the settings as it exits, and then allow it to dry to avoid ink smudging. Note: Labels require more information, see the "Loading Paper" chapter. The Print Setup... tab appears. 3 In the Paper Options section, from the "Paper size" list, select Custom Size. Partial sheets (with areas exposed by the printer. The margins are open. 6...
...to set by missing labels) may cause labels to peel off during printing, resulting in the Printer Margins area. 40 b Customize the settings as it exits, and then allow it to dry to avoid ink smudging. Note: Labels require more information, see the "Loading Paper" chapter. The Print Setup... tab appears. 3 In the Paper Options section, from the "Paper size" list, select Custom Size. Partial sheets (with areas exposed by the printer. The margins are open. 6...

User's Guide
Page 46
.... Refilling print cartridges The warranty does not cover repair of Original Lexmark Ink message, the original Lexmark ink in the indicated cartridge (s) has been depleted. 46 Lexmark does not recommend use Lexmark supplies. The print cartridge carrier moves and stops at the loading position, unless the printer is on. 2 Lift the access cover, and then press down...
.... Refilling print cartridges The warranty does not cover repair of Original Lexmark Ink message, the original Lexmark ink in the indicated cartridge (s) has been depleted. 46 Lexmark does not recommend use Lexmark supplies. The print cartridge carrier moves and stops at the loading position, unless the printer is on. 2 Lift the access cover, and then press down...

User's Guide
Page 47
... you believe you purchased a new, genuine Lexmark print cartridge, but the Out of Original Lexmark Ink message appears: 1 Click Learn More on the message, select the check box, and then click Close. • If you are using the printer without a computer, press Cancel. If print...Œ Programs or All Programs, and then click the printer folder. 3 From the printer folder, click Maintenance Œ Clean cartridges. 4 Click Print. 47 If print quality has not improved, clean the print cartridge nozzles. Lexmark's warranty does not cover damage caused by non-Lexmark ink or print cartridges.
... you believe you purchased a new, genuine Lexmark print cartridge, but the Out of Original Lexmark Ink message appears: 1 Click Learn More on the message, select the check box, and then click Close. • If you are using the printer without a computer, press Cancel. If print...Œ Programs or All Programs, and then click the printer folder. 3 From the printer folder, click Maintenance Œ Clean cartridges. 4 Click Print. 47 If print quality has not improved, clean the print cartridge nozzles. Lexmark's warranty does not cover damage caused by non-Lexmark ink or print cartridges.

User's Guide
Page 48
...cloth, gently hold the cloth against the contacts for about three seconds, and then wipe in the direction shown. 48 A page prints, forcing ink through the print cartridge nozzles to clean them. 5 To test if the print quality has improved, print the document again. 6 If print...then try cleaning the nozzles up to two more times. Using Macintosh 1 Load plain paper. 2 From the Finder desktop, double click the printer folder. 3 Double-click the printer utility icon. 4 From the Maintenance tab, click Clean Print Nozzles. Wiping the print cartridge nozzles and contacts 1 Remove the print cartridge(s). ...
...cloth, gently hold the cloth against the contacts for about three seconds, and then wipe in the direction shown. 48 A page prints, forcing ink through the print cartridge nozzles to clean them. 5 To test if the print quality has improved, print the document again. 6 If print...then try cleaning the nozzles up to two more times. Using Macintosh 1 Load plain paper. 2 From the Finder desktop, double click the printer folder. 3 Double-click the printer utility icon. 4 From the Maintenance tab, click Clean Print Nozzles. Wiping the print cartridge nozzles and contacts 1 Remove the print cartridge(s). ...

User's Guide
Page 49
...2 Remove paper from the paper support and paper exit tray. 3 Dampen a clean, lint-free cloth with water. Cleaning the exterior of the printer 1 Make sure that has accumulated on the paper exit tray. Warning-Potential Damage: Using a damp cloth to clean the interior may damage the... finish of the printer. 4 Wipe only the outside of the printer, making sure to remove any ink residue that the printer is still not satisfactory, replace the print cartridge(s). Preserving the print cartridges • Keep new...
...2 Remove paper from the paper support and paper exit tray. 3 Dampen a clean, lint-free cloth with water. Cleaning the exterior of the printer 1 Make sure that has accumulated on the paper exit tray. Warning-Potential Damage: Using a damp cloth to clean the interior may damage the... finish of the printer. 4 Wipe only the outside of the printer, making sure to remove any ink residue that the printer is still not satisfactory, replace the print cartridge(s). Preserving the print cartridges • Keep new...
User's Guide
Page 54
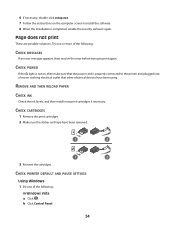
... that other electrical devices have been removed. 1 2 1 2 3 Reinsert the cartridges. Try one of the following : In Windows Vista a Click . CHECK PRINTER DEFAULT AND PAUSE SETTINGS Using Windows 1 Do one or more of the following : CHECK MESSAGES If an error message appears, then resolve the error before... sticker and tape have been using. Page does not print These are possible solutions. REMOVE AND THEN RELOAD PAPER CHECK INK Check the ink levels, and then install new print cartridges if necessary. CHECK POWER If the light is completed, enable the security software again.
... that other electrical devices have been removed. 1 2 1 2 3 Reinsert the cartridges. Try one of the following : In Windows Vista a Click . CHECK PRINTER DEFAULT AND PAUSE SETTINGS Using Windows 1 Do one or more of the following : CHECK MESSAGES If an error message appears, then resolve the error before... sticker and tape have been using. Page does not print These are possible solutions. REMOVE AND THEN RELOAD PAPER CHECK INK Check the ink levels, and then install new print cartridges if necessary. CHECK POWER If the light is completed, enable the security software again.


