
Getting Started
Page 2
Operating system notice All features and functions are operating system-dependent. CAUTION: Do not set up this product or the manufacturer's authorized replacement power supply and power supply cord. For complete descriptions: • Windows users-See the User's Guide. • Macintosh users-If your product...the use of some parts may not always be obvious. Lexmark is designed, tested, and approved to a properly grounded electrical outlet that is near the product and easily accessible. Connect the power supply cord to meet strict global safety standards with the printer software....
Operating system notice All features and functions are operating system-dependent. CAUTION: Do not set up this product or the manufacturer's authorized replacement power supply and power supply cord. For complete descriptions: • Windows users-See the User's Guide. • Macintosh users-If your product...the use of some parts may not always be obvious. Lexmark is designed, tested, and approved to a properly grounded electrical outlet that is near the product and easily accessible. Connect the power supply cord to meet strict global safety standards with the printer software....

Getting Started
Page 12
6 Insert the power supply. 7 Connect the power cord. 8 Make sure the power is on. 2 1 9 Open the access cover. 12
6 Insert the power supply. 7 Connect the power cord. 8 Make sure the power is on. 2 1 9 Open the access cover. 12

Getting Started
Page 23
Connect the printer to a power source using the power cord. 1 Plug the power cord all the way into the power supply on the printer. 2 Plug the power cord into an electrical outlet that other electrical devices have been using. 2 1 3 If the light is not on, press . 3 Internal wireless adapter Connect to a computer using a USB cable. Use the 8 Paper support To Load paper. 1 Use the 1 USB port 2 Power supply 2 3 To Connect the printer to a wireless network. 23
Connect the printer to a power source using the power cord. 1 Plug the power cord all the way into the power supply on the printer. 2 Plug the power cord into an electrical outlet that other electrical devices have been using. 2 1 3 If the light is not on, press . 3 Internal wireless adapter Connect to a computer using a USB cable. Use the 8 Paper support To Load paper. 1 Use the 1 USB port 2 Power supply 2 3 To Connect the printer to a wireless network. 23
Getting Started
Page 34
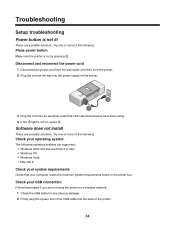
Check your USB connection Follow these steps if you are not using the printer on a wireless network: 1 Check the USB cable for any obvious damage. 2 Firmly plug the square end of the USB cable into an electrical outlet that your system ... box. Software does not install These are possible solutions. Disconnect and reconnect the power cord 1 Disconnect the power cord from the wall outlet, and then from the printer. 2 Plug the cord all the way into the power supply on the printer. 2 1 3 Plug the cord into the back of the following: Check your operating system The following : Press...
Check your USB connection Follow these steps if you are not using the printer on a wireless network: 1 Check the USB cable for any obvious damage. 2 Firmly plug the square end of the USB cable into an electrical outlet that your system ... box. Software does not install These are possible solutions. Disconnect and reconnect the power cord 1 Disconnect the power cord from the wall outlet, and then from the printer. 2 Plug the cord all the way into the power supply on the printer. 2 1 3 Plug the cord into the back of the following: Check your operating system The following : Press...
Getting Started
Page 35
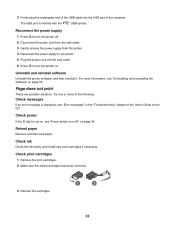
... printer software, and then reinstall it. For more of the computer. Reconnect the power supply 1 Press to turn the printer off. 2 Disconnect the power cord from the wall outlet. 3 Gently remove the power supply from the printer. 4 Reconnect the power supply to turn the printer on. 3 Firmly plug the rectangular end of the ...USB cable into the wall outlet. 6 Press to the printer. 5 Plug the power cord into the USB port of the following: Check messages If an error message is not lit" on page 34. The USB port is marked with ...
... printer software, and then reinstall it. For more of the computer. Reconnect the power supply 1 Press to turn the printer off. 2 Disconnect the power cord from the wall outlet. 3 Gently remove the power supply from the printer. 4 Reconnect the power supply to turn the printer on. 3 Firmly plug the rectangular end of the ...USB cable into the wall outlet. 6 Press to the printer. 5 Plug the power cord into the USB port of the following: Check messages If an error message is not lit" on page 34. The USB port is marked with ...
Getting Started
Page 36
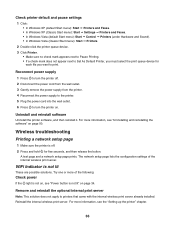
... server Note: This solution does not apply to print. Wireless troubleshooting Printing a network setup page 1 Make sure the printer is off . 2 Disconnect the power cord from the wall outlet. 3 Gently remove the power supply from the printer. 4 Reconnect the power supply to the printer. 5 Plug the power cord into the wall outlet. 6 Press to turn the printer...
... server Note: This solution does not apply to print. Wireless troubleshooting Printing a network setup page 1 Make sure the printer is off . 2 Disconnect the power cord from the wall outlet. 3 Gently remove the power supply from the printer. 4 Reconnect the power supply to the printer. 5 Plug the power cord into the wall outlet. 6 Press to turn the printer...

User's Guide
Page 2
CAUTIONS Do not place or use of some parts may not always be obvious. Operating system notice All features and functions are operating system-dependent. Lexmark is near water or wet locations. SAVE THESE INSTRUCTIONS. For complete descriptions: • Windows users-See the User's ...not set up this product near the product and easily accessible. The safety features of specific Lexmark components. Refer service or repairs, other replacement parts. Connect the power supply cord to a properly grounded electrical outlet that is not responsible for the use of other than ...
CAUTIONS Do not place or use of some parts may not always be obvious. Operating system notice All features and functions are operating system-dependent. Lexmark is near water or wet locations. SAVE THESE INSTRUCTIONS. For complete descriptions: • Windows users-See the User's ...not set up this product near the product and easily accessible. The safety features of specific Lexmark components. Refer service or repairs, other replacement parts. Connect the power supply cord to a properly grounded electrical outlet that is not responsible for the use of other than ...
User's Guide
Page 11
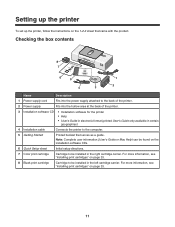
Checking the box contents 8 1 7 2 3 6 5 1 2 4 3 Name Description 1 Power supply cord Fits into the power supply attached to the back of the printer. 2 Power supply Fits into the hollow area at the back of the printer. 3 Installation software CD • Installation software for the printer • Help • User's ...
Checking the box contents 8 1 7 2 3 6 5 1 2 4 3 Name Description 1 Power supply cord Fits into the power supply attached to the back of the printer. 2 Power supply Fits into the hollow area at the back of the printer. 3 Installation software CD • Installation software for the printer • Help • User's ...
User's Guide
Page 14
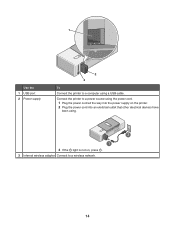
1 Use the 1 USB port 2 Power supply 2 3 To Connect the printer to a wireless network. 14 Connect the printer to a power source using the power cord. 1 Plug the power cord all the way into the power supply on the printer. 2 Plug the power cord into an electrical outlet that other electrical devices have been using. 2 1 3 If the light is not on, press . 3 Internal wireless adapter Connect to a computer using a USB cable.
1 Use the 1 USB port 2 Power supply 2 3 To Connect the printer to a wireless network. 14 Connect the printer to a power source using the power cord. 1 Plug the power cord all the way into the power supply on the printer. 2 Plug the power cord into an electrical outlet that other electrical devices have been using. 2 1 3 If the light is not on, press . 3 Internal wireless adapter Connect to a computer using a USB cable.

User's Guide
Page 38
... 1 Turn off and then restart your computer. 2 Click Cancel on all the way into the power supply on the printer. 2 Plug the cord into the USB port of the printer. Troubleshooting Setup troubleshooting Power light is not lit Make sure you have been using. 2 1 3 If the light is ... later • Windows XP • Windows Vista Solution 1 Check that other electrical devices have disconnected the power supply cord from the wall outlet and then from the printer. 1 Plug the cord all New Hardware Found screens. 3 Insert the CD, and then follow the instructions on the computer screen ...
... 1 Turn off and then restart your computer. 2 Click Cancel on all the way into the power supply on the printer. 2 Plug the cord into the USB port of the printer. Troubleshooting Setup troubleshooting Power light is not lit Make sure you have been using. 2 1 3 If the light is ... later • Windows XP • Windows Vista Solution 1 Check that other electrical devices have disconnected the power supply cord from the wall outlet and then from the printer. 1 Plug the cord all New Hardware Found screens. 3 Insert the CD, and then follow the instructions on the computer screen ...
User's Guide
Page 39
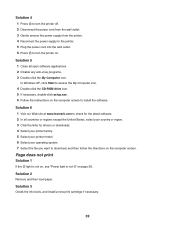
... computer screen. Solution 3 Check the ink levels, and install a new print cartridge if necessary. 39 Solution 6 1 Visit our Web site at www.lexmark.com to check for the latest software. 2 In all open software applications. 2 Disable any anti-virus programs. 3 Double-click the My Computer icon....the light is not on, see "Power light is not lit" on . Solution 4 1 Press to turn the printer off. 2 Disconnect the power cord from the wall outlet. 3 Gently remove the power supply from the printer. 4 Reconnect the power supply to the printer. 5 Plug the power cord into the wall outlet. 6 Press ...
... computer screen. Solution 3 Check the ink levels, and install a new print cartridge if necessary. 39 Solution 6 1 Visit our Web site at www.lexmark.com to check for the latest software. 2 In all open software applications. 2 Disable any anti-virus programs. 3 Double-click the My Computer icon....the light is not on, see "Power light is not lit" on . Solution 4 1 Press to turn the printer off. 2 Disconnect the power cord from the wall outlet. 3 Gently remove the power supply from the printer. 4 Reconnect the power supply to the printer. 5 Plug the power cord into the wall outlet. 6 Press ...

User's Guide
Page 50
...product is available at www.lexmark.com. 50 Note: Some modes may not apply to calculate the total product energy usage. After this single use only and is/are licensed for a print job. 5.84 Power Saver The product is waiting for a single use license/agreement, return... is sometimes helpful to your acceptance of the following table documents the power consumption characteristics of Watts, the power consumption should be returned only to stop product power consumption, disconnect the power supply cord from hard-copy original documents. Total energy usage It is required. ...
...product is available at www.lexmark.com. 50 Note: Some modes may not apply to calculate the total product energy usage. After this single use only and is/are licensed for a print job. 5.84 Power Saver The product is waiting for a single use license/agreement, return... is sometimes helpful to your acceptance of the following table documents the power consumption characteristics of Watts, the power consumption should be returned only to stop product power consumption, disconnect the power supply cord from hard-copy original documents. Total energy usage It is required. ...


