Maintenance Guide
Page 2
... the printer control panel 9 Checking the status of supplies from a network computer 9 Ordering supplies...9 Ordering toner cartridges...9 Ordering imaging units...10 Ordering a fuser or a transfer module...10 Ordering a waste toner bottle...10 Ordering ADF replacement parts...11 Replacing Supplies...11 Replacing an... imaging unit...11 Replacing a toner cartridge...14 Replacing the waste toner bottle...16 Moving the printer...17 Before moving the printer...17 ...
... the printer control panel 9 Checking the status of supplies from a network computer 9 Ordering supplies...9 Ordering toner cartridges...9 Ordering imaging units...10 Ordering a fuser or a transfer module...10 Ordering a waste toner bottle...10 Ordering ADF replacement parts...11 Replacing Supplies...11 Replacing an... imaging unit...11 Replacing a toner cartridge...14 Replacing the waste toner bottle...16 Moving the printer...17 Before moving the printer...17 ...
Maintenance Guide
Page 6
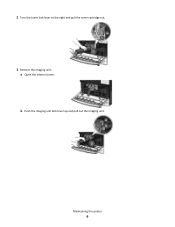
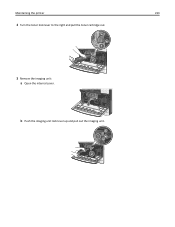
Maintaining the printer 6 2 Turn the toner lock lever to the right and pull the toner cartridge out. 3 Remove the imaging unit: a Open the internal cover. b Push the imaging unit lock lever up and pull out the imaging unit.
Maintaining the printer 6 2 Turn the toner lock lever to the right and pull the toner cartridge out. 3 Remove the imaging unit: a Open the internal cover. b Push the imaging unit lock lever up and pull out the imaging unit.
Maintenance Guide
Page 7
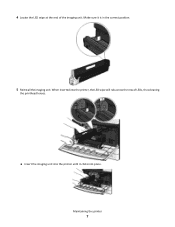
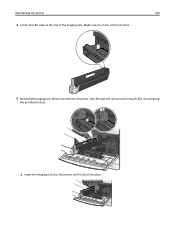
4 Locate the LED wipe at the end of LEDs, thus cleaning the printhead lenses. When inserted into place. a Insert the imaging unit into the printer until it is in the correct position. 5 Reinstall the imaging unit. Maintaining the printer 7 Make sure it clicks into the printer, the LED wipe will rub across the row of the imaging unit.
4 Locate the LED wipe at the end of LEDs, thus cleaning the printhead lenses. When inserted into place. a Insert the imaging unit into the printer until it is in the correct position. 5 Reinstall the imaging unit. Maintaining the printer 7 Make sure it clicks into the printer, the LED wipe will rub across the row of the imaging unit.
Maintenance Guide
Page 8
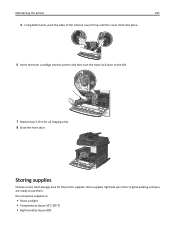
... above 35°C (95°F) • High humidity above 80% • Salty air Maintaining the printer 8 Storing supplies Choose a cool, clean storage area for all imaging units. 8 Close the front door.
... above 35°C (95°F) • High humidity above 80% • Salty air Maintaining the printer 8 Storing supplies Choose a cool, clean storage area for all imaging units. 8 Close the front door.
Maintenance Guide
Page 10
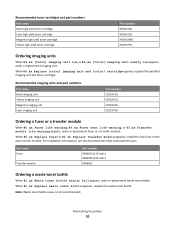
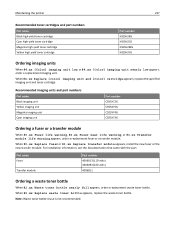
... toner bottle. For installation information, see the documentation that came with the part. Recommended imaging units and part numbers Part name Black imaging unit Yellow imaging unit Magenta imaging unit Cyan imaging unit Part number C925X72G C925X75G C925X74G C925X73G Ordering a fuser or a transfer module When 80.xx...high-yield toner cartridge Part number X925H2KG X925H2CG X925H2MG X925H2YG Ordering imaging units When 84.xx [Color] imaging unit low, or 84.xx [Color] imaging unit nearly low appears, order a replacement imaging unit. When 80.xx Replace fuser or 83.xx Replace transfer ...
... toner bottle. For installation information, see the documentation that came with the part. Recommended imaging units and part numbers Part name Black imaging unit Yellow imaging unit Magenta imaging unit Cyan imaging unit Part number C925X72G C925X75G C925X74G C925X73G Ordering a fuser or a transfer module When 80.xx...high-yield toner cartridge Part number X925H2KG X925H2CG X925H2MG X925H2YG Ordering imaging units When 84.xx [Color] imaging unit low, or 84.xx [Color] imaging unit nearly low appears, order a replacement imaging unit. When 80.xx Replace fuser or 83.xx Replace transfer ...
Maintenance Guide
Page 11
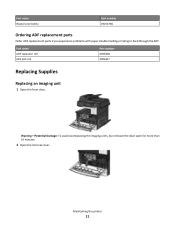
Maintaining the printer 11 Warning-Potential Damage: To avoid overexposing the imaging units, do not leave the door open for more than 10 minutes. 2 Open the internal cover. Part name ADF separator roll ADF pick roll Part number 40X6328 40X6327 Replacing Supplies Replacing an imaging unit 1 Open the front door. Part name Waste toner bottle Part number C925X76G Ordering ADF replacement parts Order ADF replacement parts if you experience problems with paper double-feeding or failing to feed through the ADF.
Maintaining the printer 11 Warning-Potential Damage: To avoid overexposing the imaging units, do not leave the door open for more than 10 minutes. 2 Open the internal cover. Part name ADF separator roll ADF pick roll Part number 40X6328 40X6327 Replacing Supplies Replacing an imaging unit 1 Open the front door. Part name Waste toner bottle Part number C925X76G Ordering ADF replacement parts Order ADF replacement parts if you experience problems with paper double-feeding or failing to feed through the ADF.
Maintenance Guide
Page 12
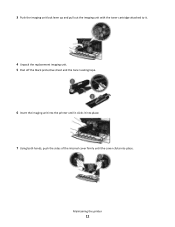
Maintaining the printer 12 3 Push the imaging unit lock lever up and pull out the imaging unit with the toner cartridge attached to it. 4 Unpack the replacement imaging unit. 5 Peel off the black protective sheet and the toner sealing tape. 6 Insert the imaging unit into the printer until it clicks it into place. 7 Using both hands, push the sides of the internal cover firmly until the cover clicks into place.
Maintaining the printer 12 3 Push the imaging unit lock lever up and pull out the imaging unit with the toner cartridge attached to it. 4 Unpack the replacement imaging unit. 5 Peel off the black protective sheet and the toner sealing tape. 6 Insert the imaging unit into the printer until it clicks it into place. 7 Using both hands, push the sides of the internal cover firmly until the cover clicks into place.
Maintenance Guide
Page 14
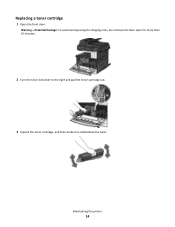
Replacing a toner cartridge 1 Open the front door. Warning-Potential Damage: To avoid overexposing the imaging units, do not leave the door open for more than 10 minutes. 2 Turn the toner lock lever to the right and pull the toner cartridge out. 3 Unpack the toner cartridge, and then shake it to redistribute the toner. Maintaining the printer 14
Replacing a toner cartridge 1 Open the front door. Warning-Potential Damage: To avoid overexposing the imaging units, do not leave the door open for more than 10 minutes. 2 Turn the toner lock lever to the right and pull the toner cartridge out. 3 Unpack the toner cartridge, and then shake it to redistribute the toner. Maintaining the printer 14
Print Defects Guide
Page 1
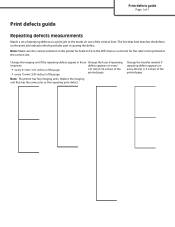
... (1.61 inches) of the page • every 75 mm (2.95 inches) of the page 141 mm (5.55 inches) of the printed page. Replace the imaging unit that best matches the defects on the print job indicates which particular part is set of repeating defects on every 38 mm (1.5 inches) of the... vertical lines. Note: The printer has four imaging units. Change the transfer module if repeating defects appears on a print job to be printed at the correct size. The line that has the same color...
... (1.61 inches) of the page • every 75 mm (2.95 inches) of the page 141 mm (5.55 inches) of the printed page. Replace the imaging unit that best matches the defects on the print job indicates which particular part is set of repeating defects on every 38 mm (1.5 inches) of the... vertical lines. Note: The printer has four imaging units. Change the transfer module if repeating defects appears on a print job to be printed at the correct size. The line that has the same color...
Supplies Guide
Page 1
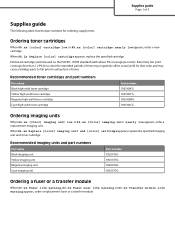
... cartridge Magenta high-yield toner cartridge Cyan high-yield toner cartridge Part number C925H2KG C925H2YG C925H2MG C925H2CG Ordering imaging units When 84.xx [Color] imaging unit low, or 84.xx [Color] imaging unit nearly low appears, order a replacement imaging unit. When 88.2x Replace [color] cartridge appears, replace the specified cartridge. Supplies guide Page 1 of toner. Estimated cartridge...
... cartridge Magenta high-yield toner cartridge Cyan high-yield toner cartridge Part number C925H2KG C925H2YG C925H2MG C925H2CG Ordering imaging units When 84.xx [Color] imaging unit low, or 84.xx [Color] imaging unit nearly low appears, order a replacement imaging unit. When 88.2x Replace [color] cartridge appears, replace the specified cartridge. Supplies guide Page 1 of toner. Estimated cartridge...
User's Guide
Page 9
... of supplies from the printer control panel 236 Checking the status of supplies from a network computer 236 Ordering supplies...236 Ordering toner cartridges ...236 Ordering imaging units ...237 Ordering a fuser or a transfer module...237 Ordering a waste toner bottle ...237 Ordering ADF replacement parts...238 Replacing Supplies...238 Replacing an...
... of supplies from the printer control panel 236 Checking the status of supplies from a network computer 236 Ordering supplies...236 Ordering toner cartridges ...236 Ordering imaging units ...237 Ordering a fuser or a transfer module...237 Ordering a waste toner bottle ...237 Ordering ADF replacement parts...238 Replacing Supplies...238 Replacing an...
User's Guide
Page 11
... job...265 Tray [x] paper size unsupported ...265 Unsupported disk...265 1565 Emulation error, load emulation option 265 30.xx Missing [color] cartridge and/or [color] imaging unit 265 31.xx Missing or defective [color] cartridge 265 32.xx [color] cartridge part number unsupported by device 265 34 Incorrect paper size, open [src...
... job...265 Tray [x] paper size unsupported ...265 Unsupported disk...265 1565 Emulation error, load emulation option 265 30.xx Missing [color] cartridge and/or [color] imaging unit 265 31.xx Missing or defective [color] cartridge 265 32.xx [color] cartridge part number unsupported by device 265 34 Incorrect paper size, open [src...

User's Guide
Page 12
....xx Transfer module missing ...271 83.xx Replace transfer module ...271 84 Defective [color] imaging unit...272 84.xx [color] imaging unit nearly low...272 84.xx [color] imaging unit low...272 84.xx Replace [color] imaging unit and [color] cartridge 272 84 Unsupported [color] imaging unit...272 88.xx [color] cartridge nearly low ...272 88.xx [color] cartridge low... does not work...275 Large jobs do not collate...276 Unexpected page breaks occur...276 Solving copy problems...276 Copier does not respond ...276 Scanner unit does not close...277 Poor copy quality ...277
....xx Transfer module missing ...271 83.xx Replace transfer module ...271 84 Defective [color] imaging unit...272 84.xx [color] imaging unit nearly low...272 84.xx [color] imaging unit low...272 84.xx Replace [color] imaging unit and [color] cartridge 272 84 Unsupported [color] imaging unit...272 88.xx [color] cartridge nearly low ...272 88.xx [color] cartridge low... does not work...275 Large jobs do not collate...276 Unexpected page breaks occur...276 Solving copy problems...276 Copier does not respond ...276 Scanner unit does not close...277 Poor copy quality ...277
User's Guide
Page 143
... menus 143 Understanding printer menus Menus list Supplies Paper Menu Reports Network/Ports Replace Supply Cyan Cartridge Magenta Cartridge Yellow Cartridge Black Cartridge Cyan Imaging Unit Magenta Imaging Unit Yellow Imaging Unit Black Imaging Unit Separator Pick Assembly and Roller Waste Toner Bottle Fuser Transfer Module Maintenance Kit Default Source Paper Size/Type Configure MP Substitute Size Paper...
... menus 143 Understanding printer menus Menus list Supplies Paper Menu Reports Network/Ports Replace Supply Cyan Cartridge Magenta Cartridge Yellow Cartridge Black Cartridge Cyan Imaging Unit Magenta Imaging Unit Yellow Imaging Unit Black Imaging Unit Separator Pick Assembly and Roller Waste Toner Bottle Fuser Transfer Module Maintenance Kit Default Source Paper Size/Type Configure MP Substitute Size Paper...
User's Guide
Page 145
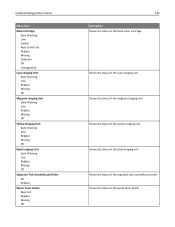
...Invalid Near End of Life Replace Missing Defective OK Unsupported Cyan Imaging Unit Early Warning Low Replace Missing OK Magenta Imaging Unit Early Warning Low Replace Missing OK Yellow Imaging Unit Early Warning Low Replace Missing OK Black Imaging Unit Early Warning Low Replace Missing OK Separator Pick Assembly and ... status of the black toner cartridge Shows the status of the cyan imaging unit Shows the status of the magenta imaging unit Shows the status of the yellow imaging unit Shows the status of the black imaging unit Shows the status of the separator pick assembly and roller Shows the ...
...Invalid Near End of Life Replace Missing Defective OK Unsupported Cyan Imaging Unit Early Warning Low Replace Missing OK Magenta Imaging Unit Early Warning Low Replace Missing OK Yellow Imaging Unit Early Warning Low Replace Missing OK Black Imaging Unit Early Warning Low Replace Missing OK Separator Pick Assembly and ... status of the black toner cartridge Shows the status of the cyan imaging unit Shows the status of the magenta imaging unit Shows the status of the yellow imaging unit Shows the status of the black imaging unit Shows the status of the separator pick assembly and roller Shows the ...
User's Guide
Page 178
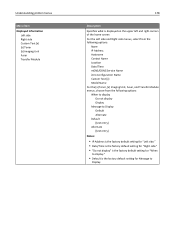
Understanding printer menus Menu item Displayed Information Left side Right side Custom Text [x] [x] Toner [x] Imaging Unit Fuser Transfer Module 178 Description Specifies what is displayed on the upper left and right corners of the home screen For the Left ...options: None IP Address Hostname Contact Name Location Date/Time mDNS/DDNS Service Name Zero Configuration Name Custom Text [x] Model Name For the [x] Toner, [x] Imaging Unit, Fuser, and Transfer Module menus, choose from the following options: When to display Do not display Display Message to Display Default Alternate Default [text entry...
Understanding printer menus Menu item Displayed Information Left side Right side Custom Text [x] [x] Toner [x] Imaging Unit Fuser Transfer Module 178 Description Specifies what is displayed on the upper left and right corners of the home screen For the Left ...options: None IP Address Hostname Contact Name Location Date/Time mDNS/DDNS Service Name Zero Configuration Name Custom Text [x] Model Name For the [x] Toner, [x] Imaging Unit, Fuser, and Transfer Module menus, choose from the following options: When to display Do not display Display Message to Display Default Alternate Default [text entry...
User's Guide
Page 233
Maintaining the printer 233 2 Turn the toner lock lever to the right and pull the toner cartridge out. 3 Remove the imaging unit: a Open the internal cover. 1 2 b Push the imaging unit lock lever up and pull out the imaging unit. 1
Maintaining the printer 233 2 Turn the toner lock lever to the right and pull the toner cartridge out. 3 Remove the imaging unit: a Open the internal cover. 1 2 b Push the imaging unit lock lever up and pull out the imaging unit. 1
User's Guide
Page 234
Maintaining the printer 234 4 Locate the LED wipe at the end of LEDs, thus cleaning the printhead lenses. When inserted into place. a Insert the imaging unit into the printer until it is in the correct position. 5 Reinstall the imaging unit. Make sure it clicks into the printer, the LED wipe will rub across the row of the imaging unit.
Maintaining the printer 234 4 Locate the LED wipe at the end of LEDs, thus cleaning the printhead lenses. When inserted into place. a Insert the imaging unit into the printer until it is in the correct position. 5 Reinstall the imaging unit. Make sure it clicks into the printer, the LED wipe will rub across the row of the imaging unit.
User's Guide
Page 235
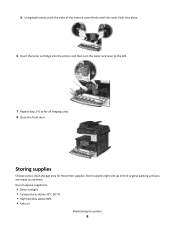
... then turn the toner lock lever to the left. 2 1 7 Repeat step 2-6 to for the printer supplies. Storing supplies Choose a cool, clean storage area for all imaging units. 8 Close the front door. Maintaining the printer 235 b Using both hands, push the sides of the internal cover firmly until you are ready to : •...
... then turn the toner lock lever to the left. 2 1 7 Repeat step 2-6 to for the printer supplies. Storing supplies Choose a cool, clean storage area for all imaging units. 8 Close the front door. Maintaining the printer 235 b Using both hands, push the sides of the internal cover firmly until you are ready to : •...
User's Guide
Page 237
...replace the waste toner bottle. When 84.xx Replace [color] imaging unit and [color] cartridge appears, replace the specified imaging unit and toner cartridge. Recommended imaging units and part numbers Part name Black imaging unit Yellow imaging unit Magenta imaging unit Cyan imaging unit Part number C925X72G C925X75G C925X74G C925X73G Ordering a fuser or a ... Yellow high‑yield toner cartridge Part number X925H2KG X925H2CG X925H2MG X925H2YG Ordering imaging units When 84.xx [Color] imaging unit low, or 84.xx [Color] imaging unit nearly low appears, order a replacement...
...replace the waste toner bottle. When 84.xx Replace [color] imaging unit and [color] cartridge appears, replace the specified imaging unit and toner cartridge. Recommended imaging units and part numbers Part name Black imaging unit Yellow imaging unit Magenta imaging unit Cyan imaging unit Part number C925X72G C925X75G C925X74G C925X73G Ordering a fuser or a ... Yellow high‑yield toner cartridge Part number X925H2KG X925H2CG X925H2MG X925H2YG Ordering imaging units When 84.xx [Color] imaging unit low, or 84.xx [Color] imaging unit nearly low appears, order a replacement...

