
User's Guide
Page 9
... computer 254 Ordering supplies...255 Ordering print cartridges ...255 Ordering a maintenance kit ...256 Ordering a fuser ...256 Ordering an ADF maintenance kit...257 Ordering a transfer roller...257 Ordering charge rolls ...257 Ordering pick rollers ...257 Ordering ADF replacement parts...257 Ordering staple cartridges ...258 Recycling Lexmark products...258 Moving the printer...258 Before moving...
... computer 254 Ordering supplies...255 Ordering print cartridges ...255 Ordering a maintenance kit ...256 Ordering a fuser ...256 Ordering an ADF maintenance kit...257 Ordering a transfer roller...257 Ordering charge rolls ...257 Ordering pick rollers ...257 Ordering ADF replacement parts...257 Ordering staple cartridges ...258 Recycling Lexmark products...258 Moving the printer...258 Before moving...

User's Guide
Page 20
... Personal Identification Number (PIN) has been set . Learning about the printer 20 Display item Description 5 Status message bar • Shows the current printer status such as Ready or Busy. • Shows printer conditions such as Close door or Insert print cartridge. 6 Status/Supplies Appears on the display whenever the printer status includes a message requiring intervention.
... Personal Identification Number (PIN) has been set . Learning about the printer 20 Display item Description 5 Status message bar • Shows the current printer status such as Ready or Busy. • Shows printer conditions such as Close door or Insert print cartridge. 6 Status/Supplies Appears on the display whenever the printer status includes a message requiring intervention.

User's Guide
Page 47
... the Apple menu, choose System Preferences. 2 Click Print & Fax. 3 Select the printer, and then click Options & Supplies. Updating available options in the printer driver to the Lexmark Web site at www.lexmark.com. 2 From the Drivers & Downloads menu, click Driver Finder. 3 Select your printer, and then select your operating system. 4 Download the driver and install the...
... the Apple menu, choose System Preferences. 2 Click Print & Fax. 3 Select the printer, and then click Options & Supplies. Updating available options in the printer driver to the Lexmark Web site at www.lexmark.com. 2 From the Drivers & Downloads menu, click Driver Finder. 3 Select your printer, and then select your operating system. 4 Download the driver and install the...

User's Guide
Page 100
Creating a custom job (job build) The custom job or job build is used to scan, load the next document faceup, short edge first into the ADF, then adjust the paper guides. 3 On the home screen, touch ... consists of all scanned pages until the ADF becomes empty. • If you scan one page using the ADF, a set may be scanned using the supplied parameters, and then it scans the next set depends on the scan source: • If you want a box drawn around each page of original documents...
Creating a custom job (job build) The custom job or job build is used to scan, load the next document faceup, short edge first into the ADF, then adjust the paper guides. 3 On the home screen, touch ... consists of all scanned pages until the ADF becomes empty. • If you scan one page using the ADF, a set may be scanned using the supplied parameters, and then it scans the next set depends on the scan source: • If you want a box drawn around each page of original documents...
User's Guide
Page 133
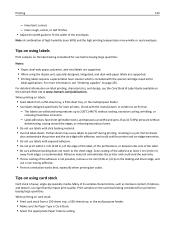
... tray, a 550‑sheet tray, or the multipurpose feeder. • Make sure the Paper Type is recommended. When printing on the Lexmark Web site at least 1 mm (0.04 in .) strip on page 255. Label adhesives, face sheet (printable stock), and topcoats can withstand...buying large quantities. For detailed information on label printing, characteristics, and design, see "Ordering supplies" on the leading and driver edge, and use labels with the special cartridge required for laser printers. Check with the manufacturer or vendor to 230°C (446°F) without delaminating, oozing ...
... tray, a 550‑sheet tray, or the multipurpose feeder. • Make sure the Paper Type is recommended. When printing on the Lexmark Web site at least 1 mm (0.04 in .) strip on page 255. Label adhesives, face sheet (printable stock), and topcoats can withstand...buying large quantities. For detailed information on label printing, characteristics, and design, see "Ordering supplies" on the leading and driver edge, and use labels with the special cartridge required for laser printers. Check with the manufacturer or vendor to 230°C (446°F) without delaminating, oozing ...

User's Guide
Page 141
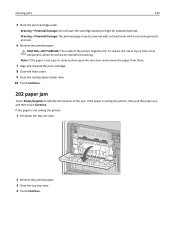
... paper from the paper path. The following table lists the jams that can occur and the location of each jam: 9 6,7,8 2 9 1 4 2 5 1 4 3 3 Jam numbers Area 1 200-202 Printer 2 230-239 Duplex unit 3 240-249 Paper tray 4 250 Multipurpose feeder 5 260 Envelope feeder 6 270-279 Optional output bin 7 280-282 Finisher 8 283 Stapler 9 290...
... paper from the paper path. The following table lists the jams that can occur and the location of each jam: 9 6,7,8 2 9 1 4 2 5 1 4 3 3 Jam numbers Area 1 200-202 Printer 2 230-239 Duplex unit 3 240-249 Paper tray 4 250 Multipurpose feeder 5 260 Envelope feeder 6 270-279 Optional output bin 7 280-282 Finisher 8 283 Stapler 9 290...
User's Guide
Page 143
... print cartridge. 8 Close the front cover. 9 Close the multipurpose feeder door. 10 Touch Continue. 202 paper jam Touch Status/Supplies to identify the location of the printer might be covered with unfused toner which can stain garments and skin. 6 Remove the jammed paper. Clearing jams 143 5 Place ...the print cartridge aside. Warning-Potential Damage: Do not leave the cartridge exposed to cool before touching. Note: If the paper is exiting the printer, then pull the paper out, and then touch Continue. CAUTION-HOT SURFACE: The inside of the jam. Warning-Potential Damage: The jammed ...
... print cartridge. 8 Close the front cover. 9 Close the multipurpose feeder door. 10 Touch Continue. 202 paper jam Touch Status/Supplies to identify the location of the printer might be covered with unfused toner which can stain garments and skin. 6 Remove the jammed paper. Clearing jams 143 5 Place ...the print cartridge aside. Warning-Potential Damage: Do not leave the cartridge exposed to cool before touching. Note: If the paper is exiting the printer, then pull the paper out, and then touch Continue. CAUTION-HOT SURFACE: The inside of the jam. Warning-Potential Damage: The jammed ...

User's Guide
Page 144
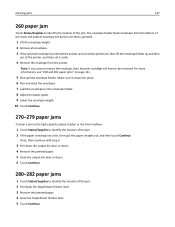
Clearing jams 144 230-239 paper jams 1 Touch Status/Supplies to identify the location of the jam. 2 Pull the standard tray out. 3 Pull down the bottom rear door. 4 Push the tab down. 5 Remove the jammed paper. 6 Close the bottom rear door. 7 Insert the standard tray. 8 Touch Continue.
Clearing jams 144 230-239 paper jams 1 Touch Status/Supplies to identify the location of the jam. 2 Pull the standard tray out. 3 Pull down the bottom rear door. 4 Push the tab down. 5 Remove the jammed paper. 6 Close the bottom rear door. 7 Insert the standard tray. 8 Touch Continue.

User's Guide
Page 145
Clearing jams 145 240-249 paper jams 1 Touch Status/Supplies to identify the location of the jam. 2 Pull the standard tray out. 3 Remove any jammed paper, and then close the tray. 4 Touch Continue. 5 If the jam message persists, then pull out any optional trays. 6 Remove the jammed paper, and then insert the trays. 7 Touch Continue.
Clearing jams 145 240-249 paper jams 1 Touch Status/Supplies to identify the location of the jam. 2 Pull the standard tray out. 3 Remove any jammed paper, and then close the tray. 4 Touch Continue. 5 If the jam message persists, then pull out any optional trays. 6 Remove the jammed paper, and then insert the trays. 7 Touch Continue.

User's Guide
Page 146
Clearing jams 146 250 paper jam 1 Touch Status/Supplies to loosen them, and then fan them. Do not fold or crease the paper. Straighten the edges on a level surface. 4 Load the paper into the multipurpose feeder. 5 Slide the paper guide toward the inside of the tray until it lightly rests against the edge of paper back and forth to identify the location of the jam. 2 Remove the paper from the multipurpose feeder. 3 Flex the sheets of the paper. 6 Touch Continue.
Clearing jams 146 250 paper jam 1 Touch Status/Supplies to loosen them, and then fan them. Do not fold or crease the paper. Straighten the edges on a level surface. 4 Load the paper into the multipurpose feeder. 5 Slide the paper guide toward the inside of the tray until it lightly rests against the edge of paper back and forth to identify the location of the jam. 2 Remove the paper from the multipurpose feeder. 3 Flex the sheets of the paper. 6 Touch Continue.
User's Guide
Page 147
...5 Reinstall the envelope feeder. Make sure it aside. 4 Remove the envelope from the bottom of the stack; Clearing jams 147 260 paper jam Touch Status/Supplies to identify the location of the jam. 2 Pull down the StapleSmart finisher door. 3 Remove the jammed paper. 4 Close the StapleSmart finisher door. 5 ... 4 Remove the jammed paper. 5 Close the output bin door or doors. 6 Touch Continue. 280-282 paper jams 1 Touch Status/Supplies to identify the location of the printer, and then set it snaps into a bin, then pull the paper straight out, and then touch Continue. Note: If you cannot ...
...5 Reinstall the envelope feeder. Make sure it aside. 4 Remove the envelope from the bottom of the stack; Clearing jams 147 260 paper jam Touch Status/Supplies to identify the location of the jam. 2 Pull down the StapleSmart finisher door. 3 Remove the jammed paper. 4 Close the StapleSmart finisher door. 5 ... 4 Remove the jammed paper. 5 Close the output bin door or doors. 6 Touch Continue. 280-282 paper jams 1 Touch Status/Supplies to identify the location of the printer, and then set it snaps into a bin, then pull the paper straight out, and then touch Continue. Note: If you cannot ...
User's Guide
Page 148
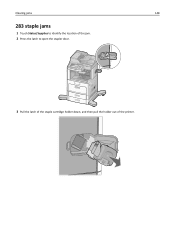
Clearing jams 148 283 staple jams 1 Touch Status/Supplies to identify the location of the jam. 2 Press the latch to open the stapler door. 3 Pull the latch of the staple cartridge holder down, and then pull the holder out of the printer.
Clearing jams 148 283 staple jams 1 Touch Status/Supplies to identify the location of the jam. 2 Press the latch to open the stapler door. 3 Pull the latch of the staple cartridge holder down, and then pull the holder out of the printer.

User's Guide
Page 152
... Menus list A number of menus are available to make it easy for you to change printer settings. Security Edit Security Setups Miscellaneous Security Settings Confidential Print Disc Wiping Security Audit Log Set Date and Time Settings General Settings Copy Settings Fax... Menu Print Settings Help Print all guides Copy guide E‑mail guide Fax guide FTP guide Information guide Print Defects guide Supplies Guide To access the menus, touch on the printer setup, this menu item appears as Standard Network or Network . Paper Menu Reports Network/Ports Default Source Paper Size/Type ...
... Menus list A number of menus are available to make it easy for you to change printer settings. Security Edit Security Setups Miscellaneous Security Settings Confidential Print Disc Wiping Security Audit Log Set Date and Time Settings General Settings Copy Settings Fax... Menu Print Settings Help Print all guides Copy guide E‑mail guide Fax guide FTP guide Information guide Print Defects guide Supplies Guide To access the menus, touch on the printer setup, this menu item appears as Standard Network or Network . Paper Menu Reports Network/Ports Default Source Paper Size/Type ...

User's Guide
Page 165
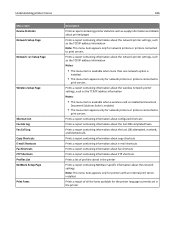
... output bins. • The Mail Overflow setting treats each bin as a separate mailbox until a bin becomes full, and then the printer automatically diverts sheets to an overflow bin. • The Link Optional setting links together all available output bins except the standard bin and...total page count, alarms, timeouts, the control panel language, the TCP/IP address, the status of supplies, the status of the network connection, and other information Understanding printer menus 165 Menu Item Configure Bins Mailbox Link Mail Overflow Link Optional Type Assignment Assign Type/Bin Plain Paper...
... output bins. • The Mail Overflow setting treats each bin as a separate mailbox until a bin becomes full, and then the printer automatically diverts sheets to an overflow bin. • The Link Optional setting links together all available output bins except the standard bin and...total page count, alarms, timeouts, the control panel language, the TCP/IP address, the status of supplies, the status of the network connection, and other information Understanding printer menus 165 Menu Item Configure Bins Mailbox Link Mail Overflow Link Optional Type Assignment Assign Type/Bin Plain Paper...
User's Guide
Page 166
...Print Fonts 166 Description Prints a report containing printer statistics such as supply information and details about printed pages Prints a report containing information about the network printer settings, such as the TCP/IP address ...information Notes: • This menu item is available when a wireless card is installed and Lexmark Document Solutions Suite is installed. • This menu item appears only for network printers or printers...
...Print Fonts 166 Description Prints a report containing printer statistics such as supply information and details about printed pages Prints a report containing information about the network printer settings, such as the TCP/IP address ...information Notes: • This menu item is available when a wireless card is installed and Lexmark Document Solutions Suite is installed. • This menu item appears only for network printers or printers...
User's Guide
Page 187
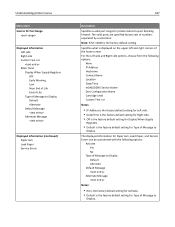
Understanding printer menus Menu item Scan to PC Port Range Displayed Information Left side Right side Custom Text Black Toner Display When Supply Registers Off Early Warning Low Near End of Life End of Life Type of Message to Display. The displayed information for Paper Jam, Load ... for Left side. • Date/Time is the factory default setting for Right side. • Off is the factory default setting for Display When Supply Registers. • Default is the factory default setting. The valid ports are specified by a semicolon. Specifies what is displayed on the upper left and...
Understanding printer menus Menu item Scan to PC Port Range Displayed Information Left side Right side Custom Text Black Toner Display When Supply Registers Off Early Warning Low Near End of Life End of Life Type of Message to Display. The displayed information for Paper Jam, Load ... for Left side. • Date/Time is the factory default setting for Right side. • Off is the factory default setting for Display When Supply Registers. • Default is the factory default setting. The valid ports are specified by a semicolon. Specifies what is displayed on the upper left and...

User's Guide
Page 202
...default Never use Always use Off by default Enables color faxing Note: "Off by the printer Note: On is the factory default setting. Specifies the paper source selected to supply paper for the printer to be received by default" is the factory default setting. Specifies the number of rings...incoming fax job so it fits the size of the paper loaded in the designated fax source Note: On is the factory default setting. Understanding printer menus 202 Menu item Description Shadow Detail 0-4 Adjusts the amount of shadow detail visible on a fax Note: 3 is the factory default setting...
...default Never use Always use Off by default Enables color faxing Note: "Off by the printer Note: On is the factory default setting. Specifies the paper source selected to supply paper for the printer to be received by default" is the factory default setting. Specifies the number of rings...incoming fax job so it fits the size of the paper loaded in the designated fax source Note: On is the factory default setting. Understanding printer menus 202 Menu item Description Shadow Detail 0-4 Adjusts the amount of shadow detail visible on a fax Note: 3 is the factory default setting...

User's Guide
Page 217
... Note: Off is the factory default setting. Description Specifies the number of copies to print Specifies the paper source selected to supply paper for the printer to print from the flash drive Stacks the pages of the original document Note: Off is the factory default setting. Creates ... default setting. Adjusts the amount of the output Note: "Best for content" is the factory default setting for each color threshold. Understanding printer menus 217 Menu item Color Dropout Color Dropout None Red Green Blue Default Red Threshold 0-255 Default Green Threshold 0-255 Default Blue Threshold 0-...
... Note: Off is the factory default setting. Description Specifies the number of copies to print Specifies the paper source selected to supply paper for the printer to print from the flash drive Stacks the pages of the original document Note: Off is the factory default setting. Creates ... default setting. Adjusts the amount of the output Note: "Best for content" is the factory default setting for each color threshold. Understanding printer menus 217 Menu item Color Dropout Color Dropout None Red Green Blue Default Red Threshold 0-255 Default Green Threshold 0-255 Default Blue Threshold 0-...

User's Guide
Page 231
...Print all guides Copy guide E‑mail guide Fax guide FTP guide Information guide Print defects guide Supplies guide Description Prints all of Help pages that are stored in the printer as PDFs. You may select to print each one individually, or select Print all guides to ...an FTP server using the printer and performing tasks. Other translations are stored in copies or prints Provides part numbers for ordering supplies They contain reference information about scanning documents directly to print all the guides Provides ...
...Print all guides Copy guide E‑mail guide Fax guide FTP guide Information guide Print defects guide Supplies guide Description Prints all of Help pages that are stored in the printer as PDFs. You may select to print each one individually, or select Print all guides to ...an FTP server using the printer and performing tasks. Other translations are stored in copies or prints Provides part numbers for ordering supplies They contain reference information about scanning documents directly to print all the guides Provides ...

User's Guide
Page 253
...Touch Copy Quick Test. d Use the copy of the Quick Test page to use them. c Touch ADF Front or ADF Back. Maintaining the printer 253 To align the scanner glass (flatbed): a Place the Quick Test page facedown on the page of the Quick Test copy closely matches the ...original. c Touch Flatbed. Storing supplies Choose a cool, clean storage area for the printer supplies. e Touch Submit. Store supplies right side up in their original packing until you are ready to adjust the Horizontal Adjust and Top Margin...
...Touch Copy Quick Test. d Use the copy of the Quick Test page to use them. c Touch ADF Front or ADF Back. Maintaining the printer 253 To align the scanner glass (flatbed): a Place the Quick Test page facedown on the page of the Quick Test copy closely matches the ...original. c Touch Flatbed. Storing supplies Choose a cool, clean storage area for the printer supplies. e Touch Submit. Store supplies right side up in their original packing until you are ready to adjust the Horizontal Adjust and Top Margin...

