User's Guide
Page 5
...-size paper ...69 Printing transparencies...70 Printing a banner ...70 Watermark ...70 Changing printer settings...70 Saving and deleting print settings...70 Resetting printer software to factory default settings 71 Resetting the printer to factory default settings 71 Copying...73 Making a copy...73 Adjusting copy quality...73 Making a copy lighter or darker...74...
...-size paper ...69 Printing transparencies...70 Printing a banner ...70 Watermark ...70 Changing printer settings...70 Saving and deleting print settings...70 Resetting printer software to factory default settings 71 Resetting the printer to factory default settings 71 Copying...73 Making a copy...73 Adjusting copy quality...73 Making a copy lighter or darker...74...

User's Guide
Page 29
... print cartridge nozzles. • Align Cartridges to align the cartridge. • Print Test Page to change the timeout feature before the printer, if left unused, resets to view the ink level of photo(s) to print. • Set Defaults to print a test page. Note: When you selected during initial setup. Pattern 1 (FSK...
... print cartridge nozzles. • Align Cartridges to align the cartridge. • Print Test Page to change the timeout feature before the printer, if left unused, resets to view the ink level of photo(s) to print. • Set Defaults to print a test page. Note: When you selected during initial setup. Pattern 1 (FSK...
User's Guide
Page 71
... ΠPrinter. In Windows 2000 and Windows XP, click Start ΠSettings ΠPrinters or Printers and Faxes. 2 Right-click the Lexmark 5000 Series icon. 3 Click Printing Preferences. 4 Click the Save Settings menu. 5 From the Restore section, select Factory Settings (Defaults). Note: .... 9 Press . 10 Press or until Use Factory appears. 7 Press . Note: Resetting to the original settings without using the printer software. Resetting the printer to factory default settings You can reset your printer to factory default settings will delete all printer settings you selected. 1 Press ...
... ΠPrinter. In Windows 2000 and Windows XP, click Start ΠSettings ΠPrinters or Printers and Faxes. 2 Right-click the Lexmark 5000 Series icon. 3 Click Printing Preferences. 4 Click the Save Settings menu. 5 From the Restore section, select Factory Settings (Defaults). Note: .... 9 Press . 10 Press or until Use Factory appears. 7 Press . Note: Resetting to the original settings without using the printer software. Resetting the printer to factory default settings You can reset your printer to factory default settings will delete all printer settings you selected. 1 Press ...

User's Guide
Page 118
... lower the transmission speed, the longer it will take your fax to send. • This solution will reduce the speed for future faxes until you reset the transmission speed. 11 Resend the fax. 12 If the problem persists, repeat the previous steps to send the fax at intervals up to five...
... lower the transmission speed, the longer it will take your fax to send. • This solution will reduce the speed for future faxes until you reset the transmission speed. 11 Resend the fax. 12 If the problem persists, repeat the previous steps to send the fax at intervals up to five...

User's Guide
Page 165
... fax 46 Fax Setup Utility 56 scan 77 custom-size paper, loading 37 custom-size paper, printing 69 D defaults Fax menu 46 resetting printer software to factory defaults 71 resetting printer to factory defaults 71 Scan menu 77 Settings menu 29 descreening 91 Despeckle change setting 90 direct IP printing 96 display...
... fax 46 Fax Setup Utility 56 scan 77 custom-size paper, loading 37 custom-size paper, printing 69 D defaults Fax menu 46 resetting printer software to factory defaults 71 resetting printer to factory defaults 71 Scan menu 77 Settings menu 29 descreening 91 Despeckle change setting 90 direct IP printing 96 display...
User's Guide
Page 166
... 136 e-mail attaching a scanned image 81 attaching files 80 E-mail button 31 e-mail screen preferences changing 81 e-mailing an image 81 F factory default settings resetting printer 71 resetting printer software 71 faded colors 128 failed to connect error message 117 Fax menu 46 fax activity reports 62 activity reports using the control...
... 136 e-mail attaching a scanned image 81 attaching files 80 E-mail button 31 e-mail screen preferences changing 81 e-mailing an image 81 F factory default settings resetting printer 71 resetting printer software 71 faded colors 128 failed to connect error message 117 Fax menu 46 fax activity reports 62 activity reports using the control...

User's Guide
Page 169
... photos 126 software Fax Solutions Software 59 Productivity Studio 31 removing and reinstalling 110 Solution Center 33 software does not install 108 software settings, printer resetting to factory defaults 71 Solution Center understanding 33 Solution Center buttons Advanced 33 How To 33 Maintenance 33 Troubleshooting 33 understanding 33 Speed Dial setting...
... photos 126 software Fax Solutions Software 59 Productivity Studio 31 removing and reinstalling 110 Solution Center 33 software does not install 108 software settings, printer resetting to factory defaults 71 Solution Center understanding 33 Solution Center buttons Advanced 33 How To 33 Maintenance 33 Troubleshooting 33 understanding 33 Speed Dial setting...

User's Guide (Mac)
Page 5
Copy troubleshooting...153 Scan troubleshooting...155 Jams and misfeeds troubleshooting 160 Error messages...163 Settings are not saved...170 Resetting the printer to factory default settings 170 Removing and reinstalling the software 171 Notices...172 Edition notice...172 Product information...173 Power consumption...179 Networking glossary 185 Contents 5
Copy troubleshooting...153 Scan troubleshooting...155 Jams and misfeeds troubleshooting 160 Error messages...163 Settings are not saved...170 Resetting the printer to factory default settings 170 Removing and reinstalling the software 171 Notices...172 Edition notice...172 Product information...173 Power consumption...179 Networking glossary 185 Contents 5

User's Guide (Mac)
Page 49
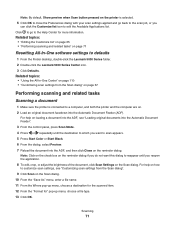
... then click Close on the reminder dialog. If you choose to defaults 1 From the Finder desktop, double-click the Lexmark 5000 Series folder. 2 Double-click the Lexmark 5000 Series Center icon. 3 Click Defaults. Related topics: • "Collating copies using the computer The printer can... "Enhancing photo print quality using the software" on page 67 Printing 49 Related topics: • "Customizing scan settings from the Scan dialog" on page 87 Resetting All-In-One software settings to collate, the pages print in this order: 1, 2, 3, 1, 2, 3. 1 With a document open, click File Œ...
... then click Close on the reminder dialog. If you choose to defaults 1 From the Finder desktop, double-click the Lexmark 5000 Series folder. 2 Double-click the Lexmark 5000 Series Center icon. 3 Click Defaults. Related topics: • "Collating copies using the computer The printer can... "Enhancing photo print quality using the software" on page 67 Printing 49 Related topics: • "Customizing scan settings from the Scan dialog" on page 87 Resetting All-In-One software settings to collate, the pages print in this order: 1, 2, 3, 1, 2, 3. 1 With a document open, click File Œ...

User's Guide (Mac)
Page 68
... document or image. Increase or decrease the color correction curve. Produce a mirror image of measurement from the pop-up menu. Start scanning. Reset the Adjustment controls to activate or deactivate auto-cropping. See a preview of the image by inverting the RGB data. Select or clear Auto-... settings. Some settings in the dialog are at the top of an image. 1 From the Finder desktop, double-click the Lexmark 5000 Series folder. 2 Double-click the Lexmark 5000 Series Center icon. Related topics: • "Using the All-In-One Center" on page 110 Cropping photos using the...
... document or image. Increase or decrease the color correction curve. Produce a mirror image of measurement from the pop-up menu. Start scanning. Reset the Adjustment controls to activate or deactivate auto-cropping. See a preview of the image by inverting the RGB data. Select or clear Auto-... settings. Some settings in the dialog are at the top of an image. 1 From the Finder desktop, double-click the Lexmark 5000 Series folder. 2 Double-click the Lexmark 5000 Series Center icon. Related topics: • "Using the All-In-One Center" on page 110 Cropping photos using the...
User's Guide (Mac)
Page 71
... edit, crop, or adjust the brightness of the document, click Scan Settings on page 71 Resetting All-In-One software settings to defaults 1 From the Finder desktop, double-click the Lexmark 5000 Series folder. 2 Double-click the Lexmark 5000 Series Center icon. 3 Click Defaults. Note: By default, Show preview when Scan button pressed...
... edit, crop, or adjust the brightness of the document, click Scan Settings on page 71 Resetting All-In-One software settings to defaults 1 From the Finder desktop, double-click the Lexmark 5000 Series folder. 2 Double-click the Lexmark 5000 Series Center icon. 3 Click Defaults. Note: By default, Show preview when Scan button pressed...

User's Guide (Mac)
Page 102
...) - If phones in your telecommunications company to either On or Off. Select: • Language to change the timeout feature before the printer, if left unused, resets to make other selections.
...) - If phones in your telecommunications company to either On or Off. Select: • Language to change the timeout feature before the printer, if left unused, resets to make other selections.

User's Guide (Mac)
Page 141
... lower the transmission speed, the longer it will take your fax to send. • This solution will reduce the speed for future faxes until you reset the transmission speed. 11 Resend the fax. 12 If the problem persists, repeat the previous steps to On, press . Lower the transmission speed 1 From the...
... lower the transmission speed, the longer it will take your fax to send. • This solution will reduce the speed for future faxes until you reset the transmission speed. 11 Resend the fax. 12 If the problem persists, repeat the previous steps to On, press . Lower the transmission speed 1 From the...

User's Guide (Mac)
Page 170
...selected setting. For information on how to change this time-out feature, see "Saving settings" on page 103. Resetting the printer to factory default settings You can reset your printer to begin printing. Settings are not saved These are possible solutions. The printer reverts to the selected ...Color or Start Black to the original settings without using the printer software. Note: Language appears on the display, indicating that the printer has been reset. 8 Press or until the country or region you press to select a setting, an * appears next to select the time format. 17 ...
...selected setting. For information on how to change this time-out feature, see "Saving settings" on page 103. Resetting the printer to factory default settings You can reset your printer to begin printing. Settings are not saved These are possible solutions. The printer reverts to the selected ...Color or Start Black to the original settings without using the printer software. Note: Language appears on the display, indicating that the printer has been reset. 8 Press or until the country or region you press to select a setting, an * appears next to select the time format. 17 ...


