Technical Reference
Page 57
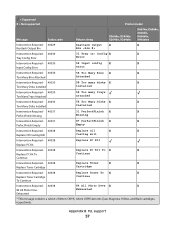
... PC Kit Replace PC Kit Intervention Required - 40038 Replace PC Kit To X X Replace PC Kit To Continue Continue Intervention Required - 40038 Replace Toner X X Replace Toner Cartridge Cartridge Intervention Required - 40038 Replace Toner To X X Replace Toner Cartridge Continue To Continue Intervention Required - 40038 84 All Photo Devs X X 84 All Photo Devs Exhausted Exhausted * This message contains a subset of...
... PC Kit Replace PC Kit Intervention Required - 40038 Replace PC Kit To X X Replace PC Kit To Continue Continue Intervention Required - 40038 Replace Toner X X Replace Toner Cartridge Cartridge Intervention Required - 40038 Replace Toner To X X Replace Toner Cartridge Continue To Continue Intervention Required - 40038 84 All Photo Devs X X 84 All Photo Devs Exhausted Exhausted * This message contains a subset of...
Technical Reference
Page 66
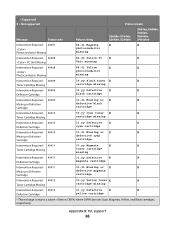
... Intervention Required - 40409 30.yy Black toner X X Toner Cartridge Missing cartridge missing Intervention Required - 40409 31.yy Defective X X Defective Cartridge black cartridge Intervention Required - 40409 31.41 Missing or X X Missing or Defective Cartridge defective black cartridge Intervention Required - 40410 30.yy Cyan toner X X Toner Cartridge Missing cartridge missing Intervention Required - 40410 31.yy Defective X X Defective Cartridge cyan cartridge Intervention Required - 40410 31.41 Missing...
... Intervention Required - 40409 30.yy Black toner X X Toner Cartridge Missing cartridge missing Intervention Required - 40409 31.yy Defective X X Defective Cartridge black cartridge Intervention Required - 40409 31.41 Missing or X X Missing or Defective Cartridge defective black cartridge Intervention Required - 40410 30.yy Cyan toner X X Toner Cartridge Missing cartridge missing Intervention Required - 40410 31.yy Defective X X Defective Cartridge cyan cartridge Intervention Required - 40410 31.41 Missing...
Card Stock & Label Guide
Page 11
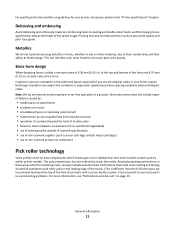
...• modification or attachments • accidents or misuse • unsuitable physical or operating environment • maintenance by any unauthorized (non-Lexmark) servicer • operation of a product beyond the limit of its duty cycle • failure to avoid nesting problems. For more reliably...The auto compensator has two rollers that could cause nesting and tenting should fall outside of Lexmark specifications • use of non-Lexmark supplies (such as toner cartridges and/or inkjet cartridges) • use of printing media outside the pick roller area on the leading edge ...
...• modification or attachments • accidents or misuse • unsuitable physical or operating environment • maintenance by any unauthorized (non-Lexmark) servicer • operation of a product beyond the limit of its duty cycle • failure to avoid nesting problems. For more reliably...The auto compensator has two rollers that could cause nesting and tenting should fall outside of Lexmark specifications • use of non-Lexmark supplies (such as toner cartridges and/or inkjet cartridges) • use of printing media outside the pick roller area on the leading edge ...
Card Stock & Label Guide
Page 130
... or later is crusty or stiff. If you replace the print cartridge, more sheets of the printer frequently, possibly daily. Using third party, non-Lexmark cartridges and fuser cleaners can result in toner build-up in the pad to clean the inside of paper. ... Diamond FineTM toner cartridges (P/N 1382100 or 1382150) when duplexing. • Note that are printing on some media. See your printer warranty. • Use a 4039 print cartridge (P/N 1380850 or 1380950) in your printer documentation for information about ordering additional fuser cleaners. Contact Lexmark customer support ...
... or later is crusty or stiff. If you replace the print cartridge, more sheets of the printer frequently, possibly daily. Using third party, non-Lexmark cartridges and fuser cleaners can result in toner build-up in the pad to clean the inside of paper. ... Diamond FineTM toner cartridges (P/N 1382100 or 1382150) when duplexing. • Note that are printing on some media. See your printer warranty. • Use a 4039 print cartridge (P/N 1380850 or 1380950) in your printer documentation for information about ordering additional fuser cleaners. Contact Lexmark customer support ...

Maintenance Guide
Page 2
Contents Maintaining the printer 3 Cleaning the exterior of the printer...3 Cleaning the scanner glass...3 Cleaning the ADF separator rollers...4 Adjusting scanner registration...5 Storing supplies...6 Checking the status of supplies...7 Checking the status of supplies from the printer control panel 7 Checking the status of supplies from a network computer 7 Ordering supplies...8 Ordering toner cartridges...8 Ordering a photoconductor kit...8 Ordering ADF replacement parts...9 Moving the printer to another location...9 Shipping the printer...10 Contents 2
Contents Maintaining the printer 3 Cleaning the exterior of the printer...3 Cleaning the scanner glass...3 Cleaning the ADF separator rollers...4 Adjusting scanner registration...5 Storing supplies...6 Checking the status of supplies...7 Checking the status of supplies from the printer control panel 7 Checking the status of supplies from a network computer 7 Ordering supplies...8 Ordering toner cartridges...8 Ordering a photoconductor kit...8 Ordering ADF replacement parts...9 Moving the printer to another location...9 Shipping the printer...10 Contents 2

Maintenance Guide
Page 8
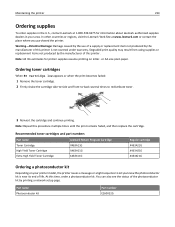
...-to-side and front-to-back several times to let you purchased the printer. Recommended toner cartridges and part numbers Part name Toner Cartridge High Yield Toner Cartridge Extra High Yield Toner Cartridge Lexmark Return Program Cartridge X463A11G X463H11G X463X11G Regular cartridge X463A21G X463H21G X463X21G Ordering a photoconductor kit Depending on letter- Note: Repeat this time, order a photoconductor kit. or A4-size...
...-to-side and front-to-back several times to let you purchased the printer. Recommended toner cartridges and part numbers Part name Toner Cartridge High Yield Toner Cartridge Extra High Yield Toner Cartridge Lexmark Return Program Cartridge X463A11G X463H11G X463X11G Regular cartridge X463A21G X463H21G X463X21G Ordering a photoconductor kit Depending on letter- Note: Repeat this time, order a photoconductor kit. or A4-size...
User's Guide
Page 9
......233 Checking the status of supplies from the printer control panel 233 Checking the status of supplies from a network computer 233 Ordering supplies...234 Ordering toner cartridges ...234 Ordering a photoconductor kit ...234 Ordering ADF replacement parts...235 Moving the printer to another location 235 Shipping the printer...236 Administrative support 237 Finding...
......233 Checking the status of supplies from the printer control panel 233 Checking the status of supplies from a network computer 233 Ordering supplies...234 Ordering toner cartridges ...234 Ordering a photoconductor kit ...234 Ordering ADF replacement parts...235 Moving the printer to another location 235 Shipping the printer...236 Administrative support 237 Finding...

User's Guide
Page 11
... disabled...264 56 Standard parallel port disabled...264 56 Standard USB port disabled ...264 56 USB port disabled ...264 57 Configuration change toner cartridge...261 31 Replace defective cartridge ...261 32 Cartridge part number unsupported by device 261 34 Short paper ...261 35 Insufficient memory to support Resource Save feature 261 37 Insufficient memory...
... disabled...264 56 Standard parallel port disabled...264 56 Standard USB port disabled ...264 56 USB port disabled ...264 57 Configuration change toner cartridge...261 31 Replace defective cartridge ...261 32 Cartridge part number unsupported by device 261 34 Short paper ...261 35 Insufficient memory to support Resource Save feature 261 37 Insufficient memory...
User's Guide
Page 73
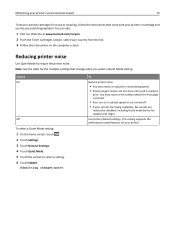
You may notice a reduction in processing speed. • Printer engine motors do not start until a job is printed. • Fans run at www.lexmark.com/recycle. 2 From the Toner Cartridges section, select your printer. Use factory default settings. Reducing printer noise Use Quiet Mode to select a setting. 6 Touch Submit. Minimizing your printer's environmental impact...
You may notice a reduction in processing speed. • Printer engine motors do not start until a job is printed. • Fans run at www.lexmark.com/recycle. 2 From the Toner Cartridges section, select your printer. Use factory default settings. Reducing printer noise Use Quiet Mode to select a setting. 6 Touch Submit. Minimizing your printer's environmental impact...
User's Guide
Page 234
... items not produced by the manufacturer of the photoconductor kit by the manufacturer of this printer. Recommended toner cartridges and part numbers Part name Lexmark Return Program Cartridge Toner Cartridge High Yield Toner Cartridge X463A11G X463H11G Extra High Yield Toner Cartridge X463X11G Regular cartridge X463A21G X463H21G X463X21G Ordering a photoconductor kit Depending on letter‑ or A4‑size plain paper. In...
... items not produced by the manufacturer of the photoconductor kit by the manufacturer of this printer. Recommended toner cartridges and part numbers Part name Lexmark Return Program Cartridge Toner Cartridge High Yield Toner Cartridge X463A11G X463H11G Extra High Yield Toner Cartridge X463X11G Regular cartridge X463A21G X463H21G X463X21G Ordering a photoconductor kit Depending on letter‑ or A4‑size plain paper. In...
User's Guide
Page 237
...needs to see the Networking Guide on the Software and Documentation CD and the Embedded Web Server Administrator's Guide on the Lexmark Web site at www.lexmark.com/publications. Administrative support 237 Administrative support Finding advanced networking and administrator information This chapter covers basic administrative support tasks....the photoconductor kit, and capacity measurements of your Web browser. For more information, see paper tray settings, the level of toner in the toner cartridge, the percentage of life remaining in the address field of certain printer parts.
...needs to see the Networking Guide on the Software and Documentation CD and the Embedded Web Server Administrator's Guide on the Lexmark Web site at www.lexmark.com/publications. Administrative support 237 Administrative support Finding advanced networking and administrator information This chapter covers basic administrative support tasks....the photoconductor kit, and capacity measurements of your Web browser. For more information, see paper tray settings, the level of toner in the toner cartridge, the percentage of life remaining in the address field of certain printer parts.

User's Guide
Page 239
... jam messages and locations Note: To resolve any message, all paper or specialty media must be cleared from the entire paper path. Inside are the toner cartridge and photoconductor kit. 2 Standard exit bin 3 Front door 4 Manual or multipurpose feeder door 5 Standard 250‑sheet tray (Tray 1) 6 Optional 250‑ or 550‑...
... jam messages and locations Note: To resolve any message, all paper or specialty media must be cleared from the entire paper path. Inside are the toner cartridge and photoconductor kit. 2 Standard exit bin 3 Front door 4 Manual or multipurpose feeder door 5 Standard 250‑sheet tray (Tray 1) 6 Optional 250‑ or 550‑...

User's Guide
Page 242
Clearing jams 242 3 If you do not see the jam, open the front door, and then remove the photoconductor kit and toner cartridge. 4 Lift the flap at the front of the printer, and then remove any jammed sheets. 5 If you do not see any jammed sheets, open the rear door.
Clearing jams 242 3 If you do not see the jam, open the front door, and then remove the photoconductor kit and toner cartridge. 4 Lift the flap at the front of the printer, and then remove any jammed sheets. 5 If you do not see any jammed sheets, open the rear door.

User's Guide
Page 243
Clearing jams 243 6 Remove the jam. 7 Close the rear door. 8 Insert the photoconductor kit and toner cartridge. 9 Close the front door. 10 Touch Continue. 202 paper jam Touch Status/Supplies to identify the location of the jam. If the paper is exiting the printer, then pull the paper out, and then touch Continue. If the paper is not exiting the printer: 1 Pull down the rear door. 2 Remove the jammed paper.
Clearing jams 243 6 Remove the jam. 7 Close the rear door. 8 Insert the photoconductor kit and toner cartridge. 9 Close the front door. 10 Touch Continue. 202 paper jam Touch Status/Supplies to identify the location of the jam. If the paper is exiting the printer, then pull the paper out, and then touch Continue. If the paper is not exiting the printer: 1 Pull down the rear door. 2 Remove the jammed paper.

User's Guide
Page 249
Clearing jams 249 If the sheet is not visible, complete the following steps: 1 Open the front door, and then remove the photoconductor kit and toner cartridge. 2 Lift the flap at the front of the printer, and then remove any jams. 3 Reinsert the photoconductor kit and toner cartridge. 4 Close the front door. 5 Touch Continue.
Clearing jams 249 If the sheet is not visible, complete the following steps: 1 Open the front door, and then remove the photoconductor kit and toner cartridge. 2 Lift the flap at the front of the printer, and then remove any jams. 3 Reinsert the photoconductor kit and toner cartridge. 4 Close the front door. 5 Touch Continue.

User's Guide
Page 261
... link buffer changes. Troubleshooting 261 30 Invalid refill, change toner cartridge The printer has detected an invalid, refilled toner cartridge. Remove the toner cartridge, and then install a new one. 31 Replace defective cartridge Remove the defective toner cartridge, and then install a new one. 32 Cartridge part number unsupported by device Remove the toner cartridge, and then install a supported one. 34 Short paper...
... link buffer changes. Troubleshooting 261 30 Invalid refill, change toner cartridge The printer has detected an invalid, refilled toner cartridge. Remove the toner cartridge, and then install a new one. 31 Replace defective cartridge Remove the defective toner cartridge, and then install a new one. 32 Cartridge part number unsupported by device Remove the toner cartridge, and then install a supported one. 34 Short paper...

User's Guide
Page 266
... : • Replace the photoconductor kit. • Touch Continue to clear the message and continue printing. 88 Cartridge low The toner is low. Replace the toner cartridge, and then touch Continue to have routine maintenance done. If the error message remains, the hard disk may be... and continue printing. • Format the printer hard disk. Replace the toner cartridge, and then touch Continue to clear the message and continue printing. 88.yy Replace cartridge The toner cartridge is empty. 1 Replace the toner cartridge. 2 Touch Continue to replace the pick rollers, the charge roll, the...
... : • Replace the photoconductor kit. • Touch Continue to clear the message and continue printing. 88 Cartridge low The toner is low. Replace the toner cartridge, and then touch Continue to have routine maintenance done. If the error message remains, the hard disk may be... and continue printing. • Format the printer hard disk. Replace the toner cartridge, and then touch Continue to clear the message and continue printing. 88.yy Replace cartridge The toner cartridge is empty. 1 Replace the toner cartridge. 2 Touch Continue to replace the pick rollers, the charge roll, the...

User's Guide
Page 273
UNWANTED TONER IS IN THE BACKGROUND • Adjust the darkness to clean the ADF scanner glass as well. Try one or more information, see: "Cleaning the scanner ... MAY BE DIRTY Clean the scanner glass with a clean, lint‑free cloth dampened with water. THE TONER MAY BE LOW When 88 Cartridge low appears or when the print becomes faded, replace the toner cartridge. Troubleshooting 273 Poor copy quality These are some examples of the following: CHECK THE DISPLAY FOR ERROR MESSAGES...
UNWANTED TONER IS IN THE BACKGROUND • Adjust the darkness to clean the ADF scanner glass as well. Try one or more information, see: "Cleaning the scanner ... MAY BE DIRTY Clean the scanner glass with a clean, lint‑free cloth dampened with water. THE TONER MAY BE LOW When 88 Cartridge low appears or when the print becomes faded, replace the toner cartridge. Troubleshooting 273 Poor copy quality These are some examples of the following: CHECK THE DISPLAY FOR ERROR MESSAGES...

User's Guide
Page 284
... down and 2 ABC 6 MNO while turning the printer on. 4 Release the buttons when the screen with the progress bar appears. Reinstall the toner cartridge. For more of the following topics may help isolate print quality problems, print the print quality test pages: 1 Turn the printer off. 2 ...Load Letter‑ or A4‑size paper in the following : PACKING MATERIAL MAY BE ON THE TONER CARTRIDGE Remove the toner cartridge and make sure the packing material is properly removed. You may need to be serviced. Isolating print quality problems To help you solve...
... down and 2 ABC 6 MNO while turning the printer on. 4 Release the buttons when the screen with the progress bar appears. Reinstall the toner cartridge. For more of the following topics may help isolate print quality problems, print the print quality test pages: 1 Turn the printer off. 2 ...Load Letter‑ or A4‑size paper in the following : PACKING MATERIAL MAY BE ON THE TONER CARTRIDGE Remove the toner cartridge and make sure the packing material is properly removed. You may need to be serviced. Isolating print quality problems To help you solve...

User's Guide
Page 288
... a different fill pattern from the Print dialog. Solid black or white streaks ABC ABC DEF DEF These are possible solutions. THE TONER MAY BE LOW When 88 Cartridge low appears or when the print becomes faded, replace the toner cartridge. CHECK THE PAPER Make sure you are using paper that meets the printer specifications.
... a different fill pattern from the Print dialog. Solid black or white streaks ABC ABC DEF DEF These are possible solutions. THE TONER MAY BE LOW When 88 Cartridge low appears or when the print becomes faded, replace the toner cartridge. CHECK THE PAPER Make sure you are using paper that meets the printer specifications.


