
User's Guide
Page 9
... for the use of some parts may not always be obvious. The safety features of specific Lexmark components. Refer service or repairs, other replacement parts. Connect the power supply cord to a professional service person. Remove the power cord from the electrical outlet before inspecting it. CAUTION-POTENTIAL INJURY: Do not twist, bind, crush, or place...
... for the use of some parts may not always be obvious. The safety features of specific Lexmark components. Refer service or repairs, other replacement parts. Connect the power supply cord to a professional service person. Remove the power cord from the electrical outlet before inspecting it. CAUTION-POTENTIAL INJURY: Do not twist, bind, crush, or place...
User's Guide
Page 13
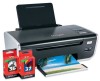
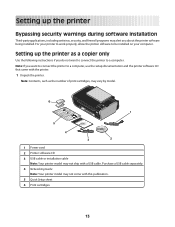
... your computer. For your printer to work properly, allow the printer software to a computer, use the setup documentation and the printer software CD that came with this publication. 5 Quick Setup sheet 6 Print cartridges 13 Setting up the printer as the number of print cartridges, may vary by model. 6 1 2 3 WI F I PRINTING 1 5 4 3 2 1 Power cord 2 Printer software CD 3 USB cable...
... your computer. For your printer to work properly, allow the printer software to a computer, use the setup documentation and the printer software CD that came with this publication. 5 Quick Setup sheet 6 Print cartridges 13 Setting up the printer as the number of print cartridges, may vary by model. 6 1 2 3 WI F I PRINTING 1 5 4 3 2 1 Power cord 2 Printer software CD 3 USB cable...

User's Guide
Page 14
2 Remove all tape and packing material from all areas of the printer. WI F I PRINTING 5 Connect the power cord to the printer, and then to an electrical outlet that is easily accessible and near the printer. 2 1 14 W I F I PRINTING 4 Extend the paper guides. 2 1 W I F I PRINTING 3 Raise the paper support, and then extend the paper exit tray.
2 Remove all tape and packing material from all areas of the printer. WI F I PRINTING 5 Connect the power cord to the printer, and then to an electrical outlet that is easily accessible and near the printer. 2 1 14 W I F I PRINTING 4 Extend the paper guides. 2 1 W I F I PRINTING 3 Raise the paper support, and then extend the paper exit tray.
User's Guide
Page 101
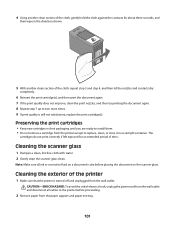
... glass 1 Dampen a clean, lint-free cloth with water. 2 Gently wipe the scanner glass clean. Cleaning the exterior of the printer 1 Make sure that the printer is dry before proceeding. 2 Remove paper from the wall outlet and disconnect all ink or corrective fluid on the scanner glass. Note...• Do not remove a cartridge from the printer except to the printer before placing the document on a document is turned off and unplugged from the wall outlet. CAUTION-SHOCK HAZARD: To avoid the risk of electric shock, unplug the power cord from the paper support and paper exit tray....
... glass 1 Dampen a clean, lint-free cloth with water. 2 Gently wipe the scanner glass clean. Cleaning the exterior of the printer 1 Make sure that the printer is dry before proceeding. 2 Remove paper from the wall outlet and disconnect all ink or corrective fluid on the scanner glass. Note...• Do not remove a cartridge from the printer except to the printer before placing the document on a document is turned off and unplugged from the wall outlet. CAUTION-SHOCK HAZARD: To avoid the risk of electric shock, unplug the power cord from the paper support and paper exit tray....
User's Guide
Page 105
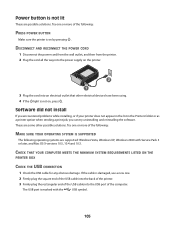
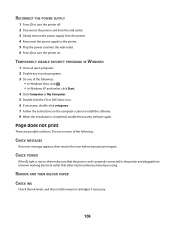
DISCONNECT AND RECONNECT THE POWER CORD 1 Disconnect the power cord from the wall outlet, and then from the printer. 2 Plug the cord all the way into the power supply on the printer. 2 1 3 Plug the cord into the USB port of the computer. Power button is damaged, use a new one. 2 Firmly plug the square end of the USB cable into the back...
DISCONNECT AND RECONNECT THE POWER CORD 1 Disconnect the power cord from the wall outlet, and then from the printer. 2 Plug the cord all the way into the power supply on the printer. 2 1 3 Plug the cord into the USB port of the computer. Power button is damaged, use a new one. 2 Firmly plug the square end of the USB cable into the back...
User's Guide
Page 106
... These are possible solutions. CHECK POWER If the light is not on . RECONNECT THE POWER SUPPLY 1 Press to turn the printer off. 2 Disconnect the power cord from the wall outlet. 3 Gently remove the power supply from the printer. 4 Reconnect the power supply to the printer. 5 Plug the power cord into a known working electrical outlet that the power cord is completed, enable the security...
... These are possible solutions. CHECK POWER If the light is not on . RECONNECT THE POWER SUPPLY 1 Press to turn the printer off. 2 Disconnect the power cord from the wall outlet. 3 Gently remove the power supply from the printer. 4 Reconnect the power supply to the printer. 5 Plug the power cord into a known working electrical outlet that the power cord is completed, enable the security...

User's Guide
Page 108
... Utilities Œ Print Center or Printer Setup Utility. If you want to turn off the printer. 2 Disconnect the power cord from the wall outlet. 3 Remove the power supply from the Default Printer pop-up menu, check if the printer is on hold . DISCONNECT AND RECONNECT POWER SUPPLY 1 Press to turn on ... document name, and then click Resume. • If you want to set the printer as the default printer, then select the printer from the printer. 4 Reconnect the power supply to the printer. 5 Plug the power cord into the wall outlet. 6 Press to resume all print jobs in the queue, ...
... Utilities Œ Print Center or Printer Setup Utility. If you want to turn off the printer. 2 Disconnect the power cord from the wall outlet. 3 Remove the power supply from the Default Printer pop-up menu, check if the printer is on hold . DISCONNECT AND RECONNECT POWER SUPPLY 1 Press to turn on ... document name, and then click Resume. • If you want to set the printer as the default printer, then select the printer from the printer. 4 Reconnect the power supply to the printer. 5 Plug the power cord into the wall outlet. 6 Press to resume all print jobs in the queue, ...

User's Guide
Page 109
... appear in sleep mode. 1 Unplug the power cord from the printer. 4 Reconnect the power supply to the printer. 5 Plug the power cord into the wall outlet. 3 Press to turn the printer on . Try one of the following: MAKE SURE THE PRINTER POWER SUPPLY IS ATTACHED CORRECTLY 1 Press to turn the printer off slowly, then the printer is blinking on and off . 2 Disconnect...
... appear in sleep mode. 1 Unplug the power cord from the printer. 4 Reconnect the power supply to the printer. 5 Plug the power cord into the wall outlet. 3 Press to turn the printer on . Try one of the following: MAKE SURE THE PRINTER POWER SUPPLY IS ATTACHED CORRECTLY 1 Press to turn the printer off slowly, then the printer is blinking on and off . 2 Disconnect...
User's Guide
Page 134
...LEXMARK LICENSE AGREEMENTS PLEASE READ CAREFULLY: BY USING THIS PRODUCT, YOU AGREE TO BE BOUND BY ALL THE TERMS AND CONDITIONS OF THESE LICENSE AGREEMENTS. Since power consumption claims are subject to use license/agreement; After this printing device are sold subject to stop product power consumption, disconnect the power supply cord...cartridge when replacement is designed with this single use, the license to change. See www.lexmark.com for current values. The Power Saver Mode saves energy by the time the product spends in the previous table represent time-averaged ...
...LEXMARK LICENSE AGREEMENTS PLEASE READ CAREFULLY: BY USING THIS PRODUCT, YOU AGREE TO BE BOUND BY ALL THE TERMS AND CONDITIONS OF THESE LICENSE AGREEMENTS. Since power consumption claims are subject to use license/agreement; After this printing device are sold subject to stop product power consumption, disconnect the power supply cord...cartridge when replacement is designed with this single use, the license to change. See www.lexmark.com for current values. The Power Saver Mode saves energy by the time the product spends in the previous table represent time-averaged ...


