
Embedded Web Server Administrator's Guide
Page 23
... wiping), or Manual (for either scheduled or ad-hoc wiping). Multi-pass wiping is not supported on certain days or during certain hours. Setting up memory space. Note: If you do not see Disk Wiping in the main Security menu, it is compliant with multiple passes for greater security. Note: All...
... wiping), or Manual (for either scheduled or ad-hoc wiping). Multi-pass wiping is not supported on certain days or during certain hours. Setting up memory space. Note: If you do not see Disk Wiping in the main Security menu, it is compliant with multiple passes for greater security. Note: All...

User's Guide
Page 2
... Available internal options...29 Accessing the system board to set up wireless printing...55 Follow these steps to install internal options...30 Installing a memory card ...32 Installing a flash memory or firmware card...34 Installing an Internal Solutions Port...36 Installing a printer hard disk ...43 Installing a fax card ...47 Installing hardware options...50...
... Available internal options...29 Accessing the system board to set up wireless printing...55 Follow these steps to install internal options...30 Installing a memory card ...32 Installing a flash memory or firmware card...34 Installing an Internal Solutions Port...36 Installing a printer hard disk ...43 Installing a fax card ...47 Installing hardware options...50...
User's Guide
Page 6
... Canceling an outgoing fax...142 Canceling a fax while the original documents are still scanning 142 Canceling a fax after the original documents have been scanned to memory 142 Contents 6
... Canceling an outgoing fax...142 Canceling a fax while the original documents are still scanning 142 Canceling a fax after the original documents have been scanned to memory 142 Contents 6

User's Guide
Page 10
... Fax server 'To Format' not set up ...256 Insert Tray ...257 Install Tray ...257 Invalid PIN...257 Load with ...257 Load manual feeder with ...257 Memory full, cannot print faxes...258 Network/Network ...258 No analog phone line connected to ...255 Check tray connection ...255 Close front door...255 Close door... scanner ADF...258 Remove packaging material, check ...258 Remove paper from standard output bin...258 Contents 10 Scan Job Canceled ...256 Fax failed...256 Fax memory full...256 Fax partition inoperative.
... Fax server 'To Format' not set up ...256 Insert Tray ...257 Install Tray ...257 Invalid PIN...257 Load with ...257 Load manual feeder with ...257 Memory full, cannot print faxes...258 Network/Network ...258 No analog phone line connected to ...255 Check tray connection ...255 Close front door...255 Close door... scanner ADF...258 Remove packaging material, check ...258 Remove paper from standard output bin...258 Contents 10 Scan Job Canceled ...256 Fax failed...256 Fax memory full...256 Fax partition inoperative.

User's Guide
Page 11
......260 34 Short paper ...260 35 Insufficient memory to support Resource Save feature 261 37 Insufficient memory to collate job ...261 37 Insufficient memory, some Held Jobs were deleted 261 37 Insufficient memory, some held jobs will not be restored 261 38 Memory full...261 39 Complex page, some data may... not have printed...261 50 PPDS font error ...262 51 Defective flash detected ...262 52 Not enough free space in flash memory for resources 262 53 Unformatted flash detected ...262 54 Network software error...262 54 Serial option error...262 54 Standard network software error......
......260 34 Short paper ...260 35 Insufficient memory to support Resource Save feature 261 37 Insufficient memory to collate job ...261 37 Insufficient memory, some Held Jobs were deleted 261 37 Insufficient memory, some held jobs will not be restored 261 38 Memory full...261 39 Complex page, some data may... not have printed...261 50 PPDS font error ...262 51 Defective flash detected ...262 52 Not enough free space in flash memory for resources 262 53 Unformatted flash detected ...262 54 Network software error...262 54 Serial option error...262 54 Standard network software error......

User's Guide
Page 13
Solving option problems...279 Option does not operate correctly or quits after it is installed 279 Drawers...280 Flash memory card...280 Hard disk with adapter...280 Internal Solutions Port ...280 Memory card ...280 Solving paper feed problems...281 Paper frequently jams ...281 Paper trays...281 Paper jam message remains after jam is...
Solving option problems...279 Option does not operate correctly or quits after it is installed 279 Drawers...280 Flash memory card...280 Hard disk with adapter...280 Internal Solutions Port ...280 Memory card ...280 Solving paper feed problems...281 Paper frequently jams ...281 Paper trays...281 Paper jam message remains after jam is...
User's Guide
Page 15
... this product or make any cables going into the printer. CAUTION-SHOCK HAZARD: If you are accessing the system board or installing optional hardware or memory devices sometime after setting up this product to the manufacturer's instructions and local regulations. Use of controls or adjustments or performance of injury from the...
... this product or make any cables going into the printer. CAUTION-SHOCK HAZARD: If you are accessing the system board or installing optional hardware or memory devices sometime after setting up this product to the manufacturer's instructions and local regulations. Use of controls or adjustments or performance of injury from the...

User's Guide
Page 29
Available internal options • Memory cards - Printer memory - IPDS and SCS/TNe - Flash memory - RS-232-C Serial ISP - you can customize your printer connectivity and memory capacity by adding optional cards. PrintCryptionTM • Printer hard disk • LexmarkTM Internal Solutions Ports (ISP)... - Parallel 1284-B ISP - If you are accessing the system board or installing optional hardware or memory devices sometime after setting up the printer, then turn them off , and unplug the power cord from the wall outlet before ...
Available internal options • Memory cards - Printer memory - IPDS and SCS/TNe - Flash memory - RS-232-C Serial ISP - you can customize your printer connectivity and memory capacity by adding optional cards. PrintCryptionTM • Printer hard disk • LexmarkTM Internal Solutions Ports (ISP)... - Parallel 1284-B ISP - If you are accessing the system board or installing optional hardware or memory devices sometime after setting up the printer, then turn them off , and unplug the power cord from the wall outlet before ...

User's Guide
Page 30
Additional printer setup 30 CAUTION-SHOCK HAZARD: If you have any other devices attached to install internal options Note: This task requires a flathead screwdriver. If you are accessing the system board or installing optional hardware or memory devices sometime after setting up the printer, then turn the printer off as well, and unplug any cables going into the printer. 1 Loosen the screws on the back of the system board a quarter turn them off , and unplug the power cord from the wall outlet before continuing. Accessing the system board to the printer, then turn .
Additional printer setup 30 CAUTION-SHOCK HAZARD: If you have any other devices attached to install internal options Note: This task requires a flathead screwdriver. If you are accessing the system board or installing optional hardware or memory devices sometime after setting up the printer, then turn the printer off as well, and unplug any cables going into the printer. 1 Loosen the screws on the back of the system board a quarter turn them off , and unplug the power cord from the wall outlet before continuing. Accessing the system board to the printer, then turn .

User's Guide
Page 31
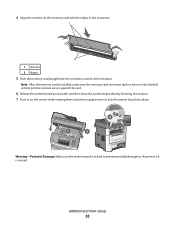
Warning-Potential Damage: System board electronic components are easily damaged by static electricity. Touch something metal on the printer before touching any system board electronic components or connectors. 1 Flash memory or firmware card connectors 2 Fax card connector 3 Lexmark Internal Solutions Port or printer hard disk connector 4 Memory card connector Additional printer setup 31 2 Lift the front of the scanner unit to open the system board. 3 Use the following illustration to locate the appropriate connector.
Warning-Potential Damage: System board electronic components are easily damaged by static electricity. Touch something metal on the printer before touching any system board electronic components or connectors. 1 Flash memory or firmware card connectors 2 Fax card connector 3 Lexmark Internal Solutions Port or printer hard disk connector 4 Memory card connector Additional printer setup 31 2 Lift the front of the scanner unit to open the system board. 3 Use the following illustration to locate the appropriate connector.
User's Guide
Page 32
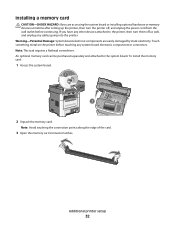
...system board electronic components or connectors. Note: Avoid touching the connection points along the edge of the card. 3 Open the memory card connector latches. Additional printer setup 32 Warning-Potential Damage: System board electronic components are accessing the system board or installing optional ...cord from the wall outlet before touching any cables going into the printer. Touch something metal on the printer before continuing. Installing a memory card CAUTION-SHOCK HAZARD: If you have any other devices attached to the system board. If you are easily damaged by static ...
...system board electronic components or connectors. Note: Avoid touching the connection points along the edge of the card. 3 Open the memory card connector latches. Additional printer setup 32 Warning-Potential Damage: System board electronic components are accessing the system board or installing optional ...cord from the wall outlet before touching any cables going into the printer. Touch something metal on the printer before continuing. Installing a memory card CAUTION-SHOCK HAZARD: If you have any other devices attached to the system board. If you are easily damaged by static ...
User's Guide
Page 33
... the system board is locked to prevent possible damage to the printer if it clicks into place. Additional printer setup 33 Note: After the memory card is moved. 4 Align the notches on the screws while rotating them clockwise a quarter turn to the latched vertical position and are secure... close the system board door by lowering the scanner. 7 Push in on the memory card with the ridges in the connector. 1 Notches 2 Ridges 5 Push the memory card straight into the connector until it is installed, make sure the memory card connector latches return to lock the system board into place.
... the system board is locked to prevent possible damage to the printer if it clicks into place. Additional printer setup 33 Note: After the memory card is moved. 4 Align the notches on the screws while rotating them clockwise a quarter turn to the latched vertical position and are secure... close the system board door by lowering the scanner. 7 Push in on the memory card with the ridges in the connector. 1 Notches 2 Ridges 5 Push the memory card straight into the connector until it is installed, make sure the memory card connector latches return to lock the system board into place.

User's Guide
Page 34
Only one of each may be installed, but the connectors are accessing the system board or installing optional hardware or memory devices sometime after setting up the printer, then turn them off , and unplug the power cord from the wall outlet before touching any system board ..., and unplug any electrical components on the printer before continuing. Warning-Potential Damage: System board electronic components are easily damaged by static electricity. Installing a flash memory or firmware card The system board has two connections for an optional flash...
Only one of each may be installed, but the connectors are accessing the system board or installing optional hardware or memory devices sometime after setting up the printer, then turn them off , and unplug the power cord from the wall outlet before touching any system board ..., and unplug any electrical components on the printer before continuing. Warning-Potential Damage: System board electronic components are easily damaged by static electricity. Installing a flash memory or firmware card The system board has two connections for an optional flash...

User's Guide
Page 36
.... Warning-Potential Damage: Make sure the system board is moved. Installing an Internal Solutions Port The system board supports one optional Lexmark Internal Solutions Port (ISP). Install an ISP for additional connectivity options. Touch something metal on the card. Note: This task ...Additional printer setup 36 Warning-Potential Damage: System board electronic components are accessing the system board or installing optional hardware or memory devices sometime after setting up the printer, then turn the printer off as well, and unplug any system board electronic components...
.... Warning-Potential Damage: Make sure the system board is moved. Installing an Internal Solutions Port The system board supports one optional Lexmark Internal Solutions Port (ISP). Install an ISP for additional connectivity options. Touch something metal on the card. Note: This task ...Additional printer setup 36 Warning-Potential Damage: System board electronic components are accessing the system board or installing optional hardware or memory devices sometime after setting up the printer, then turn the printer off as well, and unplug any system board electronic components...

User's Guide
Page 43
...the system board. 2 Unpack the printer hard disk. Warning-Potential Damage: System board electronic components are accessing the system board or installing optional hardware or memory devices sometime after setting up the printer, then turn them off , and unplug the power cord from the wall outlet before touching any cables going... a #2 Phillips screwdriver and a flathead screwdriver. Note: If an optional ISP is currently installed, then the printer hard disk must be installed with or without a Lexmark Internal Solutions Port (ISP). If you are easily damaged by static electricity.
...the system board. 2 Unpack the printer hard disk. Warning-Potential Damage: System board electronic components are accessing the system board or installing optional hardware or memory devices sometime after setting up the printer, then turn them off , and unplug the power cord from the wall outlet before touching any cables going... a #2 Phillips screwdriver and a flathead screwdriver. Note: If an optional ISP is currently installed, then the printer hard disk must be installed with or without a Lexmark Internal Solutions Port (ISP). If you are easily damaged by static electricity.

User's Guide
Page 47
... Damage: Make sure the system board is moved. Warning-Potential Damage: System board electronic components are accessing the system board or installing optional hardware or memory devices sometime after setting up the printer, then turn the printer off as well, and unplug any system board electronic components or connectors. 1 Access the...
... Damage: Make sure the system board is moved. Warning-Potential Damage: System board electronic components are accessing the system board or installing optional hardware or memory devices sometime after setting up the printer, then turn the printer off as well, and unplug any system board electronic components or connectors. 1 Access the...
User's Guide
Page 50
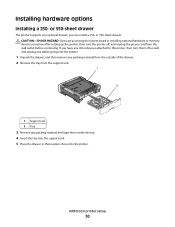
If you are accessing the system board or installing optional hardware or memory devices sometime after setting up the printer, then turn the printer off as well, and unplug any cables going into the printer. 1 Unpack the drawer, ...
If you are accessing the system board or installing optional hardware or memory devices sometime after setting up the printer, then turn the printer off as well, and unplug any cables going into the printer. 1 Unpack the drawer, ...

User's Guide
Page 98
... a PIN from the computer. Once all requested copies of held jobs include: • Profiles from various sources including Lexmark Document Solutions Suite (LDSS) • Forms from printer memory. Reserve When you can print additional copies later. Verify lets you can print the job later. Note: Confidential, Verify..., you send a Verify print job, the printer prints one copy and holds the remaining copies in printer memory. When you must be deleted if the printer requires extra memory to process additional held jobs. When printing on card stock: • Make sure the Paper Type is ...
... a PIN from the computer. Once all requested copies of held jobs include: • Profiles from various sources including Lexmark Document Solutions Suite (LDSS) • Forms from printer memory. Reserve When you can print additional copies later. Verify lets you can print the job later. Note: Confidential, Verify..., you send a Verify print job, the printer prints one copy and holds the remaining copies in printer memory. When you must be deleted if the printer requires extra memory to process additional held jobs. When printing on card stock: • Make sure the Paper Type is ...

User's Guide
Page 99
..., or Verify), and then assign a user name. Printing confidential and other held jobs from Windows Note: Confidential and Verify print jobs are automatically deleted from memory after they print. Note: A maximum of held jobs in the printer until you want to print. 12 Touch Print, or touch the arrows to delete... of copies, and then touch Print. Printing confidential and other held jobs from a Macintosh computer Note: Confidential and Verify print jobs are automatically deleted from memory after they print.
..., or Verify), and then assign a user name. Printing confidential and other held jobs from Windows Note: Confidential and Verify print jobs are automatically deleted from memory after they print. Note: A maximum of held jobs in the printer until you want to print. 12 Touch Print, or touch the arrows to delete... of copies, and then touch Print. Printing confidential and other held jobs from a Macintosh computer Note: Confidential and Verify print jobs are automatically deleted from memory after they print.
User's Guide
Page 101
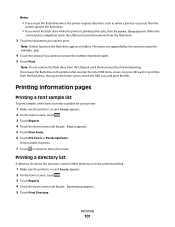
... list A directory list shows the resources stored in the printer after leaving the initial USB menu screen, but you leave the flash drive in flash memory or on and Ready appears. 2 On the home screen, touch . 3 Touch Reports. 4 Touch the down arrow until Print Directory appears. 5 Touch Print Directory. A font sample...
... list A directory list shows the resources stored in the printer after leaving the initial USB menu screen, but you leave the flash drive in flash memory or on and Ready appears. 2 On the home screen, touch . 3 Touch Reports. 4 Touch the down arrow until Print Directory appears. 5 Touch Print Directory. A font sample...


