
Getting Started
Page 3
... Card menu ...31 Using the PictBridge menu ...32 Using the Settings menu ...33 Saving settings ...35 Learning about the software 37 Using the printer software...37 Using the Lexmark Imaging Studio...37 Using the Solution Center...38 Using Printing Preferences...40 Opening Printing Preferences ...40 Using the Save Settings menu ...40 Using...
... Card menu ...31 Using the PictBridge menu ...32 Using the Settings menu ...33 Saving settings ...35 Learning about the software 37 Using the printer software...37 Using the Lexmark Imaging Studio...37 Using the Solution Center...38 Using Printing Preferences...40 Opening Printing Preferences ...40 Using the Save Settings menu ...40 Using...
Getting Started
Page 4
...only) ...52 Wi-Fi indicator light is orange ...53 Wi-Fi indicator light is blinking orange during installation 54 Wireless network printer does not print ...57 Wireless printer is no longer working...58 Photos do not transfer from a memory card across a wireless network 63 Changing wireless settings after...an internal wireless print server to factory default settings 65 Uninstalling and reinstalling the software 66 Advanced wireless setup 68 Adding a printer to an existing ad hoc wireless network 68 Creating an ad hoc wireless network 69 Notices...72 Edition notice...72 Networking glossary...73 ...
...only) ...52 Wi-Fi indicator light is orange ...53 Wi-Fi indicator light is blinking orange during installation 54 Wireless network printer does not print ...57 Wireless printer is no longer working...58 Photos do not transfer from a memory card across a wireless network 63 Changing wireless settings after...an internal wireless print server to factory default settings 65 Uninstalling and reinstalling the software 66 Advanced wireless setup 68 Adding a printer to an existing ad hoc wireless network 68 Creating an ad hoc wireless network 69 Notices...72 Edition notice...72 Networking glossary...73 ...
Getting Started
Page 5
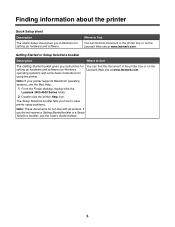
...this document in the printer box or on the Lexmark Web site at www.lexmark.com. The Setup Solutions booklet tells you did not receive a Getting Started booklet or a Setup Solutions booklet, see the Mac Help: 1 From the Finder desktop, double-click the Lexmark 3500-4500 Series folder.... 2 Double-click the printer Help icon. If you how to find this document in the printer box or on the Lexmark Web site at www.lexmark.com. Finding information about the printer Quick Setup sheet Description The Quick Setup...
...this document in the printer box or on the Lexmark Web site at www.lexmark.com. The Setup Solutions booklet tells you did not receive a Getting Started booklet or a Setup Solutions booklet, see the Mac Help: 1 From the Finder desktop, double-click the Lexmark 3500-4500 Series folder.... 2 Double-click the printer Help icon. If you how to find this document in the printer box or on the Lexmark Web site at www.lexmark.com. Finding information about the printer Quick Setup sheet Description The Quick Setup...
Getting Started
Page 6
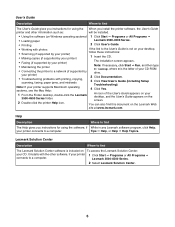
... for using the software, if While in any Lexmark software program, click Help, your printer connects to find this document on the Lexmark Web site at www.lexmark.com. You can also find The Lexmark Solution Center software is the letter of the User... Run, and then type D:\setup, where D is included on To access the Lexmark Solution Center: your CD. Lexmark 3500-4500 Series. 2 Select Lexmark Solution Center. 6 Lexmark Solution Center Description Where to a computer. your printer supports Macintosh operating systems, see the Mac Help: 4 Click Yes. 1 From the...
... for using the software, if While in any Lexmark software program, click Help, your printer connects to find this document on the Lexmark Web site at www.lexmark.com. You can also find The Lexmark Solution Center software is the letter of the User... Run, and then type D:\setup, where D is included on To access the Lexmark Solution Center: your CD. Lexmark 3500-4500 Series. 2 Select Lexmark Solution Center. 6 Lexmark Solution Center Description Where to a computer. your printer supports Macintosh operating systems, see the Mac Help: 4 Click Yes. 1 From the...
Getting Started
Page 7
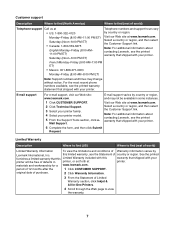
... Saturday (Noon-6:00 PM ET) Telephone numbers and support hours vary by Lexmark International, Inc. Note: For additional information about contacting Lexmark, see the printed warranty statement that shipped with your printer model. 5 From the Support Tools section, click e- See the printed furnishes... this limited warranty, see the printed warranty that shipped with your printer. 6 Complete the form, and then click Submit Request. Mail Support. Note: For additional information about contacting Lexmark, see the Statement of Warranty information varies by country or region....
... Saturday (Noon-6:00 PM ET) Telephone numbers and support hours vary by Lexmark International, Inc. Note: For additional information about contacting Lexmark, see the printed warranty statement that shipped with your printer model. 5 From the Support Tools section, click e- See the printed furnishes... this limited warranty, see the printed warranty that shipped with your printer. 6 Complete the form, and then click Submit Request. Mail Support. Note: For additional information about contacting Lexmark, see the Statement of Warranty information varies by country or region....

Getting Started
Page 8
Record the following information (located on the store receipt and the back of the printer), and have it ready when you contact us so that we may serve you faster: • Machine Type number • Serial number • Date purchased • Store where purchased 8
Record the following information (located on the store receipt and the back of the printer), and have it ready when you contact us so that we may serve you faster: • Machine Type number • Serial number • Date purchased • Store where purchased 8
Getting Started
Page 9
...system" on page 9. • For printing on a Macintosh operating system or without a computer, see "Setting up the printer on a Macintosh operating system or without a computer" on page 11. Setting up the printer If you are the things you need to set it up on another computer on page 19. Setting up... is also known as security key, WEP key, or WPA key. Use the table below to write down the information you previously set up the printer with the wireless network, or contact the person who set up your network secure. This password is connected to your wireless network. 2 Know the...
...system" on page 9. • For printing on a Macintosh operating system or without a computer, see "Setting up the printer on a Macintosh operating system or without a computer" on page 11. Setting up the printer If you are the things you need to set it up on another computer on page 19. Setting up... is also known as security key, WEP key, or WPA key. Use the table below to write down the information you previously set up the printer with the wireless network, or contact the person who set up your network secure. This password is connected to your wireless network. 2 Know the...
Getting Started
Page 10
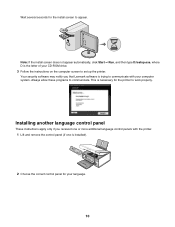
..., and then type D:\setup.exe, where D is necessary for the printer to work properly. Installing another language control panel These instructions apply only if you that Lexmark software is trying to set up the printer. Your security software may notify you received one or more additional language control... panels with your CD-ROM drive. 3 Follow the instructions on the computer screen to communicate with the printer. 1 Lift and remove...
..., and then type D:\setup.exe, where D is necessary for the printer to work properly. Installing another language control panel These instructions apply only if you that Lexmark software is trying to set up the printer. Your security software may notify you received one or more additional language control... panels with your CD-ROM drive. 3 Follow the instructions on the computer screen to communicate with the printer. 1 Lift and remove...
Getting Started
Page 11
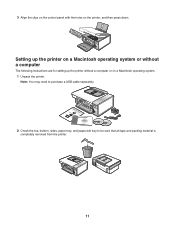
Setting up the printer on a Macintosh operating system or without a computer The following instructions are for setting up the printer without a computer or on the printer, and then press down. 3 Align the clips on the control panel with the holes on a Macintosh operating system. 1 Unpack the printer. Note: You may need to purchase a USB cable separately. 1 2 3 2 Check the top, bottom, sides, paper tray, and paper exit tray to be sure that all tape and packing material is completely removed from the printer. 11
Setting up the printer on a Macintosh operating system or without a computer The following instructions are for setting up the printer without a computer or on the printer, and then press down. 3 Align the clips on the control panel with the holes on a Macintosh operating system. 1 Unpack the printer. Note: You may need to purchase a USB cable separately. 1 2 3 2 Check the top, bottom, sides, paper tray, and paper exit tray to be sure that all tape and packing material is completely removed from the printer. 11
Getting Started
Page 13
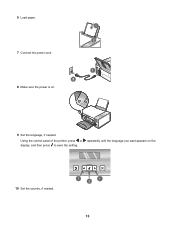
Using the control panel of the printer, press or display, and then press to save the setting. repeatedly until the language you want appears on . 9 Set the language, if needed . 1 1 2 13 6 Load paper. 1 2 7 Connect the power cord. 8 Make sure the power is on the 10 Set the country, if needed .
Using the control panel of the printer, press or display, and then press to save the setting. repeatedly until the language you want appears on . 9 Set the language, if needed . 1 1 2 13 6 Load paper. 1 2 7 Connect the power cord. 8 Make sure the power is on the 10 Set the country, if needed .
Getting Started
Page 14
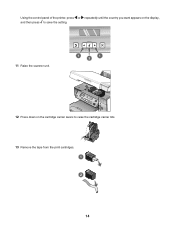
Using the control panel of the printer, press or repeatedly until the country you want appears on the display, and then press to save the setting. 11 Raise the scanner unit. 1 1 2 12 Press down on the cartridge carrier levers to raise the cartridge carrier lids. 13 Remove the tape from the print cartridges. 1 2 14
Using the control panel of the printer, press or repeatedly until the country you want appears on the display, and then press to save the setting. 11 Raise the scanner unit. 1 1 2 12 Press down on the cartridge carrier levers to raise the cartridge carrier lids. 13 Remove the tape from the print cartridges. 1 2 14
Getting Started
Page 15
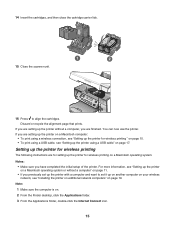
... cartridge carrier lids. 15 Close the scanner unit. 16 Press to set it up the printer on a Macintosh operating system or without a computer, you are finished. If you are for setting up the printer for wireless printing " on page 15. • To print using a USB cable, see... "Setting up the printer without a computer" on . 2 From the Finder desktop, click the Applications folder. 3 From the ...
... cartridge carrier lids. 15 Close the scanner unit. 16 Press to set it up the printer on a Macintosh operating system or without a computer, you are finished. If you are for setting up the printer for wireless printing " on page 15. • To print using a USB cable, see... "Setting up the printer without a computer" on . 2 From the Finder desktop, click the Applications folder. 3 From the ...
Getting Started
Page 16
... base station. • If you do not know this information, see the documentation that came with other wireless devices c Select the type of the printer's MAC address. b For BSS (Basic Service Set) Type, select • Infrastructure if your wireless network uses a wireless access point (wireless router)...must enter a hexadecimal key. Notes: • You may need to enter the password for Macintosh. 18 From the Finder desktop, double-click the Lexmark 3500-4500 Series Installer icon. 19 Double-click the Install icon. 16 4 From the toolbar, click the AirPort icon. 5 From the Network pop...
... base station. • If you do not know this information, see the documentation that came with other wireless devices c Select the type of the printer's MAC address. b For BSS (Basic Service Set) Type, select • Infrastructure if your wireless network uses a wireless access point (wireless router)...must enter a hexadecimal key. Notes: • You may need to enter the password for Macintosh. 18 From the Finder desktop, double-click the Lexmark 3500-4500 Series Installer icon. 19 Double-click the Install icon. 16 4 From the toolbar, click the AirPort icon. 5 From the Network pop...
Getting Started
Page 17
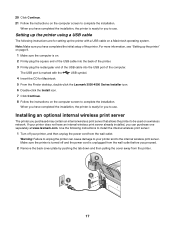
...wireless print server already installed, you can cause damage to unplug the printer can purchase one separately at www.lexmark.com. Warning: Failure to your printer, and then unplug the power cord from the printer. 17 The USB port is unplugged from the wall outlet before you...for Macintosh. 5 From the Finder desktop, double-click the Lexmark 3500-4500 Series Installer icon. 6 Double-click the Install icon. 7 Click Continue. 8 Follow the instructions on a wireless network. For more information, see "Setting up the printer with the USB symbol. 4 Insert the CD for setting ...
...wireless print server already installed, you can cause damage to unplug the printer can purchase one separately at www.lexmark.com. Warning: Failure to your printer, and then unplug the power cord from the printer. 17 The USB port is unplugged from the wall outlet before you...for Macintosh. 5 From the Finder desktop, double-click the Lexmark 3500-4500 Series Installer icon. 6 Double-click the Install icon. 7 Click Continue. 8 Follow the instructions on a wireless network. For more information, see "Setting up the printer with the USB symbol. 4 Insert the CD for setting ...

Getting Started
Page 18
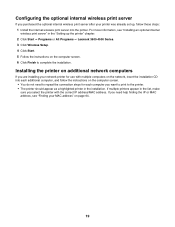
... before you purchased the optional internal wireless print server separately and have already installed the printer: a Click Start ΠPrograms or All Programs ΠLexmark 3500-4500 Series. b Click Wireless Setup. Save the packaging materials. 3 Unpack the internal wireless print server. Warning: Wireless print servers are easily damaged by static ...
... before you purchased the optional internal wireless print server separately and have already installed the printer: a Click Start ΠPrograms or All Programs ΠLexmark 3500-4500 Series. b Click Wireless Setup. Save the packaging materials. 3 Unpack the internal wireless print server. Warning: Wireless print servers are easily damaged by static ...
Getting Started
Page 19
...server after your MAC address" on page 64. 19 For more information, see "Finding your printer was already set up the printer" chapter. 2 Click Start ΠPrograms or All Programs ΠLexmark 3500-4500 Series. 3 Click Wireless Setup. 4 Click Start. 5 Follow the instructions on ...the computer screen. 6 Click Finish to complete the installation. Configuring the optional internal wireless print server If you select the printer with multiple computers on the ...
...server after your MAC address" on page 64. 19 For more information, see "Finding your printer was already set up the printer" chapter. 2 Click Start ΠPrograms or All Programs ΠLexmark 3500-4500 Series. 3 Click Wireless Setup. 4 Click Start. 5 Follow the instructions on ...the computer screen. 6 Click Finish to complete the installation. Configuring the optional internal wireless print server If you select the printer with multiple computers on the ...
Getting Started
Page 20
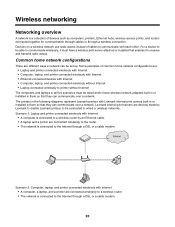
... communicate over a network. Scenario 2: Computer, laptop, and printer connected wirelessly with Lexmark internal print servers built in or installed in the following diagrams represent Lexmark printers with Internet • A computer, a laptop, and a printer are different ways a network can communicate over a network.... computer is connected to a wireless router by an Ethernet cable. • A laptop and a printer are devices made by Lexmark to enable Lexmark printers to a wireless router. • The network is a collection of common home network configurations are: • Laptop...
... communicate over a network. Scenario 2: Computer, laptop, and printer connected wirelessly with Lexmark internal print servers built in or installed in the following diagrams represent Lexmark printers with Internet • A computer, a laptop, and a printer are different ways a network can communicate over a network.... computer is connected to a wireless router by an Ethernet cable. • A laptop and a printer are devices made by Lexmark to enable Lexmark printers to a wireless router. • The network is a collection of common home network configurations are: • Laptop...
Getting Started
Page 21
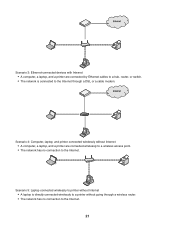
... Internet • A laptop is directly connected wirelessly to a printer without Internet • A computer, a laptop, and a printer are connected by Ethernet cables to a hub, router, or switch. • The network is connected to the Internet through a wireless router. &#...8226; The network has no connection to the Internet. Scenario 3: Ethernet-connected devices with Internet • A computer, a laptop, and a printer are connected wirelessly to a wireless access point. • The network has no connection to the Internet. 21 Scenario 4: Computer, laptop, and...
... Internet • A laptop is directly connected wirelessly to a printer without Internet • A computer, a laptop, and a printer are connected by Ethernet cables to a hub, router, or switch. • The network is connected to the Internet through a wireless router. &#...8226; The network has no connection to the Internet. Scenario 3: Ethernet-connected devices with Internet • A computer, a laptop, and a printer are connected wirelessly to a wireless access point. • The network has no connection to the Internet. 21 Scenario 4: Computer, laptop, and...
Getting Started
Page 22
... with each other , the more likely it from other . IP addresses An IP address is a unique number used by printing out the printer's network setup page. MAC address Most network equipment has a unique hardware identification number to locate and communicate with each other devices on the ... This is called the network name. Printing a network setup page A network setup page lists your configuration settings. Many factors can locate the printer's IP address by devices on an IP network to distinguish it is that allows devices to join the same wireless network. The IP address ...
... with each other , the more likely it from other . IP addresses An IP address is a unique number used by printing out the printer's network setup page. MAC address Most network equipment has a unique hardware identification number to locate and communicate with each other devices on the ... This is called the network name. Printing a network setup page A network setup page lists your configuration settings. Many factors can locate the printer's IP address by devices on an IP network to distinguish it is that allows devices to join the same wireless network. The IP address ...
Getting Started
Page 23
... and share the same SSID and channel. appears. d Check that the printer has an IP address. Lexmark recommends setting up in infrastructure mode using the installation CD that start with the printer. Characteristics Communication Security Range Speed Infrastructure Ad hoc Through wireless access point ..." section of communication is set to the ping, several seconds "Request timed out." This mode of the "Troubleshooting" chapter. If the printer does not respond: a Print a setup page. In addition, they must have a valid IP address and be configured with an ad ...
... and share the same SSID and channel. appears. d Check that the printer has an IP address. Lexmark recommends setting up in infrastructure mode using the installation CD that start with the printer. Characteristics Communication Security Range Speed Infrastructure Ad hoc Through wireless access point ..." section of communication is set to the ping, several seconds "Request timed out." This mode of the "Troubleshooting" chapter. If the printer does not respond: a Print a setup page. In addition, they must have a valid IP address and be configured with an ad ...


