
Troubleshooting Guide
Page 3
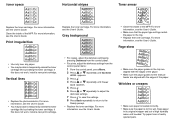
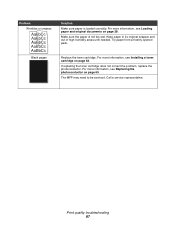
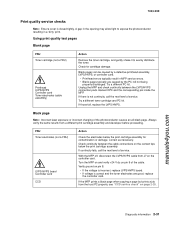
...'s Guide. • You may be able to the Ready prompt. • Replace the toner cartridge. Vertical lines AaBbCc AaBbCc AaBbCc AaBbCc AaBbCc • Replace the photoconductor. Clean the inside of high humidity areas until Toner Dark appears. 5 Press . 6 Press or repeatedly to adjust the darkness settings. 7 Press to save the settings...
...'s Guide. • You may be able to the Ready prompt. • Replace the toner cartridge. Vertical lines AaBbCc AaBbCc AaBbCc AaBbCc AaBbCc • Replace the photoconductor. Clean the inside of high humidity areas until Toner Dark appears. 5 Press . 6 Press or repeatedly to adjust the darkness settings. 7 Press to save the settings...

Troubleshooting Guide
Page 4
... sending a fax. • To ensure the printer is an error message, see the User's Guide. • If replacing the toner cartridge does not correct the problem, replace the photoconductor. For more information, see the User's Guide.... • Make sure the MFP is set as the default printer and is done before sending or receiving a fax. Handset - or Click Start Control Panel Printers and Other Hardware Printers and Faxes. 2 Double-click the Lexmark X340/X340n/ X342n icon. 3 Click Printer...
... sending a fax. • To ensure the printer is an error message, see the User's Guide. • If replacing the toner cartridge does not correct the problem, replace the photoconductor. For more information, see the User's Guide.... • Make sure the MFP is set as the default printer and is done before sending or receiving a fax. Handset - or Click Start Control Panel Printers and Other Hardware Printers and Faxes. 2 Double-click the Lexmark X340/X340n/ X342n icon. 3 Click Printer...

User's Guide
Page 5
... options 59 Chapter 9: Maintaining the MFP 61 Removing a toner cartridge 61 Installing a toner cartridge 62 Redistributing toner ...63 Replacing the photoconductor 65 Cleaning the MFP ...67 Cleaning the scanner glass 67 Cleaning the outside of the MFP 67 Cleaning the inside of the MFP ...68 Ordering supplies ...70 Recycling Lexmark products 70 Chapter 10: Troubleshooting 71 Setup troubleshooting ...72 Removing and reinstalling the drivers software 74 Jams and misfeeds troubleshooting 75 Clearing...
... options 59 Chapter 9: Maintaining the MFP 61 Removing a toner cartridge 61 Installing a toner cartridge 62 Redistributing toner ...63 Replacing the photoconductor 65 Cleaning the MFP ...67 Cleaning the scanner glass 67 Cleaning the outside of the MFP 67 Cleaning the inside of the MFP ...68 Ordering supplies ...70 Recycling Lexmark products 70 Chapter 10: Troubleshooting 71 Setup troubleshooting ...72 Removing and reinstalling the drivers software 74 Jams and misfeeds troubleshooting 75 Clearing...

User's Guide
Page 65
Replacing the photoconductor 1 Press the access button on the left side of the MFP, and open the front cover. 1 2 2 Pull on the handle to remove the print cartridge assembly. 3 Place the print cartridge assembly on a flat, clean surface. Replacing the photoconductor 65
Replacing the photoconductor 1 Press the access button on the left side of the MFP, and open the front cover. 1 2 2 Pull on the handle to remove the print cartridge assembly. 3 Place the print cartridge assembly on a flat, clean surface. Replacing the photoconductor 65
User's Guide
Page 66
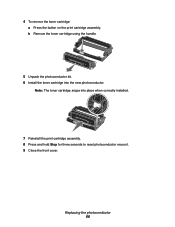
Replacing the photoconductor 66 4 To remove the toner cartridge: a Press the button on the print cartridge assembly. b Remove the toner cartridge using the handle. 5 Unpack the photoconductor kit. 6 Install the toner cartridge into place when correctly installed. 7 Reinstall the print cartridge assembly. 8 Press and hold Stop for three seconds to reset photoconductor recount. 9 Close the front cover. Note: The toner cartridge snaps into the new photoconductor.
Replacing the photoconductor 66 4 To remove the toner cartridge: a Press the button on the print cartridge assembly. b Remove the toner cartridge using the handle. 5 Unpack the photoconductor kit. 6 Install the toner cartridge into place when correctly installed. 7 Reinstall the print cartridge assembly. 8 Press and hold Stop for three seconds to reset photoconductor recount. 9 Close the front cover. Note: The toner cartridge snaps into the new photoconductor.
User's Guide
Page 68
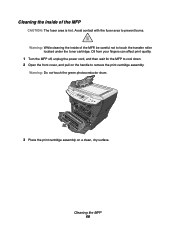
..., and then wait for the MFP to cool down. 2 Open the front cover, and pull on a clean, dry surface. Warning: Do not touch the green photoconductor drum. 3 Place the print cartridge assembly on the handle to prevent burns. Warning: While cleaning the inside of the MFP, be careful not to touch...
..., and then wait for the MFP to cool down. 2 Open the front cover, and pull on a clean, dry surface. Warning: Do not touch the green photoconductor drum. 3 Place the print cartridge assembly on the handle to prevent burns. Warning: While cleaning the inside of the MFP, be careful not to touch...
User's Guide
Page 70
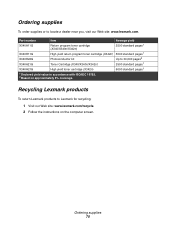
... standard pages1 X340H11G High yield return program toner cartridge (X342n) 6000 standard pages1 X340H22G Photoconductor kit Up to locate a dealer near you, visit our Web site: www.lexmark.com. Recycling Lexmark products To return Lexmark products to Lexmark for recycling: 1 Visit our Web site: www.lexmark.com/recycle. 2 Follow the instructions on approximately 5% coverage. Ordering supplies 70...
... standard pages1 X340H11G High yield return program toner cartridge (X342n) 6000 standard pages1 X340H22G Photoconductor kit Up to locate a dealer near you, visit our Web site: www.lexmark.com. Recycling Lexmark products To return Lexmark products to Lexmark for recycling: 1 Visit our Web site: www.lexmark.com/recycle. 2 Follow the instructions on approximately 5% coverage. Ordering supplies 70...

User's Guide
Page 85
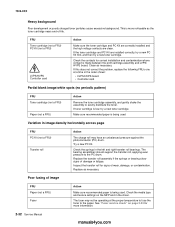
... Solution You may be able to temporarily extend the toner cartridge life by redistributing the toner. Install a new toner cartridge. Replace the photoconductor. For more information, see Replacing the photoconductor on page 62. For more information, see Installing a toner cartridge on page 62. Make sure the front door is securely latched on...
... Solution You may be able to temporarily extend the toner cartridge life by redistributing the toner. Install a new toner cartridge. Replace the photoconductor. For more information, see Replacing the photoconductor on page 62. For more information, see Installing a toner cartridge on page 62. Make sure the front door is securely latched on...
User's Guide
Page 87
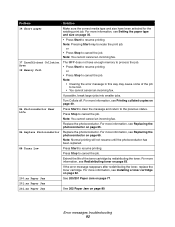
... may need to be serviced. If replacing the toner cartridge does not correct the problem, replace the photoconductor. For more information, see Installing a toner cartridge on page 62. For more information, see Replacing the photoconductor on page 28. For more information, see Loading paper and original documents on page 65. Problem Wrinkles...
... may need to be serviced. If replacing the toner cartridge does not correct the problem, replace the photoconductor. For more information, see Installing a toner cartridge on page 62. For more information, see Replacing the photoconductor on page 28. For more information, see Loading paper and original documents on page 65. Problem Wrinkles...
User's Guide
Page 92
... Start may cause some of the toner cartridge by redistributing the toner. Press Stop to resume printing. For more information, see Replacing the photoconductor on page 63. Note: You cannot cancel an incoming fax. 37 Insufficient Collation Area 38 Memory Full The MFP does not have been selected... way may truncate the print job. For more information, see Redistributing toner on page 65. Note: Normal printing will not resume until the photoconductor has been replaced. 88 Toner Low Press Start to cancel the job. Extend the life of the job to be lost. • You...
... Start may cause some of the toner cartridge by redistributing the toner. Press Stop to resume printing. For more information, see Replacing the photoconductor on page 63. Note: You cannot cancel an incoming fax. 37 Insufficient Collation Area 38 Memory Full The MFP does not have been selected... way may truncate the print job. For more information, see Redistributing toner on page 65. Note: Normal printing will not resume until the photoconductor has been replaced. 88 Toner Low Press Start to cancel the job. Extend the life of the job to be lost. • You...
User's Guide
Page 103
Index Load Media 91 Memory Full 92 No Answer 91 No Dial Tone 91 Photoconductor Near Life 92 Qlink Not Found 91 Replace Photoconductor 92 Short Paper 92 Toner Low 92 Unsupported Toner Cartridge 91 USB Not Connected 91 error messages troubleshooting 91 F fax activity reports 47 Fax Advanced ...
Index Load Media 91 Memory Full 92 No Answer 91 No Dial Tone 91 Photoconductor Near Life 92 Qlink Not Found 91 Replace Photoconductor 92 Short Paper 92 Toner Low 92 Unsupported Toner Cartridge 91 USB Not Connected 91 error messages troubleshooting 91 F fax activity reports 47 Fax Advanced ...
User's Guide
Page 104
... 62 ordering 70 recycling 70 redistributing toner 63 removing 61 transparencies printing 40 troubleshooting copy 84 104 editing 48 printing 48 searching 48 photoconductor, replacing 65 power supply port 19 prefix 45 Presto! PageManager 27 print cartridge assembly 65 print properties opening 26 tabs 26 using ...40 Q QLINK, using 27 R rear cover 19 rear output slot 38 rear paper exit 38 receiving a fax automatically 45 manually 46 recycling Lexmark products 70 redistributing toner 63 reducing an image 53 removing software 74 toner cartridge 61 reports fax activity 47 Fax Call log 47 Fax Job...
... 62 ordering 70 recycling 70 redistributing toner 63 removing 61 transparencies printing 40 troubleshooting copy 84 104 editing 48 printing 48 searching 48 photoconductor, replacing 65 power supply port 19 prefix 45 Presto! PageManager 27 print cartridge assembly 65 print properties opening 26 tabs 26 using ...40 Q QLINK, using 27 R rear cover 19 rear output slot 38 rear paper exit 38 receiving a fax automatically 45 manually 46 recycling Lexmark products 70 redistributing toner 63 reducing an image 53 removing software 74 toner cartridge 61 reports fax activity 47 Fax Call log 47 Fax Job...

Service Manual
Page 17
... capacity Item 7003-100 Lexmark X340 7003-050 Lexmark X340n 7003-110 Lexmark X342n Available input trays 250-sheet tray 4 4 4 Single-sheet manual 4 4 4 feeder 550-sheet optional drawer 4 4 4 Toner and photoconductor Toner cartridge yield 1,500 pages* (X 340 starter toner cartridge) 2500 pages (X 342n starter toner cartridge) 2500 pages (X340, X340n, and X342n replacement cartridge) 6000 pages...
... capacity Item 7003-100 Lexmark X340 7003-050 Lexmark X340n 7003-110 Lexmark X342n Available input trays 250-sheet tray 4 4 4 Single-sheet manual 4 4 4 feeder 550-sheet optional drawer 4 4 4 Toner and photoconductor Toner cartridge yield 1,500 pages* (X 340 starter toner cartridge) 2500 pages (X 342n starter toner cartridge) 2500 pages (X340, X340n, and X342n replacement cartridge) 6000 pages...

Service Manual
Page 33
... USB port. • Press Menu until the menus are entered or the MFP is insufficient memory available to print the formatted data. The photoconductor must be taken: • Press or Start to clear the message and continue printing. • Press Stop to clear the message and continue... at the end of further errors is suppressed until Busy/Waiting appears, and select Reset Printer. 84 Photoconductor Life Warning This message displays when the photoconductor unit is detected, but the port has been disabled. The following actions may cause data loss. 54 Std Network Software Error This...
... USB port. • Press Menu until the menus are entered or the MFP is insufficient memory available to print the formatted data. The photoconductor must be taken: • Press or Start to clear the message and continue printing. • Press Stop to clear the message and continue... at the end of further errors is suppressed until Busy/Waiting appears, and select Reset Printer. 84 Photoconductor Life Warning This message displays when the photoconductor unit is detected, but the port has been disabled. The following actions may cause data loss. 54 Std Network Software Error This...
Service Manual
Page 53
...(not a FRU) Printhead LVPS/HVPS Controller card Toner electrodes (cable assembly) Action Remove the toner cartridge, and gently shake it to expose the photoconductor resulting in MFP service errors. • Blank pages typically are good, replace the controller card. Try a different PC kit. Unplug the MFP ...cartridge damage. A gap in the opening may allow light to evenly distribute the toner. If continuity fails, call the next level of the photoconductor causes an all-black page. Always verify the same results from the host PC properly, see "CCD service check" on the controller card...
...(not a FRU) Printhead LVPS/HVPS Controller card Toner electrodes (cable assembly) Action Remove the toner cartridge, and gently shake it to expose the photoconductor resulting in MFP service errors. • Blank pages typically are good, replace the controller card. Try a different PC kit. Unplug the MFP ...cartridge damage. A gap in the opening may allow light to evenly distribute the toner. If continuity fails, call the next level of the photoconductor causes an all-black page. Always verify the same results from the host PC properly, see "CCD service check" on the controller card...
Service Manual
Page 54
... a FRU) Transfer roll Action The charge roll may not be operating at a time in the driver. The fuser may have an unbalanced pressure against the photoconductor (PC) drum. This is low, try a new toner cartridge. FRU Toner cartridge (not a FRU) PC Kit (not a FRU) LVPS/HVPS Controller card Action Make sure...
... a FRU) Transfer roll Action The charge roll may not be operating at a time in the driver. The fuser may have an unbalanced pressure against the photoconductor (PC) drum. This is low, try a new toner cartridge. FRU Toner cartridge (not a FRU) PC Kit (not a FRU) LVPS/HVPS Controller card Action Make sure...

Service Manual
Page 158
... roll 2-38 service error codes 2-7 service menus X340⁄ 342n 3-1 special tools 1-7 specifications description description 1-1 photoconductor capacity 1-3 toner capacity 1-3 start 2-1 Start button 2-5 Stop button 2-5 sub error codes 2-14 symptoms MFP 2-2 MFP POSTsymptoms 2-2 POST symptoms 2-2 T taking printer offline 2-5 with Stop button 2-5 tires removal 4-19 tools 1-7 Top cover removal 4-11 transfer roll removal 4-33...
... roll 2-38 service error codes 2-7 service menus X340⁄ 342n 3-1 special tools 1-7 specifications description description 1-1 photoconductor capacity 1-3 toner capacity 1-3 start 2-1 Start button 2-5 Stop button 2-5 sub error codes 2-14 symptoms MFP 2-2 MFP POSTsymptoms 2-2 POST symptoms 2-2 T taking printer offline 2-5 with Stop button 2-5 tires removal 4-19 tools 1-7 Top cover removal 4-11 transfer roll removal 4-33...


