
Sending a fax using the computer
Page 1
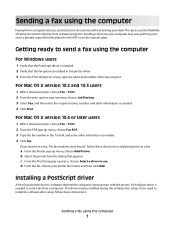
... placed in the ADF or on the scanner glass. For Mac OS X version 10.4 or later users 1 With a document open , choose File > Print. 2 From the print options pop-up menu, choose Job Routing. 3 Select Fax, and then enter the recipient name, number, and other information as a fax: a From the Printer pop-up menu, choose Fax PDF. 3 Type the fax number in the printer driver. 3 From the Print dialog Fax screen, type the name and number of faxing documents directly from software programs. Sending a fax from the...
... placed in the ADF or on the scanner glass. For Mac OS X version 10.4 or later users 1 With a document open , choose File > Print. 2 From the print options pop-up menu, choose Job Routing. 3 Select Fax, and then enter the recipient name, number, and other information as a fax: a From the Printer pop-up menu, choose Fax PDF. 3 Type the fax number in the printer driver. 3 From the Print dialog Fax screen, type the name and number of faxing documents directly from software programs. Sending a fax from the...
Troubleshooting Guide
Page 1
.... 1 Disconnect the USB cable from the MFP. 3 Plug the cord all open software applications. 2 Temporarily disable any Add New Hardware screens appear, click Cancel. 6 Eject and reinsert the software CD. 7 Reconnect the USB cable to help prevent document and paper jams. • Use only recommended print materials. • Do not mix paper types in the paper tray and the manual feeder. • Do not overload the paper tray. Display is not lit 1 Turn off the MFP. 2 Disconnect the power supply cord...
.... 1 Disconnect the USB cable from the MFP. 3 Plug the cord all open software applications. 2 Temporarily disable any Add New Hardware screens appear, click Cancel. 6 Eject and reinsert the software CD. 7 Reconnect the USB cable to help prevent document and paper jams. • Use only recommended print materials. • Do not mix paper types in the paper tray and the manual feeder. • Do not overload the paper tray. Display is not lit 1 Turn off the MFP. 2 Disconnect the power supply cord...

Troubleshooting Guide
Page 2
...; Make sure the toner cartridge is loaded correctly. • Load a smaller amount of paper into the MFP. Print speed is set as the default printer. 1 Click Start Settings Printers and Faxes or Printers. For more information, see "Removing and reinstalling the drivers software" on a level surface Paper does not feed • Make sure paper is installed correctly. See the User's Guide for more information, see the User's Guide. • Only use . • Minimize the number and size of paper for loading by...
...; Make sure the toner cartridge is loaded correctly. • Load a smaller amount of paper into the MFP. Print speed is set as the default printer. 1 Click Start Settings Printers and Faxes or Printers. For more information, see "Removing and reinstalling the drivers software" on a level surface Paper does not feed • Make sure paper is installed correctly. See the User's Guide for more information, see the User's Guide. • Only use . • Minimize the number and size of paper for loading by...

Troubleshooting Guide
Page 4
...; Make sure cable connections for and clear any faxes that have been stored in use . 3 Click Edit. 4 Under Resolution, select a lower number. 5 Click OK. 6 Click Scan Now. Scan was unsuccessful • Restart the computer. • Remove and reinstall the software. Partial document scans • Make sure the document is an error message, see the User's Guide. • Make sure the MFP is set as the default printer and is loaded correctly into the ADF or on page 1. Power...
...; Make sure cable connections for and clear any faxes that have been stored in use . 3 Click Edit. 4 Under Resolution, select a lower number. 5 Click OK. 6 Click Scan Now. Scan was unsuccessful • Restart the computer. • Remove and reinstall the software. Partial document scans • Make sure the document is an error message, see the User's Guide. • Make sure the MFP is set as the default printer and is loaded correctly into the ADF or on page 1. Power...
User's Guide
Page 3
... to fax 14 Connecting directly to a telephone wall jack 14 Connecting to a telephone 15 Getting the MFP ready to copy 16 Chapter 3: Learning about the MFP 17 Understanding the parts of the MFP 17 Using the control panel buttons 20 Using the control panel menus 22 Navigating the control panel menus 22 Printing a list of menu items 22 Printing a network setup page (X342n only 22 Changing the default mode 24 Setting the Timeout option 24 Setting the network options (X342n only 25 Using the MFP software 26 Using Print...
... to fax 14 Connecting directly to a telephone wall jack 14 Connecting to a telephone 15 Getting the MFP ready to copy 16 Chapter 3: Learning about the MFP 17 Understanding the parts of the MFP 17 Using the control panel buttons 20 Using the control panel menus 22 Navigating the control panel menus 22 Printing a list of menu items 22 Printing a network setup page (X342n only 22 Changing the default mode 24 Setting the Timeout option 24 Setting the network options (X342n only 25 Using the MFP software 26 Using Print...
User's Guide
Page 7
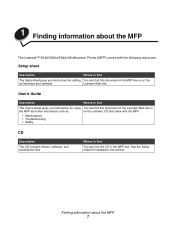
Finding information about the MFP The Lexmark™ X340/X340n/X342n Multifunction Printer (MFP) comes with the MFP. • Maintenance • Troubleshooting • Safety CD Description The CD contains drivers, software, and publications files. See the Setup sheet for using You can find this CD in the MFP box. User's Guide Description Where to find You can find this document on the Lexmark Web site or the MFP and other information such...
Finding information about the MFP The Lexmark™ X340/X340n/X342n Multifunction Printer (MFP) comes with the MFP. • Maintenance • Troubleshooting • Safety CD Description The CD contains drivers, software, and publications files. See the Setup sheet for using You can find this CD in the MFP box. User's Guide Description Where to find You can find this document on the Lexmark Web site or the MFP and other information such...
User's Guide
Page 12
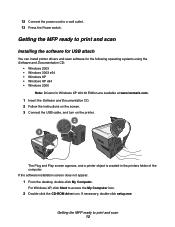
... Connect the power cord to access the My Computer icon. 2 Double-click the CD-ROM drive icon. If the software installation screen does not appear: 1 From the desktop, double-click My Computer. Getting the MFP ready to print and scan 12 Getting the MFP ready to print and scan Installing the software for USB attach You can install printer drivers and scan software for the following operating systems using the Software and Documentation CD: • Windows 2003 • Windows...
... Connect the power cord to access the My Computer icon. 2 Double-click the CD-ROM drive icon. If the software installation screen does not appear: 1 From the desktop, double-click My Computer. Getting the MFP ready to print and scan 12 Getting the MFP ready to print and scan Installing the software for USB attach You can install printer drivers and scan software for the following operating systems using the Software and Documentation CD: • Windows 2003 • Windows...
User's Guide
Page 13
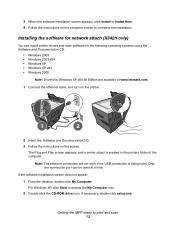
... connection port can install printer drivers and scan software for the following operating systems using the Software and Documentation CD: • Windows 2003 • Windows 2003 x64 • Windows XP • Windows XP x64 • Windows 2000 Note: Drivers for network attach (X342n only) You can be used . Note: The ethernet connection will not work if the USB connection is created in the printers folder of the computer. 3 When the software installation screen appears, click Install or Install Now. 4 Follow the instructions...
... connection port can install printer drivers and scan software for the following operating systems using the Software and Documentation CD: • Windows 2003 • Windows 2003 x64 • Windows XP • Windows XP x64 • Windows 2000 Note: Drivers for network attach (X342n only) You can be used . Note: The ethernet connection will not work if the USB connection is created in the printers folder of the computer. 3 When the software installation screen appears, click Install or Install Now. 4 Follow the instructions...
User's Guide
Page 24
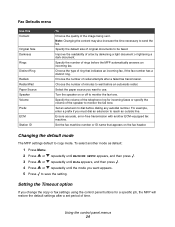
... of the telephone ring for a specific job, the MFP will restore the default settings after a failed fax transmission. Ensure accurate, error-free transmission with another mode as default: 1 Press Menu. 2 Press or repeatedly until MACHINE SETUP appears, and then press . 3 Press or repeatedly until Mode appears, and then press . 4 Press or repeatedly until the mode you change the copy or fax settings using the control panel buttons for incoming faxes or specify the volume of...
... of the telephone ring for a specific job, the MFP will restore the default settings after a failed fax transmission. Ensure accurate, error-free transmission with another mode as default: 1 Press Menu. 2 Press or repeatedly until MACHINE SETUP appears, and then press . 3 Press or repeatedly until Mode appears, and then press . 4 Press or repeatedly until the mode you change the copy or fax settings using the control panel buttons for incoming faxes or specify the volume of...

User's Guide
Page 88
... to use . To change the scanning resolution to a lower value: 1 From the control panel, press Scan. 2 From the QLINK dialog on the computer screen, select the location you are printing a document, wait until printing is done before sending the scan job. Partial document scans Solution Check the display. If you want to Set As Default. For more information, see Setting the paper type and size on page 54. If there is done before sending the scan job. Scan troubleshooting Problem Scanner does...
... to use . To change the scanning resolution to a lower value: 1 From the control panel, press Scan. 2 From the QLINK dialog on the computer screen, select the location you are printing a document, wait until printing is done before sending the scan job. Partial document scans Solution Check the display. If you want to Set As Default. For more information, see Setting the paper type and size on page 54. If there is done before sending the scan job. Scan troubleshooting Problem Scanner does...
User's Guide
Page 91
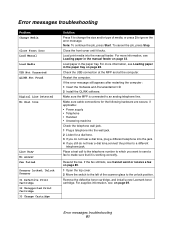
... the manual feeder. If the fax still fails, see Loading paper in the paper tray. Remove the defective toner cartridge, and install a new Lexmark toner cartridge. Close the front cover until it is connected to an analog telephone line. Check the USB connection at the MFP and at the computer. Restart the computer. To cancel the job, press Stop. Load paper in the paper tray on page 69. Error messages troubleshooting Problem Change Media Close Front Door Load Manual Load Media USB Not Connected QLINK Not Found Digital Line Detected No dial tone Line...
... the manual feeder. If the fax still fails, see Loading paper in the paper tray. Remove the defective toner cartridge, and install a new Lexmark toner cartridge. Close the front cover until it is connected to an analog telephone line. Check the USB connection at the MFP and at the computer. Restart the computer. To cancel the job, press Stop. Load paper in the paper tray on page 69. Error messages troubleshooting Problem Change Media Close Front Door Load Manual Load Media USB Not Connected QLINK Not Found Digital Line Detected No dial tone Line...
User's Guide
Page 92
Turn Collate off. Replace the photoconductor. For more information, see Setting the paper type and size on page 65. or • Press Stop to be lost. • You cannot cancel an incoming fax. Note: • Clearing the error message in this way may truncate the print job. For more information, see Replacing the photoconductor on page 35. • Press Start to cancel the job. Note: You cannot cancel an incoming fax. Problem Solution 34...
Turn Collate off. Replace the photoconductor. For more information, see Setting the paper type and size on page 65. or • Press Stop to be lost. • You cannot cancel an incoming fax. Note: • Clearing the error message in this way may truncate the print job. For more information, see Replacing the photoconductor on page 35. • Press Start to cancel the job. Note: You cannot cancel an incoming fax. Problem Solution 34...
User's Guide
Page 103
... the ADF 36 documents on the scanner glass 37 envelopes 33 labels 33 manual feeder 32 paper 28, 32 paper tray 28 transparencies 33 M menus, control panel Copy Defaults 23 Fax Advanced 23 Fax Defaults 24 MFP 84 mode, changing 24 N network setup 25 noise emission levels 100 O output location front output tray 38 rear paper exit 38 selecting 38 overlay, installing 10 P paper loading 28, 32 paper jam 76 paper saver 40, 52 paper size, setting 35 paper tray,installing 11 paper type, setting 35 pause 45 Phone Book adding shortcuts 47 deleting...
... the ADF 36 documents on the scanner glass 37 envelopes 33 labels 33 manual feeder 32 paper 28, 32 paper tray 28 transparencies 33 M menus, control panel Copy Defaults 23 Fax Advanced 23 Fax Defaults 24 MFP 84 mode, changing 24 N network setup 25 noise emission levels 100 O output location front output tray 38 rear paper exit 38 selecting 38 overlay, installing 10 P paper loading 28, 32 paper jam 76 paper saver 40, 52 paper size, setting 35 paper tray,installing 11 paper type, setting 35 pause 45 Phone Book adding shortcuts 47 deleting...
Service Manual
Page 23
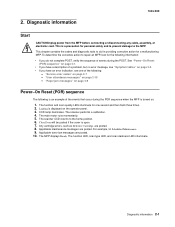
... to repair an MFP, look for one of the following is an example of events during the POR sequence when the MFP is open. 7. The function and scan quality LEDs illuminate for the following information: • If you have an error indication, see "Symptom tables" on the operator panel. 3. The function LED, scan type LED, and scan darkness LEDs illuminate. "Paper jam messages" on page 2-9 Power-On Reset (POR...
... to repair an MFP, look for one of the following is an example of events during the POR sequence when the MFP is open. 7. The function and scan quality LEDs illuminate for the following information: • If you have an error indication, see "Symptom tables" on the operator panel. 3. The function LED, scan type LED, and scan darkness LEDs illuminate. "Paper jam messages" on page 2-9 Power-On Reset (POR...
Service Manual
Page 26
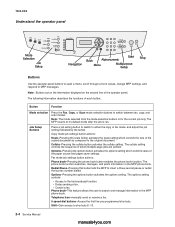
... options setting which controls value of the operator panel. Button Function Mode selection Press the Fax, Copy, or Scan mode selection buttons to shortcuts 6 -10. 2-4 Service Manual manuals4you.com The MFP reverts to it's default mode after the job is for the current job only. Shift-Gain access to switch between fax, copy, and scan modes. Fax mode job settings button actions: Phone book-Pressing the phone book button enables the phone book function. 7003-XXX Understand the operator panel Buttons Use the operator panel buttons to open a menu, scroll through a list...
... options setting which controls value of the operator panel. Button Function Mode selection Press the Fax, Copy, or Scan mode selection buttons to shortcuts 6 -10. 2-4 Service Manual manuals4you.com The MFP reverts to it's default mode after the job is for the current job only. Shift-Gain access to switch between fax, copy, and scan modes. Fax mode job settings button actions: Phone book-Pressing the phone book button enables the phone book function. 7003-XXX Understand the operator panel Buttons Use the operator panel buttons to open a menu, scroll through a list...
Service Manual
Page 29
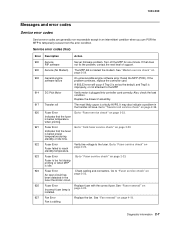
... the MFP to "Fuser service check" on page 2-23. standby temperature. 923 Fuser Error Go to temporarily recover from the error condition. Also, check the load condition. See "Modem service check" on page 4-18. If the problem continues, replace the controller card. Diagnostic information 2-7 Service error codes (9xx) Error Description Action 900 Service RIP software Server firmware problem. A 902.33 error will occur if Tray 2 is set as the default, and Tray2 is improperly, or not attached to "Fuser service check" on An open...
... the MFP to "Fuser service check" on page 2-23. standby temperature. 923 Fuser Error Go to temporarily recover from the error condition. Also, check the load condition. See "Modem service check" on page 4-18. If the problem continues, replace the controller card. Diagnostic information 2-7 Service error codes (9xx) Error Description Action 900 Service RIP software Server firmware problem. A 902.33 error will occur if Tray 2 is set as the default, and Tray2 is improperly, or not attached to "Fuser service check" on An open...
Service Manual
Page 57
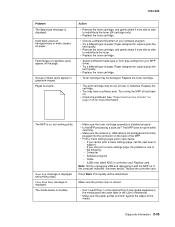
... sizes table in graysacle images. Close Front Door message is displayed. The MFP does not print while scanning. • Make sure the network or USB cable is not damaged and is one of black spots appear in the User's Reference). • Make sure the paper guides are blank. If you can print a menu settings page, the problem is firmly plugged into the connector on , but nothing prints. Replace card. If the computer indicates "unknown device," replace the controller card...
... sizes table in graysacle images. Close Front Door message is displayed. The MFP does not print while scanning. • Make sure the network or USB cable is not damaged and is one of black spots appear in the User's Reference). • Make sure the paper guides are blank. If you can print a menu settings page, the problem is firmly plugged into the connector on , but nothing prints. Replace card. If the computer indicates "unknown device," replace the controller card...

Service Manual
Page 60
... +5V. If changing the toner cartridge doesn't fix the problem, check pin 1 in the spring and the cable connection on pin 1 is present, replace the toner sensor. Inspect the roll for debris, and clean as necessary. Action Check transfer roll area for signs of wear or damage, and replace if necessary. 2-38 Service Manual manuals4you.com 7003-XXX Toner sensor service check FRU Toner sensor Controller card Transfer roll service check FRU Transfer...
... +5V. If changing the toner cartridge doesn't fix the problem, check pin 1 in the spring and the cable connection on pin 1 is present, replace the toner sensor. Inspect the roll for debris, and clean as necessary. Action Check transfer roll area for signs of wear or damage, and replace if necessary. 2-38 Service Manual manuals4you.com 7003-XXX Toner sensor service check FRU Toner sensor Controller card Transfer roll service check FRU Transfer...
Service Manual
Page 66
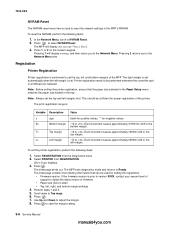
... blank for positive values, "-" for proper registration of firmware. • Paper size (A4 or Letter) • Top, left ,and bottom margins of support to reset the network settings in the bottom margin. Press . 7. Printer registration needs to adjust the margin. 8. To set the top and left margin. The skew page contains the following information that the paper size selected in the Paper Setup menu matches the paper size loaded in...
... blank for positive values, "-" for proper registration of firmware. • Paper size (A4 or Letter) • Top, left ,and bottom margins of support to reset the network settings in the bottom margin. Press . 7. Printer registration needs to adjust the margin. 8. To set the top and left margin. The skew page contains the following information that the paper size selected in the Paper Setup menu matches the paper size loaded in...

Service Manual
Page 158
... 2-33 white or black lines 2-33 toner sensor 2-38 transfer roll 2-38 service error codes 2-7 service menus X340⁄ 342n 3-1 special tools 1-7 specifications description description 1-1 photoconductor capacity 1-3 toner capacity 1-3 start 2-1 Start button 2-5 Stop button 2-5 sub error codes 2-14 symptoms MFP 2-2 MFP POSTsymptoms 2-2 POST symptoms 2-2 T taking printer offline 2-5 with Stop button 2-5 tires removal 4-19 tools 1-7 Top cover removal 4-11 transfer roll removal 4-33 transport cable removal 4-34 troubleshooting clearing operator panel error messages 2-5 stopping printer 2-5 U user...
... 2-33 white or black lines 2-33 toner sensor 2-38 transfer roll 2-38 service error codes 2-7 service menus X340⁄ 342n 3-1 special tools 1-7 specifications description description 1-1 photoconductor capacity 1-3 toner capacity 1-3 start 2-1 Start button 2-5 Stop button 2-5 sub error codes 2-14 symptoms MFP 2-2 MFP POSTsymptoms 2-2 POST symptoms 2-2 T taking printer offline 2-5 with Stop button 2-5 tires removal 4-19 tools 1-7 Top cover removal 4-11 transfer roll removal 4-33 transport cable removal 4-34 troubleshooting clearing operator panel error messages 2-5 stopping printer 2-5 U user...


