

Troubleshooting Guide
Page 2
... Press . 4 Press or repeatedly until scanning is complete before using the manual feeder, this is normal. or Click Start Control Panel Printers and Other Hardware Printers and Faxes. 2 Double-click the Lexmark X340/X340n/ X342n icon. 3 Click Printer, and make sure the guides are against... by flexing or fanning it . For more information, see "Removing and reinstalling the drivers software" on page 1. • If you are scanning a document, wait until Toner Dark appears. 5 Press . 6 Press or repeatedly to adjust the darkness settings. 7 Press to save the ...
... Press . 4 Press or repeatedly until scanning is complete before using the manual feeder, this is normal. or Click Start Control Panel Printers and Other Hardware Printers and Faxes. 2 Double-click the Lexmark X340/X340n/ X342n icon. 3 Click Printer, and make sure the guides are against... by flexing or fanning it . For more information, see "Removing and reinstalling the drivers software" on page 1. • If you are scanning a document, wait until Toner Dark appears. 5 Press . 6 Press or repeatedly to adjust the darkness settings. 7 Press to save the ...

Troubleshooting Guide
Page 4
or Click Start Control Panel Printers and Other Hardware Printers and Faxes. 2 Double-click the Lexmark X340/X340n/ X342n icon. 3 Click Printer, and make sure that have been stored in use . 3 Click Edit. 4 Under Resolution, select a lower number. 5 Click OK. 6 Click Scan Now. If there is an error message, see the User's Guide. •...
or Click Start Control Panel Printers and Other Hardware Printers and Faxes. 2 Double-click the Lexmark X340/X340n/ X342n icon. 3 Click Printer, and make sure that have been stored in use . 3 Click Edit. 4 Under Resolution, select a lower number. 5 Click OK. 6 Click Scan Now. If there is an error message, see the User's Guide. •...
Troubleshooting Guide
Page 5
...; Check the toner cartridge, and replace it has been programmed for the number that the quality of the telephone line connection. • Increase the fax scan resolution. 4 Press . 5 Press or appears.
...; Check the toner cartridge, and replace it has been programmed for the number that the quality of the telephone line connection. • Increase the fax scan resolution. 4 Press . 5 Press or appears.
User's Guide
Page 3
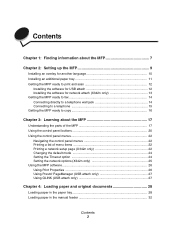
... overlay for another language 10 Installing an additional paper tray 11 Getting the MFP ready to print and scan 12 Installing the software for USB attach 12 Installing the software for network attach (X342n only 13 Getting the MFP ready to fax 14 Connecting directly to a telephone wall jack 14 Connecting to... panel buttons 20 Using the control panel menus 22 Navigating the control panel menus 22 Printing a list of menu items 22 Printing a network setup page (X342n only 22 Changing the default mode 24 Setting the Timeout option 24 Setting the network options...
... overlay for another language 10 Installing an additional paper tray 11 Getting the MFP ready to print and scan 12 Installing the software for USB attach 12 Installing the software for network attach (X342n only 13 Getting the MFP ready to fax 14 Connecting directly to a telephone wall jack 14 Connecting to... panel buttons 20 Using the control panel menus 22 Navigating the control panel menus 22 Printing a list of menu items 22 Printing a network setup page (X342n only 22 Changing the default mode 24 Setting the Timeout option 24 Setting the network options...

User's Guide
Page 5
... of the MFP 68 Ordering supplies ...70 Recycling Lexmark products 70 Chapter 10: Troubleshooting 71 Setup troubleshooting ...72 Removing and reinstalling the drivers software 74 Jams and misfeeds troubleshooting 75 Clearing a paper jam 76 Print and copy troubleshooting 84 Print quality troubleshooting 85 Scan troubleshooting ...88 Fax troubleshooting ...89 Error messages troubleshooting...
... of the MFP 68 Ordering supplies ...70 Recycling Lexmark products 70 Chapter 10: Troubleshooting 71 Setup troubleshooting ...72 Removing and reinstalling the drivers software 74 Jams and misfeeds troubleshooting 75 Clearing a paper jam 76 Print and copy troubleshooting 84 Print quality troubleshooting 85 Scan troubleshooting ...88 Fax troubleshooting ...89 Error messages troubleshooting...
User's Guide
Page 12
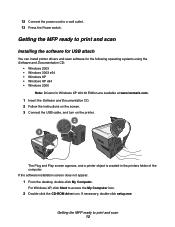
... icon. 2 Double-click the CD-ROM drive icon. For Windows XP, click Start to print and scan Installing the software for USB attach You can install printer drivers and scan software for the following operating systems using the Software and Documentation CD: • Windows 2003 • ...Windows 2003 x64 • Windows XP • Windows XP x64 • Windows 2000 Note: Drivers for Windows XP x64 bit Edition are available at www.lexmark.com....
... icon. 2 Double-click the CD-ROM drive icon. For Windows XP, click Start to print and scan Installing the software for USB attach You can install printer drivers and scan software for the following operating systems using the Software and Documentation CD: • Windows 2003 • ...Windows 2003 x64 • Windows XP • Windows XP x64 • Windows 2000 Note: Drivers for Windows XP x64 bit Edition are available at www.lexmark.com....
User's Guide
Page 13
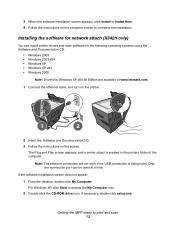
... instructions on the screen. For Windows XP, click Start to print and scan 13 The Plug and Play screen appears, and a printer object is being used at www.lexmark.com. 1 Connect the ethernet cable, and turn on the printer. 1 2 2 Insert the Software and Documentation CD. 3 Follow the ...connection port can install printer drivers and scan software for the following operating systems using the Software and Documentation CD: • Windows 2003 • Windows 2003 x64 • Windows XP • Windows XP x64 • Windows 2000 Note: Drivers for network attach (X342n only) You can be...
... instructions on the screen. For Windows XP, click Start to print and scan 13 The Plug and Play screen appears, and a printer object is being used at www.lexmark.com. 1 Connect the ethernet cable, and turn on the printer. 1 2 2 Insert the Software and Documentation CD. 3 Follow the ...connection port can install printer drivers and scan software for the following operating systems using the Software and Documentation CD: • Windows 2003 • Windows 2003 x64 • Windows XP • Windows XP x64 • Windows 2000 Note: Drivers for network attach (X342n only) You can be...
User's Guide
Page 17
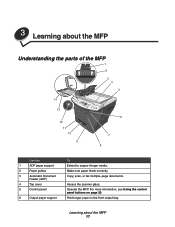
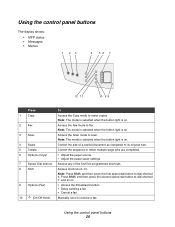
3 Learning about the MFP 17 Copy, scan, or fax multiple-page documents. Make sure paper feeds correctly. Operate the MFP. Learning about the MFP Understanding the parts of the MFP 1 2 3 4 5 14 13 12 11 10 9 6 7 8 Use the 1 ADF paper support 2 Paper guides 3 Automatic Document Feeder (ADF) 4 Top cover 5 Control panel 6 Output paper support To Extend to support longer media. Access the scanner glass. Hold longer paper in the front output tray. For more information, see Using the control panel buttons on page 20.
3 Learning about the MFP 17 Copy, scan, or fax multiple-page documents. Make sure paper feeds correctly. Operate the MFP. Learning about the MFP Understanding the parts of the MFP 1 2 3 4 5 14 13 12 11 10 9 6 7 8 Use the 1 ADF paper support 2 Paper guides 3 Automatic Document Feeder (ADF) 4 Top cover 5 Control panel 6 Output paper support To Extend to support longer media. Access the scanner glass. Hold longer paper in the front output tray. For more information, see Using the control panel buttons on page 20.
User's Guide
Page 18
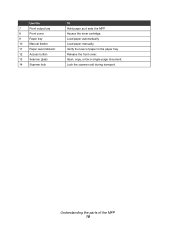
Verify the level of the MFP 18 Lock the scanner unit during transport. Release the front cover. Understanding the parts of paper in the paper tray. Load paper automatically. Load paper manually. Scan, copy, or fax a single-page document. Access the toner cartridge. Use the 7 Front output tray 8 Front cover 9 Paper tray 10 Manual feeder 11 Paper level indicator 12 Access button 13 Scanner glass 14 Scanner lock To Hold paper as it exits the MFP.
Verify the level of the MFP 18 Lock the scanner unit during transport. Release the front cover. Understanding the parts of paper in the paper tray. Load paper automatically. Load paper manually. Scan, copy, or fax a single-page document. Access the toner cartridge. Use the 7 Front output tray 8 Front cover 9 Paper tray 10 Manual feeder 11 Paper level indicator 12 Access button 13 Scanner glass 14 Scanner lock To Hold paper as it exits the MFP.
User's Guide
Page 20
... the first speed dial button to make copies. Note: The mode is selected when the button light is on . 9 Options (Fax) • Access the Broadcast function. • Delay sending a fax. • Cancel a fax. 10 (On/Off Hook) Manually send or receive a fax. Note: The mode is selected when ...the button light is on. 3 Scan Access the Scan mode to dial shortcut 7, and so on . 2 Fax Access the Fax mode to its original size. 5 Collate Control the sequence in which multiple-page...
... the first speed dial button to make copies. Note: The mode is selected when the button light is on . 9 Options (Fax) • Access the Broadcast function. • Delay sending a fax. • Cancel a fax. 10 (On/Off Hook) Manually send or receive a fax. Note: The mode is selected when ...the button light is on. 3 Scan Access the Scan mode to dial shortcut 7, and so on . 2 Fax Access the Fax mode to its original size. 5 Collate Control the sequence in which multiple-page...
User's Guide
Page 21
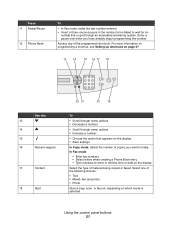
... an automated answering system. In Copy mode: Select the number of the following choices: • Text • Mixed-text and photo • Photo Start a copy, scan, or fax job, depending on the display. • Save settings. In Fax mode: • Enter fax numbers. • Select letters when creating a Phone Book entry...
... an automated answering system. In Copy mode: Select the number of the following choices: • Text • Mixed-text and photo • Photo Start a copy, scan, or fax job, depending on the display. • Save settings. In Fax mode: • Enter fax numbers. • Select letters when creating a Phone Book entry...
User's Guide
Page 22
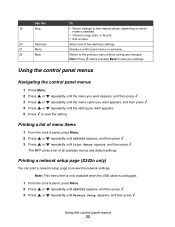
Printing a network setup page (X342n only) You can print a network setup page to the previous menu without saving any changes. Select one of all available menus and default settings. Note: ... or repeatedly until Print Menus appears, and then press . Note: This menu item is only available when the USB cable is selected. • Cancel a copy, scan, or fax job. • Exit a menu. Using the control panel menus 22 Return to review the network settings. Using the control panel menus Navigating the...
Printing a network setup page (X342n only) You can print a network setup page to the previous menu without saving any changes. Select one of all available menus and default settings. Note: ... or repeatedly until Print Menus appears, and then press . Note: This menu item is only available when the USB cable is selected. • Cancel a copy, scan, or fax job. • Exit a menu. Using the control panel menus 22 Return to review the network settings. Using the control panel menus Navigating the...
User's Guide
Page 26
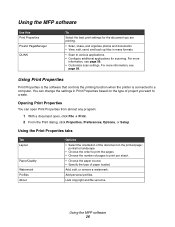
... source. • Specify the type of paper loaded. Opening Print Properties You can change the settings in many formats. • Scan to various applications. • Configure additional applications for the document you want to a computer. Using the MFP software 26 PageManager QLINK..., see page 56. • Customize scan settings. Lists copyright and file versions. Add personal profiles. Using the MFP software Use this Print Properties Presto! Using Print Properties Print Properties is the software that controls the printing function when the printer is connected to create.
... source. • Specify the type of paper loaded. Opening Print Properties You can change the settings in many formats. • Scan to various applications. • Configure additional applications for the document you want to a computer. Using the MFP software 26 PageManager QLINK..., see page 56. • Customize scan settings. Lists copyright and file versions. Add personal profiles. Using the MFP software Use this Print Properties Presto! Using Print Properties Print Properties is the software that controls the printing function when the printer is connected to create.

User's Guide
Page 27
...Using QLINK (USB attach only) With QLINK, you can: • Scan to scan, share, and organize photos and documents. PageManager. 2 Click Help Æ Help. PageManager, click Start Æ Programs or All Programs Æ Lexmark Applications Æ Presto! PageManager. To open Presto! To open QLINK, ... one of the following methods: • From the MFP control panel, press Scan. • Double-click the QLINK icon on the desktop. • Click Start Æ Programs or All Programs Æ Lexmark Æ Lexmark X34x Series Æ QLINK. Using Presto! PageManager Help: 1 Open Presto!...
...Using QLINK (USB attach only) With QLINK, you can: • Scan to scan, share, and organize photos and documents. PageManager. 2 Click Help Æ Help. PageManager, click Start Æ Programs or All Programs Æ Lexmark Applications Æ Presto! PageManager. To open Presto! To open QLINK, ... one of the following methods: • From the MFP control panel, press Scan. • Double-click the QLINK icon on the desktop. • Click Start Æ Programs or All Programs Æ Lexmark Æ Lexmark X34x Series Æ QLINK. Using Presto! PageManager Help: 1 Open Presto!...

User's Guide
Page 36
.... For more information, see Loading original documents on the scanner glass on the ADF against the edges of an original document into the ADF for scanning, copying, and faxing. • Remove staples and paper clips from the original documents before loading into the ADF 36 Loading original documents into the ADF...
.... For more information, see Loading original documents on the scanner glass on the ADF against the edges of an original document into the ADF for scanning, copying, and faxing. • Remove staples and paper clips from the original documents before loading into the ADF 36 Loading original documents into the ADF...

User's Guide
Page 37
Loading original documents on the scanner glass You can scan, copy, and fax photos, text documents, magazine articles, newspapers, and other publications. Loading original documents on the scanner glass 37 Note: Place postcards, 4 x 6 cards, small items, or thin media (such as magazine clippings or carbonless paper) on the scanner glass. 1 Open the top cover. 2 Place the document face-down on the scanner glass in the upper left corner.
Loading original documents on the scanner glass You can scan, copy, and fax photos, text documents, magazine articles, newspapers, and other publications. Loading original documents on the scanner glass 37 Note: Place postcards, 4 x 6 cards, small items, or thin media (such as magazine clippings or carbonless paper) on the scanner glass. 1 Open the top cover. 2 Place the document face-down on the scanner glass in the upper left corner.
User's Guide
Page 38
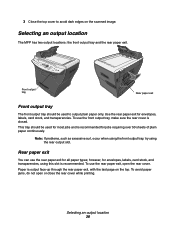
... use the front output tray, make sure the rear cover is output face-up through the rear paper exit, with the last page on the scanned image. Paper is closed. This tray should be used to avoid dark edges on the top. Rear paper exit You can use the rear paper...
... use the front output tray, make sure the rear cover is output face-up through the rear paper exit, with the last page on the scanned image. Paper is closed. This tray should be used to avoid dark edges on the top. Rear paper exit You can use the rear paper...

User's Guide
Page 43
... tone. Sending a fax Note: Make sure the MFP is on. 2 Load an original document face-up shortcuts on page 47. • If you have finished scanning the entire document. Sending a fax 43 Place these items on the scanner glass. 3 From the control panel, press Fax. 4 Press to create one, see Setting...
... tone. Sending a fax Note: Make sure the MFP is on. 2 Load an original document face-up shortcuts on page 47. • If you have finished scanning the entire document. Sending a fax 43 Place these items on the scanner glass. 3 From the control panel, press Fax. 4 Press to create one, see Setting...

User's Guide
Page 44
... one, see Using the Phone Book on page 48. 6 When you hear the fax tone, press Start. Sending a fax to a group (broadcast fax) You can scan a document now and fax it at once. Sending a fax at a scheduled time (delay send) Using the delay send feature, you do not have a Speed Dial..., press 1 (for Yes) if you have another page. 7 If prompted, press 1 (for yes) if you have more pages, or 2 (for No) if you have finished scanning the entire document. Note: • If you do not have a Phone Book list but want to select a number.
... one, see Using the Phone Book on page 48. 6 When you hear the fax tone, press Start. Sending a fax to a group (broadcast fax) You can scan a document now and fax it at once. Sending a fax at a scheduled time (delay send) Using the delay send feature, you do not have a Speed Dial..., press 1 (for Yes) if you have another page. 7 If prompted, press 1 (for yes) if you have more pages, or 2 (for No) if you have finished scanning the entire document. Note: • If you do not have a Phone Book list but want to select a number.
User's Guide
Page 54
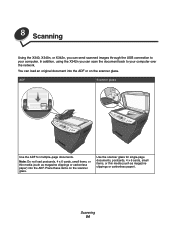
... X340, X340n, or X342n, you can scan the document back to your computer over the network. Place these items on the scanner glass. Note: Do not load postcards, 4 x 6 cards, small items, or thin media (such as magazine clippings or carbonless paper). Scanning 54 You can send scanned images through the USB connection to your..., 4 x 6 cards, small items, or thin media (such as magazine clippings or carbonless paper) into the ADF or on the scanner glass. In addition, using the X342n you can load an original document into the ADF.
... X340, X340n, or X342n, you can scan the document back to your computer over the network. Place these items on the scanner glass. Note: Do not load postcards, 4 x 6 cards, small items, or thin media (such as magazine clippings or carbonless paper). Scanning 54 You can send scanned images through the USB connection to your..., 4 x 6 cards, small items, or thin media (such as magazine clippings or carbonless paper) into the ADF or on the scanner glass. In addition, using the X342n you can load an original document into the ADF.


