User's Guide
Page 18
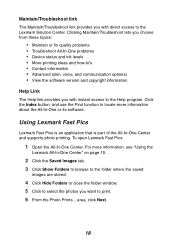
...All-In-One Center. area, click Next. 18 Maintain/Troubleshoot link The Maintain/Troubleshoot link provides you with direct access to the Lexmark Solution Center. Using Lexmark Fast Pics Lexmark Fast Pics is an application that is part of the All-In-One Center and supports photo printing. Clicking Maintain/Troubleshoot lets ... Saved Images tab. 3 Click Show Folders to browse to the folder where the saved images are stored. 4 Click Hide Folders to close the folder window. 5 Click to select the photos you want to the Help program. For more information about the All-In-One or its software.
...All-In-One Center. area, click Next. 18 Maintain/Troubleshoot link The Maintain/Troubleshoot link provides you with direct access to the Lexmark Solution Center. Using Lexmark Fast Pics Lexmark Fast Pics is an application that is part of the All-In-One Center and supports photo printing. Clicking Maintain/Troubleshoot lets ... Saved Images tab. 3 Click Show Folders to browse to the folder where the saved images are stored. 4 Click Hide Folders to close the folder window. 5 Click to select the photos you want to the Help program. For more information about the All-In-One or its software.
User's Guide
Page 20
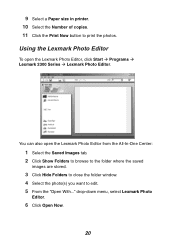
... Editor To open the Lexmark Photo Editor from the All-In-One Center: 1 Select the Saved Images tab. 2 Click Show Folders to browse to the folder where the saved images are stored. 3 Click Hide Folders to close the folder window. 4 Select the photo(s) you want to print the ...photos. You can also open the Lexmark Photo Editor, click Start Æ Programs Æ Lexmark 2300 Series Æ Lexmark Photo Editor. drop-down menu, select Lexmark Photo Editor. 6 Click Open Now. 20 9 Select a...
... Editor To open the Lexmark Photo Editor from the All-In-One Center: 1 Select the Saved Images tab. 2 Click Show Folders to browse to the folder where the saved images are stored. 3 Click Hide Folders to close the folder window. 4 Select the photo(s) you want to print the ...photos. You can also open the Lexmark Photo Editor, click Start Æ Programs Æ Lexmark 2300 Series Æ Lexmark Photo Editor. drop-down menu, select Lexmark Photo Editor. 6 Click Open Now. 20 9 Select a...
User's Guide
Page 26
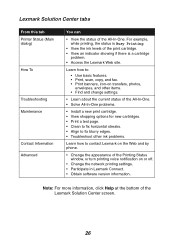
...more information, click Help at the bottom of the print cartridge. • View an indicator showing if there is a cartridge problem. • Access the Lexmark Web site. Learn how to: • Use basic features. • Print, scan, copy, and fax. • Print banners, iron-on transfers, ... • Change the appearance of the All-In-One. Lexmark Solution Center tabs From this tab Printer Status (Main dialog) How To Troubleshooting Maintenance Contact Information Advanced You can • View the status of the Printing Status window, or turn printing voice notification on or off. •...
...more information, click Help at the bottom of the print cartridge. • View an indicator showing if there is a cartridge problem. • Access the Lexmark Web site. Learn how to: • Use basic features. • Print, scan, copy, and fax. • Print banners, iron-on transfers, ... • Change the appearance of the All-In-One. Lexmark Solution Center tabs From this tab Printer Status (Main dialog) How To Troubleshooting Maintenance Contact Information Advanced You can • View the status of the Printing Status window, or turn printing voice notification on or off. •...
User's Guide
Page 41
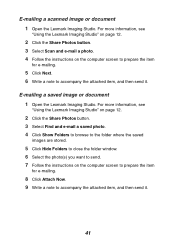
... information, see "Using the Lexmark Imaging Studio" on page 12. 2 Click the Share Photos button. 3 Select Find and e-mail a saved photo. 4 Click Show Folders to browse to the folder where the saved images are stored. 5 Click Hide Folders to close the folder window. 6 Select the photo(s) you... want to send. 7 Follow the instructions on the computer screen to prepare the item for e-mailing. 8 Click Attach Now. 9 Write a note to accompany the attached item, and then send it . 41 E-mailing a saved image or document 1 Open the Lexmark Imaging Studio...
... information, see "Using the Lexmark Imaging Studio" on page 12. 2 Click the Share Photos button. 3 Select Find and e-mail a saved photo. 4 Click Show Folders to browse to the folder where the saved images are stored. 5 Click Hide Folders to close the folder window. 6 Select the photo(s) you... want to send. 7 Follow the instructions on the computer screen to prepare the item for e-mailing. 8 Click Attach Now. 9 Write a note to accompany the attached item, and then send it . 41 E-mailing a saved image or document 1 Open the Lexmark Imaging Studio...
User's Guide
Page 48
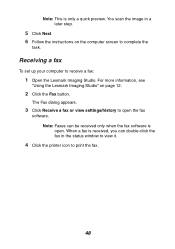
... 12. 2 Click the Fax button. You scan the image in the status window to view it. 4 Click the printer icon to open . For more information, see "Using the Lexmark Imaging Studio" on the computer screen to receive a fax: 1 Open the Lexmark Imaging Studio. Receiving a fax To set up your computer to complete the...
... 12. 2 Click the Fax button. You scan the image in the status window to view it. 4 Click the printer icon to open . For more information, see "Using the Lexmark Imaging Studio" on the computer screen to receive a fax: 1 Open the Lexmark Imaging Studio. Receiving a fax To set up your computer to complete the...
User's Guide
Page 62
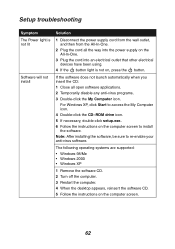
...devices have been using. 4 If the button light is not on, press the button. The following operating systems are supported: • Windows 98/Me • Windows 2000 • Windows XP 1 Remove the software CD. 2 Turn off the computer. 3 Restart the computer. 4 When the desktop appears, reinsert the software ... disable any anti-virus programs. 3 Double-click the My Computer icon. Note: After installing the software, be sure to install the software. For Windows XP, click Start to access the My Computer icon. 4 Double-click the CD-ROM drive icon. 5 If necessary, double-click setup.exe. ...
...devices have been using. 4 If the button light is not on, press the button. The following operating systems are supported: • Windows 98/Me • Windows 2000 • Windows XP 1 Remove the software CD. 2 Turn off the computer. 3 Restart the computer. 4 When the desktop appears, reinsert the software ... disable any anti-virus programs. 3 Double-click the My Computer icon. Note: After installing the software, be sure to install the software. For Windows XP, click Start to access the My Computer icon. 4 Double-click the CD-ROM drive icon. 5 If necessary, double-click setup.exe. ...
User's Guide
Page 64
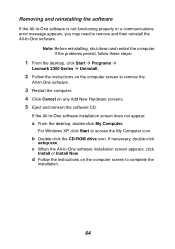
d Follow the instructions on the computer screen to access the My Computer icon. b Double-click the CD-ROM drive icon. For Windows XP, click Start to complete the installation. 64 c When the All-In-One software installation screen appears, click Install or Install Now.... If the problems persist, follow these steps: 1 From the desktop, click Start Æ Programs Æ Lexmark 2300 Series Æ Uninstall. 2 Follow the instructions on the computer screen to remove and then reinstall the All-In-One software. If necessary, double-...
d Follow the instructions on the computer screen to access the My Computer icon. b Double-click the CD-ROM drive icon. For Windows XP, click Start to complete the installation. 64 c When the All-In-One software installation screen appears, click Install or Install Now.... If the problems persist, follow these steps: 1 From the desktop, click Start Æ Programs Æ Lexmark 2300 Series Æ Uninstall. 2 Follow the instructions on the computer screen to remove and then reinstall the All-In-One software. If necessary, double-...


