User Guide
Page 2
... up wireless printing...39 Information you will need to set up the printer on a wireless network 39 Installing the printer on a wireless network (Windows 40 Installing the printer on a wireless network (Macintosh 42 Installing the printer on a wired network 44 Changing port settings after installing a new network Internal Solutions Port 47 Setting up serial printing...49 Loading paper and...
... up wireless printing...39 Information you will need to set up the printer on a wireless network 39 Installing the printer on a wireless network (Windows 40 Installing the printer on a wireless network (Macintosh 42 Installing the printer on a wired network 44 Changing port settings after installing a new network Internal Solutions Port 47 Setting up serial printing...49 Loading paper and...
User Guide
Page 4
... jam...90 271-279 paper jams...91 280 paper jams...91 281 paper jam...92 282 paper jam...92 283 staple jam...93 Understanding printer menus 95 Menus list...95 Paper menu...96 Default Source menu ...96 Paper Size/Type menu ...96 Configure MP menu...99 Envelope Enhance......menu ...102 Paper Loading menu ...104 Custom Types menu ...106 Universal Setup menu...106 Bin Setup menu...107 Reports menu...108 Network/Ports menu...109 Active NIC menu ...109 Standard Network or Network menus ...109 Network Reports menu ...111 Network Card menu...111 TCP/IP menu ...112 IPv6 menu ...113 Wireless menu ...113
... jam...90 271-279 paper jams...91 280 paper jams...91 281 paper jam...92 282 paper jam...92 283 staple jam...93 Understanding printer menus 95 Menus list...95 Paper menu...96 Default Source menu ...96 Paper Size/Type menu ...96 Configure MP menu...99 Envelope Enhance......menu ...102 Paper Loading menu ...104 Custom Types menu ...106 Universal Setup menu...106 Bin Setup menu...107 Reports menu...108 Network/Ports menu...109 Active NIC menu ...109 Standard Network or Network menus ...109 Network Reports menu ...111 Network Card menu...111 TCP/IP menu ...112 IPv6 menu ...113 Wireless menu ...113
User Guide
Page 5
...141 Image menu ...142 Flash Drive menu ...142 Help menu...144 Understanding printer messages 146 List of status and error messages...146 Maintaining the printer 168 Cleaning the exterior of the printer...168 Storing supplies...168 Conserving supplies...168 Checking the status of supplies...169... Checking the status of supplies from the printer control panel 169 Checking the status of supplies from a network computer 169 Ordering...
...141 Image menu ...142 Flash Drive menu ...142 Help menu...144 Understanding printer messages 146 List of status and error messages...146 Maintaining the printer 168 Cleaning the exterior of the printer...168 Storing supplies...168 Conserving supplies...168 Checking the status of supplies...169... Checking the status of supplies from the printer control panel 169 Checking the status of supplies from a network computer 169 Ordering...

User Guide
Page 6
... Ordering pick rollers ...172 Ordering staple cartridges ...172 Ordering a transfer roller...172 Recycling Lexmark products...172 Moving the printer...172 Before moving the printer ...172 Moving the printer to another location...173 Shipping the printer ...173 Administrative support 174 Finding advanced networking and administrator information 174 Using the Embedded Web Server...174 Checking the device status...
... Ordering pick rollers ...172 Ordering staple cartridges ...172 Ordering a transfer roller...172 Recycling Lexmark products...172 Moving the printer...172 Before moving the printer ...172 Moving the printer to another location...173 Shipping the printer ...173 Administrative support 174 Finding advanced networking and administrator information 174 Using the Embedded Web Server...174 Checking the device status...
User Guide
Page 8
Safety information 8 Safety information Connect the power cord to the public switched telephone network. Note: Use the handholds located on the power cord. Use only the telecommunications (RJ‑11) cord provided with this product or ...cord to the manufacturer's instructions and local regulations. CAUTION-POTENTIAL INJURY: This product uses a laser. You must understand the section in your operating instructions that is designed, tested, and approved to lift the drawer and printer at the same time. Do not recharge, disassemble, or incinerate a lithium battery. CAUTION...
Safety information 8 Safety information Connect the power cord to the public switched telephone network. Note: Use the handholds located on the power cord. Use only the telecommunications (RJ‑11) cord provided with this product or ...cord to the manufacturer's instructions and local regulations. CAUTION-POTENTIAL INJURY: This product uses a laser. You must understand the section in your operating instructions that is designed, tested, and approved to lift the drawer and printer at the same time. Do not recharge, disassemble, or incinerate a lithium battery. CAUTION...
User Guide
Page 10
.... Help Description The Help gives you instructions for local, network, box or on what you instructions for setting up You can find While in any Lexmark software program, click Help, Tips > Help, or Help > Help Topics. Note: For additional information about the printer Setup information Description Where to find The Setup information gives...
.... Help Description The Help gives you instructions for local, network, box or on what you instructions for setting up You can find While in any Lexmark software program, click Help, Tips > Help, or Help > Help Topics. Note: For additional information about the printer Setup information Description Where to find The Setup information gives...

User Guide
Page 36
A loss of data or a malfunction can occur. 2 Ethernet port Connect the printer to the Ethernet port 1 2 1 USB port Warning-Potential Damage: Do not touch the USB cable, any electrical or cabling connections, such as the fax feature, ... cord, or telephone, during a lightning storm. Be sure to match the following: • The USB symbol on the cable with the USB symbol on the printer • The appropriate Ethernet cable to the computer using a USB cable or Ethernet cable. Do not set up this product or make any...
A loss of data or a malfunction can occur. 2 Ethernet port Connect the printer to the Ethernet port 1 2 1 USB port Warning-Potential Damage: Do not touch the USB cable, any electrical or cabling connections, such as the fax feature, ... cord, or telephone, during a lightning storm. Be sure to match the following: • The USB symbol on the cable with the USB symbol on the printer • The appropriate Ethernet cable to the computer using a USB cable or Ethernet cable. Do not set up this product or make any...
User Guide
Page 37
... it is not installed correctly. Note: If you installed is not listed, then it again. • Network setup page-If your printer is a network model and is attached to a network, print a network setup page to verify the network connection. Printing a network setup page If the printer is "Not Connected," the LAN drop may not be active, or the...
... it is not installed correctly. Note: If you installed is not listed, then it again. • Network setup page-If your printer is a network model and is attached to a network, print a network setup page to verify the network connection. Printing a network setup page If the printer is "Not Connected," the LAN drop may not be active, or the...

User Guide
Page 39
... to auto for the same type on the router and on the printer, or the printer will need to set for infrastructure networks. Some ad hoc networks will be able to four in use on the network. or - Additional printer setup 39 7 Under Available Options, add any installed hardware options, ... 2 Double‑click Utilities, and then double‑click Print Center or Printer Setup Utility. 3 Select the printer, and then from the Printers menu, choose Show Info. 4 From the pop‑up to communicate on the network by the setup software. • SSID-The SSID is also referred to as...
... to auto for the same type on the router and on the printer, or the printer will need to set for infrastructure networks. Some ad hoc networks will be able to four in use on the network. or - Additional printer setup 39 7 Under Available Options, add any installed hardware options, ... 2 Double‑click Utilities, and then double‑click Print Center or Printer Setup Utility. 3 Select the printer, and then from the Printers menu, choose Show Info. 4 From the pop‑up to communicate on the network by the setup software. • SSID-The SSID is also referred to as...

User Guide
Page 40
... on the Software and Documentation CD. Note: Using an unsecured wireless network is connected to set up the printer. 1 Connect the power cable, and then turn the printer on. No security If your printer. • Your wireless network is installed in your wireless network does not use any type of security, then you want to the...
... on the Software and Documentation CD. Note: Using an unsecured wireless network is connected to set up the printer. 1 Connect the power cable, and then turn the printer on. No security If your printer. • Your wireless network is installed in your wireless network does not use any type of security, then you want to the...

User Guide
Page 41
...the following order: a Temporarily connect a USB cable between the computer on the wireless network to use the wireless printer, follow steps 2 through 6 and step 8 for each computer. Note: After the printer is configured, the software will instruct you to complete the software installation. 9 To... allow other computers on the wireless network and the printer. b If your printer has faxing capabilities, then connect the telephone cable. 8 Follow...
...the following order: a Temporarily connect a USB cable between the computer on the wireless network to use the wireless printer, follow steps 2 through 6 and step 8 for each computer. Note: After the printer is configured, the software will instruct you to complete the software installation. 9 To... allow other computers on the wireless network and the printer. b If your printer has faxing capabilities, then connect the telephone cable. 8 Follow...

User Guide
Page 42
... the x's are the last six digits of the MAC address located on the sheet that shipped with the printer. b Click Network. c Click AirPort. Enter the printer information 1 Access the AirPort options. Note: The application is referred to as Rendezvous in the space provided ...Mac OS X version 10.5 or later a From the Apple menu, choose System Preferences. Additional printer setup 42 Installing the printer on a wireless network (Macintosh) Prepare to configure the printer 1 Locate the printer MAC address on the MAC address sheet. 3 Open the Safari browser. 4 From the Bookmarks ...
... the x's are the last six digits of the MAC address located on the sheet that shipped with the printer. b Click Network. c Click AirPort. Enter the printer information 1 Access the AirPort options. Note: The application is referred to as Rendezvous in the space provided ...Mac OS X version 10.5 or later a From the Apple menu, choose System Preferences. Additional printer setup 42 Installing the printer on a wireless network (Macintosh) Prepare to configure the printer 1 Locate the printer MAC address on the MAC address sheet. 3 Open the Safari browser. 4 From the Bookmarks ...
User Guide
Page 43
... AirPort. Configure your computer to use to protect your wireless network. 4 Enter the security information necessary for the printer to a network printer, each Macintosh user must install a custom PostScript Printer Description (PPD) file and create a printer in the CD or DVD drive. e Click Continue after viewing...installation is installed on the computer: a Insert the Software and Documentation CD in the Print Center or Printer Setup Utility. 1 Install a PPD file on the computer. b Click Network. In Mac OS X version 10.4 and earlier a From the Finder desktop, choose Go > Applications....
... AirPort. Configure your computer to use to protect your wireless network. 4 Enter the security information necessary for the printer to a network printer, each Macintosh user must install a custom PostScript Printer Description (PPD) file and create a printer in the CD or DVD drive. e Click Continue after viewing...installation is installed on the computer: a Insert the Software and Documentation CD in the Print Center or Printer Setup Utility. 1 Install a PPD file on the computer. b Click Network. In Mac OS X version 10.4 and earlier a From the Finder desktop, choose Go > Applications....

User Guide
Page 44
... sure that: • You have completed the initial setup of the printer. • The printer is connected to your network with the appropriate type of cable. In Mac OS X version 10.4 and earlier 1 From the Finder desktop, choose Go > Applications. 2 Double&#... the list. 5 Click Add. Wait for the Welcome screen to Ethernet and fiber optic network connections. Additional printer setup 44 4 Select the printer from the list. 10 Click Add. Before you install the printer on a wired network. In Mac OS X version 10.4 and earlier 1 From the Finder desktop, choose Go > Applications. 2 ...
... sure that: • You have completed the initial setup of the printer. • The printer is connected to your network with the appropriate type of cable. In Mac OS X version 10.4 and earlier 1 From the Finder desktop, choose Go > Applications. 2 Double&#... the list. 5 Click Add. Wait for the Welcome screen to Ethernet and fiber optic network connections. Additional printer setup 44 4 Select the printer from the list. 10 Click Add. Before you install the printer on a wired network. In Mac OS X version 10.4 and earlier 1 From the Finder desktop, choose Go > Applications. 2 ...
User Guide
Page 108
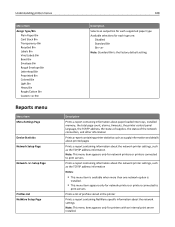
... information Notes: • This menu item is available when more than one network option is the factory default setting. Prints a report containing information about the network settings Note: This menu item appears only for network printers or printers connected to print servers. Understanding printer menus Menu Item Assign Type/Bin Plain Paper Bin Card Stock Bin...
... information Notes: • This menu item is available when more than one network option is the factory default setting. Prints a report containing information about the network settings Note: This menu item appears only for network printers or printers connected to print servers. Understanding printer menus Menu Item Assign Type/Bin Plain Paper Bin Card Stock Bin...

User Guide
Page 111
... menu is available from the Network/Ports menu: Network/Ports > Standard Network or Network > Std Network Setup or Net Setup > Reports or Network Reports Menu item Print Setup Page Print NetWare Setup Page Description Prints a report containing information about the current network setup Notes: • The Setup Page contains information about the network printer settings, such as the TCP...
... menu is available from the Network/Ports menu: Network/Ports > Standard Network or Network > Std Network Setup or Net Setup > Reports or Network Reports Menu item Print Setup Page Print NetWare Setup Page Description Prints a report containing information about the current network setup Notes: • The Setup Page contains information about the network printer settings, such as the TCP...
User Guide
Page 135
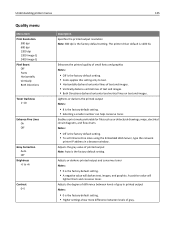
...flow charts Notes: • Off is the factory default setting. • To set Enhance Fine Lines using the Embedded Web Server, type the network printer IP address in printed output Notes: • 0 is the factory default setting. • Higher settings show more difference between levels of gray...output and conserves toner Notes: • 0 is the factory default setting. • Selecting a smaller number can help conserve toner. Understanding printer menus 135 Quality menu Menu item Print Resolution 300 dpi 600 dpi 1200 dpi 1200 Image Q 2400 Image Q Pixel Boost Off Fonts Horizontally ...
...flow charts Notes: • Off is the factory default setting. • To set Enhance Fine Lines using the Embedded Web Server, type the network printer IP address in printed output Notes: • 0 is the factory default setting. • Higher settings show more difference between levels of gray...output and conserves toner Notes: • 0 is the factory default setting. • Selecting a smaller number can help conserve toner. Understanding printer menus 135 Quality menu Menu item Print Resolution 300 dpi 600 dpi 1200 dpi 1200 Image Q 2400 Image Q Pixel Boost Off Fonts Horizontally ...
User Guide
Page 175
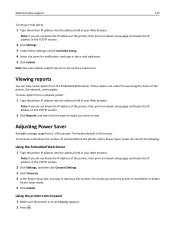
... 175 To set up e‑mail alerts: 1 Type the printer IP address into the address field of your Web browser. To view reports from 1-240 minutes. Adjusting Power Saver Available settings range from a network printer: 1 Type the printer IP address into the address field of your Web browser. Note...: If you do not know the IP address of the printer, then print a network setup page and locate the IP address in the TCP/IP...
... 175 To set up e‑mail alerts: 1 Type the printer IP address into the address field of your Web browser. To view reports from 1-240 minutes. Adjusting Power Saver Available settings range from a network printer: 1 Type the printer IP address into the address field of your Web browser. Note...: If you do not know the IP address of the printer, then print a network setup page and locate the IP address in the TCP/IP...
Service Manual
Page 240
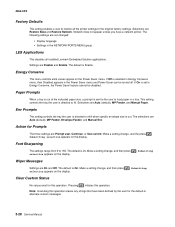
...setting change , and then press selection appears on the display. . Note: Executing this operation erases any strings that have a network printer. Energy Conserve This menu controls what values appear on the display. Env Prompts This setting controls the tray the user is directed..., and then press selection appears on the display. . 4062-XXX Factory Defaults This setting enables a user to restore all installed Lexmark Embedded Solution applications. Selections are Disable and Enable. Font Sharpening The settings range from 0 to the original factory settings. Submitting Clear...
...setting change , and then press selection appears on the display. . Note: Executing this operation erases any strings that have a network printer. Energy Conserve This menu controls what values appear on the display. Env Prompts This setting controls the tray the user is directed..., and then press selection appears on the display. . 4062-XXX Factory Defaults This setting enables a user to restore all installed Lexmark Embedded Solution applications. Selections are Disable and Enable. Font Sharpening The settings range from 0 to the original factory settings. Submitting Clear...
Service Manual
Page 266
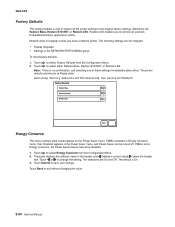
... be turned off. The default is no confirmation, and selecting one of these settings immediately takes effect. Network does not appear unless you to remove all the printer settings to the original factory settings. Touch 2. to exit without changing the value. 3-54 Service Manual... are On and Off. Touch or to change . The printer restarts and returns to save your change the setting. Note: There is On. 3. 4062-XXX Factory Defaults This setting enables a user to restore all Lexmark Embedded Solutions applications (LES). To reset factory defaults: 1. The...
... be turned off. The default is no confirmation, and selecting one of these settings immediately takes effect. Network does not appear unless you to remove all the printer settings to the original factory settings. Touch 2. to exit without changing the value. 3-54 Service Manual... are On and Off. Touch or to change . The printer restarts and returns to save your change the setting. Note: There is On. 3. 4062-XXX Factory Defaults This setting enables a user to restore all Lexmark Embedded Solutions applications (LES). To reset factory defaults: 1. The...


