
Setup Guide
Page 38
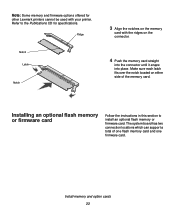
Note: Some memory and firmware options offered for specifications. Refer to install an optional flash memory or firmware card. Ridge Notch Latch Notch 3 Align the notches on either side of one flash memory card and one firmware card. Make sure each latch fits over the notch located on the memory card with your printer. Installing an optional flash memory or firmware card Follow the instructions in this section to the Publications CD for other Lexmark printers cannot be used with...
Note: Some memory and firmware options offered for specifications. Refer to install an optional flash memory or firmware card. Ridge Notch Latch Notch 3 Align the notches on either side of one flash memory card and one firmware card. Make sure each latch fits over the notch located on the memory card with your printer. Installing an optional flash memory or firmware card Follow the instructions in this section to the Publications CD for other Lexmark printers cannot be used with...

Setup Guide
Page 50
... drivers work well for local printing 45 b Select the printer you install Note: Installing a custom driver replaces the system driver. In addition to install printer drivers on our Lexmark Web site at www.lexmark.com. If the CD auto launches, exit the CD. Click Next. 2 Browse to the location of Windows software may need to install the custom printer driver using the drivers CD that you may already have administrative access to the following driver installation instructions, you have a system printer driver...
... drivers work well for local printing 45 b Select the printer you install Note: Installing a custom driver replaces the system driver. In addition to install printer drivers on our Lexmark Web site at www.lexmark.com. If the CD auto launches, exit the CD. Click Next. 2 Browse to the location of Windows software may need to install the custom printer driver using the drivers CD that you may already have administrative access to the following driver installation instructions, you have a system printer driver...
Setup Guide
Page 56
Visit our Lexmark Web site at a time. Setting parameters in the printer Note: For information about serial menus and messages, refer to the Publications CD that shipped with your printer. 1 On the printer operator panel, press Menu until Print Menus appears on the attached computer, and 3) match the serial settings in the COM port. Note the following restrictions: - The driver package for Sun Solaris supports USB connections to 1) set serial parameters in UNIX...
Visit our Lexmark Web site at a time. Setting parameters in the printer Note: For information about serial menus and messages, refer to the Publications CD that shipped with your printer. 1 On the printer operator panel, press Menu until Print Menus appears on the attached computer, and 3) match the serial settings in the COM port. Note the following restrictions: - The driver package for Sun Solaris supports USB connections to 1) set serial parameters in UNIX...

Setup Guide
Page 57
... exit the menus when finished. 6 Print a Menu Settings page and verify that your serial parameters are installing, and then select the communications port (COM1 or COM2) you want to the printer you accept the Printer Software License Agreement. 4 Select Local printer install, and then click Next. 5 Check the box next to use . Flow Control recommended protocol setting is connected to find the serial parameters. - Keep this page for local printing 52
... exit the menus when finished. 6 Print a Menu Settings page and verify that your serial parameters are installing, and then select the communications port (COM1 or COM2) you want to the printer you accept the Printer Software License Agreement. 4 Select Local printer install, and then click Next. 5 Check the box next to use . Flow Control recommended protocol setting is connected to find the serial parameters. - Keep this page for local printing 52
Setup Guide
Page 63
... network using an available LAN connection or open port on each network computer. Click View Documentation and look for information about each network computer. • A shared printer is on TCP/IP networks, installing printer drivers, and the process involved in creating new network ports. If you choose to install the printer drivers on a hub. In Windows environments, network printers can be "shared" so that shipped with your specific Windows environment. More information about network printer installation for direct printing...
... network using an available LAN connection or open port on each network computer. Click View Documentation and look for information about each network computer. • A shared printer is on TCP/IP networks, installing printer drivers, and the process involved in creating new network ports. If you choose to install the printer drivers on a hub. In Windows environments, network printers can be "shared" so that shipped with your specific Windows environment. More information about network printer installation for direct printing...
User's Reference
Page 4
... used print cartridge 86 Cleaning the printer 87 Installing the new print cartridge 88 Replacing the charge roll 90 Replacing the transfer roller 94 Replacing the pick rollers 98 Replacing the label fuser cleaner 101 Replacing the staple cartridge 104 Removing a used staple cartridge 105 Installing a new staple cartridge 106 Resetting the maintenance counter 108 Printer maintenance when printing on card stock 108 Printer maintenance when printing on labels 108 Chapter 5: Troubleshooting 109 Solving basic printer problems 109 Checking an unresponsive printer 109 Solving display...
... used print cartridge 86 Cleaning the printer 87 Installing the new print cartridge 88 Replacing the charge roll 90 Replacing the transfer roller 94 Replacing the pick rollers 98 Replacing the label fuser cleaner 101 Replacing the staple cartridge 104 Removing a used staple cartridge 105 Installing a new staple cartridge 106 Resetting the maintenance counter 108 Printer maintenance when printing on card stock 108 Printer maintenance when printing on labels 108 Chapter 5: Troubleshooting 109 Solving basic printer problems 109 Checking an unresponsive printer 109 Solving display...

User's Reference
Page 23
... initial Print box to see all the printer features, use the system drivers built into your operating system. Updated drivers, as well as the pages you can also use the Lexmark custom printer drivers. Refer to the Setup Guide for more information. Canceling from the Lexmark Web site.You can change. To support all of the available printer settings you want to print or the number of copies). 4 Click Properties or Setup to adjust printer settings not...
... initial Print box to see all the printer features, use the system drivers built into your operating system. Updated drivers, as well as the pages you can also use the Lexmark custom printer drivers. Refer to the Setup Guide for more information. Canceling from the Lexmark Web site.You can change. To support all of the available printer settings you want to print or the number of copies). 4 Click Properties or Setup to adjust printer settings not...

User's Reference
Page 36
...; Set the Paper Type menu item to Labels in letter size, A4 size, and legal size sheets. or 500-sheet drawers. When printing on the Lexmark Web site at least 1 mm (0.04 in a jam. or 500-sheet trays, or the optional 250- Try a sample of the printer require a special fuser cleaner for label applications to peel off during printing, resulting in .) away from edges. Set the Paper Type from the printer operator panel, the printer driver...
...; Set the Paper Type menu item to Labels in letter size, A4 size, and legal size sheets. or 500-sheet drawers. When printing on the Lexmark Web site at least 1 mm (0.04 in a jam. or 500-sheet trays, or the optional 250- Try a sample of the printer require a special fuser cleaner for label applications to peel off during printing, resulting in .) away from edges. Set the Paper Type from the printer operator panel, the printer driver...
User's Reference
Page 82
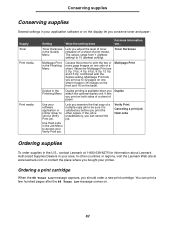
... Toner Low message comes on the display let you Duplex attach the optional duplex unit. Ordering a print cartridge When the 88 Toner Low message appears, you adjust the level of toner released on both sides of a sheet of print media. Toner Darkness Multipage Print in the Finishing Menu Causes the printer to be sure it is available when you conserve toner and paper: Supply Toner Print media Print media Setting What the setting does For more page images on the back). Verify Print Canceling a print job Held Jobs...
... Toner Low message comes on the display let you Duplex attach the optional duplex unit. Ordering a print cartridge When the 88 Toner Low message appears, you adjust the level of toner released on both sides of a sheet of print media. Toner Darkness Multipage Print in the Finishing Menu Causes the printer to be sure it is available when you conserve toner and paper: Supply Toner Print media Print media Setting What the setting does For more page images on the back). Verify Print Canceling a print job Held Jobs...
User's Reference
Page 113
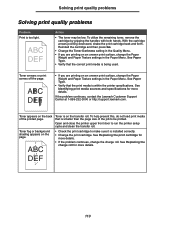
... Toner Darkness setting in the Paper Menu. Toner is installed correctly. • Change the print cartridge. Toner smears or print comes off the page. To help prevent this, do not load print media that is within the printer specifications. See Paper Type. • Verify that the correct print media is too light. To utilize the remaining toner, remove the cartridge by gripping the handles with both hands. Toner appears on the page. If the problem continues, contact the Lexmark Customer Support...
... Toner Darkness setting in the Paper Menu. Toner is installed correctly. • Change the print cartridge. Toner smears or print comes off the page. To help prevent this, do not load print media that is within the printer specifications. See Paper Type. • Verify that the correct print media is too light. To utilize the remaining toner, remove the cartridge by gripping the handles with both hands. Toner appears on the page. If the problem continues, contact the Lexmark Customer Support...
User's Reference
Page 116
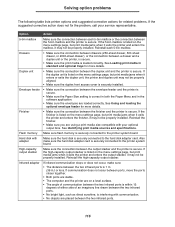
... side of an imaginary line drawn between the duplex unit and the printer is loaded correctly. Envelope feeder • Make sure the connection between the finisher and the printer is secure. Finisher • Make sure the connection between the envelope feeder and the printer is secure. • Make sure the Paper Size setting is interfering with communication. • No objects are using a print media size compatible with adapter Make sure the hard disk is listed on the menu settings page, but print media jams...
... side of an imaginary line drawn between the duplex unit and the printer is loaded correctly. Envelope feeder • Make sure the connection between the finisher and the printer is secure. Finisher • Make sure the connection between the envelope feeder and the printer is secure. • Make sure the Paper Size setting is interfering with communication. • No objects are using a print media size compatible with adapter Make sure the hard disk is listed on the menu settings page, but print media jams...

User's Reference
Page 184
... languages or specific applications, such as printed or that will print for each code point). To support multiple applications and languages, your print media. Symbol sets for each key on the keyboard (or more information, refer to the Card Stock & Label Guide available on your printer has 83 symbol sets for scientific text. See Using the printer menus and Print media guidelines for information on the drivers CD. Symbol sets A symbol set...
... languages or specific applications, such as printed or that will print for each code point). To support multiple applications and languages, your print media. Symbol sets for each key on the keyboard (or more information, refer to the Card Stock & Label Guide available on your printer has 83 symbol sets for scientific text. See Using the printer menus and Print media guidelines for information on the drivers CD. Symbol sets A symbol set...

User's Reference
Page 208
... the second line of job from the operator panel menus, press Go before sending a job to print. You use these numbers to the Ready state. • Clear some operator panel messages. • Resume printing after you have changed printer settings from the Print and Hold jobs. Note: Buttons act upon the information displayed on the display). • Exit printer menus and return to enter your personal identification number (PIN) after loading print media and clearing paper jams. • Exit Power Saver.
... the second line of job from the operator panel menus, press Go before sending a job to print. You use these numbers to the Ready state. • Clear some operator panel messages. • Resume printing after you have changed printer settings from the Print and Hold jobs. Note: Buttons act upon the information displayed on the display). • Exit printer menus and return to enter your personal identification number (PIN) after loading print media and clearing paper jams. • Exit Power Saver.

User's Reference
Page 226
... documents stacked in the manual feed slot. Prime Stapler is installed. Utilities Menu Use the Utilities Menu to available printer resources, printer settings, and print jobs. See also: Reset Active Bin Offset Pages Purpose: To offset the output of each print job or each other. Values: None* Between Copies Between Jobs Stacks all sheets directly on top of listings relating to print a variety of each copy of paper several times. Offsets each print job. Selects paper from the specified tray...
... documents stacked in the manual feed slot. Prime Stapler is installed. Utilities Menu Use the Utilities Menu to available printer resources, printer settings, and print jobs. See also: Reset Active Bin Offset Pages Purpose: To offset the output of each print job or each other. Values: None* Between Copies Between Jobs Stacks all sheets directly on top of listings relating to print a variety of each copy of paper several times. Offsets each print job. Selects paper from the specified tray...
User's Reference
Page 273
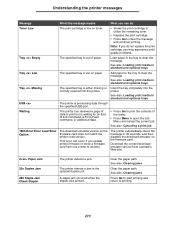
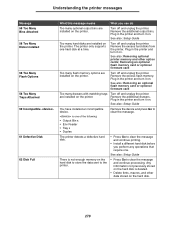
... stapler was primed. Add paper to the tray to clear the message and continue printing. Clear the paper path. Insert the tray completely into the printer. See also: Loading print media in the optional duplex unit. Understanding the printer messages Message What this message means What you can occur if you update printer firmware or move a firmware card from Lexmark's Web site. 2 Paper Jam 23x Duplex Jam 283 Staple Jam Check Stapler The printer detects a jam. Note: If you do Toner Low The print cartridge is either missing...
... stapler was primed. Add paper to the tray to clear the message and continue printing. Clear the paper path. Insert the tray completely into the printer. See also: Loading print media in the optional duplex unit. Understanding the printer messages Message What this message means What you can occur if you update printer firmware or move a firmware card from Lexmark's Web site. 2 Paper Jam 23x Duplex Jam 283 Staple Jam Check Stapler The printer detects a jam. Note: If you do Toner Low The print cartridge is either missing...
User's Reference
Page 278
... printer. See also: Setup Guide Too many flash memory options are installed on the printer. The printer only supports one of the following: • Output Bin x • Env Feeder • Tray x • Duplex Remove the device and press Go to clear the message. Turn off and unplug the printer. Plug in the printer and turn it on. Remove the additional output bins. Turn off and unplug the printer. Removing an optional flash memory card or optional firmware card Too many hard...
... printer. See also: Setup Guide Too many flash memory options are installed on the printer. The printer only supports one of the following: • Output Bin x • Env Feeder • Tray x • Duplex Remove the device and press Go to clear the message. Turn off and unplug the printer. Plug in the printer and turn it on. Remove the additional output bins. Turn off and unplug the printer. Removing an optional flash memory card or optional firmware card Too many hard...

User's Reference
Page 279
... message and continue printing. See also: Resetting the maintenance counter The printer has detected that may be allowed until you can do not have a print cartridge on . See also: Replacing the print cartridge Messages labeled 900-999 relate to clear the message and continue printing. • Format the disk before performing any disk operations. See also: Contacting service 279 The printer requires replacement of the problem. Turn the printer off and check all cable connections...
... message and continue printing. See also: Resetting the maintenance counter The printer has detected that may be allowed until you can do not have a print cartridge on . See also: Replacing the print cartridge Messages labeled 900-999 relate to clear the message and continue printing. • Format the disk before performing any disk operations. See also: Contacting service 279 The printer requires replacement of the problem. Turn the printer off and check all cable connections...
User's Reference
Page 288
... (Serial Menu) 259 PS SmartSwitch (USB Menu) 256 PS SmartSwitch, setting See also printer language 236 network port 253 parallel port 249 serial port 259 USB port 256 Q Quality Menu 234 PictureGrade 235 Print Resolution 234 Toner Darkness 235 Quick Reference (Help Menu) 263 R recommended papers 30 Remove Held Jobs (Utilities Menu) 228 repeat print 188 replacing charge roll 90 label fuser cleaner 101 pick rollers 98 staple cartridge 104 transfer roll 94 reserve print 189 Reset Active Bin (Job Menu) 233 Reset Printer (Job Menu) 232 resetting printer 232...
... (Serial Menu) 259 PS SmartSwitch (USB Menu) 256 PS SmartSwitch, setting See also printer language 236 network port 253 parallel port 249 serial port 259 USB port 256 Q Quality Menu 234 PictureGrade 235 Print Resolution 234 Toner Darkness 235 Quick Reference (Help Menu) 263 R recommended papers 30 Remove Held Jobs (Utilities Menu) 228 repeat print 188 replacing charge roll 90 label fuser cleaner 101 pick rollers 98 staple cartridge 104 transfer roll 94 reserve print 189 Reset Active Bin (Job Menu) 233 Reset Printer (Job Menu) 232 resetting printer 232...
User's Reference
Page 289
... offline 208 with Menu button 208 with Stop button 208 test printing Hex Trace mode 230 menus page 227 timeout print 237 wait 238 toner alarm 240 Toner Alarm (Setup Menu) 240 Toner Darkness (Quality Menu) 235 transfer roll replacing 94 transparencies guidelines 34 loading input tray 49 multipurpose feeder 61 tray linking 76 Tray Renumber (PCL Emul Menu) 245 troubleshooting basic printer problems 109 clearing operator panel error messages 208 display problems 110 network printing problems 119 option problems 115 optional 2000-sheet drawer 118 print quality 113 printer settings 207 printing...
... offline 208 with Menu button 208 with Stop button 208 test printing Hex Trace mode 230 menus page 227 timeout print 237 wait 238 toner alarm 240 Toner Alarm (Setup Menu) 240 Toner Darkness (Quality Menu) 235 transfer roll replacing 94 transparencies guidelines 34 loading input tray 49 multipurpose feeder 61 tray linking 76 Tray Renumber (PCL Emul Menu) 245 troubleshooting basic printer problems 109 clearing operator panel error messages 208 display problems 110 network printing problems 119 option problems 115 optional 2000-sheet drawer 118 print quality 113 printer settings 207 printing...

Technical Reference
Page 275
If the default paper source is a manual source, ManualFeed is the best match or not. Indicates the amount of time that should be printed. Use the N-up ), refer to your printer user documentation. Specifies the tray to select, if possible, whether it is set to be consulted to True, and a change is set by size, color, or weight. The command > setpagedevice selects Tray 2 even though Tray 1 is Off...
If the default paper source is a manual source, ManualFeed is the best match or not. Indicates the amount of time that should be printed. Use the N-up ), refer to your printer user documentation. Specifies the tray to select, if possible, whether it is set to be consulted to True, and a change is set by size, color, or weight. The command > setpagedevice selects Tray 2 even though Tray 1 is Off...


