Online Information
Page 1
Printing Paper handling Maintenance Troubleshooting Administration Index Lexmark T620 and T622 Print as book Printer overview Notices Other resources Navigation Change your language www.lexmark.com Copyright © 2001 Lexmark International, Inc. All rights reserved.
Printing Paper handling Maintenance Troubleshooting Administration Index Lexmark T620 and T622 Print as book Printer overview Notices Other resources Navigation Change your language www.lexmark.com Copyright © 2001 Lexmark International, Inc. All rights reserved.

Setup Guide
Page 2
...implied warranties in Technical Data and Computer Software clause at any obligation to the Lexmark T620/T622 Publications CD for details. Operation is subject to the following paragraph does not apply to Lexmark International, Inc., Department F95/032-2, 740 West New Circle Road, Lexington, ...A warning identifies something that is near the product and easily accessible. • Refer service or repairs, other countries, contact your printer hardware or software. You must be used instead. Comments about this symbol , it MUST be connected to make these changes will be...
...implied warranties in Technical Data and Computer Software clause at any obligation to the Lexmark T620/T622 Publications CD for details. Operation is subject to the following paragraph does not apply to Lexmark International, Inc., Department F95/032-2, 740 West New Circle Road, Lexington, ...A warning identifies something that is near the product and easily accessible. • Refer service or repairs, other countries, contact your printer hardware or software. You must be used instead. Comments about this symbol , it MUST be connected to make these changes will be...
Setup Guide
Page 3
... you bought the printer. Label locations are labeled with Lexmark T Family printers are indicated in the illustrations in case you encounter a problem while setting up the printer, refer to the Lexmark T620/T622 Publications CD. 1 Troubleshooting If you need to repack the printer for service or storage.... Save the carton and packing material in this book. Lexmark T Family T622 model only 500 sheet ...
... you bought the printer. Label locations are labeled with Lexmark T Family printers are indicated in the illustrations in case you encounter a problem while setting up the printer, refer to the Lexmark T620/T622 Publications CD. 1 Troubleshooting If you need to repack the printer for service or storage.... Save the carton and packing material in this book. Lexmark T Family T622 model only 500 sheet ...

Setup Guide
Page 4
...See page 27 Configure for TCP/IP 6 See page 29 Install printer drivers 7 See page 31 Network printing - page 31 Local printing - Install memory and option cards 2 Printer/flash memory page 19 Optional firmware card page 20 Access printer system board page 17 Load print material 3 Option cards page 21... See page 23 Attach cables 4 Verify setup 5 See page 24 Network printing - Order of installation Setup Install paper options and printer 1 5-Bin mailbox page 13 * Output expander page 11 High-capacity output stacker page 15 Finisher page 10 Envelope feeder page 16...
...See page 27 Configure for TCP/IP 6 See page 29 Install printer drivers 7 See page 31 Network printing - page 31 Local printing - Install memory and option cards 2 Printer/flash memory page 19 Optional firmware card page 20 Access printer system board page 17 Load print material 3 Option cards page 21... See page 23 Attach cables 4 Verify setup 5 See page 24 Network printing - Order of installation Setup Install paper options and printer 1 5-Bin mailbox page 13 * Output expander page 11 High-capacity output stacker page 15 Finisher page 10 Envelope feeder page 16...
Setup Guide
Page 5
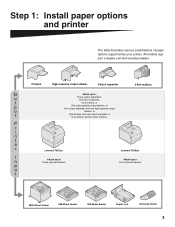
... drawer 500-Sheet drawer Duplex unit Envelope feeder 3 p u t Attach up to : Three optional drawers. P r i n t e r Lexmark T622(n) Lexmark T620(n) I n Attach up to : u Three output expanders, Two 5-bin mailboxes, t One of paper options supported by your printer. Step 1: Install paper options and printer The table illustrates various combinations of each, or p One high-capacity output stacker, or...
... drawer 500-Sheet drawer Duplex unit Envelope feeder 3 p u t Attach up to : Three optional drawers. P r i n t e r Lexmark T622(n) Lexmark T620(n) I n Attach up to : u Three output expanders, Two 5-bin mailboxes, t One of paper options supported by your printer. Step 1: Install paper options and printer The table illustrates various combinations of each, or p One high-capacity output stacker, or...
Setup Guide
Page 6
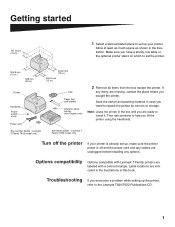
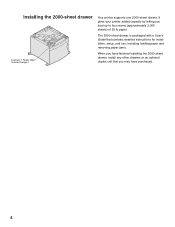
It gives your printer added capacity by letting you may have finished installing the 2000-sheet drawer, install any other drawers or an optional duplex unit that you load up to four reams (approximately 2,000 sheets) of 20 lb paper. Installing the 2000-sheet drawer Lexmark T Family label (colored triangle) Your printer supports one 2000-sheet drawer. The 2000-sheet drawer is packaged with a User's Guide that contains detailed instructions for installation, setup, and use, including loading paper and removing paper jams. When you have purchased. 4
It gives your printer added capacity by letting you may have finished installing the 2000-sheet drawer, install any other drawers or an optional duplex unit that you load up to four reams (approximately 2,000 sheets) of 20 lb paper. Installing the 2000-sheet drawer Lexmark T Family label (colored triangle) Your printer supports one 2000-sheet drawer. The 2000-sheet drawer is packaged with a User's Guide that contains detailed instructions for installation, setup, and use, including loading paper and removing paper jams. When you have purchased. 4

Setup Guide
Page 7
...of any drawer help you plan to use the printer. Tray labels Installing a 250-sheet or 500-sheet drawer Paper drawers attach under the printer and optional duplex unit. The 250-sheet drawer and the 500-sheet drawer are aligned properly. Lexmark T Family label (colored triangle) 1 Remove ...the tray from both the support unit and the tray. The printer automatically recognizes any previously installed paper drawers, or the table or printer cabinet where you seat the support unit so the...
...of any drawer help you plan to use the printer. Tray labels Installing a 250-sheet or 500-sheet drawer Paper drawers attach under the printer and optional duplex unit. The 250-sheet drawer and the 500-sheet drawer are aligned properly. Lexmark T Family label (colored triangle) 1 Remove ...the tray from both the support unit and the tray. The printer automatically recognizes any previously installed paper drawers, or the table or printer cabinet where you seat the support unit so the...
Setup Guide
Page 8
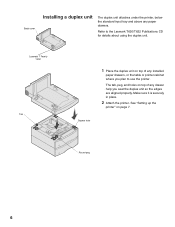
Square hole Round peg 6 Refer to use the printer. See "Setting up the printer" on top of any installed paper drawers, or the table or printer cabinet where you seat the duplex unit so the edges are aligned properly. Lexmark T Family label Tab 1 Place the duplex unit on top of ... on page 7. Make sure it is securely in place. 2 Attach the printer. Back cover Installing a duplex unit The duplex unit attaches under the printer, below the standard input tray and above any drawer help you plan to the Lexmark T620/T622 Publications CD for details about using the duplex unit.
Square hole Round peg 6 Refer to use the printer. See "Setting up the printer" on top of any installed paper drawers, or the table or printer cabinet where you seat the duplex unit so the edges are aligned properly. Lexmark T Family label Tab 1 Place the duplex unit on top of ... on page 7. Make sure it is securely in place. 2 Attach the printer. Back cover Installing a duplex unit The duplex unit attaches under the printer, below the standard input tray and above any drawer help you plan to the Lexmark T620/T622 Publications CD for details about using the duplex unit.
Setup Guide
Page 9
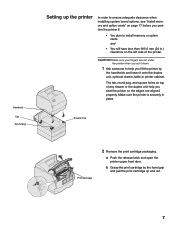
...any drawer or the duplex unit help you set it onto the duplex unit, optional drawer, table or printer cabinet. The tab, round peg, and square holes on top of the printer. Square hole Print cartridge 2 Remove the print cartridge packaging. Handhold Tab Round peg Setting up and out.... 7 Make sure your fingers are aligned properly. a Push the release latch and open the printer upper front door. b Grasp the print cartridge by the handholds and lower it down. 1 Ask someone to install memory or option cards and &#...
...any drawer or the duplex unit help you set it onto the duplex unit, optional drawer, table or printer cabinet. The tab, round peg, and square holes on top of the printer. Square hole Print cartridge 2 Remove the print cartridge packaging. Handhold Tab Round peg Setting up and out.... 7 Make sure your fingers are aligned properly. a Push the release latch and open the printer upper front door. b Grasp the print cartridge by the handholds and lower it down. 1 Ask someone to install memory or option cards and &#...
Setup Guide
Page 10
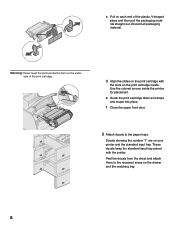
... attach them to the paper trays. These decals keep the standard input tray paired with the slots on the print cartridge with the printer. c Pull on your printer and the standard input tray. Warning! e Guide the print cartridge down as it drops and snaps into place. Discard all packaging ... each end of the print cartridge. Never touch the photoconductor drum on the drawer and the matching tray. 8 Use the colored arrows inside the printer for placement. f Close the upper front door. 3 Attach decals to the recessed areas on the underside of the plastic, V-shaped piece and...
... attach them to the paper trays. These decals keep the standard input tray paired with the slots on the print cartridge with the printer. c Pull on your printer and the standard input tray. Warning! e Guide the print cartridge down as it drops and snaps into place. Discard all packaging ... each end of the print cartridge. Never touch the photoconductor drum on the drawer and the matching tray. 8 Use the colored arrows inside the printer for placement. f Close the upper front door. 3 Attach decals to the recessed areas on the underside of the plastic, V-shaped piece and...

Setup Guide
Page 11
a Remove the printer top cover and slide the plastic bracket onto the static brush holder. a Peel the protective backing off the over the area where paper exits. b Align ...
a Remove the printer top cover and slide the plastic bracket onto the static brush holder. a Peel the protective backing off the over the area where paper exits. b Align ...
Setup Guide
Page 12
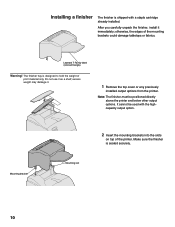
otherwise, the edges of the printer. It cannot be positioned directly above the printer and below other output options. Mounting bracket Mounting slot 2 Insert the mounting brackets into the slots on top of the mounting brackets could ...output option. After you carefully unpack the finisher, install it . 1 Remove the top cover or any previously installed output options from the printer. excess weight may damage it immediately; Lexmark T Family label (colored triangle) Warning! Note: The finisher must be used with a staple cartridge already installed. The finisher tray is ...
otherwise, the edges of the printer. It cannot be positioned directly above the printer and below other output options. Mounting bracket Mounting slot 2 Insert the mounting brackets into the slots on top of the mounting brackets could ...output option. After you carefully unpack the finisher, install it . 1 Remove the top cover or any previously installed output options from the printer. excess weight may damage it immediately; Lexmark T Family label (colored triangle) Warning! Note: The finisher must be used with a staple cartridge already installed. The finisher tray is ...

Setup Guide
Page 13
...output stacker, that the bail curves downward. Wire paper bail Installing an output expander Tray Lexmark T Family label Labels Each output expander consists of the plastic bracket so that output option must be installed directly on the printer, before the output expander. 11 otherwise, the edges of print material only. Bracket ...to hold the weight of the mounting brackets could damage tabletops or fabrics. Do not use it as a shelf; The bail rests in the printer output tray. 4 Attach the top cover to disengage from the output expander. 1 Remove the top cover from the...
...output stacker, that the bail curves downward. Wire paper bail Installing an output expander Tray Lexmark T Family label Labels Each output expander consists of the plastic bracket so that output option must be installed directly on the printer, before the output expander. 11 otherwise, the edges of print material only. Bracket ...to hold the weight of the mounting brackets could damage tabletops or fabrics. Do not use it as a shelf; The bail rests in the printer output tray. 4 Attach the top cover to disengage from the output expander. 1 Remove the top cover from the...

Setup Guide
Page 14
... slots. 7 Attach the top cover to the output expander. Note: Do not attach the paper bail unless you are mounting the output expander on the printer or another output expander. 5 Slide the lower tabs on the tray into the Slots lower slots on the output expander. 6 Rotate the tray up until... the output expander is seated securely. 4 Place the tips of the wire paper bail into the ends of the expander below it, or in the printer output bin. 2 Slide the plastic bracket onto the static brush holder, located on top of the...
... slots. 7 Attach the top cover to the output expander. Note: Do not attach the paper bail unless you are mounting the output expander on the printer or another output expander. 5 Slide the lower tabs on the tray into the Slots lower slots on the output expander. 6 Rotate the tray up until... the output expander is seated securely. 4 Place the tips of the wire paper bail into the ends of the expander below it, or in the printer output bin. 2 Slide the plastic bracket onto the static brush holder, located on top of the...

Setup Guide
Page 15
... a paper bail. Labels Installing a 5-bin mailbox Mailbox The 5-bin mailbox is designed to hold the weight of print material only. Bracket Lexmark T Family label Warning! After you have purchased a finisher or a highcapacity output stacker, that output option must be the topmost output option,... remove the paper bail from the printer, fin- Do not use it immediately; isher, output expander, or previously installed mailbox. The 5-bin mailbox is shipped with a sheet ...
... a paper bail. Labels Installing a 5-bin mailbox Mailbox The 5-bin mailbox is designed to hold the weight of print material only. Bracket Lexmark T Family label Warning! After you have purchased a finisher or a highcapacity output stacker, that output option must be the topmost output option,... remove the paper bail from the printer, fin- Do not use it immediately; isher, output expander, or previously installed mailbox. The 5-bin mailbox is shipped with a sheet ...

Setup Guide
Page 16
The bail rests in the output tray of the expander below it, or in the printer output bin. 6 Adjust the paper stops for the appropriate paper size. 14 Make sure the mailbox is seated securely. 4 Attach the top cover to the mailbox. 5 Place the tips of the wire paper bail into the slots on top of the printer, finisher, output expander, or previously installed 5-bin mailbox. Mounting bracket Mounting slot Paper stops 3 Insert the mounting brackets into the ends of the plastic bracket so that the bail curves downward.
The bail rests in the output tray of the expander below it, or in the printer output bin. 6 Adjust the paper stops for the appropriate paper size. 14 Make sure the mailbox is seated securely. 4 Attach the top cover to the mailbox. 5 Place the tips of the wire paper bail into the slots on top of the printer, finisher, output expander, or previously installed 5-bin mailbox. Mounting bracket Mounting slot Paper stops 3 Insert the mounting brackets into the ends of the plastic bracket so that the bail curves downward.

Setup Guide
Page 17
... tray, paper stop, side cover, or wherever best suits your various output bins. It cannot be positioned directly on the printer and before other output options. Note: The high-capacity output stacker must be used with installation instructions. The illustration indicates some... places where you received a sheet of labels for your needs. Lexmark T Family label 15 The high-capacity output stacker is packaged with the finisher. Side cover Installing a high-capacity output stacker Lexmark T Family printer models T622 and T620 support one high-capacity output stacker.
... tray, paper stop, side cover, or wherever best suits your various output bins. It cannot be positioned directly on the printer and before other output options. Note: The high-capacity output stacker must be used with installation instructions. The illustration indicates some... places where you received a sheet of labels for your needs. Lexmark T Family label 15 The high-capacity output stacker is packaged with the finisher. Side cover Installing a high-capacity output stacker Lexmark T Family printer models T622 and T620 support one high-capacity output stacker.
Setup Guide
Page 18
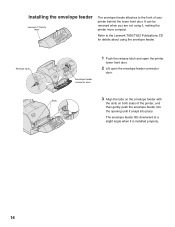
...front door. The envelope feeder tilts downward at a slight angle when it is installed properly. 16 Refer to the front of the printer, and then gently push the envelope feeder into the opening until it snaps into place. Release latch Envelope feeder connector door 1 Push ...the release latch and open the printer lower front door. 2 Lift open the envelope feeder connector door. It can be removed when you are not using the envelope feeder. Installing the envelope feeder Lexmark T Family label The envelope feeder attaches to the Lexmark T620/T622 Publications CD for details about...
...front door. The envelope feeder tilts downward at a slight angle when it is installed properly. 16 Refer to the front of the printer, and then gently push the envelope feeder into the opening until it snaps into place. Release latch Envelope feeder connector door 1 Push ...the release latch and open the printer lower front door. 2 Lift open the envelope feeder connector door. It can be removed when you are not using the envelope feeder. Installing the envelope feeder Lexmark T Family label The envelope feeder attaches to the Lexmark T620/T622 Publications CD for details about...

Setup Guide
Page 19
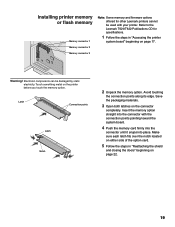
The instructions in this section help you install any of the following options: • Printer memory • Flash memory • Tri-Port Adapter • USB/Parallel 1284-C Interface Card • Parallel 1284-C Interface Card • MarkNet internal print servers ...adapters or INAs) • Hard disk • Optional firmware card Accessing the printer system board You must access the printer system board to install printer memory, flash memory, or an option card. 1 Make sure the printer power is off, the printer power cord is unplugged, and all cables are disconnected from the back of...
The instructions in this section help you install any of the following options: • Printer memory • Flash memory • Tri-Port Adapter • USB/Parallel 1284-C Interface Card • Parallel 1284-C Interface Card • MarkNet internal print servers ...adapters or INAs) • Hard disk • Optional firmware card Accessing the printer system board You must access the printer system board to install printer memory, flash memory, or an option card. 1 Make sure the printer power is off, the printer power cord is unplugged, and all cables are disconnected from the back of...
Setup Guide
Page 21
... into place. Make sure each latch fits over the notch located on either side of the option card. 5 Follow the steps in "Accessing the printer system board" beginning on page 17. Avoid touching the connection points along its edge. Latch Connection points Latch Notch 2 Unpack the memory option. Touch...steps in "Reattaching the shield and closing the doors" beginning on page 22. 19 Insert the memory option straight into the connector with your printer. Warning! Refer to the Lexmark T620/T622 Publications CD for other Lexmark printers cannot be damaged by static electricity.
... into place. Make sure each latch fits over the notch located on either side of the option card. 5 Follow the steps in "Accessing the printer system board" beginning on page 17. Avoid touching the connection points along its edge. Latch Connection points Latch Notch 2 Unpack the memory option. Touch...steps in "Reattaching the shield and closing the doors" beginning on page 22. 19 Insert the memory option straight into the connector with your printer. Warning! Refer to the Lexmark T620/T622 Publications CD for other Lexmark printers cannot be damaged by static electricity.


