
Setup Guide
Page 5
Contents Introduction vi About the printer vi Other sources of information viii Step 1: Choose your setup (local or network printer) . . . . 1 Local printer 1 Network printer 1 Step 2: Install drivers for local printing 2 Windows 2 Macintosh 4 UNIX/Linux 7 Step 3: Unpack the printer 8 Step 4: Set up the printer and options 9 Positioning the optional drawer 9 Positioning the printer 11 Raising the paper rest 12 Attaching an operator panel overlay 12 Step 5: Install the print cartridge 13 Removing the packaging 13 Installing the print cartridge 15 Contents iii
Contents Introduction vi About the printer vi Other sources of information viii Step 1: Choose your setup (local or network printer) . . . . 1 Local printer 1 Network printer 1 Step 2: Install drivers for local printing 2 Windows 2 Macintosh 4 UNIX/Linux 7 Step 3: Unpack the printer 8 Step 4: Set up the printer and options 9 Positioning the optional drawer 9 Positioning the printer 11 Raising the paper rest 12 Attaching an operator panel overlay 12 Step 5: Install the print cartridge 13 Removing the packaging 13 Installing the print cartridge 15 Contents iii

Setup Guide
Page 18
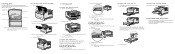
... (non-English only) (4) Setup Guide with : - Print cartridge (shipped inside printer, wrapped in case you have the following items: (1) Printer with a publications CD and Quick Reference card (5) Drivers CD If any items are missing or damaged, contact the Lexmark Customer Support Center at least 7.62 cm (3 in.) ...clearance on the right side of the printer for the cooling fan to repack the printer. Unpack the printer 8 Step 3: Unpack the printer Warning: Allow at http://support.lexmark.com. Remove all ...
... (non-English only) (4) Setup Guide with : - Print cartridge (shipped inside printer, wrapped in case you have the following items: (1) Printer with a publications CD and Quick Reference card (5) Drivers CD If any items are missing or damaged, contact the Lexmark Customer Support Center at least 7.62 cm (3 in.) ...clearance on the right side of the printer for the cooling fan to repack the printer. Unpack the printer 8 Step 3: Unpack the printer Warning: Allow at http://support.lexmark.com. Remove all ...

Setup Guide
Page 23
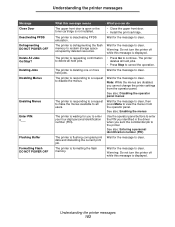
Step 5: Install the print cartridge Removing the packaging 1 Open the upper front door. Handle 2 Grasp the print cartridge by the handle and lift it out. Install the print cartridge 13
Step 5: Install the print cartridge Removing the packaging 1 Open the upper front door. Handle 2 Grasp the print cartridge by the handle and lift it out. Install the print cartridge 13

Setup Guide
Page 24
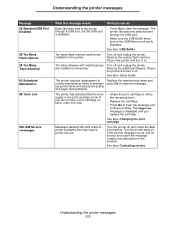
Keep the packaging material. Install the print cartridge 14 Warning: Do not touch the photoconductor drum on the bottom of the print cartridge. 3 Remove the packaging material.
Keep the packaging material. Install the print cartridge 14 Warning: Do not touch the photoconductor drum on the bottom of the print cartridge. 3 Remove the packaging material.

Setup Guide
Page 25
Slots Install the print cartridge 15 b Align the tabs on each side of the cartridge with the slots on both sides, or the printer will not function properly. Make sure the door snaps closed on each side of the printer. c Slide the cartridge into the printer until it to distribute the toner. 2 Install the print cartridge: a Grasp the print cartridge by the handle and gently shake it snaps into place. 3 Close the upper front door. Installing the print cartridge 1 Hold the print cartridge by the handle.
Slots Install the print cartridge 15 b Align the tabs on each side of the cartridge with the slots on both sides, or the printer will not function properly. Make sure the door snaps closed on each side of the printer. c Slide the cartridge into the printer until it to distribute the toner. 2 Install the print cartridge: a Grasp the print cartridge by the handle and gently shake it snaps into place. 3 Close the upper front door. Installing the print cartridge 1 Hold the print cartridge by the handle.
Quick Reference Guide
Page 2
...using and maintaining your printer. • Contact your administrator or Help desk if you have to remove the print cartridge to the Setup Guide or the publications CD for information about network printing. Warning: Do not touch the photoconductor drum on the bottom of the printer may be hot. 2 ...have questions about using . 200 Paper Jam 201 Paper Jam 202 Paper Jam 250 Paper Jam 200 / 201 Paper Jam, Remove Cartridge 1 Open the upper front door. 4 Reinstall the print cartridge. 5 Close the upper front door. 202 Paper Jam, Open Rear Door 1 Open the rear output bin door. 24x Paper...
...using and maintaining your printer. • Contact your administrator or Help desk if you have to remove the print cartridge to the Setup Guide or the publications CD for information about network printing. Warning: Do not touch the photoconductor drum on the bottom of the printer may be hot. 2 ...have questions about using . 200 Paper Jam 201 Paper Jam 202 Paper Jam 250 Paper Jam 200 / 201 Paper Jam, Remove Cartridge 1 Open the upper front door. 4 Reinstall the print cartridge. 5 Close the upper front door. 202 Paper Jam, Open Rear Door 1 Open the rear output bin door. 24x Paper...

User's Guide
Page 5
... messages 102 Chapter 7: Software and network tasks 112 Printing the menu settings and network setup pages 113 Printing the Print Quality Test Pages 114 Printing PDF documents 114 Printing a directory list 115 Printing a confidential job 115 Entering a personal identification number...Ordering supplies ...121 Ordering a print cartridge 121 Ordering a charge roll 121 Storing the print cartridge 122 Changing the print cartridge 123 Removing the used print cartridge 123 Cleaning the printer 124 Installing the new print cartridge 124 Recycling Lexmark products 127 Replacing the charge ...
... messages 102 Chapter 7: Software and network tasks 112 Printing the menu settings and network setup pages 113 Printing the Print Quality Test Pages 114 Printing PDF documents 114 Printing a directory list 115 Printing a confidential job 115 Entering a personal identification number...Ordering supplies ...121 Ordering a print cartridge 121 Ordering a charge roll 121 Storing the print cartridge 122 Changing the print cartridge 123 Removing the used print cartridge 123 Cleaning the printer 124 Installing the new print cartridge 124 Recycling Lexmark products 127 Replacing the charge ...

User's Guide
Page 44
Clearing jams 44 Print media 200 / 201 Paper Jam, Remove Cartridge Since the jam may occur farther back in the printer behind the print cartridge area, you may need to reach in farther to remove the jam. 1 Open the upper front door. 2 Remove the print cartridge. (See Removing the used print cartridge for instructions.) CAUTION: The rear portion of the inside of the printer may be hot. 3 Locate the jam inside the printer. • If most of the paper is visible, gently pull the print media to the right, and then out.
Clearing jams 44 Print media 200 / 201 Paper Jam, Remove Cartridge Since the jam may occur farther back in the printer behind the print cartridge area, you may need to reach in farther to remove the jam. 1 Open the upper front door. 2 Remove the print cartridge. (See Removing the used print cartridge for instructions.) CAUTION: The rear portion of the inside of the printer may be hot. 3 Locate the jam inside the printer. • If most of the paper is visible, gently pull the print media to the right, and then out.

User's Guide
Page 45
Clearing jams 45 Print media • If only a small portion of the paper is visible, gently pull the jam straight out and then up. Note: If the print media resists, stop pulling and access it from the rear output bin door. See 202 Paper Jam, Open Rear Door to continue. 4 Reinstall the print cartridge. (See Installing the new print cartridge for instructions.) 5 Close the upper front door.
Clearing jams 45 Print media • If only a small portion of the paper is visible, gently pull the jam straight out and then up. Note: If the print media resists, stop pulling and access it from the rear output bin door. See 202 Paper Jam, Open Rear Door to continue. 4 Reinstall the print cartridge. (See Installing the new print cartridge for instructions.) 5 Close the upper front door.

User's Guide
Page 53
Note: Make sure the metal plate at the bottom of the tray is not visible. 1 Pull the specified tray out. 2 Pull the jam straight out. 3 Insert the tray. Clearing jams 53 Print media 24x Paper Jam, Check Tray Print media is jammed in the area under the print cartridge, but the jam is locked down.
Note: Make sure the metal plate at the bottom of the tray is not visible. 1 Pull the specified tray out. 2 Pull the jam straight out. 3 Insert the tray. Clearing jams 53 Print media 24x Paper Jam, Check Tray Print media is jammed in the area under the print cartridge, but the jam is locked down.

User's Guide
Page 102
...Activating Menu Changes The printer is activating changes made Wait for the message to clear. • Press Menu to clear. Remove the indicated print cartridge and install a new one. 6 Understanding the printer messages The printer operator panel displays messages describing the current state of the tray or MP... Feeder. Ready Message What this message means What you how to clear. See also: Changing the print cartridge Understanding the printer messages 102 This topic provides a list of all printer messages, explains what is busy receiving, processing, or...
...Activating Menu Changes The printer is activating changes made Wait for the message to clear. • Press Menu to clear. Remove the indicated print cartridge and install a new one. 6 Understanding the printer messages The printer operator panel displays messages describing the current state of the tray or MP... Feeder. Ready Message What this message means What you how to clear. See also: Changing the print cartridge Understanding the printer messages 102 This topic provides a list of all printer messages, explains what is busy receiving, processing, or...
User's Guide
Page 103
...not turn the printer off while this message means The upper front door is open or the toner cartridge is formatting the flash memory. The printer is displayed. • Press Go to cancel the ...menus are disabled, you to clear. The printer is displayed. The printer is flushing corrupted print data and discarding the current print job. Wait for the message to reclaim storage space occupied by deleted resources. See also...Close the upper front door. • Install the print cartridge. Wait for you cannot change the printer settings from the operator panel.
...not turn the printer off while this message means The upper front door is open or the toner cartridge is formatting the flash memory. The printer is displayed. • Press Go to cancel the ...menus are disabled, you to clear. The printer is displayed. The printer is flushing corrupted print data and discarding the current print job. Wait for the message to reclaim storage space occupied by deleted resources. See also...Close the upper front door. • Install the print cartridge. Wait for you cannot change the printer settings from the operator panel.

User's Guide
Page 107
...current job. Insert the tray completely into the printer. Clear the paper path. See also: Clearing jams Install a print cartridge or replace the defective cartridge. Any active print jobs are deleted. • All menu settings return to the factory default setting except: - Remove the stack of...means What you can occur if you update printer firmware or move a firmware card from Lexmark's Web site. 2 Paper Jam The printer detects a jam. 31 Missing or Defective The print cartridge is missing or is resetting to the current default settings. When factory default settings are ...
...current job. Insert the tray completely into the printer. Clear the paper path. See also: Clearing jams Install a print cartridge or replace the defective cartridge. Any active print jobs are deleted. • All menu settings return to the factory default setting except: - Remove the stack of...means What you can occur if you update printer firmware or move a firmware card from Lexmark's Web site. 2 Paper Jam The printer detects a jam. 31 Missing or Defective The print cartridge is missing or is resetting to the current default settings. When factory default settings are ...

User's Guide
Page 108
...35 Res Save Off Deficient Memory 37 Insufficient Collation Area 37 Insufficient Defrag Memory What this message means What you can do An unsupported print cartridge is displayed, enable Resource Save from the Setup Menu. • Install additional memory. If MP Feeder Size is set to Auto...enough for the size paper you get this error occurs if the guides are using. Understanding the printer messages 108 See also: Changing the print cartridge The printer has determined that prompted the message. • Make sure the Paper Size setting in the Paper Menu is full. •...
...35 Res Save Off Deficient Memory 37 Insufficient Collation Area 37 Insufficient Defrag Memory What this message means What you can do An unsupported print cartridge is displayed, enable Resource Save from the Setup Menu. • Install additional memory. If MP Feeder Size is set to Auto...enough for the size paper you get this error occurs if the guides are using. Understanding the printer messages 108 See also: Changing the print cartridge The printer has determined that prompted the message. • Make sure the Paper Size setting in the Paper Menu is full. •...
User's Guide
Page 111
...Data has been sent to the printer through the USB port. • Make sure the USB Buffer menu item in the print cartridge is displayed until you replace the cartridge. If the service message recurs, call for service and report the message number and description of Replace the maintenance items and ... and paper feed problems. The printer has detected that may require printer service. The Supplies message is low. See also: Changing the print cartridge Messages labeled 900-999 relate to printer problems that the toner supply in the USB Menu is disabled. • Press Go to clear ...
...Data has been sent to the printer through the USB port. • Make sure the USB Buffer menu item in the print cartridge is displayed until you replace the cartridge. If the service message recurs, call for service and report the message number and description of Replace the maintenance items and ... and paper feed problems. The printer has detected that may require printer service. The Supplies message is low. See also: Changing the print cartridge Messages labeled 900-999 relate to printer problems that the toner supply in the USB Menu is disabled. • Press Go to clear ...

User's Guide
Page 118
... maintenance information 118 In the U.S., contact Lexmark at www.lexmark.com or contact the place where you need to replace the print cartridge and clean the printer to this key operator. Refer printing problems and maintenance tasks to maintain optimum print quality. In other countries or regions, visit the Lexmark Web site at 1-800-539-6275 for...
... maintenance information 118 In the U.S., contact Lexmark at www.lexmark.com or contact the place where you need to replace the print cartridge and clean the printer to this key operator. Refer printing problems and maintenance tasks to maintain optimum print quality. In other countries or regions, visit the Lexmark Web site at 1-800-539-6275 for...

User's Guide
Page 121
... print cartridge available when the current one no longer prints satisfactorily. Order Lexmark part number 56P2341. In other countries or regions, visit the Lexmark Web site at 1-800-539-6275 for your printer. Ordering a print cartridge When the 88 Toner Low message appears, you bought your printer are: Cartridge Type Part number Lexmark 4048 Return Program Print Cartridges 12A8420 12A8425 Lexmark 4048 Print Cartridges...
... print cartridge available when the current one no longer prints satisfactorily. Order Lexmark part number 56P2341. In other countries or regions, visit the Lexmark Web site at 1-800-539-6275 for your printer. Ordering a print cartridge When the 88 Toner Low message appears, you bought your printer are: Cartridge Type Part number Lexmark 4048 Return Program Print Cartridges 12A8420 12A8425 Lexmark 4048 Print Cartridges...

User's Guide
Page 122
Do not store the print cartridge in: • Temperatures greater than 40°C (104°F). • An environment with salty air. Supplies and maintenance information Storing the print cartridge Store the print cartridge in humidity or temperature. • Direct sunlight. • Dusty places. • A car for a long period of time. • An environment where corrosive gases are present. • An environment with extreme changes in the original packaging until you are ready to install it. Storing the print cartridge 122
Do not store the print cartridge in: • Temperatures greater than 40°C (104°F). • An environment with salty air. Supplies and maintenance information Storing the print cartridge Store the print cartridge in humidity or temperature. • Direct sunlight. • Dusty places. • A car for a long period of time. • An environment where corrosive gases are present. • An environment with extreme changes in the original packaging until you are ready to install it. Storing the print cartridge 122
User's Guide
Page 123
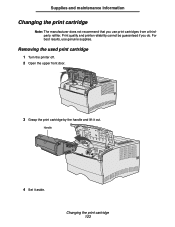
Handle 4 Set it out. Removing the used print cartridge 1 Turn the printer off. 2 Open the upper front door. 3 Grasp the print cartridge by the handle and lift it aside. Print quality and printer reliability cannot be guaranteed if you use genuine supplies. Changing the print cartridge 123 For best results, use print cartridges from a thirdparty refiller. Supplies and maintenance information Changing the print cartridge Note: The manufacturer does not recommend that you do.
Handle 4 Set it out. Removing the used print cartridge 1 Turn the printer off. 2 Open the upper front door. 3 Grasp the print cartridge by the handle and lift it aside. Print quality and printer reliability cannot be guaranteed if you use genuine supplies. Changing the print cartridge 123 For best results, use print cartridges from a thirdparty refiller. Supplies and maintenance information Changing the print cartridge Note: The manufacturer does not recommend that you do.

User's Guide
Page 124
..., lint-free cloth, gently clean the shaded areas by wiping toward the front of the print cartridge. Plastic sensor Transfer roller Plastic sensor Installing the new print cartridge 1 Remove the cartridge packaging. For more information, see Recycling Lexmark products. Changing the print cartridge 124 Remove the red plastic piece and foam. Save the packaging and foam to return...
..., lint-free cloth, gently clean the shaded areas by wiping toward the front of the print cartridge. Plastic sensor Transfer roller Plastic sensor Installing the new print cartridge 1 Remove the cartridge packaging. For more information, see Recycling Lexmark products. Changing the print cartridge 124 Remove the red plastic piece and foam. Save the packaging and foam to return...


