
Quick Reference
Page 2
... we encourage our customers to participate in the postage-paid bags. Bags usually arrive within 7-10 days. printer except as the only cartridge alternative to Lexmark's recycling partner. Important safety information Connect the power cord to request postage-paid return bag, and then... be used with all new parts, though components may be used only once. This patented printer is preaddressed. Visit www.lexmark.com/recycle to : (1) use only genuine Lexmark inkjet cartridges with this license/agreement to work with this product to a restriction that cartridges ...
... we encourage our customers to participate in the postage-paid bags. Bags usually arrive within 7-10 days. printer except as the only cartridge alternative to Lexmark's recycling partner. Important safety information Connect the power cord to request postage-paid return bag, and then... be used with all new parts, though components may be used only once. This patented printer is preaddressed. Visit www.lexmark.com/recycle to : (1) use only genuine Lexmark inkjet cartridges with this license/agreement to work with this product to a restriction that cartridges ...
Quick Reference
Page 3
...Scanning to a PDF...28 Canceling scan jobs...28 E-mailing 29 Sending e-mail...29 Canceling an e‑mail...29 Setting up the printer to fax 30 Step 1: Connect the printer to the telephone line 30 Step 2: Check the dial tone 37 Step 3: Set your fax name and fax number 37 Step ...contact list 38 Faxing 39 Sending faxes...39 Receiving faxes...39 Wireless networking 41 Information you will need to set up the printer on a wireless network 41 Installing the printer on a wireless network 41 What is Wi‑Fi Protected Setup 41 Configuring Wi‑Fi Protected Setup manually 42 ...
...Scanning to a PDF...28 Canceling scan jobs...28 E-mailing 29 Sending e-mail...29 Canceling an e‑mail...29 Setting up the printer to fax 30 Step 1: Connect the printer to the telephone line 30 Step 2: Check the dial tone 37 Step 3: Set your fax name and fax number 37 Step ...contact list 38 Faxing 39 Sending faxes...39 Receiving faxes...39 Wireless networking 41 Information you will need to set up the printer on a wireless network 41 Installing the printer on a wireless network 41 What is Wi‑Fi Protected Setup 41 Configuring Wi‑Fi Protected Setup manually 42 ...
Quick Reference
Page 5
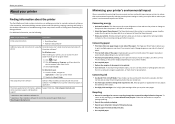
...paper. • Print on the Lexmark Support Web site at http://support.lexmark.com. 5 Minimizing your printer's environmental impact We are committed to protecting the environment and are continually improving our printers to : Applications > select your printer. Most programs or applications let you... drive for reuse or recycling through the Lexmark Cartridge Collection Program. Recycling • Return ink cartridges for presentation. You can be able to www.lexmark.com/recycle. It also includes information on troubleshooting printer setup issues as well as solving basic ...
...paper. • Print on the Lexmark Support Web site at http://support.lexmark.com. 5 Minimizing your printer's environmental impact We are committed to protecting the environment and are continually improving our printers to : Applications > select your printer. Most programs or applications let you... drive for reuse or recycling through the Lexmark Cartridge Collection Program. Recycling • Return ink cartridges for presentation. You can be able to www.lexmark.com/recycle. It also includes information on troubleshooting printer setup issues as well as solving basic ...
Quick Reference
Page 6
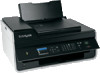
... multiple computers. • Intuitive touch screen-Use the full‑featured color touch screen for the following printer models: • Lexmark S415 • Lexmark S419 Printer features Depending on the printer instead of going through the usual process of inactivity. Other fax features include 99 speed dials, automatic redial, junk fax blocking, and caller ID. •...
... multiple computers. • Intuitive touch screen-Use the full‑featured color touch screen for the following printer models: • Lexmark S415 • Lexmark S419 Printer features Depending on the printer instead of going through the usual process of inactivity. Other fax features include 99 speed dials, automatic redial, junk fax blocking, and caller ID. •...

Quick Reference
Page 7
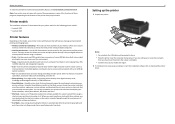
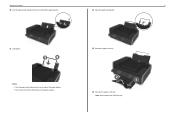
About your printer 7 With a CD or DVD drive (Windows/Macintosh) Without a CD or DVD drive or for Linux Download the printer driver from all areas of the printer. 5 Open the printer. Note: If the installation screen does not appear after a minute, then see "Installation screen did not appear during installation" on page 43. 3 Remove tape and packing material from www.lexmark.com. 4 Attach the paper support.
About your printer 7 With a CD or DVD drive (Windows/Macintosh) Without a CD or DVD drive or for Linux Download the printer driver from all areas of the printer. 5 Open the printer. Note: If the installation screen does not appear after a minute, then see "Installation screen did not appear during installation" on page 43. 3 Remove tape and packing material from www.lexmark.com. 4 Attach the paper support.

Quick Reference
Page 8
... folder that came with another one. About your printer 8 6 If necessary, replace the preinstalled language sheet with your printer. 1 2 xxxx xx xxxxxxxx xxxx xx xxxxx xxxxxxxx xxxx xx xxxxxxxx xxxx xx xxxxx xxxxxxxx 7 Raise the printer control panel until it clicks into the language sheet... holder, and then attach the language sheet holder to the printer control panel. a Remove the preinstalled language sheet from the printer control panel. 8 Close the printer. 1 2 xxxx xx xxxxxxxx xxxx xx xxxxx xxxxxxxx xxxx xx xxxxxxxx xxxx xx xxxxx xxxxxxxx...
... folder that came with another one. About your printer 8 6 If necessary, replace the preinstalled language sheet with your printer. 1 2 xxxx xx xxxxxxxx xxxx xx xxxxx xxxxxxxx xxxx xx xxxxxxxx xxxx xx xxxxx xxxxxxxx 7 Raise the printer control panel until it clicks into the language sheet... holder, and then attach the language sheet holder to the printer control panel. a Remove the preinstalled language sheet from the printer control panel. 8 Close the printer. 1 2 xxxx xx xxxxxxxx xxxx xx xxxxx xxxxxxxx xxxx xx xxxxxxxx xxxx xx xxxxx xxxxxxxx...
Quick Reference
Page 9
Note: Do not attach the USB cable yet. About your printer 9 10 Use the paper guide adjustment lever to adjust the paper guides. • Do not load more than 100 sheets in the paper support. 14 Connect the power cord only. Notes: • Use the paper guide adjustment lever to extend the paper guides. 12 Close the paper feed guard. 11 Load paper. 13 Extend the paper exit tray.
Note: Do not attach the USB cable yet. About your printer 9 10 Use the paper guide adjustment lever to adjust the paper guides. • Do not load more than 100 sheets in the paper support. 14 Connect the power cord only. Notes: • Use the paper guide adjustment lever to extend the paper guides. 12 Close the paper feed guard. 11 Load paper. 13 Extend the paper exit tray.
Quick Reference
Page 10
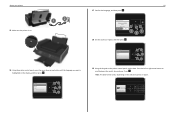
Press the left or right arrow button to scroll between the month, day, and year. About your Printer Are you want is highlighted on the printer control panel, set the date. Press OK . Set Date 18 / 01 / 2011 Press OK when complete. Country/Region United States Albania Algeria Please choose a...Set the country or region, and then press OK . Language Selection You have chosen English as the language for your printer 15 Make sure the printer is on. 16 Using the printer control panel, press the up or down arrow button until the language you sure? Note: The date format varies, depending...
Press the left or right arrow button to scroll between the month, day, and year. About your Printer Are you want is highlighted on the printer control panel, set the date. Press OK . Set Date 18 / 01 / 2011 Press OK when complete. Country/Region United States Albania Algeria Please choose a...Set the country or region, and then press OK . Language Selection You have chosen English as the language for your printer 15 Make sure the printer is on. 16 Using the printer control panel, press the up or down arrow button until the language you sure? Note: The date format varies, depending...

Quick Reference
Page 11
... button. • To add a space, press the number 0. Fax Setup Do you want to access all the features of your sent faxes. Lexmark Pro4000 Series Installation Configure Advanced Features You can I don't do this now? How can now print, but there are additional steps required to set ...07:00) Mountain Time (USA/C... Now Later 24 Enter your fax number for the printer, and then press OK . Get my printer ready to scan directly to my computer Configure Lexmark SmartSolutions and standalone email Get my printer ready to step 25. Your fax name identifies you as the sender in all ...
... button. • To add a space, press the number 0. Fax Setup Do you want to access all the features of your sent faxes. Lexmark Pro4000 Series Installation Configure Advanced Features You can I don't do this now? How can now print, but there are additional steps required to set ...07:00) Mountain Time (USA/C... Now Later 24 Enter your fax number for the printer, and then press OK . Get my printer ready to scan directly to my computer Configure Lexmark SmartSolutions and standalone email Get my printer ready to step 25. Your fax name identifies you as the sender in all ...

Quick Reference
Page 12
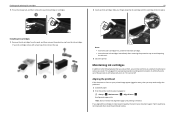
About your finger along the ink cartridge until the cartridge clicks into place. 3 1 2 Notes: • Insert the color cartridges first, and then the black cartridge. • Insert the new ink cartridges immediately after removing the protective cap to avoid exposing the ink to the cartridge installation position. 27 Unpack the ink cartridges, and then remove the protective caps from the cartridges. 12 28 Insert each ink cartridge. Slide your printer 26 Open the printer. Note: The printhead moves to air. 29 Close the printer. 1 2 3
About your finger along the ink cartridge until the cartridge clicks into place. 3 1 2 Notes: • Insert the color cartridges first, and then the black cartridge. • Insert the new ink cartridges immediately after removing the protective cap to avoid exposing the ink to the cartridge installation position. 27 Unpack the ink cartridges, and then remove the protective caps from the cartridges. 12 28 Insert each ink cartridge. Slide your printer 26 Open the printer. Note: The printhead moves to air. 29 Close the printer. 1 2 3

Quick Reference
Page 13
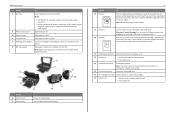
..., copy, or fax multiple‑page letter‑, legal‑, and A4‑size documents. 2 Paper feed guard Prevent items from the ADF. About your printer 30 Press OK to print and will move in and out during the process. • Streaks on the alignment page are normal and not an... indication of the printer 3 Notes: • The alignment page prints. • Do not remove the page until printing is finished. lever 6 ADF exit tray Hold documents as they exit...
..., copy, or fax multiple‑page letter‑, legal‑, and A4‑size documents. 2 Paper feed guard Prevent items from the ADF. About your printer 30 Press OK to print and will move in and out during the process. • Streaks on the alignment page are normal and not an... indication of the printer 3 Notes: • The alignment page prints. • Do not remove the page until printing is finished. lever 6 ADF exit tray Hold documents as they exit...
Quick Reference
Page 14
...11 Tray extension 12 PictBridge and USB port 13 ADF paper guide To Load original documents into the ADF. Note: Remove the plug to the printer and the telephone line. Hold paper as magazine clippings) into the ADF. Connect a PictBridge-enabled digital camera or a flash drive to the... printhead access area when no printhead is supported in the printer. 22 Jam clearance cover Access and clear paper jams. 23 Ink cartridge access area Install, replace, or remove ink cartridges. 24 Scanner unit •...
...11 Tray extension 12 PictBridge and USB port 13 ADF paper guide To Load original documents into the ADF. Note: Remove the plug to the printer and the telephone line. Hold paper as magazine clippings) into the ADF. Connect a PictBridge-enabled digital camera or a flash drive to the... printhead access area when no printhead is supported in the printer. 22 Jam clearance cover Access and clear paper jams. 23 Ink cartridge access area Install, replace, or remove ink cartridges. 24 Scanner unit •...

Quick Reference
Page 15
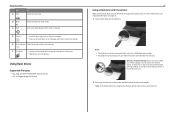
... saved list of copies or prints you have already begun entering the number. Enter a pause only when you want to make. Note: When the printer is turned off in a fax number to wait for three seconds to turn off . • Switch to view the last five numbers dialed. Dial... 9 8 Use 8 Redial 9 Pause 10 Dial Tone 17 15 16 To Display the last number dialed. Insert a three-second pause in Sleep mode. • Printer status • Messages • Menus 3 Arrow buttons Navigate through an automated answering system. Press the left or right arrow button to Sleep mode. About your...
... saved list of copies or prints you have already begun entering the number. Enter a pause only when you want to make. Note: When the printer is turned off in a fax number to wait for three seconds to turn off . • Switch to view the last five numbers dialed. Dial... 9 8 Use 8 Redial 9 Pause 10 Dial Tone 17 15 16 To Display the last number dialed. Insert a three-second pause in Sleep mode. • Printer status • Messages • Menus 3 Arrow buttons Navigate through an automated answering system. Press the left or right arrow button to Sleep mode. About your...
Quick Reference
Page 16
...Eco‑Mode • Change to black‑and‑white mode. For more information, see "Supported file types" on the printer display. Note: If the printer does not recognize the memory device, then remove and reinsert it. Using flash drives Supported file types • .jpg, .jpeg,...flash drive into the port. Warning-Potential Damage: Do not touch any cables, any network adapter, any connector, the memory device, or the printer in progress. • Clear current settings or error messages, and return to previous settings. 16 Wi‑Fi indicator Check the wireless status ...
...Eco‑Mode • Change to black‑and‑white mode. For more information, see "Supported file types" on the printer display. Note: If the printer does not recognize the memory device, then remove and reinsert it. Using flash drives Supported file types • .jpg, .jpeg,...flash drive into the port. Warning-Potential Damage: Do not touch any cables, any network adapter, any connector, the memory device, or the printer in progress. • Clear current settings or error messages, and return to previous settings. 16 Wi‑Fi indicator Check the wireless status ...
Quick Reference
Page 17
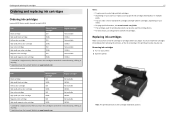
... Ordering and replacing ink cartridges Ordering ink cartridges Lexmark S410 Series models (except Lexmark S419) Item Return Program Regular cartridge2 cartridge1 Black... For page yield information, visit www.lexmark.com/yields. • The cartridges used for printing photos. • ... to Lexmark for a single use only. After use only genuine Lexmark ink cartridges. Note: The printhead moves to the cartridge installation position. Lexmark S419 ...remanufacturing, refilling, or recycling. 2 Available only on the Lexmark Web site at www.lexmark.com. 17 Notes: • To get the ink ...
... Ordering and replacing ink cartridges Ordering ink cartridges Lexmark S410 Series models (except Lexmark S419) Item Return Program Regular cartridge2 cartridge1 Black... For page yield information, visit www.lexmark.com/yields. • The cartridges used for printing photos. • ... to Lexmark for a single use only. After use only genuine Lexmark ink cartridges. Note: The printhead moves to the cartridge installation position. Lexmark S419 ...remanufacturing, refilling, or recycling. 2 Available only on the Lexmark Web site at www.lexmark.com. 17 Notes: • To get the ink ...
Quick Reference
Page 18
...document again. If print quality has not improved, then clean the printhead nozzles. Maintaining ink cartridges In addition to air. 3 Close the printer. Note: Do not remove the alignment page until the cartridge clicks into a properly grounded, working electrical outlet. Slide your finger along the... pack, and then remove the protective cap from the ink cartridge. If you may need to align the printhead. 1 Load plain paper. 2 From the printer control panel, navigate to improve print quality, then print your ink cartridge comes with a twist cap, then remove the cap. 1 2 3 18 2...
...document again. If print quality has not improved, then clean the printhead nozzles. Maintaining ink cartridges In addition to air. 3 Close the printer. Note: Do not remove the alignment page until the cartridge clicks into a properly grounded, working electrical outlet. Slide your finger along the... pack, and then remove the protective cap from the ink cartridge. If you may need to align the printhead. 1 Load plain paper. 2 From the printer control panel, navigate to improve print quality, then print your ink cartridge comes with a twist cap, then remove the cap. 1 2 3 18 2...

Quick Reference
Page 19
...levels are too low, you must replace the ink cartridges before you may need to clean the printhead nozzles to improve the quality of your printer plugged to a properly grounded, working electrical outlet to allow it to Clean Printhead or Deep Clean Printhead, and then press OK . A cleaning... prints. Ordering and replacing ink cartridges 19 Cleaning the printhead nozzles If you have not been using the printer for a long period, then you can clean the printhead nozzles. 1 Load paper. 2 From the printer control panel, navigate to: > Setup > OK > Maintenance > OK 3 Press the up or down ...
...levels are too low, you must replace the ink cartridges before you may need to clean the printhead nozzles to improve the quality of your printer plugged to a properly grounded, working electrical outlet to allow it to Clean Printhead or Deep Clean Printhead, and then press OK . A cleaning... prints. Ordering and replacing ink cartridges 19 Cleaning the printhead nozzles If you have not been using the printer for a long period, then you can clean the printhead nozzles. 1 Load paper. 2 From the printer control panel, navigate to: > Setup > OK > Maintenance > OK 3 Press the up or down ...
Quick Reference
Page 20
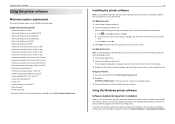
... install option, and then select all packages listed. 1 Close all the necessary software was installed. You may have chosen to the Lexmark Web site at http://support.lexmark.com. 20 Installing the printer software Note: If you installed the printer software on the computer screen. If you did not install these additional programs during...
... install option, and then select all packages listed. 1 Close all the necessary software was installed. You may have chosen to the Lexmark Web site at http://support.lexmark.com. 20 Installing the printer software Note: If you installed the printer software on the computer screen. If you did not install these additional programs during...
Quick Reference
Page 21
... with a document open , choose File > Print. Note: Your printer may not come with the printer software if the printer has wireless capability. Using the printer software Printer software Use the LexmarkTM Printer Home (referred to as Printer Home) Lexmark Phone Book (referred to as Phone Book) Abbyy Sprint OCR Lexmark Wireless Setup Utility (referred to as Wireless Setup Utility...
... with a document open , choose File > Print. Note: Your printer may not come with the printer software if the printer has wireless capability. Using the printer software Printer software Use the LexmarkTM Printer Home (referred to as Printer Home) Lexmark Phone Book (referred to as Phone Book) Abbyy Sprint OCR Lexmark Wireless Setup Utility (referred to as Wireless Setup Utility...

Quick Reference
Page 22
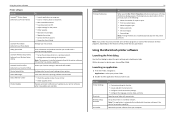
... the full features of the printer that you purchased. Use Customer Support Lexmark Software Updates Lexmark Online Order Supplies Online Printer Registration Visit Lexmark SmartSolutions To Contact customer support. Visit the Lexmark Web site. Download and install the latest printer software. Register your printer. • Visit the SmartSolutions Web site. • Choose your printer folder > Web Links 2 Double‑...
... the full features of the printer that you purchased. Use Customer Support Lexmark Software Updates Lexmark Online Order Supplies Online Printer Registration Visit Lexmark SmartSolutions To Contact customer support. Visit the Lexmark Web site. Download and install the latest printer software. Register your printer. • Visit the SmartSolutions Web site. • Choose your printer folder > Web Links 2 Double‑...


