Fax Guide
Page 2
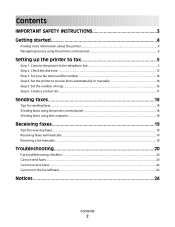
... list...17 Sending faxes 18 Tips for sending faxes...18 Sending faxes using the printer control panel...18 Sending faxes using the computer...18 Receiving faxes 19 Tips for receiving faxes...19 Receiving faxes automatically...19 Receiving a fax manually...19 Troubleshooting 20 Fax troubleshooting checklist...20 Cannot send faxes...20 Cannot receive faxes...22 Cannot run the fax software...23 Notices 24...
... list...17 Sending faxes 18 Tips for sending faxes...18 Sending faxes using the printer control panel...18 Sending faxes using the computer...18 Receiving faxes 19 Tips for receiving faxes...19 Receiving faxes automatically...19 Receiving a fax manually...19 Troubleshooting 20 Fax troubleshooting checklist...20 Cannot send faxes...20 Cannot receive faxes...22 Cannot run the fax software...23 Notices 24...
Fax Guide
Page 3
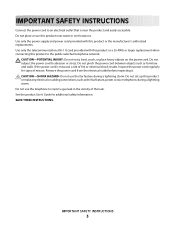
...product to an electrical outlet that is misused, a risk of fire or electrical shock results. CAUTION-SHOCK HAZARD: Do not use the fax feature during a lightning storm. See the product User's Guide for signs of the leak. SAVE THESE INSTRUCTIONS. Inspect the power cord regularly...26 AWG or larger replacement when connecting this product or the manufacturer's authorized replacements. Do not pinch the power cord between objects such as the fax feature, power cord, or telephone, during a lightning storm. CAUTION-POTENTIAL INJURY: Do not twist, bind, crush, or place heavy objects on...
...product to an electrical outlet that is misused, a risk of fire or electrical shock results. CAUTION-SHOCK HAZARD: Do not use the fax feature during a lightning storm. See the product User's Guide for signs of the leak. SAVE THESE INSTRUCTIONS. Inspect the power cord regularly...26 AWG or larger replacement when connecting this product or the manufacturer's authorized replacements. Do not pinch the power cord between objects such as the fax feature, power cord, or telephone, during a lightning storm. CAUTION-POTENTIAL INJURY: Do not twist, bind, crush, or place heavy objects on...
Fax Guide
Page 4
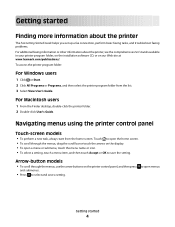
...started 4 Touch to open the home screen. • To scroll through the menus, use the arrow buttons on our Web site at www.lexmark.com/publications/. to open a menu or submenu, touch the menu name or icon. • To select a setting, touch a menu item,.... • To open menus Getting started Finding more information about the printer The Fax Getting Started Guide helps you set up a fax connection, perform basic faxing tasks, and troubleshoot faxing problems. For additional faxing information or other information about the printer, see the comprehensive User's Guide available in...
...started 4 Touch to open the home screen. • To scroll through the menus, use the arrow buttons on our Web site at www.lexmark.com/publications/. to open a menu or submenu, touch the menu name or icon. • To select a setting, touch a menu item,.... • To open menus Getting started Finding more information about the printer The Fax Getting Started Guide helps you set up a fax connection, perform basic faxing tasks, and troubleshoot faxing problems. For additional faxing information or other information about the printer, see the comprehensive User's Guide available in...
Fax Guide
Page 5
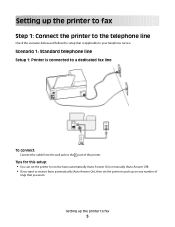
...this setup: • You can set the printer to receive faxes automatically (Auto Answer On) or manually (Auto Answer Off). • If you want to receive faxes automatically (Auto Answer On), then set the printer to pick up the printer to fax Step 1: Connect the printer to the telephone line Check the scenarios... below and follow the setup that is connected to a dedicated fax line To connect: Connect the cable from the wall jack to the port of rings ...
...this setup: • You can set the printer to receive faxes automatically (Auto Answer On) or manually (Auto Answer Off). • If you want to receive faxes automatically (Auto Answer On), then set the printer to pick up the printer to fax Step 1: Connect the printer to the telephone line Check the scenarios... below and follow the setup that is connected to a dedicated fax line To connect: Connect the cable from the wall jack to the port of rings ...

Fax Guide
Page 6
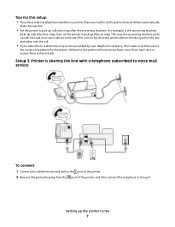
Connected to different wall jacks To connect: Connect the cable from the port of the printer. Setting up the printer to fax 6 Setup 2: Printer is sharing the line with an answering machine Connected to the same telephone wall jack To connect: 1 Connect the cable from the wall jack to the port of the printer. 2 Remove the protective plug from the wall jack to the port of the printer, and then connect the answering machine to the port.
Connected to different wall jacks To connect: Connect the cable from the port of the printer. Setting up the printer to fax 6 Setup 2: Printer is sharing the line with an answering machine Connected to the same telephone wall jack To connect: 1 Connect the cable from the wall jack to the port of the printer. 2 Remove the protective plug from the wall jack to the port of the printer, and then connect the answering machine to the port.
Fax Guide
Page 7
This way, the answering machine picks up calls after four rings, then set the printer to fax 7 Otherwise, the printer will not receive faxes even if you have only one telephone number on the line and takes over the call is sharing the line with a telephone subscribed to voice ... to the port. Tips for the printer. Setting up the printer to pick up calls two rings after six rings. Setup 3: Printer is a fax, then the printer detects the fax signal on your voice calls are received. If the call . • If you set the correct ring pattern for this setup: •...
This way, the answering machine picks up calls after four rings, then set the printer to fax 7 Otherwise, the printer will not receive faxes even if you have only one telephone number on the line and takes over the call is sharing the line with a telephone subscribed to voice ... to the port. Tips for the printer. Setting up the printer to pick up calls two rings after six rings. Setup 3: Printer is a fax, then the printer detects the fax signal on your voice calls are received. If the call . • If you set the correct ring pattern for this setup: •...
Fax Guide
Page 8
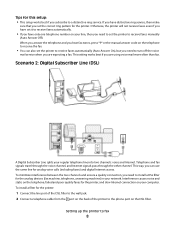
... through the other channel. To minimize interference between the two channels and ensure a quality connection, you need to set the printer to receive faxes manually (Auto Answer Off). To install a filter for the printer, and slow Internet connection on your line, then you need to the ...Scenario 2: Digital Subscriber Line (DSL) A Digital Subscriber Line splits your network. Interference causes noise and static on the telephone, failed and poor quality faxes for the printer: 1 Connect the line port of the DSL filter to the wall jack. 2 Connect a telephone cable from the port on the ...
... through the other channel. To minimize interference between the two channels and ensure a quality connection, you need to set the printer to receive faxes manually (Auto Answer Off). To install a filter for the printer, and slow Internet connection on your line, then you need to the ...Scenario 2: Digital Subscriber Line (DSL) A Digital Subscriber Line splits your network. Interference causes noise and static on the telephone, failed and poor quality faxes for the printer: 1 Connect the line port of the DSL filter to the wall jack. 2 Connect a telephone cable from the port on the ...
Fax Guide
Page 9
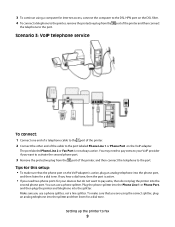
... you are using a computer for Internet access, connect the computer to the DSL HPN port on the VoIP adapter. The port labeled Phone Line 2 or Fax Port is not always active. To make sure that you hear a dial tone, then the port is active, plug an analog telephone into the phone... Line 1 or Phone Port on the DSL filter. 4 To connect a telephone to the printer, remove the protective plug from the port of the cable to fax 9 3 To continue using the correct splitter, plug an analog telephone into the splitter and then listen for a dial tone. You can use a phone splitter, not...
... you are using a computer for Internet access, connect the computer to the DSL HPN port on the VoIP adapter. The port labeled Phone Line 2 or Fax Port is not always active. To make sure that you hear a dial tone, then the port is active, plug an analog telephone into the phone... Line 1 or Phone Port on the DSL filter. 4 To connect a telephone to the printer, remove the protective plug from the port of the cable to fax 9 3 To continue using the correct splitter, plug an analog telephone into the splitter and then listen for a dial tone. You can use a phone splitter, not...
Fax Guide
Page 10
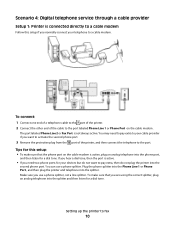
...is active, plug an analog telephone into the splitter. Setting up the printer to a cable modem. Make sure you normally connect your telephone to fax 10 Plug the phone splitter into the Phone Line 1 or Phone Port , and then plug the printer and telephone into the phone port, ...and then listen for a dial tone. The port labeled Phone Line 2 or Fax Port is not always active. You can use a phone splitter, not a line splitter. Scenario 4: Digital telephone service through a cable provider Setup 1: Printer is...
...is active, plug an analog telephone into the splitter. Setting up the printer to a cable modem. Make sure you normally connect your telephone to fax 10 Plug the phone splitter into the Phone Line 1 or Phone Port , and then plug the printer and telephone into the phone port, ...and then listen for a dial tone. The port labeled Phone Line 2 or Fax Port is not always active. You can use a phone splitter, not a line splitter. Scenario 4: Digital telephone service through a cable provider Setup 1: Printer is...
Fax Guide
Page 11
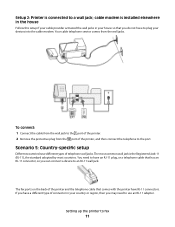
... then connect the telephone to a wall jack; You need to an RJ-11 wall jack. If you have a different type of telephone wall jacks. The fax ports on the back of the printer and the telephone cable that has an RJ-11 connector, so you can connect a device to use an... RJ-11 adapter. To connect: 1 Connect the cable from the wall jack to fax 11 cable modem is installed elsewhere in the house Follow this setup if your cable provider activated the wall jacks in your country or region...
... then connect the telephone to a wall jack; You need to an RJ-11 wall jack. If you have a different type of telephone wall jacks. The fax ports on the back of the printer and the telephone cable that has an RJ-11 connector, so you can connect a device to use an... RJ-11 adapter. To connect: 1 Connect the cable from the wall jack to fax 11 cable modem is installed elsewhere in the house Follow this setup if your cable provider activated the wall jacks in your country or region...
Fax Guide
Page 12
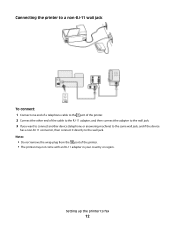
... another device (telephone or answering machine) to the same wall jack, and if the device has a non-RJ 11 connector, then connect it directly to fax 12 Setting up the printer to the wall jack. Connecting the printer to a non-RJ-11 wall jack To connect: 1 Connect one end of a telephone...
... another device (telephone or answering machine) to the same wall jack, and if the device has a non-RJ 11 connector, then connect it directly to fax 12 Setting up the printer to the wall jack. Connecting the printer to a non-RJ-11 wall jack To connect: 1 Connect one end of a telephone...
Fax Guide
Page 13
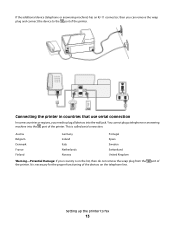
Connecting the printer in countries that use serial connection In some countries or regions, you can remove the wrap plug and connect the device to fax 13 You cannot plug a telephone or answering machine into the wall jack. It is on the telephone line. Austria Belgium Denmark France Finland Germany Ireland ...
Connecting the printer in countries that use serial connection In some countries or regions, you can remove the wrap plug and connect the device to fax 13 You cannot plug a telephone or answering machine into the wall jack. It is on the telephone line. Austria Belgium Denmark France Finland Germany Ireland ...
Fax Guide
Page 14
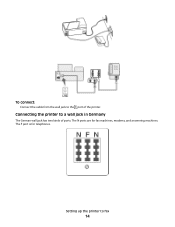
Connecting the printer to a wall jack in Germany The German wall jack has two kinds of the printer. Setting up the printer to fax 14 The F port is for fax machines, modems, and answering machines. The N ports are for telephones. To connect: Connect the cable from the wall jack to the port of ports.
Connecting the printer to a wall jack in Germany The German wall jack has two kinds of the printer. Setting up the printer to fax 14 The F port is for fax machines, modems, and answering machines. The N ports are for telephones. To connect: Connect the cable from the wall jack to the port of ports.
Fax Guide
Page 15
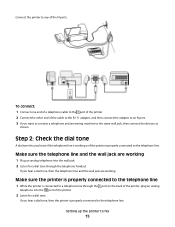
... printer. 2 Connect the other end of the N ports. Step 2: Check the dial tone A dial tone lets you want to connect a telephone and answering machine to fax 15 If you hear a dial tone, then the telephone line and the wall jack are working .
... printer. 2 Connect the other end of the N ports. Step 2: Check the dial tone A dial tone lets you want to connect a telephone and answering machine to fax 15 If you hear a dial tone, then the telephone line and the wall jack are working .

Fax Guide
Page 16
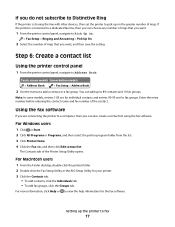
...: 1 From the printer control panel, navigate to On in Step 4, then do not hear a dial tone, then review Step 1 or see the "Fax troubleshooting checklist" on page 20. Each telephone number has a designated ring pattern (a single ring, a double ring, a triple ring). If the pattern is... printer control panel, navigate to the Distinctive Ring Pattern Detection (DPRD) feature offered by telephone companies. If you subscribe to Ring Pattern: > Fax Setup > Ringing and Answering > Ring Pattern 2 Select the ring pattern for the printer, and then save the setting. This feature allows you to...
...: 1 From the printer control panel, navigate to On in Step 4, then do not hear a dial tone, then review Step 1 or see the "Fax troubleshooting checklist" on page 20. Each telephone number has a designated ring pattern (a single ring, a double ring, a triple ring). If the pattern is... printer control panel, navigate to the Distinctive Ring Pattern Detection (DPRD) feature offered by telephone companies. If you subscribe to Ring Pattern: > Fax Setup > Ringing and Answering > Ring Pattern 2 Select the ring pattern for the printer, and then save the setting. This feature allows you to...
Fax Guide
Page 17
...the contact. Note: In some models, entries 1-89 are for individual contacts and entries 90-99 are connecting the printer to 89 contacts and 10 fax groups. Using the fax software If you are for your printer. 3 Click the Contacts tab. • To add contacts, click the Individuals tab. • To ... users 1 Click or Start. 2 Click All Programs or Programs, and then select the printer program folder from the list. 3 Click Printer Home. 4 Click the Fax tab, and then click Edit contact list. Setting up the printer to pick up to a computer, then you can also create a contact list using the...
...the contact. Note: In some models, entries 1-89 are for individual contacts and entries 90-99 are connecting the printer to 89 contacts and 10 fax groups. Using the fax software If you are for your printer. 3 Click the Contacts tab. • To add contacts, click the Individuals tab. • To ... users 1 Click or Start. 2 Click All Programs or Programs, and then select the printer program folder from the list. 3 Click Printer Home. 4 Click the Fax tab, and then click Edit contact list. Setting up the printer to pick up to a computer, then you can also create a contact list using the...

Fax Guide
Page 18
... using the ADF, adjust the paper guide on the ADF to the width of the recipient. 4 Click Fax. Note: In order to see the fax options on the list, choose Add a printer, and then choose the fax version of the printer. 3 Enter the name and number of the original document. • When using... the scanner glass, close the top cover to avoid dark edges on the computer screen. Sending faxes Tips for sending faxes Before you send a fax: • Make sure that the printer is on and connected to a working if you must use the...
... using the ADF, adjust the paper guide on the ADF to the width of the recipient. 4 Click Fax. Note: In order to see the fax options on the list, choose Add a printer, and then choose the fax version of the printer. 3 Enter the name and number of the original document. • When using... the scanner glass, close the top cover to avoid dark edges on the computer screen. Sending faxes Tips for sending faxes Before you send a fax: • Make sure that the printer is on and connected to a working if you must use the...

Fax Guide
Page 19
...), then make sure that Auto Answer is on: a From the printer control panel, navigate to Auto Answer: > Fax Setup > Ringing and Answering > Auto Answer b Turn on the telephone attached to receive faxes automatically (Auto Answer On), then load paper in the printer. b Set the number of rings, and then save ... Pick Up On. Warning-Potential Damage: Do not touch the cables or the and ports while actively receiving a fax. The line is working telephone, DSL, or VoIP line. Receiving faxes automatically 1 Make sure that the ringer volume is not set to Off. • If you have set is off: a From...
...), then make sure that Auto Answer is on: a From the printer control panel, navigate to Auto Answer: > Fax Setup > Ringing and Answering > Auto Answer b Turn on the telephone attached to receive faxes automatically (Auto Answer On), then load paper in the printer. b Set the number of rings, and then save ... Pick Up On. Warning-Potential Damage: Do not touch the cables or the and ports while actively receiving a fax. The line is working telephone, DSL, or VoIP line. Receiving faxes automatically 1 Make sure that the ringer volume is not set to Off. • If you have set is off: a From...

Fax Guide
Page 20
...YOU HAVE REGISTERED YOUR USER INFORMATION IN THE PRINTER If you do not hear a dial tone, then use a line splitter. Cannot send faxes If the "Fax troubleshooting checklist" does not solve the problem, then try one or more of the printer. If you did not enter your user information...• If the printer is connected to a VoIP adapter or cable modem, then make sure you are using a phone splitter. Some fax machines also block unknown faxes or faxes without entering your setup scenario. • Make sure that the cables are connected to the correct ports. • Make sure that you...
...YOU HAVE REGISTERED YOUR USER INFORMATION IN THE PRINTER If you do not hear a dial tone, then use a line splitter. Cannot send faxes If the "Fax troubleshooting checklist" does not solve the problem, then try one or more of the printer. If you did not enter your user information...• If the printer is connected to a VoIP adapter or cable modem, then make sure you are using a phone splitter. Some fax machines also block unknown faxes or faxes without entering your setup scenario. • Make sure that the cables are connected to the correct ports. • Make sure that you...
Fax Guide
Page 21
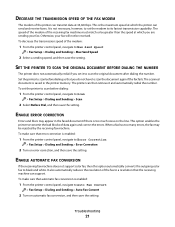
...1 From the printer control panel, navigate to black and white. The printer can then retrieve it to transmit the bad blocks of the fax to Error Correction: > Fax Setup > Dialing and Sending > Error Correction 2 Turn on the line. ENABLE ERROR CORRECTION Errors and blurs may be greater than the ...and then save the setting. This is too much noise on error correction, and then save the setting. Otherwise, your fax. When a fax has too many errors, the fax may appear in the printer memory. It also automatically reduces the resolution of data again and correct the errors. DECREASE THE ...
...1 From the printer control panel, navigate to black and white. The printer can then retrieve it to transmit the bad blocks of the fax to Error Correction: > Fax Setup > Dialing and Sending > Error Correction 2 Turn on the line. ENABLE ERROR CORRECTION Errors and blurs may be greater than the ...and then save the setting. This is too much noise on error correction, and then save the setting. Otherwise, your fax. When a fax has too many errors, the fax may appear in the printer memory. It also automatically reduces the resolution of data again and correct the errors. DECREASE THE ...


