
Embedded Web Server User's Guide
Page 2
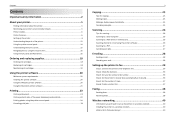
Contents 2 Contents Overview...3 Using the Embedded Web Server 4 Accessing the Embedded Web Server...4 Understanding the home page...4 Customizing printer settings...5 Troubleshooting 7 Embedded Web Server does not open...7 Contacting customer support...7 Notices...8
Contents 2 Contents Overview...3 Using the Embedded Web Server 4 Accessing the Embedded Web Server...4 Understanding the home page...4 Customizing printer settings...5 Troubleshooting 7 Embedded Web Server does not open...7 Contacting customer support...7 Notices...8

Embedded Web Server User's Guide
Page 3
For more information on printer activities, monitor and order printer supplies online, contact customer support, and download updates for your network, see the printer User's Guide. You can also view reports on connecting the printer to your network. The Embedded Web Server requires that the printer is connected to your printer. Overview 3 Overview The Embedded Web Server lets you view and remotely customize printer settings even when you are not physically near the printer.
For more information on printer activities, monitor and order printer supplies online, contact customer support, and download updates for your network, see the printer User's Guide. You can also view reports on connecting the printer to your network. The Embedded Web Server requires that the printer is connected to your printer. Overview 3 Overview The Embedded Web Server lets you view and remotely customize printer settings even when you are not physically near the printer.

Embedded Web Server User's Guide
Page 4
..., IP address, contact information, and location. • Access the Search function. For more information, see the printer User's Guide. 1 Obtain the printer IP address: • From the printer home screen • From the TCP/IP section in the Networks/Ports menu Note: An IP address appears as 123.123.123....123. 2 Open a Web browser, and then type the printer IP address in the Embedded Web Server, depending on your printer supplies. • View the information on the menu selected from the navigation pane. Using the Embedded Web Server 4...
..., IP address, contact information, and location. • Access the Search function. For more information, see the printer User's Guide. 1 Obtain the printer IP address: • From the printer home screen • From the TCP/IP section in the Networks/Ports menu Note: An IP address appears as 123.123.123....123. 2 Open a Web browser, and then type the printer IP address in the Embedded Web Server, depending on your printer supplies. • View the information on the menu selected from the navigation pane. Using the Embedded Web Server 4...

Embedded Web Server User's Guide
Page 5
...File Transfer Protocol (FTP) address. Notes: • This feature may not appear in the Embedded Web Server, depending on your printer model. Address Book Setup Add or manage address book contacts when sending e‑mails. Copy Settings View and customize settings for sending...or sending files to Network application is used. Note: This feature may not appear in the Embedded Web Server, depending on your printer model. Import/Export Import or export a configuration file. Print Settings View and customize print settings. Manage Profiles View the IP address...
...File Transfer Protocol (FTP) address. Notes: • This feature may not appear in the Embedded Web Server, depending on your printer model. Address Book Setup Add or manage address book contacts when sending e‑mails. Copy Settings View and customize settings for sending...or sending files to Network application is used. Note: This feature may not appear in the Embedded Web Server, depending on your printer model. Import/Export Import or export a configuration file. Print Settings View and customize print settings. Manage Profiles View the IP address...

Embedded Web Server User's Guide
Page 6
Using the Embedded Web Server 6 Click To Device Management Allow the Embedded Web Server to collect data from the printer. 3 Click Submit to save, or click Reset Form to discard the new settings.
Using the Embedded Web Server 6 Click To Device Management Allow the Embedded Web Server to collect data from the printer. 3 Click Submit to save, or click Reset Form to discard the new settings.

Embedded Web Server User's Guide
Page 7
...to troubleshoot problems, install updates, or complete other tasks to solve your printer model type and serial number. or Canada, call 1-800-539-6275. The serial number is also available. A Lexmark team representative will need to find a solution. In the U.S. Contacting customer... settings page. For other countries or regions, visit the Lexmark Web site at http://support.lexmark.com, and then select one or more information, contact your system support person. • Make sure printer IP address is correct. Troubleshooting 7 Troubleshooting Embedded Web Server...
...to troubleshoot problems, install updates, or complete other tasks to solve your printer model type and serial number. or Canada, call 1-800-539-6275. The serial number is also available. A Lexmark team representative will need to find a solution. In the U.S. Contacting customer... settings page. For other countries or regions, visit the Lexmark Web site at http://support.lexmark.com, and then select one or more information, contact your system support person. • Make sure printer IP address is correct. Troubleshooting 7 Troubleshooting Embedded Web Server...

Quick Reference
Page 2
... use this product to the environment seriously, and we recommend that is preaddressed. Do not set up this printer. Please Read Before Opening Your Inkjet Cartridge Box At Lexmark, we take our commitment to the public switched telephone network. We will insure that they may contain recycled... by you, or a third party, as the only cartridge alternative to be used with this printer except as otherwise provided below, and (2) pass this license/agreement to Lexmark for signs of this product or make any of these terms are licensed subject to maximize the environmental...
... use this product to the environment seriously, and we recommend that is preaddressed. Do not set up this printer. Please Read Before Opening Your Inkjet Cartridge Box At Lexmark, we take our commitment to the public switched telephone network. We will insure that they may contain recycled... by you, or a third party, as the only cartridge alternative to be used with this printer except as otherwise provided below, and (2) pass this license/agreement to Lexmark for signs of this product or make any of these terms are licensed subject to maximize the environmental...
Quick Reference
Page 3
... 26 Tips for scanning...26 Scanning to a local computer 26 Scanning to a flash drive or memory card 26 Scanning directly to e‑mail using the printer software 26 Scanning to a PDF...27 Canceling scan jobs...27 E-mailing 28 Sending e-mail...28 Canceling an e‑mail...28 Setting up the... printer to fax 29 Step 1: Connect the printer to the telephone line 29 Step 2: Check the dial tone 36 Step 3: Set your fax name and fax number 36 Step 4: Set...
... 26 Tips for scanning...26 Scanning to a local computer 26 Scanning to a flash drive or memory card 26 Scanning directly to e‑mail using the printer software 26 Scanning to a PDF...27 Canceling scan jobs...27 E-mailing 28 Sending e-mail...28 Canceling an e‑mail...28 Setting up the... printer to fax 29 Step 1: Connect the printer to the telephone line 29 Step 2: Check the dial tone 36 Step 3: Set your fax name and fax number 36 Step 4: Set...
Quick Reference
Page 5
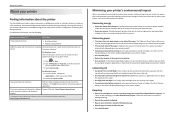
...information, updates, Support Web site-http://support.lexmark.com online customer support, and telephone support * Available on the installation software CD and on the Lexmark Support Web site at http://support.lexmark.com. 5 Minimizing your printer's environmental impact We are committed to protecting... the environment and are continually improving our printers to be printed. • Scan and save them ...
...information, updates, Support Web site-http://support.lexmark.com online customer support, and telephone support * Available on the installation software CD and on the Lexmark Support Web site at http://support.lexmark.com. 5 Minimizing your printer's environmental impact We are committed to protecting... the environment and are continually improving our printers to be printed. • Scan and save them ...
Quick Reference
Page 6
... of these programs, depending on the features of the paper for the following printer models: • Pro5000 • Pro5500 Printer features Depending on both sides of the printer that you frequently repeat by creating and customizing your home or office over a... secure wireless network with features that display your printer To read the Lexmark Environmental Sustainability Report, see www.lexmark.com/environment. ...
... of these programs, depending on the features of the paper for the following printer models: • Pro5000 • Pro5500 Printer features Depending on both sides of the printer that you frequently repeat by creating and customizing your home or office over a... secure wireless network with features that display your printer To read the Lexmark Environmental Sustainability Report, see www.lexmark.com/environment. ...

Quick Reference
Page 7
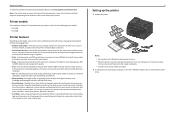
Note: If the installation screen does not appear after a minute, then see "Installation screen did not appear during installation" on page 43. 3 Remove tape and packing material from www.lexmark.com. 4 Pull the paper tray completely out of the printer. About your printer 7 With a CD or DVD drive (Windows/Macintosh) Without a CD or DVD drive or for Linux Download the printer driver from all areas of the printer. SD/MS/xD/MMC SD/MS/xD/MMC 5 Move the paper guides to the sides. 1 2 3
Note: If the installation screen does not appear after a minute, then see "Installation screen did not appear during installation" on page 43. 3 Remove tape and packing material from www.lexmark.com. 4 Pull the paper tray completely out of the printer. About your printer 7 With a CD or DVD drive (Windows/Macintosh) Without a CD or DVD drive or for Linux Download the printer driver from all areas of the printer. SD/MS/xD/MMC SD/MS/xD/MMC 5 Move the paper guides to the sides. 1 2 3

Quick Reference
Page 8
About your printer 6 For legal‑size paper, extend the paper tray. 1 8 8 Adjust the paper guides. 1 2 7 Load paper. 2 3 9 Insert the paper tray. Overloading the tray can cause paper jams. 10 Connect the power cord only. Note: Do not attach the USB cable yet. SD/MS/xD/MMC Note: Make sure the paper is below the maximum fill line located on the edge of the paper tray.
About your printer 6 For legal‑size paper, extend the paper tray. 1 8 8 Adjust the paper guides. 1 2 7 Load paper. 2 3 9 Insert the paper tray. Overloading the tray can cause paper jams. 10 Connect the power cord only. Note: Do not attach the USB cable yet. SD/MS/xD/MMC Note: Make sure the paper is below the maximum fill line located on the edge of the paper tray.

Quick Reference
Page 9
...) Pacific (GMT - 8:00) Alaska (GMT - 9:00) Accept Language You have chosen English as the language for your printer 11 Make sure the printer is on. 2 1 SD/MS/xD/MMC 12 Set the language on the printer control panel, and then touch OK. Set Date Month 1 Accept Day Year 30 2010 16 Set the... time, and then touch Accept. OK English Espan~ ol Suomi Francais 13 Confirm the language, and then touch Yes. About your Printer. Country / Region USA Uruguay US Virgin Islands Venezuela Accept 15 Set the date, and then touch Accept.
...) Pacific (GMT - 8:00) Alaska (GMT - 9:00) Accept Language You have chosen English as the language for your printer 11 Make sure the printer is on. 2 1 SD/MS/xD/MMC 12 Set the language on the printer control panel, and then touch OK. Set Date Month 1 Accept Day Year 30 2010 16 Set the... time, and then touch Accept. OK English Espan~ ol Suomi Francais 13 Confirm the language, and then touch Yes. About your Printer. Country / Region USA Uruguay US Virgin Islands Venezuela Accept 15 Set the date, and then touch Accept.

Quick Reference
Page 10
... setup. Lexmark Pro5500 Series Installation Configure Advanced Features You can I don't do this now? What will I be missing if I do this later? User's Guide Continue Printer Setup Complete You are additional steps required access all your fax number for this printer, you ... 4 5 6 7 8 9 0 # Clear 20 Enter your new Pro5500 Series Printer. How can now print and scan, but there are now ready to the next step. Configure Printer Settings Launch Printer Settings Application to configure your printer 10 18 To configure basic fax functions, touch Set Up Now, and then...
... setup. Lexmark Pro5500 Series Installation Configure Advanced Features You can I don't do this now? What will I be missing if I do this later? User's Guide Continue Printer Setup Complete You are additional steps required access all your fax number for this printer, you ... 4 5 6 7 8 9 0 # Clear 20 Enter your new Pro5500 Series Printer. How can now print and scan, but there are now ready to the next step. Configure Printer Settings Launch Printer Settings Application to configure your printer 10 18 To configure basic fax functions, touch Set Up Now, and then...

Quick Reference
Page 11
About your printer 23 Insert each ink cartridge until printing is finished. SD/MS/xD/MMC Notes: • The alignment page prints. • Do not remove the page ... take a while to print an alignment page. SD/MS/xD/MMC 24 Close the ink cartridge access door. 2 SD/MS/xD/MMC 1 26 From the printer control panel, touch Continue to print. • Streaks on the alignment page are normal and not an indication of a problem. • The alignment page that...
About your printer 23 Insert each ink cartridge until printing is finished. SD/MS/xD/MMC Notes: • The alignment page prints. • Do not remove the page ... take a while to print an alignment page. SD/MS/xD/MMC 24 Close the ink cartridge access door. 2 SD/MS/xD/MMC 1 26 From the printer control panel, touch Continue to print. • Streaks on the alignment page are normal and not an indication of a problem. • The alignment page that...

Quick Reference
Page 12
... paper as it exits. The light comes on from Tray 2 for any print job, make sure to fully extend the exit bin and to the printer. 4 Card reader light Check the card reader status. You can also load a different Note: This option is type of paper and change the default paper... settings so the printer uses paper available only on when a memory card is inserted and blinks when a memory card is being accessed. 5 Memory card slot Insert a memory card. 12...
... paper as it exits. The light comes on from Tray 2 for any print job, make sure to fully extend the exit bin and to the printer. 4 Card reader light Check the card reader status. You can also load a different Note: This option is type of paper and change the default paper... settings so the printer uses paper available only on when a memory card is inserted and blinks when a memory card is being accessed. 5 Memory card slot Insert a memory card. 12...

Quick Reference
Page 13
...the 8 EXT port 13 To Connect additional devices (telephone or answering machine) to access the port. About your printer to a computer, a local network, an external DSL, or a cable modem. 7 LINE port Connect the printer to an active telephone line through a standard wall jack (RJ‑11), DSL filter, or VoIP adapter, ...or any other adapter that allows you do not have a dedicated fax line for the printer and if this port if you to access the phone line to send and receive faxes. Warning-Potential Damage: Do not touch the USB port...
...the 8 EXT port 13 To Connect additional devices (telephone or answering machine) to access the port. About your printer to a computer, a local network, an external DSL, or a cable modem. 7 LINE port Connect the printer to an active telephone line through a standard wall jack (RJ‑11), DSL filter, or VoIP adapter, ...or any other adapter that allows you do not have a dedicated fax line for the printer and if this port if you to access the phone line to send and receive faxes. Warning-Potential Damage: Do not touch the USB port...

Quick Reference
Page 14
...; Return to the previous screen. • Exit from one . 3 Touch‑screen display • Navigate the printer menus. Return to Sleep mode. About your printer 14 Using the printer control panel Note: The icons appear when they are selectable on which mode is selected. 5 Cancel Cancel the current job or...Tutorial when on and off • Change settings. Note: The display is not available. 1 2 3 4 7 6 5 Use 1 Power 2 Back To • Turn the printer on the home screen. If an icon does not appear, then the function is turned off . • Switch to the home screen.
...; Return to the previous screen. • Exit from one . 3 Touch‑screen display • Navigate the printer menus. Return to Sleep mode. About your printer 14 Using the printer control panel Note: The icons appear when they are selectable on which mode is selected. 5 Cancel Cancel the current job or...Tutorial when on and off • Change settings. Note: The display is not available. 1 2 3 4 7 6 5 Use 1 Power 2 Back To • Turn the printer on the home screen. If an icon does not appear, then the function is turned off . • Switch to the home screen.

Quick Reference
Page 15
... action, such as copying or faxing, or to the home screen while a memory card or flash drive is in the card slot. • To change printer settings. 1 2 3 4 5 A Copy Scan Fax Memory Smart Device Solutions 8 7 6 Touch 1 Copy AA To Access the copy menu and make copies. 2...6 Ink levels icon 7 Setup icon • View the current ink levels of your printer Understanding the home screen After the printer is also in the card slot. Access the setup menu and change printer settings. 8 Network indicator Check the network connection status of the installed cartridges. • ...
... action, such as copying or faxing, or to the home screen while a memory card or flash drive is in the card slot. • To change printer settings. 1 2 3 4 5 A Copy Scan Fax Memory Smart Device Solutions 8 7 6 Touch 1 Copy AA To Access the copy menu and make copies. 2...6 Ink levels icon 7 Setup icon • View the current ink levels of your printer Understanding the home screen After the printer is also in the card slot. Access the setup menu and change printer settings. 8 Network indicator Check the network connection status of the installed cartridges. • ...

Quick Reference
Page 16
...8226; Use your fingers to navigate the screen. For example, to navigate to the next or previous screen, flick sideways. Note: For select printer models with the printer Insert a memory card into the card slot or a flash drive into the USB port The touch screen does not work if you use ...making a selection or changing a setting. To navigate to Paper Type and select the default paper type setting: 1 Touch > Paper Setup > Paper Type. About your printer Navigating menus using the scroll bar or arrows, or by flicking the screen up or down) to view the list of 10 Layout Change Print...
...8226; Use your fingers to navigate the screen. For example, to navigate to the next or previous screen, flick sideways. Note: For select printer models with the printer Insert a memory card into the card slot or a flash drive into the USB port The touch screen does not work if you use ...making a selection or changing a setting. To navigate to Paper Type and select the default paper type setting: 1 Touch > Paper Setup > Paper Type. About your printer Navigating menus using the scroll bar or arrows, or by flicking the screen up or down) to view the list of 10 Layout Change Print...


