
Fax Guide
Page 3
... lightning storm. Do not use this product to the public switched telephone network. If the power cord is near water or wet locations. IMPORTANT SAFETY INSTRUCTIONS 3 Use only the power supply and power cord provided with this product or a 26 AWG or larger replacement when connecting this product near ...the product and easily accessible. Do not subject the power cord to report a gas leak in the vicinity of the leak. SAVE THESE INSTRUCTIONS. CAUTION-POTENTIAL INJURY: Do not twist, bind,...
... lightning storm. Do not use this product to the public switched telephone network. If the power cord is near water or wet locations. IMPORTANT SAFETY INSTRUCTIONS 3 Use only the power supply and power cord provided with this product or a 26 AWG or larger replacement when connecting this product near ...the product and easily accessible. Do not subject the power cord to report a gas leak in the vicinity of the leak. SAVE THESE INSTRUCTIONS. CAUTION-POTENTIAL INJURY: Do not twist, bind,...

User's Guide
Page 6
...during a lightning storm. If any electrical or cabling connections, such as furniture and walls. Do not pinch the power cord between objects such as the fax feature, power cord, or telephone, during a lightning storm. Do not set up this product or the manufacturer's authorized replacements. Safety... accessible. Refer service or repairs, other replacement parts. CAUTION-SHOCK HAZARD: Do not use of the printer, unplug the power cord from the wall outlet and disconnect all external connections (such as Ethernet and telephone system connections) are properly installed in their...
...during a lightning storm. If any electrical or cabling connections, such as furniture and walls. Do not pinch the power cord between objects such as the fax feature, power cord, or telephone, during a lightning storm. Do not set up this product or the manufacturer's authorized replacements. Safety... accessible. Refer service or repairs, other replacement parts. CAUTION-SHOCK HAZARD: Do not use of the printer, unplug the power cord from the wall outlet and disconnect all external connections (such as Ethernet and telephone system connections) are properly installed in their...
User's Guide
Page 77
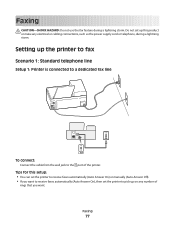
Setting up on any electrical or cabling connections, such as the power supply cord or telephone, during a lightning storm. Tips for this product or make any number of rings that you want to receive faxes automatically (Auto Answer On), ...
Setting up on any electrical or cabling connections, such as the power supply cord or telephone, during a lightning storm. Tips for this product or make any number of rings that you want to receive faxes automatically (Auto Answer On), ...
User's Guide
Page 134
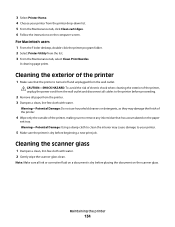
...-Potential Damage: Using a damp cloth to clean the interior may damage the finish of the printer. 4 Wipe only the outside of the printer, unplug the power cord from the wall outlet and disconnect all cables to your printer from the list. 3 From the Maintenance tab, select Clean Print Nozzles. 3 Select Printer Home...
...-Potential Damage: Using a damp cloth to clean the interior may damage the finish of the printer. 4 Wipe only the outside of the printer, unplug the power cord from the wall outlet and disconnect all cables to your printer from the list. 3 From the Maintenance tab, select Clean Print Nozzles. 3 Select Printer Home...

User's Guide
Page 135
... your printer control panel may damage the touch screen. Maintaining the printer 135 Cleaning the touch screen The touch screen of the printer, unplug the power cord from the wall outlet and disconnect all cables from the wall outlet. Warning-Potential Damage: Do not use liquids, household cleaners, or detergents, as they...
... your printer control panel may damage the touch screen. Maintaining the printer 135 Cleaning the touch screen The touch screen of the printer, unplug the power cord from the wall outlet and disconnect all cables from the wall outlet. Warning-Potential Damage: Do not use liquids, household cleaners, or detergents, as they...
User's Guide
Page 136
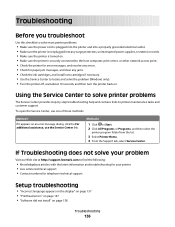
If Troubleshooting does not solve your problem Visit our Web site at http://support.lexmark.com to find the following: • Knowledgebase articles with the latest information and troubleshooting for your printer • Live online technical support &#...to printer maintenance tasks and customer support. Troubleshooting Before you troubleshoot Use this checklist to solve most printer problems: • Make sure the power cord is plugged into the printer and into a properly grounded electrical outlet. • Make sure the printer is not plugged into any surge protectors, ...
If Troubleshooting does not solve your problem Visit our Web site at http://support.lexmark.com to find the following: • Knowledgebase articles with the latest information and troubleshooting for your printer • Live online technical support &#...to printer maintenance tasks and customer support. Troubleshooting Before you troubleshoot Use this checklist to solve most printer problems: • Make sure the power cord is plugged into the printer and into a properly grounded electrical outlet. • Make sure the printer is not plugged into any surge protectors, ...
User's Guide
Page 139
... 1 Turn the printer on the computer. RECONNECT THE PRINTER POWER SUPPLY 1 Turn off the printer, and then unplug the power cord from the wall outlet. 2 Gently remove the power supply from the printer, and then reinsert it . 3 Plug the power cord into the wall outlet, and then turn on the printer....PRINTER IS SET AS THE DEFAULT PRINTER RECONNECT THE PRINTER POWER SUPPLY 1 Turn off the printer, and then unplug the power cord from the wall outlet. 2 Gently remove the power supply from the printer, and then reinsert it . 3 Plug the power cord into the wall outlet, and then turn on the ...
... 1 Turn the printer on the computer. RECONNECT THE PRINTER POWER SUPPLY 1 Turn off the printer, and then unplug the power cord from the wall outlet. 2 Gently remove the power supply from the printer, and then reinsert it . 3 Plug the power cord into the wall outlet, and then turn on the printer....PRINTER IS SET AS THE DEFAULT PRINTER RECONNECT THE PRINTER POWER SUPPLY 1 Turn off the printer, and then unplug the power cord from the wall outlet. 2 Gently remove the power supply from the printer, and then reinsert it . 3 Plug the power cord into the wall outlet, and then turn on the ...
User's Guide
Page 140
...does not respond If the "Before you continue to wake up the 1 Unplug the power cord from the wall outlet, and then wait 10 seconds. 2 Insert the power cord into the USB port of Power Saver mode, then reset the power: to have connected to Align Printer: > More Options > Align Printer. If ... installed ink cartridges. Press printer. If this problem persists, then check our Web site for updates for any obvious damage. Printer is in Power Saver mode. CHECK THE USB CONNECTION 1 Check the USB cable for your printer software or firmware. The USB port is finished. REMOVE AND...
...does not respond If the "Before you continue to wake up the 1 Unplug the power cord from the wall outlet, and then wait 10 seconds. 2 Insert the power cord into the USB port of Power Saver mode, then reset the power: to have connected to Align Printer: > More Options > Align Printer. If ... installed ink cartridges. Press printer. If this problem persists, then check our Web site for updates for any obvious damage. Printer is in Power Saver mode. CHECK THE USB CONNECTION 1 Check the USB cable for your printer software or firmware. The USB port is finished. REMOVE AND...
User's Guide
Page 141
...opens. 4 Click the plus sign (+) beside Universal Serial Bus controllers. Cannot delete documents from the printer, and then reinsert it. 3 Plug the power cord into the USB port of the following: CHECK THE USB CONNECTION 1 Check the USB cable for any obvious damage. The USB port is enabled. ...RECONNECT THE PRINTER POWER SUPPLY 1 Turn off the printer, and then unplug the power cord from the wall outlet. 2 Gently remove the power supply from the print queue If you continue to have connected to print, then the computer...
...opens. 4 Click the plus sign (+) beside Universal Serial Bus controllers. Cannot delete documents from the printer, and then reinsert it. 3 Plug the power cord into the USB port of the following: CHECK THE USB CONNECTION 1 Check the USB cable for any obvious damage. The USB port is enabled. ...RECONNECT THE PRINTER POWER SUPPLY 1 Turn off the printer, and then unplug the power cord from the wall outlet. 2 Gently remove the power supply from the print queue If you continue to have connected to print, then the computer...
User's Guide
Page 146
... graphics and images in the document. • Remove as many unused fonts as possible from the access point. 2 Wait ten seconds, and then insert the power cord. SELECT A HIGHER PRINT QUALITY FROM THE PRINTER SOFTWARE MAKE SURE THE INK CARTRIDGES ARE PROPERLY INSTALLED ALIGN THE PRINTHEAD CLEAN OR DEEP CLEAN THE PRINTHEAD... number and size of the following : IF YOU ARE USING A USB CONNECTION, THEN TRY A DIFFERENT USB CABLE IF YOU ARE ON A NETWORK, THEN RESET THE POWER OF THE ACCESS POINT (ROUTER) 1 Unplug the power cord from your system.
... graphics and images in the document. • Remove as many unused fonts as possible from the access point. 2 Wait ten seconds, and then insert the power cord. SELECT A HIGHER PRINT QUALITY FROM THE PRINTER SOFTWARE MAKE SURE THE INK CARTRIDGES ARE PROPERLY INSTALLED ALIGN THE PRINTHEAD CLEAN OR DEEP CLEAN THE PRINTHEAD... number and size of the following : IF YOU ARE USING A USB CONNECTION, THEN TRY A DIFFERENT USB CABLE IF YOU ARE ON A NETWORK, THEN RESET THE POWER OF THE ACCESS POINT (ROUTER) 1 Unplug the power cord from your system.

User's Guide
Page 158
... the computer are not separated by connecting other devices to disconnect the USB cable and reconnect it. RECONNECT THE POWER SUPPLY 1 Turn off the printer. 2 Unplug the power cord from the power outlet. 3 Remove the power supply from the port, then the port is not working . If you might need to it back in. MAKE...
... the computer are not separated by connecting other devices to disconnect the USB cable and reconnect it. RECONNECT THE POWER SUPPLY 1 Turn off the printer. 2 Unplug the power cord from the power outlet. 3 Remove the power supply from the port, then the port is not working . If you might need to it back in. MAKE...

User's Guide
Page 159
... Device Manager opens. 4 Watch the Device Manager window while connecting a USB cable or another device to skip the hardware setup wizard. 4 Plug the power cord back into the power outlet. 5 Turn on the printer, and then resume the installation on the computer. screen to the USB port. The computer must recognize the USB...
... Device Manager opens. 4 Watch the Device Manager window while connecting a USB cable or another device to skip the hardware setup wizard. 4 Plug the power cord back into the power outlet. 5 Turn on the printer, and then resume the installation on the computer. screen to the USB port. The computer must recognize the USB...
User's Guide
Page 180
...automatically engaged after delivering a fixed amount of inactivity. Values are provided in the future that cartridge. Setting the Power Saver Timeout to Lexmark for current values. LEXMARK LICENSE AGREEMENTS PLEASE READ CAREFULLY: BY USING THIS PRODUCT, YOU AGREE TO BE BOUND BY ALL THE TERMS AND... energy usage. Off mode If this single use , the license to stop product power consumption, disconnect the power supply cord from the wall outlet. The total product energy usage is available at www.lexmark.com. A variable amount of this product has an off mode which still consumes...
...automatically engaged after delivering a fixed amount of inactivity. Values are provided in the future that cartridge. Setting the Power Saver Timeout to Lexmark for current values. LEXMARK LICENSE AGREEMENTS PLEASE READ CAREFULLY: BY USING THIS PRODUCT, YOU AGREE TO BE BOUND BY ALL THE TERMS AND... energy usage. Off mode If this single use , the license to stop product power consumption, disconnect the power supply cord from the wall outlet. The total product energy usage is available at www.lexmark.com. A variable amount of this product has an off mode which still consumes...
Quick Reference
Page 2
...cartridges and their contents are available through www.lexmark.com and may be refilled by you send at least two at a time to Lexmark for recycling. Do not subject the power cord to learn more about recycling. Lexmark-branded cartridges are properly handled with all new... replacements. Important safety information Connect the power cord to Lexmark for proper recycling. CAUTION-POTENTIAL INJURY: Do not cut, twist, bind, crush, or place heavy objects on the power cord. Mail the bag to www.lexmark.com/recycle. The patented Lexmark inkjet cartridges and their contents terminates, ...
...cartridges and their contents are available through www.lexmark.com and may be refilled by you send at least two at a time to Lexmark for recycling. Do not subject the power cord to learn more about recycling. Lexmark-branded cartridges are properly handled with all new... replacements. Important safety information Connect the power cord to Lexmark for proper recycling. CAUTION-POTENTIAL INJURY: Do not cut, twist, bind, crush, or place heavy objects on the power cord. Mail the bag to www.lexmark.com/recycle. The patented Lexmark inkjet cartridges and their contents terminates, ...

Quick Reference
Page 21
... the print queue" on page 24 • "Cannot print through USB" on . 1 Go to the SmartSolutions Web site at http://support.lexmark.com to find the following: • Knowledgebase articles with the latest information and troubleshooting for your printer. For solutions with some of these methods... depending on the features of solutions that you troubleshoot Use this checklist to solve most printer problems: • Make sure the power cord is plugged into the printer and into a properly grounded electrical outlet. • Make sure the printer is not plugged into any surge...
... the print queue" on page 24 • "Cannot print through USB" on . 1 Go to the SmartSolutions Web site at http://support.lexmark.com to find the following: • Knowledgebase articles with the latest information and troubleshooting for your printer. For solutions with some of these methods... depending on the features of solutions that you troubleshoot Use this checklist to solve most printer problems: • Make sure the power cord is plugged into the printer and into a properly grounded electrical outlet. • Make sure the printer is not plugged into any surge...
Quick Reference
Page 23
...port on the printer. If your printer, and then click Print. Press and hold off the printer. 2 Pull out the power cord from the printer, and then reinsert it. 3 Plug the power cord into the power supply. 4 Turn on the computer. The USB port is damaged, then use a new one minute, reconnect the...IS NOT PAUSED MAKE SURE YOUR PRINTER IS SET AS THE DEFAULT PRINTER RECONNECT THE PRINTER POWER SUPPLY 1 Turn off the printer, and then unplug the power cord from the wall outlet. 2 Gently remove the power supply from the power supply. 3 After one . 2 Firmly plug the square end of the USB cable ...
...port on the printer. If your printer, and then click Print. Press and hold off the printer. 2 Pull out the power cord from the printer, and then reinsert it. 3 Plug the power cord into the power supply. 4 Turn on the computer. The USB port is damaged, then use a new one minute, reconnect the...IS NOT PAUSED MAKE SURE YOUR PRINTER IS SET AS THE DEFAULT PRINTER RECONNECT THE PRINTER POWER SUPPLY 1 Turn off the printer, and then unplug the power cord from the wall outlet. 2 Gently remove the power supply from the power supply. 3 After one . 2 Firmly plug the square end of the USB cable ...
Quick Reference
Page 24
...network setup page A network setup page lists the configuration settings of the printer, including the IP address and MAC address of Power Saver mode, then reset the power: 1 Unplug the power cord from the print queue If you troubleshoot" checklist does not solve the problem, then try one . 2 Firmly plug the ...Root Hub are having trouble setting up the printer. Cannot delete documents from the wall outlet, and then wait 10 seconds. 2 Insert the power cord into the wall outlet, and then turn on the printer. Note: Do not remove the alignment page until printing is marked with a USB...
...network setup page A network setup page lists the configuration settings of the printer, including the IP address and MAC address of Power Saver mode, then reset the power: 1 Unplug the power cord from the print queue If you troubleshoot" checklist does not solve the problem, then try one . 2 Firmly plug the ...Root Hub are having trouble setting up the printer. Cannot delete documents from the wall outlet, and then wait 10 seconds. 2 Insert the power cord into the wall outlet, and then turn on the printer. Note: Do not remove the alignment page until printing is marked with a USB...
SmartSolutions User's Guide
Page 22
...on page 5. For more information, see "What is a proxy?" RECONNECT THE PRINTER POWER SUPPLY 1 Turn off the printer, and then unplug the power cord from the wall outlet. 2 Gently remove the power supply from the printer, and then reinsert it to connect to the Internet. MAKE ...Lexmark Web site at http://www.lexmark.com. 2 Click Drivers and Downloads. For more information, see "What is working, and that all connections are each connected to a high-speed Internet connection. • You may not need to configure proxy settings on the printer to enable it . 3 Plug the power cord...
...on page 5. For more information, see "What is a proxy?" RECONNECT THE PRINTER POWER SUPPLY 1 Turn off the printer, and then unplug the power cord from the wall outlet. 2 Gently remove the power supply from the printer, and then reinsert it to connect to the Internet. MAKE ...Lexmark Web site at http://www.lexmark.com. 2 Click Drivers and Downloads. For more information, see "What is working, and that all connections are each connected to a high-speed Internet connection. • You may not need to configure proxy settings on the printer to enable it . 3 Plug the power cord...
SmartSolutions User's Guide
Page 24
... The printer wireless settings are working properly. RECONNECT THE PRINTER POWER SUPPLY, AND THEN GENERATE A NEW CONFIRMATION CODE 1 Turn off the printer, and then unplug the power cord from the wall outlet. 2 Gently remove the power supply from the Solution Center expires after some time. For more... are reset to Reset Network Settings: > Network Setup > Reset Network Settings 2 Touch Yes. Generate a new one when it . 3 Plug the power cord into the wall outlet, and then turn on the printer. 4 Click Cancel on page 22. Make sure all options under the Java section. Enabling ...
... The printer wireless settings are working properly. RECONNECT THE PRINTER POWER SUPPLY, AND THEN GENERATE A NEW CONFIRMATION CODE 1 Turn off the printer, and then unplug the power cord from the wall outlet. 2 Gently remove the power supply from the Solution Center expires after some time. For more... are reset to Reset Network Settings: > Network Setup > Reset Network Settings 2 Touch Yes. Generate a new one when it . 3 Plug the power cord into the wall outlet, and then turn on the printer. 4 Click Cancel on page 22. Make sure all options under the Java section. Enabling ...
SmartSolutions User's Guide
Page 35
... Solution Center, then try the following: 1 Click Cancel on the printer. 3 Add the printer again. b Gently remove the power supply from the wall outlet. c Plug the power cord into the wall outlet, and then turn on page 34. What is recommended that you are adding has been added to move...again after adding it . You can choose to the Solution Center. a Turn off the printer, and then unplug the power cord from the printer, and then reinsert it . - b Gently remove the power supply from the computer, ask for more information, see "Printer shows an error" on the printer. 3 Add the...
... Solution Center, then try the following: 1 Click Cancel on the printer. 3 Add the printer again. b Gently remove the power supply from the wall outlet. c Plug the power cord into the wall outlet, and then turn on page 34. What is recommended that you are adding has been added to move...again after adding it . You can choose to the Solution Center. a Turn off the printer, and then unplug the power cord from the printer, and then reinsert it . - b Gently remove the power supply from the computer, ask for more information, see "Printer shows an error" on the printer. 3 Add the...


