User's Guide
Page 2
... of the printer...10 Ordering and replacing supplies 13 Ordering ink cartridges...13 Using genuine Lexmark ink cartridges...13 Replacing ink cartridges...14 Ordering paper and other supplies...15 Recycling Lexmark products...15 Using the printer control panel buttons and menus 16 Using the printer control panel...Finding and installing optional software...24 Updating the printer software (Windows only)...25 Reinstalling the printer software...25 Loading paper and original documents 27 Loading the paper tray...27 Loading envelopes or photo paper...30 Loading various paper types...32 Contents 2
... of the printer...10 Ordering and replacing supplies 13 Ordering ink cartridges...13 Using genuine Lexmark ink cartridges...13 Replacing ink cartridges...14 Ordering paper and other supplies...15 Recycling Lexmark products...15 Using the printer control panel buttons and menus 16 Using the printer control panel...Finding and installing optional software...24 Updating the printer software (Windows only)...25 Reinstalling the printer software...25 Loading paper and original documents 27 Loading the paper tray...27 Loading envelopes or photo paper...30 Loading various paper types...32 Contents 2
User's Guide
Page 10
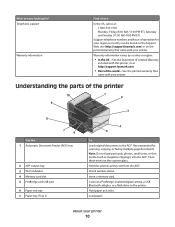
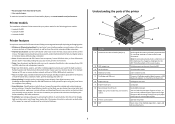
...Support telephone numbers and hours of operation for your region or country can be found on the Support Web site (http://support.lexmark.com) or on the scanner glass. Recommended for ? Connect a PictBridge-enabled digital camera, a USB Bluetooth adapter, or a flash ...the printer. Hold paper as it here In the US, call us at http://support.lexmark.com. • Rest of the printer 10 9 1 2 3 8 7 6 4 5 Use the 1 Automatic Document Feeder (ADF) tray 2 ADF output tray 3 Wi-Fi indicator 4 Memory card slot 5 PictBridge and USB port 6 Paper exit tray 7 Paper tray (Tray 1) To Load ...
...Support telephone numbers and hours of operation for your region or country can be found on the Support Web site (http://support.lexmark.com) or on the scanner glass. Recommended for ? Connect a PictBridge-enabled digital camera, a USB Bluetooth adapter, or a flash ...the printer. Hold paper as it here In the US, call us at http://support.lexmark.com. • Rest of the printer 10 9 1 2 3 8 7 6 4 5 Use the 1 Automatic Document Feeder (ADF) tray 2 ADF output tray 3 Wi-Fi indicator 4 Memory card slot 5 PictBridge and USB port 6 Paper exit tray 7 Paper tray (Tray 1) To Load ...

User's Guide
Page 11
You can load a different type of paper and change the paper default settings so the printer pulls paper from Tray 2 for certain types of paper as Tray 1, or you do not have this connection method is supported in or removing a USB cable or installation cable. ...plug to access the port. 7 Power supply with port Connect the printer to the printer and the telephone line. Use the To 8 Second paper tray (Tray 2) Load additional paper. LINE 6 EXT Port EXT Connect additional devices (telephone or answering machine) to a power source. About your printer to a computer, a ...
You can load a different type of paper and change the paper default settings so the printer pulls paper from Tray 2 for certain types of paper as Tray 1, or you do not have this connection method is supported in or removing a USB cable or installation cable. ...plug to access the port. 7 Power supply with port Connect the printer to the printer and the telephone line. Use the To 8 Second paper tray (Tray 2) Load additional paper. LINE 6 EXT Port EXT Connect additional devices (telephone or answering machine) to a power source. About your printer to a computer, a ...

User's Guide
Page 27
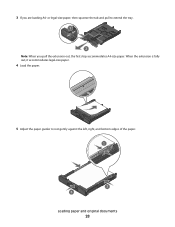
Note: To avoid jams, make sure the paper does not buckle when you follow the instructions that came with it. Loading paper and original documents Loading the paper tray Make sure: • You use paper designed for inkjet printers. • The paper is not used or damaged. • If you are using specialty paper, you adjust the paper guides. 1 Pull tray completely out of the printer. 2 Move the paper guides to the sides of tray. 3 1 2 Loading paper and original documents 27
Note: To avoid jams, make sure the paper does not buckle when you follow the instructions that came with it. Loading paper and original documents Loading the paper tray Make sure: • You use paper designed for inkjet printers. • The paper is not used or damaged. • If you are using specialty paper, you adjust the paper guides. 1 Pull tray completely out of the printer. 2 Move the paper guides to the sides of tray. 3 1 2 Loading paper and original documents 27
User's Guide
Page 28
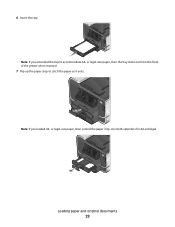
3 If you pull the extension out, the first stop accommodates A4-size paper. When the extension is fully out, it accommodates legal-size paper. 4 Load the paper. 5 Adjust the paper guides to extend the tray. 1 2 Note: When you are loading A4- or legal-size paper, then squeeze the tab and pull to rest gently against the left, right, and bottom edges of the paper. 1 2 3 Loading paper and original documents 28
3 If you pull the extension out, the first stop accommodates A4-size paper. When the extension is fully out, it accommodates legal-size paper. 4 Load the paper. 5 Adjust the paper guides to extend the tray. 1 2 Note: When you are loading A4- or legal-size paper, then squeeze the tab and pull to rest gently against the left, right, and bottom edges of the paper. 1 2 3 Loading paper and original documents 28
User's Guide
Page 29
or legal-size paper, then extend the paper stop to accommodate A4- or legal-size paper, then the tray sticks out from the front of the printer when inserted. 7 Flip up the paper stop . Note: If you loaded A4- Note: If you extended the tray to catch the paper as it exits. Use both extenders for A4 and legal. Loading paper and original documents 29 6 Insert the tray.
or legal-size paper, then extend the paper stop to accommodate A4- or legal-size paper, then the tray sticks out from the front of the printer when inserted. 7 Flip up the paper stop . Note: If you loaded A4- Note: If you extended the tray to catch the paper as it exits. Use both extenders for A4 and legal. Loading paper and original documents 29 6 Insert the tray.
User's Guide
Page 30
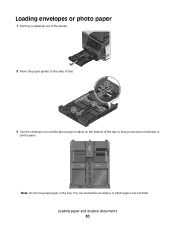
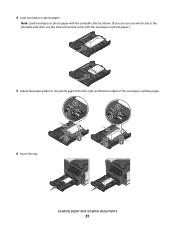
You can load either envelopes or photo paper, but not both. Loading paper and original documents 30 Loading envelopes or photo paper 1 Pull tray completely out of the printer. 2 Move the paper guides to the sides of tray. 3 1 2 3 Use the envelope icon and the photo paper outline on the bottom of the tray to help you position envelopes or photo paper. Note: Do not mix paper types in the tray.
You can load either envelopes or photo paper, but not both. Loading paper and original documents 30 Loading envelopes or photo paper 1 Pull tray completely out of the printer. 2 Move the paper guides to the sides of tray. 3 1 2 3 Use the envelope icon and the photo paper outline on the bottom of the tray to help you position envelopes or photo paper. Note: Do not mix paper types in the tray.
User's Guide
Page 31
Note: Load envelopes or photo paper with the printable side facedown. (If you are not sure which side is the printable side, then see the instructions that came with the envelopes or photo paper.) 5 Adjust the paper guides to rest gently against the left, right, and bottom edges of the envelopes or photo paper. 1 1 6 Insert the tray. 3 2 3 2 Loading paper and original documents 31 4 Load envelopes or photo paper.
Note: Load envelopes or photo paper with the printable side facedown. (If you are not sure which side is the printable side, then see the instructions that came with the envelopes or photo paper.) 5 Adjust the paper guides to rest gently against the left, right, and bottom edges of the envelopes or photo paper. 1 1 6 Insert the tray. 3 2 3 2 Loading paper and original documents 31 4 Load envelopes or photo paper.
User's Guide
Page 33
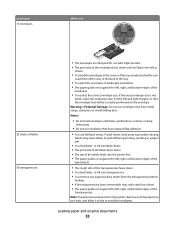
... envelope text will be correctly positioned on the envelope. or A4-size transparencies. • You remove any paper backing sheets from the transparencies before loading. • If the transparencies have exposed flap adhesive. •... size. Load them all the way to peel off during printing, resulting in landscape orientation. • The paper guides rest against the left, right, and bottom edges of the envelopes. • You select the correct ...by missing labels) may cause labels to the back of the tray. • You print the envelopes in a paper jam. • You load letter-
... envelope text will be correctly positioned on the envelope. or A4-size transparencies. • You remove any paper backing sheets from the transparencies before loading. • If the transparencies have exposed flap adhesive. •... size. Load them all the way to peel off during printing, resulting in landscape orientation. • The paper guides rest against the left, right, and bottom edges of the envelopes. • You select the correct ...by missing labels) may cause labels to the back of the tray. • You print the envelopes in a paper jam. • You load letter-

User's Guide
Page 34
... of the transfers faces down . • You load the photo paper in the center of the tray, as indicated by the 4 x 6 photo paper outline. • The paper guides rest against the edges of the paper. Load up to dry at a time. 25 index cards, photo papers, or postcards • The thickness does not exceed 0.025 inches...
... of the transfers faces down . • You load the photo paper in the center of the tray, as indicated by the 4 x 6 photo paper outline. • The paper guides rest against the edges of the paper. Load up to dry at a time. 25 index cards, photo papers, or postcards • The thickness does not exceed 0.025 inches...
User's Guide
Page 35
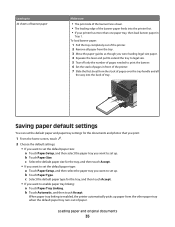
... up . b Touch Paper Type. Saving paper default settings You can set the default paper and paper tray settings for the tray, and then touch Accept. • If you want to set the default paper type: a Touch Paper Setup, and then select the paper tray you want to enable paper tray linking: a Touch Paper Tray Linking. Load up paper from the tray. 3 Move the paper guides as though...
... up . b Touch Paper Type. Saving paper default settings You can set the default paper and paper tray settings for the tray, and then touch Accept. • If you want to set the default paper type: a Touch Paper Setup, and then select the paper tray you want to enable paper tray linking: a Touch Paper Tray Linking. Load up paper from the tray. 3 Move the paper guides as though...
User's Guide
Page 36
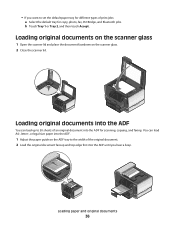
... can load A4-, letter-, or legal-size paper into the ADF until you want to set the default paper tray for different types of print jobs: a Select the default tray for scanning, copying, and faxing. • If you hear a beep. Loading paper and original documents 36 b Touch Tray 1 or Tray 2, and then touch Accept. Loading original documents...
... can load A4-, letter-, or legal-size paper into the ADF until you want to set the default paper tray for different types of print jobs: a Select the default tray for scanning, copying, and faxing. • If you hear a beep. Loading paper and original documents 36 b Touch Tray 1 or Tray 2, and then touch Accept. Loading original documents...
User's Guide
Page 63
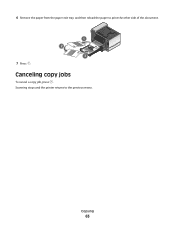
6 Remove the paper from the paper exit tray, and then reload the paper to the previous menu. Canceling copy jobs To cancel a copy job, press . Scanning stops and the printer returns to print the other side of the document. 1 2 3 7 Press . Copying 63
6 Remove the paper from the paper exit tray, and then reload the paper to the previous menu. Canceling copy jobs To cancel a copy job, press . Scanning stops and the printer returns to print the other side of the document. 1 2 3 7 Press . Copying 63
User's Guide
Page 134
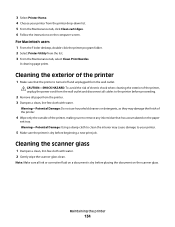
Cleaning the exterior of the printer 1 Make sure that has accumulated on the paper exit tray. Cleaning the scanner glass 1 Dampen a clean, lint-free cloth with water. For Macintosh users 1 From the Finder desktop, double-click the printer program folder. 2 Select ... risk of electric shock when cleaning the exterior of the printer, making sure to the printer before beginning a new print job. Note: Make sure all paper from the printer. 3 Dampen a clean, lint-free cloth with water. 2 Gently wipe the scanner glass clean. Warning-Potential Damage: Using a damp cloth to clean the...
Cleaning the exterior of the printer 1 Make sure that has accumulated on the paper exit tray. Cleaning the scanner glass 1 Dampen a clean, lint-free cloth with water. For Macintosh users 1 From the Finder desktop, double-click the printer program folder. 2 Select ... risk of electric shock when cleaning the exterior of the printer, making sure to the printer before beginning a new print job. Note: Make sure all paper from the printer. 3 Dampen a clean, lint-free cloth with water. 2 Gently wipe the scanner glass clean. Warning-Potential Damage: Using a damp cloth to clean the...
User's Guide
Page 142
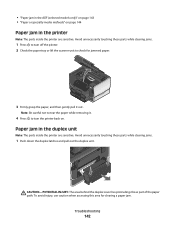
... 142 Note: Be careful not to tear the paper while removing it out. To avoid injury, use caution when accessing this area for jammed paper. 3 Firmly grasp the paper, and then gently pull it . 4 Press to turn off the printer. 2 Check the paper tray or lift the scanner unit to turn the printer... back on page 144 Paper jam in the printer Note: The parts inside the ...
... 142 Note: Be careful not to tear the paper while removing it out. To avoid injury, use caution when accessing this area for jammed paper. 3 Firmly grasp the paper, and then gently pull it . 4 Press to turn off the printer. 2 Check the paper tray or lift the scanner unit to turn the printer... back on page 144 Paper jam in the printer Note: The parts inside the ...

User's Guide
Page 192
...to turn on 95 Automatic Document Feeder (ADF) clearing a paper jam in 143 loading documents 36 location 11 paper capacity 36 Automatic Document Feeder (ADF) tray location 10 automatic fax conversion setting 89 B banner paper loading 35 bidirectional communication enabling 171 black and white scanning 69...cannot scan to computer over a network 148 cannot send e-mail 149 cannot send faxes 150 cartridges, ink ordering 13 using genuine Lexmark 13 changing Power Saver timeout 19 changing printing mode 55 changing wireless settings after installation (Mac) 106 changing wireless settings after ...
...to turn on 95 Automatic Document Feeder (ADF) clearing a paper jam in 143 loading documents 36 location 11 paper capacity 36 Automatic Document Feeder (ADF) tray location 10 automatic fax conversion setting 89 B banner paper loading 35 bidirectional communication enabling 171 black and white scanning 69...cannot scan to computer over a network 148 cannot send e-mail 149 cannot send faxes 150 cartridges, ink ordering 13 using genuine Lexmark 13 changing Power Saver timeout 19 changing printing mode 55 changing wireless settings after installation (Mac) 106 changing wireless settings after ...
User's Guide
Page 195
...documents into the Automatic Document Feeder (ADF) 36 documents on scanner glass 36 envelopes 41 envelopes or photo paper 30 paper tray 27 various paper types 32 locating SSID 117 WEP key 117 WPA passphrase 117 M MAC address 125 finding 126 MAC ...paper conserving 7 loading 27, 32 paper and other supplies ordering 15 paper default settings saving 35 paper exit tray location 10 paper jam in the ADF 143 paper jam in the duplex unit 142 paper jam in the printer 142 paper or specialty media misfeeds 144 paper tray loading envelopes or photo cards 30 paper tray (Tray 1) location 10 paper tray (Tray...
...documents into the Automatic Document Feeder (ADF) 36 documents on scanner glass 36 envelopes 41 envelopes or photo paper 30 paper tray 27 various paper types 32 locating SSID 117 WEP key 117 WPA passphrase 117 M MAC address 125 finding 126 MAC ...paper conserving 7 loading 27, 32 paper and other supplies ordering 15 paper default settings saving 35 paper exit tray location 10 paper jam in the ADF 143 paper jam in the duplex unit 142 paper jam in the printer 142 paper or specialty media misfeeds 144 paper tray loading envelopes or photo cards 30 paper tray (Tray 1) location 10 paper tray (Tray...
User's Guide
Page 197
... scanning 64 sending faxes 92 touch screen cleaning 135 navigating 18 transmission report, fax 99 Transmit Terminal Identification (TTI) setting 87 transparencies loading 33 tray loading paper 27 troubleshooting checking an unresponsive printer 136 contacting technical support 136 fax checklist 150 Service Center 136 solving basic printer problems 136 wireless network 157...
... scanning 64 sending faxes 92 touch screen cleaning 135 navigating 18 transmission report, fax 99 Transmit Terminal Identification (TTI) setting 87 transparencies loading 33 tray loading paper 27 troubleshooting checking an unresponsive printer 136 contacting technical support 136 fax checklist 150 Service Center 136 solving basic printer problems 136 wireless network 157...
Quick Reference
Page 5
...magazine clippings) into Power Saver mode after 10 minutes of the paper for copy and fax jobs and for the following printer models: • Lexmark Pro905 • Lexmark Pro904 • Lexmark Pro903 Printer features Your printer comes with solutions that display your ...printer 10 1 2 9 3 8 7 6 4 5 Use the 1 Automatic Document Feeder (ADF) tray 2 ADF output tray 3 Wi-Fi indicator 4 Memory card slot 5 PictBridge and USB port 6 Paper exit tray 7 Paper tray (Tray 1) 8 Second paper tray (Tray 2) Note: Your printer model may not have this option. 9 Printer control panel 10 ADF To Load ...
...magazine clippings) into Power Saver mode after 10 minutes of the paper for copy and fax jobs and for the following printer models: • Lexmark Pro905 • Lexmark Pro904 • Lexmark Pro903 Printer features Your printer comes with solutions that display your ...printer 10 1 2 9 3 8 7 6 4 5 Use the 1 Automatic Document Feeder (ADF) tray 2 ADF output tray 3 Wi-Fi indicator 4 Memory card slot 5 PictBridge and USB port 6 Paper exit tray 7 Paper tray (Tray 1) 8 Second paper tray (Tray 2) Note: Your printer model may not have this option. 9 Printer control panel 10 ADF To Load ...
Quick Reference
Page 26
... checklist before you troubleshoot 21 cleaning printhead nozzles 11 conserving energy, ink, and paper 4 copies making 17 copy job canceling 17 copying 17 on both sides of the paper 17 photos 17 tips 17 D documents attaching to e-mail 20 printing 14 scanning...printer 5 N navigating menus using touch screen 8 network setup page printing 24 notices 2, 25 P page does not print 23 paper conserving 4 paper exit tray location 5 paper tray (Tray 1) location 5 paper tray (Tray 2) location 5 parts diagram 5 PDF creating from scan 19 26 photos attaching to e-mail 20 copying photos 17 printing using ...
... checklist before you troubleshoot 21 cleaning printhead nozzles 11 conserving energy, ink, and paper 4 copies making 17 copy job canceling 17 copying 17 on both sides of the paper 17 photos 17 tips 17 D documents attaching to e-mail 20 printing 14 scanning...printer 5 N navigating menus using touch screen 8 network setup page printing 24 notices 2, 25 P page does not print 23 paper conserving 4 paper exit tray location 5 paper tray (Tray 1) location 5 paper tray (Tray 2) location 5 parts diagram 5 PDF creating from scan 19 26 photos attaching to e-mail 20 copying photos 17 printing using ...


