Universal Print Driver Version 2.0 White Paper
Page 9
... MS317dn - XM5200 Series (XM5263, XM5270) - Serbian If you can upgrade to UPD version 2.11. CX517de - MX517de - CS727de - MS817dn - Croatian - CS728de - XM7200 Series (XM7263, XM7270) Note: For more information, see "Supported printers" on page 22. • ...MX717de - MS617dn - CX417de - CX827de Monochrome laser multifunction products - MS517dn - MS818dn - MX617de - CX317dn - MS817n - Change history 9 Lexmark Universal Print Driver version 2.11 Note: If you are not using status monitor applications, then you are using status monitor applications, then ...
... MS317dn - XM5200 Series (XM5263, XM5270) - Serbian If you can upgrade to UPD version 2.11. CX517de - MX517de - CS727de - MS817dn - Croatian - CS728de - XM7200 Series (XM7263, XM7270) Note: For more information, see "Supported printers" on page 22. • ...MX717de - MS617dn - CX417de - CX827de Monochrome laser multifunction products - MS517dn - MS818dn - MX617de - CX317dn - MS817n - Change history 9 Lexmark Universal Print Driver version 2.11 Note: If you are not using status monitor applications, then you are using status monitor applications, then ...
Universal Print Driver Version 2.0 White Paper
Page 29
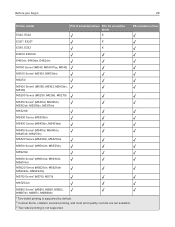
... Series1 (MS510dn, MS517dn) MS521dn MS610 Series1 (MS610de, MS610dn, MS617dn) MS620 Series (MS621dn, MS621dtn MS622de, MS622dte) MS710 Series1 (MS710, MS711) MS725dvn MS810 Series1 (MS810, MS811, MS812, MS817dn, MS817n, MS818dn) 1 Two‑sided printing is supported by default. 2 Custom forms, collation, booklet printing, and most print quality controls are not available. 3 Two‑...
... Series1 (MS510dn, MS517dn) MS521dn MS610 Series1 (MS610de, MS610dn, MS617dn) MS620 Series (MS621dn, MS621dtn MS622de, MS622dte) MS710 Series1 (MS710, MS711) MS725dvn MS810 Series1 (MS810, MS811, MS812, MS817dn, MS817n, MS818dn) 1 Two‑sided printing is supported by default. 2 Custom forms, collation, booklet printing, and most print quality controls are not available. 3 Two‑...

Embedded Web Server Administrator s Guide
Page 4
..., M1140+, M1145, M3150dn, M5163dn, MS310d, MS310dn, MS312dn, MS315dn, MS317dn, MS410d, MS410dn, MS415dn, MS417dn, MS510dn, MS517dn, MS610dn, MS610dtn, MS617dn, MS711dn, MS711dn, MS810n, MS810dn, MS811n, MS811dn, MS812dn, MS817dn, MS817n, MS818dn, MX310dn, MX317dn Advanced‑security devices Series Printer models C Series CS510de, CS510dte, CS517de, CX410de, CX410e/dte, CX417de, CX510de, CX510dhe/dthe, CX517de M Series MS610de...
..., M1140+, M1145, M3150dn, M5163dn, MS310d, MS310dn, MS312dn, MS315dn, MS317dn, MS410d, MS410dn, MS415dn, MS417dn, MS510dn, MS517dn, MS610dn, MS610dtn, MS617dn, MS711dn, MS711dn, MS810n, MS810dn, MS811n, MS811dn, MS812dn, MS817dn, MS817n, MS818dn, MX310dn, MX317dn Advanced‑security devices Series Printer models C Series CS510de, CS510dte, CS517de, CX410de, CX410e/dte, CX417de, CX510de, CX510dhe/dthe, CX517de M Series MS610de...

PRESCRIBE Emulation P41g Technical Reference -- July 2017
Page 3
...Lexmark CS510de, CS510e, CS517de • Lexmark CX310dn, CX310n CX317dn • Lexmark CX410de, CX410e • Lexmark CX510de, CX517de • Lexmark MS510dn, MS517dn • Lexmark MS610de, MS610dn, MS617dn • Lexmark MS810, MS811, MS812, MS817n, MS817dn, MS818dn • Lexmark MX310 • Lexmark MX410, MX410de • Lexmark MX510, MX517de • Lexmark MX610, MX617de • Lexmark MX710, MX717de, MX718de • Lexmark...Introduction 3 Introduction PRESCRIBE emulation option for Lexmark laser printers is used. To verify installation, print a Print Menus page from the printer ...
...Lexmark CS510de, CS510e, CS517de • Lexmark CX310dn, CX310n CX317dn • Lexmark CX410de, CX410e • Lexmark CX510de, CX517de • Lexmark MS510dn, MS517dn • Lexmark MS610de, MS610dn, MS617dn • Lexmark MS810, MS811, MS812, MS817n, MS817dn, MS818dn • Lexmark MX310 • Lexmark MX410, MX410de • Lexmark MX510, MX517de • Lexmark MX610, MX617de • Lexmark MX710, MX717de, MX718de • Lexmark...Introduction 3 Introduction PRESCRIBE emulation option for Lexmark laser printers is used. To verify installation, print a Print Menus page from the printer ...

Users Guide PDF
Page 2
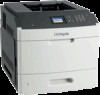
... hardware options...29 Attaching cables...33 Setting up the printer software...35 Networking...36 Verifying printer setup...40 Using MS810n, MS810dn, MS811n, MS811dn, MS812dn, MS817n, MS817dn, MS818dn 41 Learning about the printer...41 Loading paper and specialty media...44 Printing...66 Managing your printer...72 Using MS810de 83 Learning about the...
... hardware options...29 Attaching cables...33 Setting up the printer software...35 Networking...36 Verifying printer setup...40 Using MS810n, MS810dn, MS811n, MS811dn, MS812dn, MS817n, MS817dn, MS818dn 41 Learning about the printer...41 Loading paper and specialty media...44 Printing...66 Managing your printer...72 Using MS810de 83 Learning about the...

Users Guide PDF
Page 41
For more information, see www.lexmark.com/multifunctionprinters. If you purchased a printer with a similar configuration, then you are using multiple input options. Using MS810n, MS810dn, MS811n, MS811dn, MS812dn, MS817n, MS817dn, MS818dn 41 Using MS810n, MS810dn, MS811n, MS811dn, MS812dn, MS817n, MS817dn, MS818dn Learning about the printer Printer configurations Basic model 1 Standard...
For more information, see www.lexmark.com/multifunctionprinters. If you purchased a printer with a similar configuration, then you are using multiple input options. Using MS810n, MS810dn, MS811n, MS811dn, MS812dn, MS817n, MS817dn, MS818dn 41 Using MS810n, MS810dn, MS811n, MS811dn, MS812dn, MS817n, MS817dn, MS818dn Learning about the printer Printer configurations Basic model 1 Standard...

Users Guide PDF
Page 42
..., MS817dn, MS818dn 42 The following illustration shows the maximum number of optional finishers and trays that are supported by the printer. For more optional finishers: • The staple finisher must always be on other output options. In a configuration with any other configurations, visit www.lexmark...
..., MS817dn, MS818dn 42 The following illustration shows the maximum number of optional finishers and trays that are supported by the printer. For more optional finishers: • The staple finisher must always be on other output options. In a configuration with any other configurations, visit www.lexmark...

Users Guide PDF
Page 43
... or left and right. 4 Keypad Enter numbers, letters, or symbols. 5 Sleep button Enable Sleep mode or Hibernate mode. Using MS810n, MS810dn, MS811n, MS811dn, MS812dn, MS817n, MS817dn, MS818dn 43 • The output expander is configured with the printer. • The optional 250‑ and 550‑sheet trays may be...
... or left and right. 4 Keypad Enter numbers, letters, or symbols. 5 Sleep button Enable Sleep mode or Hibernate mode. Using MS810n, MS810dn, MS811n, MS811dn, MS812dn, MS817n, MS817dn, MS818dn 43 • The output expander is configured with the printer. • The optional 250‑ and 550‑sheet trays may be...

Users Guide PDF
Page 44
... down arrow button to select the paper size, and then press . 4 Press the up , processing data, or printing. Using MS810n, MS810dn, MS811n, MS811dn, MS812dn, MS817n, MS817dn, MS818dn 44 Understanding the colors of the Sleep button and indicator lights The colors of paper and specialty media can affect how reliably documents print...
... down arrow button to select the paper size, and then press . 4 Press the up , processing data, or printing. Using MS810n, MS810dn, MS811n, MS811dn, MS812dn, MS817n, MS817dn, MS818dn 44 Understanding the colors of the Sleep button and indicator lights The colors of paper and specialty media can affect how reliably documents print...

Users Guide PDF
Page 45
Using MS810n, MS810dn, MS811n, MS811dn, MS812dn, MS817n, MS817dn, MS818dn 45 • The largest supported Universal size is 216 x 356 mm (8.5 x 14 inches) for one‑sided and two‑sided printing. • When .... Doing so may use the MS710 Series printer models, which print batches of 10 or more information on the MS710 Series printer models, contact your Lexmark sales representative. From the printer control panel, navigate to: > Settings > measure > > Paper Menu > > Universal Setup > > Units of Measure > > select unit of Loading the 250‑...
Using MS810n, MS810dn, MS811n, MS811dn, MS812dn, MS817n, MS817dn, MS818dn 45 • The largest supported Universal size is 216 x 356 mm (8.5 x 14 inches) for one‑sided and two‑sided printing. • When .... Doing so may use the MS710 Series printer models, which print batches of 10 or more information on the MS710 Series printer models, contact your Lexmark sales representative. From the printer control panel, navigate to: > Settings > measure > > Paper Menu > > Universal Setup > > Units of Measure > > select unit of Loading the 250‑...

Users Guide PDF
Page 46
Note: Use the paper size indicators at the bottom of the paper being loaded until it clicks into place. Using MS810n, MS810dn, MS811n, MS811dn, MS812dn, MS817n, MS817dn, MS818dn 46 2 Squeeze and slide the width guide to the correct position for the size of the tray to help position the guides.
Note: Use the paper size indicators at the bottom of the paper being loaded until it clicks into place. Using MS810n, MS810dn, MS811n, MS811dn, MS812dn, MS817n, MS817dn, MS818dn 46 2 Squeeze and slide the width guide to the correct position for the size of the tray to help position the guides.

Users Guide PDF
Page 47
Notes: • Lock the length guide for the size of the tray to the correct position for all paper sizes. • Use the paper size indicators at the bottom of the paper being loaded. Using MS810n, MS810dn, MS811n, MS811dn, MS812dn, MS817n, MS817dn, MS818dn 47 3 Unlock the length guide, and then squeeze and slide the guide to help position the guides.
Notes: • Lock the length guide for the size of the tray to the correct position for all paper sizes. • Use the paper size indicators at the bottom of the paper being loaded. Using MS810n, MS810dn, MS811n, MS811dn, MS812dn, MS817n, MS817dn, MS818dn 47 3 Unlock the length guide, and then squeeze and slide the guide to help position the guides.

Users Guide PDF
Page 48
... the left side of the paper are on whether an optional staple finisher is installed or not. Using MS810n, MS810dn, MS811n, MS811dn, MS812dn, MS817n, MS817dn, MS818dn 48 4 Flex the sheets back and forth to loosen them, and then fan them. Do not fold or crease the paper.
... the left side of the paper are on whether an optional staple finisher is installed or not. Using MS810n, MS810dn, MS811n, MS811dn, MS812dn, MS817n, MS817dn, MS818dn 48 4 Flex the sheets back and forth to loosen them, and then fan them. Do not fold or crease the paper.

Users Guide PDF
Page 49
Using MS810n, MS810dn, MS811n, MS811dn, MS812dn, MS817n, MS817dn, MS818dn 49 • Do not slide the paper into the tray. Load paper as shown in the illustration. • If you are loading envelopes, then make sure that the flap side is facing up and the envelopes are on the left side of the tray.
Using MS810n, MS810dn, MS811n, MS811dn, MS812dn, MS817n, MS817dn, MS818dn 49 • Do not slide the paper into the tray. Load paper as shown in the illustration. • If you are loading envelopes, then make sure that the flap side is facing up and the envelopes are on the left side of the tray.

Users Guide PDF
Page 50
Using MS810n, MS810dn, MS811n, MS811dn, MS812dn, MS817n, MS817dn, MS818dn 50 • Make sure the paper is below the solid line, which is the maximum paper fill indicator. Warning-Potential Damage: Overfilling the tray can cause paper jams.
Using MS810n, MS810dn, MS811n, MS811dn, MS812dn, MS817n, MS817dn, MS818dn 50 • Make sure the paper is below the solid line, which is the maximum paper fill indicator. Warning-Potential Damage: Overfilling the tray can cause paper jams.

Users Guide PDF
Page 51
Using MS810n, MS810dn, MS811n, MS811dn, MS812dn, MS817n, MS817dn, MS818dn 51 • When using card stock, labels, or other types of specialty media, make sure the paper is below the dashed line, which is ...
Using MS810n, MS810dn, MS811n, MS811dn, MS812dn, MS817n, MS817dn, MS818dn 51 • When using card stock, labels, or other types of specialty media, make sure the paper is below the dashed line, which is ...

Users Guide PDF
Page 52
Loading A5‑size paper a Pull up and slide the width guide to the position for A5. 1 LGLOFCFOLLITOR A4 A5 2 LGLOFCFOLLITOR A4 A5 LGLOFCFOLILOTR A4 A5 Keep all other trays closed until needed. 1 Pull out the tray. 2 Adjust the width and length guides. Using MS810n, MS810dn, MS811n, MS811dn, MS812dn, MS817n, MS817dn, MS818dn 52 Loading the 2100‑sheet tray CAUTION-POTENTIAL INJURY: To reduce the risk of equipment instability, load each tray separately.
Loading A5‑size paper a Pull up and slide the width guide to the position for A5. 1 LGLOFCFOLLITOR A4 A5 2 LGLOFCFOLLITOR A4 A5 LGLOFCFOLILOTR A4 A5 Keep all other trays closed until needed. 1 Pull out the tray. 2 Adjust the width and length guides. Using MS810n, MS810dn, MS811n, MS811dn, MS812dn, MS817n, MS817dn, MS818dn 52 Loading the 2100‑sheet tray CAUTION-POTENTIAL INJURY: To reduce the risk of equipment instability, load each tray separately.

Users Guide PDF
Page 53
Using MS810n, MS810dn, MS811n, MS811dn, MS812dn, MS817n, MS817dn, MS818dn 53 b Squeeze and slide the length guide to the position for A5 until it clicks into place. 1 2 c Remove the A5 length guide from its designated slot. Note: Press the A5 length guide until it clicks into its holder. 1 2 d Insert the A5 length guide into place.
Using MS810n, MS810dn, MS811n, MS811dn, MS812dn, MS817n, MS817dn, MS818dn 53 b Squeeze and slide the length guide to the position for A5 until it clicks into place. 1 2 c Remove the A5 length guide from its designated slot. Note: Press the A5 length guide until it clicks into its holder. 1 2 d Insert the A5 length guide into place.

Users Guide PDF
Page 54
Using MS810n, MS810dn, MS811n, MS811dn, MS812dn, MS817n, MS817dn, MS818dn 54 Loading A4‑, letter‑, legal‑, oficio‑, and folio‑size paper a Pull up and slide the width guide to the correct position for the size of the paper being loaded. 1 LGLOFCFOLLITOR A4 A5 2 LGLOFCFOLLITOR A4 A5 LGLOFCFOLILOTR A4 A5
Using MS810n, MS810dn, MS811n, MS811dn, MS812dn, MS817n, MS817dn, MS818dn 54 Loading A4‑, letter‑, legal‑, oficio‑, and folio‑size paper a Pull up and slide the width guide to the correct position for the size of the paper being loaded. 1 LGLOFCFOLLITOR A4 A5 2 LGLOFCFOLLITOR A4 A5 LGLOFCFOLILOTR A4 A5

Users Guide PDF
Page 55
c Put the A5 length guide in its place. If the A5 length guide is still attached to step d. Using MS810n, MS810dn, MS811n, MS811dn, MS812dn, MS817n, MS817dn, MS818dn 55 b If the A5 length guide is not attached, then proceed to the length guide, then remove it from its holder. 1 2
c Put the A5 length guide in its place. If the A5 length guide is still attached to step d. Using MS810n, MS810dn, MS811n, MS811dn, MS812dn, MS817n, MS817dn, MS818dn 55 b If the A5 length guide is not attached, then proceed to the length guide, then remove it from its holder. 1 2
