Menus and Messages Guide
Page 31
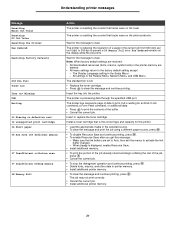
... print correctly. • Cancel the current job. • Install additional printer memory. 31 Insert the tray into the printer. The printer is waiting for the message to activate the link buffer changes. - Install a toner cartridge that is the correct type and capacity for the message to prevent a 38... Memory Full error. The printer is reducing the resolution of the job, press . • Cancel the current job. • ...
... print correctly. • Cancel the current job. • Install additional printer memory. 31 Insert the tray into the printer. The printer is waiting for the message to activate the link buffer changes. - Install a toner cartridge that is the correct type and capacity for the message to prevent a 38... Memory Full error. The printer is reducing the resolution of the job, press . • Cancel the current job. • ...
Menus and Messages Guide
Page 32
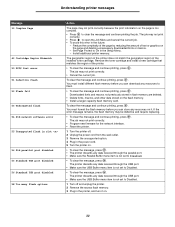
...printer memory. Remove the toner cartridge and install a new cartridge that matches the region of the installed toner cartridge. To clear the message and continue printing, press . To clear the message and continue printing, press . You must install different flash memory before you can store any resources on . 32 The printer...• Make sure the USB Buffer menu item is not set to On in the future: - Understanding printer messages Message 39 Complex Page 42 Cartridge Region Mismatch 50 PPDS font error 51 Defective flash 52 Flash full 53 Unformatted flash 54 Std network software ...
...printer memory. Remove the toner cartridge and install a new cartridge that matches the region of the installed toner cartridge. To clear the message and continue printing, press . To clear the message and continue printing, press . You must install different flash memory before you can store any resources on . 32 The printer...• Make sure the USB Buffer menu item is not set to On in the future: - Understanding printer messages Message 39 Complex Page 42 Cartridge Region Mismatch 50 PPDS font error 51 Defective flash 52 Flash full 53 Unformatted flash 54 Std network software ...
Menus and Messages Guide
Page 33
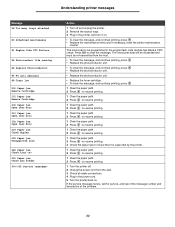
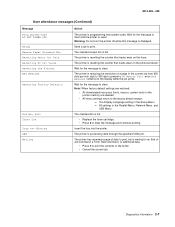
...8226; To clear the message, and continue printing, press . • Replace the photoconductor unit. • Replace the photoconductor unit. • Replace the toner cartridge. • To clear the message, and continue printing, press . 1 Clear the paper path. 2 Press to resume printing. 1 Clear the paper path... 33 Understanding printer messages Message 58 Too many trays attached 80 Scheduled maintenance 81 Engine Code CFC Failure 84 Photoconduct life warning 84 Replace Photoconductor 84 PC unit abnormal 88 Toner low 200 Paper jam Remove Cartridge 201 Paper jam Remove Cartridge 202 Paper ...
...8226; To clear the message, and continue printing, press . • Replace the photoconductor unit. • Replace the photoconductor unit. • Replace the toner cartridge. • To clear the message, and continue printing, press . 1 Clear the paper path. 2 Press to resume printing. 1 Clear the paper path... 33 Understanding printer messages Message 58 Too many trays attached 80 Scheduled maintenance 81 Engine Code CFC Failure 84 Photoconduct life warning 84 Replace Photoconductor 84 PC unit abnormal 88 Toner low 200 Paper jam Remove Cartridge 201 Paper jam Remove Cartridge 202 Paper ...
Menus and Messages Guide
Page 34
... jam 33 244.yy Paper jam 33 250.yy Paper jam 33 31 Replace defective or missing toner cartridge 31 37 Insufficient memory for Flash Memory Defragment operation 31 37 Insufficient memory to collate job 31 ... installed 32, 33 80 Scheduled maintenance 33 84 PC unit abnormal 33 84 Replace PC unit 33 88 Toner is low 33 900-999 Service 33 A A4 Width (PCL Emul Menu) 20 Activating Menu Changes 29... Advanced Status (Parallel Menu) 24 alarms error messages 18 toner 19 Auto Continue (Setup Menu) 18 Auto CR after LF (PCL Emul Menu) 21, 23 Auto LF after CR...
... jam 33 244.yy Paper jam 33 250.yy Paper jam 33 31 Replace defective or missing toner cartridge 31 37 Insufficient memory for Flash Memory Defragment operation 31 37 Insufficient memory to collate job 31 ... installed 32, 33 80 Scheduled maintenance 33 84 PC unit abnormal 33 84 Replace PC unit 33 88 Toner is low 33 900-999 Service 33 A A4 Width (PCL Emul Menu) 20 Activating Menu Changes 29... Advanced Status (Parallel Menu) 24 alarms error messages 18 toner 19 Auto Continue (Setup Menu) 18 Auto CR after LF (PCL Emul Menu) 21, 23 Auto LF after CR...
Quick Reference
Page 4
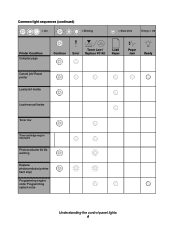
Common light sequences (continued) = On = Blinking = Slow blink Empty = Off Printer Condition Complex page Continue Toner Low / Error Replace PC Kit Load Paper Paper Jam Ready Cancel job/ Reset printer Load print media Load manual feeder Toner low Toner cartridge region mismatch Photoconductor kit life warning Replace photoconductor (printer hard stop) Programming engine code/ Programming system code Understanding the control panel lights 4
Common light sequences (continued) = On = Blinking = Slow blink Empty = Off Printer Condition Complex page Continue Toner Low / Error Replace PC Kit Load Paper Paper Jam Ready Cancel job/ Reset printer Load print media Load manual feeder Toner low Toner cartridge region mismatch Photoconductor kit life warning Replace photoconductor (printer hard stop) Programming engine code/ Programming system code Understanding the control panel lights 4
User's Guide
Page 36
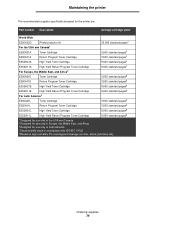
... specifically designed for the printer are: Part number Description Average cartridge yield* World Wide E250X22G Photoconductor kit 30,000 standard pages† For the USA and Canada1 E250A21A Toner Cartridge 3,500 standard pages1 E250A11A Return Program Toner Cartridge 3,500 standard pages1 E352H21A High Yield Toner Cartridge 9,000 standard pages1 E352H11A High Yield Return Program Toner Cartridge 9,000 standard pages1 For...
... specifically designed for the printer are: Part number Description Average cartridge yield* World Wide E250X22G Photoconductor kit 30,000 standard pages† For the USA and Canada1 E250A21A Toner Cartridge 3,500 standard pages1 E250A11A Return Program Toner Cartridge 3,500 standard pages1 E352H21A High Yield Toner Cartridge 9,000 standard pages1 E352H11A High Yield Return Program Toner Cartridge 9,000 standard pages1 For...

User's Guide
Page 37
You need to release and lower the front door. Ordering supplies 37 Changing a toner cartridge 1 Turn the printer off. 2 Press the button on the left side of the printer to have a new toner cartridge available when the current one no longer prints satisfactorily. You can print a few hundred pages after the 88 Toner low message appears. Maintaining the printer Ordering a toner cartridge When the 88 Toner low message appears, you should order a new toner cartridge.
You need to release and lower the front door. Ordering supplies 37 Changing a toner cartridge 1 Turn the printer off. 2 Press the button on the left side of the printer to have a new toner cartridge available when the current one no longer prints satisfactorily. You can print a few hundred pages after the 88 Toner low message appears. Maintaining the printer Ordering a toner cartridge When the 88 Toner low message appears, you should order a new toner cartridge.

User's Guide
Page 38
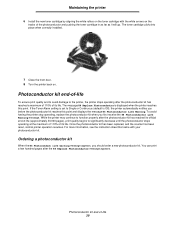
Note: You can use the packing material from the new toner cartridge to ship the old toner cartridge back to remove the toner cartridge. 4 Unpack the new toner cartridge. Ordering supplies 38 Maintaining the printer 3 Remove the toner cartridge. For more information, see Recycling Lexmark products on the base of the print cartridge assembly. b Grasp the handle, pulling up and out to Lexmark for recycling. a Press the release button on page42. 5 Firmly shake the toner cartridge in all directions to distribute the toner.
Note: You can use the packing material from the new toner cartridge to ship the old toner cartridge back to remove the toner cartridge. 4 Unpack the new toner cartridge. Ordering supplies 38 Maintaining the printer 3 Remove the toner cartridge. For more information, see Recycling Lexmark products on the base of the print cartridge assembly. b Grasp the handle, pulling up and out to Lexmark for recycling. a Press the release button on page42. 5 Firmly shake the toner cartridge in all directions to distribute the toner.
User's Guide
Page 39
... kit has reached a maximum of 110% of its life. The toner cartridge clicks into place when correctly installed. 7 Close the front door. 8 Turn the printer back on the tracks of its life. To avoid having the printer stop operating, replace the photoconductor kit when you should order a new...significantly decrease until the photoconductor stops operating at the maximum of 110% of the photoconductor and pushing the toner cartridge in as far as it will go. While the printer may continue to function properly after the photoconductor kit has reached its official end-of -life 39 ...
... kit has reached a maximum of 110% of its life. The toner cartridge clicks into place when correctly installed. 7 Close the front door. 8 Turn the printer back on the tracks of its life. To avoid having the printer stop operating, replace the photoconductor kit when you should order a new...significantly decrease until the photoconductor stops operating at the maximum of 110% of the photoconductor and pushing the toner cartridge in as far as it will go. While the printer may continue to function properly after the photoconductor kit has reached its official end-of -life 39 ...

User's Guide
Page 40
... exposure can cause print quality problems. 1 Turn the printer off. 2 Remove the print cartridge assembly. Note: Do not press the button on the print cartridge assembly Place the print cartridge assembly on a flat, clean surface. 3 Remove the toner cartridge: a Press the button on the left side of the printer to direct light for an extended period of...
... exposure can cause print quality problems. 1 Turn the printer off. 2 Remove the print cartridge assembly. Note: Do not press the button on the print cartridge assembly Place the print cartridge assembly on a flat, clean surface. 3 Remove the toner cartridge: a Press the button on the left side of the printer to direct light for an extended period of...

User's Guide
Page 41
..., the photoconductor counter has not been properly reset. Note: Print your printer menu settings pages. Maintaining the printer 5 Install the toner cartridge into the printer by aligning the white rollers on the toner cartridge with the white arrows on the tracks of the photoconductor and pushing the toner cartridge in as far as it will go. 7 Close the front...
..., the photoconductor counter has not been properly reset. Note: Print your printer menu settings pages. Maintaining the printer 5 Install the toner cartridge into the printer by aligning the white rollers on the toner cartridge with the white arrows on the tracks of the photoconductor and pushing the toner cartridge in as far as it will go. 7 Close the front...
User's Guide
Page 55
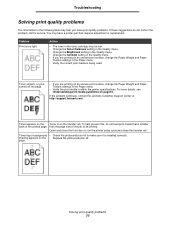
...toner in the toner cartridge may be printed. Toner smears, or print comes off the page. • If you solve print quality problems. If these suggestions do not load print media that requires adjustment or replacement. shading appears on page10. If the problem continues, contact the Lexmark Customer Support Center at http://support.lexmark... and Paper Texture settings in the Paper menu. • Verify the correct print media is within the printer specifications. Toner appears on an uneven print surface, change the Paper Weight and Paper Texture settings in the Quality menu....
...toner in the toner cartridge may be printed. Toner smears, or print comes off the page. • If you solve print quality problems. If these suggestions do not load print media that requires adjustment or replacement. shading appears on page10. If the problem continues, contact the Lexmark Customer Support Center at http://support.lexmark... and Paper Texture settings in the Paper menu. • Verify the correct print media is within the printer specifications. Toner appears on an uneven print surface, change the Paper Weight and Paper Texture settings in the Quality menu....
User's Guide
Page 56
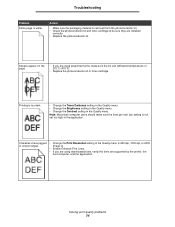
... Macintosh computer users should make sure the ink can withstand temperatures of 210°C (410°F). • Replace the photoconductor kit or toner cartridge. Streaks appear on the page. • If you are using preprinted forms, make sure the lines per inch (lpi) setting is ...photoconductor kit. • Check the photoconductor kit and toner cartridge to 600 dpi, 1200 dpi, or 2400 Image Q. • Enable Enhance Fine Lines. • If you are using downloaded fonts, verify the fonts are supported by the printer, the host computer, and the application. Troubleshooting Problem...
... Macintosh computer users should make sure the ink can withstand temperatures of 210°C (410°F). • Replace the photoconductor kit or toner cartridge. Streaks appear on the page. • If you are using preprinted forms, make sure the lines per inch (lpi) setting is ...photoconductor kit. • Check the photoconductor kit and toner cartridge to 600 dpi, 1200 dpi, or 2400 Image Q. • Enable Enhance Fine Lines. • If you are using downloaded fonts, verify the fonts are supported by the printer, the host computer, and the application. Troubleshooting Problem...

User's Guide
Page 59
Troubleshooting Cleaning the printhead lens Some print quality problems can be solved by pulling on the toner cartridge handle. Note: Do not press the button on the left side of the printer. Place the print cartridge assembly on a flat, clean surface. 4 Locate the glass printhead lens within the recessed area in the top of the printer to release and lower the front door. 3 Remove the print cartridge assembly by cleaning the printhead lens. 1 Turn the printer off. 2 Press the button on the print cartridge assembly. Cleaning the printhead lens 59
Troubleshooting Cleaning the printhead lens Some print quality problems can be solved by pulling on the toner cartridge handle. Note: Do not press the button on the left side of the printer. Place the print cartridge assembly on a flat, clean surface. 4 Locate the glass printhead lens within the recessed area in the top of the printer to release and lower the front door. 3 Remove the print cartridge assembly by cleaning the printhead lens. 1 Turn the printer off. 2 Press the button on the print cartridge assembly. Cleaning the printhead lens 59

User's Guide
Page 72
...photoconductor kit changing 40 end-of-life 39 ordering 39 recycling 42 preprinted forms 13 print cartridge See toner cartridge print media jams avoiding 17 print media specifications 11 printer settings 7 printhead lens, cleaning 59 printing 18 problems control panel 51 blank 51 displays ... 63 supplies conserving 35 recycling 42 storing 35 supplies ordering maintenance kit 42 photoconductor kit 39 toner cartridge 37 system board accessing 28 system password setting 63 T toner cartridge changing 37 ordering 37 recycling 42 translated label 8 transparencies 14 tray linking 24 W warranty 68...
...photoconductor kit changing 40 end-of-life 39 ordering 39 recycling 42 preprinted forms 13 print cartridge See toner cartridge print media jams avoiding 17 print media specifications 11 printer settings 7 printhead lens, cleaning 59 printing 18 problems control panel 51 blank 51 displays ... 63 supplies conserving 35 recycling 42 storing 35 supplies ordering maintenance kit 42 photoconductor kit 39 toner cartridge 37 system board accessing 28 system password setting 63 T toner cartridge changing 37 ordering 37 recycling 42 translated label 8 transparencies 14 tray linking 24 W warranty 68...

Service Manual
Page 16
..., -430 Media trays and supply capacity Item 4512-420 Lexmark E350d Available input trays 250-sheet tray ✔ 550-sheet option drawer ✔ 550-sheet tray ✔ Dust cover ✔ Toner and photoconductor Toner cartridge 1,500 standard pages SWE¹ 3,500 standard pages SWE¹ High toner cartridge Photoconductor kit 9,000 standard pages¹ Up to 30...
..., -430 Media trays and supply capacity Item 4512-420 Lexmark E350d Available input trays 250-sheet tray ✔ 550-sheet option drawer ✔ 550-sheet tray ✔ Dust cover ✔ Toner and photoconductor Toner cartridge 1,500 standard pages SWE¹ 3,500 standard pages SWE¹ High toner cartridge Photoconductor kit 9,000 standard pages¹ Up to 30...
Service Manual
Page 29
The printer is full. • Replace the toner cartridge. • Press to clear the message and continue printing. Res Reduced remains on the fuser. All settings in the current job from 600 dots per ... NOT POWER OFF Ready Remove Paper Standard Bin Resetting Maint Cnt Valu Resetting PC Cnt Value Resetting the Printer Res Reduced Restoring Factory Defaults Std Bin Full Toner Low Tray Missing USM Waiting Action The printer is resetting the counter that tracks wear on the display while the job prints. Send a job to...
The printer is full. • Replace the toner cartridge. • Press to clear the message and continue printing. Res Reduced remains on the fuser. All settings in the current job from 600 dots per ... NOT POWER OFF Ready Remove Paper Standard Bin Resetting Maint Cnt Valu Resetting PC Cnt Value Resetting the Printer Res Reduced Restoring Factory Defaults Std Bin Full Toner Low Tray Missing USM Waiting Action The printer is resetting the counter that tracks wear on the display while the job prints. Send a job to...

Service Manual
Page 37
... main motor, cooling fan, and fuser do not come on page 2-20. Note: Investigate any displayed codes before proceeding with these symptoms. For example, a missing toner cartridge will prevent POST from completing. See "Main motor service check" on . See "Paper feed service checks" on . Fan does not come on page 2-21. POST...
... main motor, cooling fan, and fuser do not come on page 2-20. Note: Investigate any displayed codes before proceeding with these symptoms. For example, a missing toner cartridge will prevent POST from completing. See "Main motor service check" on . See "Paper feed service checks" on . Fan does not come on page 2-21. POST...

Service Manual
Page 46
...quality. To print the print quality test pages: 1. d. f. Try a different PC kit. Enter Configuration Menu. Turn on page 3-28. 2-24 Lexmark™ E350d, E352dn Release the buttons when Performing Self Test displays. The first page has various fonts and a graphic, the second page is gray with graphics,...the last page is not continuity, call the next level of the manual for repeating defects. To exit configuration, turn the printer off the printer. Try a different toner cartridge and PC kit. • If those fail, replace the LVPS/HVPS, controller card, or the printhead in...
...quality. To print the print quality test pages: 1. d. f. Try a different PC kit. Enter Configuration Menu. Turn on page 3-28. 2-24 Lexmark™ E350d, E352dn Release the buttons when Performing Self Test displays. The first page has various fonts and a graphic, the second page is gray with graphics,...the last page is not continuity, call the next level of the manual for repeating defects. To exit configuration, turn the printer off the printer. Try a different toner cartridge and PC kit. • If those fail, replace the LVPS/HVPS, controller card, or the printhead in...
Service Manual
Page 47
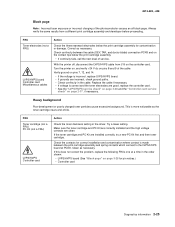
...toner cartridge and PC Kit are correctly installed and the high voltage contacts are incorrect, check ground paths. • Check confinuity in the driver. 4512-420, -430 Black page Note: Incorrect laser exposure or incorrect charging of -life. Always verify the same results from J19 on pins 8 and 9 of service. With the printer... connection PCN3 and on the contact tips below the print cartridge assembly for contamination or damage. Correct as the toner cartridge nears end-of the photoconductor causes an all black page. Turn the printer on, and verify +24 V dc on the controller card...
...toner cartridge and PC Kit are correctly installed and the high voltage contacts are incorrect, check ground paths. • Check confinuity in the driver. 4512-420, -430 Black page Note: Incorrect laser exposure or incorrect charging of -life. Always verify the same results from J19 on pins 8 and 9 of service. With the printer... connection PCN3 and on the contact tips below the print cartridge assembly for contamination or damage. Correct as the toner cartridge nears end-of the photoconductor causes an all black page. Turn the printer on, and verify +24 V dc on the controller card...


