User's Guide
Page 7
... energy consumption 4 Statement of Limited Warranty 5 Chapter 1: Printer overview 11 Chapter 2: Installing software for local printing 13 Before installing printer software 13 Windows ...13 Installing printer software using the drivers CD 13 Installing printer software through the Add Printer Wizard 13 Installing optional printer software 14 Macintosh ...14 Creating a queue in Print...
... energy consumption 4 Statement of Limited Warranty 5 Chapter 1: Printer overview 11 Chapter 2: Installing software for local printing 13 Before installing printer software 13 Windows ...13 Installing printer software using the drivers CD 13 Installing printer software through the Add Printer Wizard 13 Installing optional printer software 14 Macintosh ...14 Creating a queue in Print...
User's Guide
Page 13
..., and type D:\Setup.exe in the printers folder of the computer. The path should be available on the Lexmark Web site at www.lexmark.com. Windows The drivers CD can install printer drivers and software for the following : D:\Drivers\Print\Win_9xMe\ where D is not supported by the CD, the Add Printer Wizard must install some necessary...
..., and type D:\Setup.exe in the printers folder of the computer. The path should be available on the Lexmark Web site at www.lexmark.com. Windows The drivers CD can install printer drivers and software for the following : D:\Drivers\Print\Win_9xMe\ where D is not supported by the CD, the Add Printer Wizard must install some necessary...
User's Guide
Page 15
...lexmark.com. g Click Close when installation is now saved as Sun Solaris and Red Hat. If the printer does not appear in the USB Printer Selection list, make sure the USB cable is properly connected and the printer is turned on the computer. The printer appears in the original Printer (USB) window... the Printer List, make sure the USB cable is properly connected, and the printer is supported on the Lexmark Web site at www.lexmark.com for the printer. a Insert the drivers CD. f On the Easy Install screen, click Install. A queue has been created for installing and using...
...lexmark.com. g Click Close when installation is now saved as Sun Solaris and Red Hat. If the printer does not appear in the USB Printer Selection list, make sure the USB cable is properly connected and the printer is turned on the computer. The printer appears in the original Printer (USB) window... the Printer List, make sure the USB cable is properly connected, and the printer is supported on the Lexmark Web site at www.lexmark.com for the printer. a Insert the drivers CD. f On the Easy Install screen, click Install. A queue has been created for installing and using...

User's Guide
Page 16
...configuration Direct IP printing • Printer is connected to one of a network printer port. 3 Installing software for network printing Windows In Windows environments, network printers can print to it. Follow the steps for the printing configuration and operating system in the printers folder. ...3 Print a test page to verify printer installation. 4 Repeat steps 1-4 on the computer attached to the printer. • During driver ...
...configuration Direct IP printing • Printer is connected to one of a network printer port. 3 Installing software for network printing Windows In Windows environments, network printers can print to it. Follow the steps for the printing configuration and operating system in the printers folder. ...3 Print a test page to verify printer installation. 4 Repeat steps 1-4 on the computer attached to the printer. • During driver ...
User's Guide
Page 17
... the text box. Using the peer-to the following to verify. Installing software on the computer attached to the printer 1 Launch the drivers CD. 2 Follow the instructions on each network computer. Once Plug and Play is finished, a printer object will be created in the...name assigned during the server installation process. 5 Click OK. This requires assigning a shared name to the printer. Windows 17 Each network computer retains control of the printer in Windows NT 4.0, a hand appears under the printer object. • Browse Network Neighborhood. If files are missing, ...
... the text box. Using the peer-to the following to verify. Installing software on the computer attached to the printer 1 Launch the drivers CD. 2 Follow the instructions on each network computer. Once Plug and Play is finished, a printer object will be created in the...name assigned during the server installation process. 5 Click OK. This requires assigning a shared name to the printer. Windows 17 Each network computer retains control of the printer in Windows NT 4.0, a hand appears under the printer object. • Browse Network Neighborhood. If files are missing, ...

User's Guide
Page 18
...time this takes varies based on network traffic and other network computers return to applications much faster. Windows 18 With this is automatically assigned after you see Std Net Setup (or Network 1 Setup or ... folder. If your network is not using DHCP, an IP address is to the Lexmark Web site at www.lexmark.com for the latest information. Using the point-and-print method Note: Point and ...is using DHCP, then you must manually assign an IP address to the printer handles driver modifications and print job processing for all print jobs including those routed from the computer ...
...time this takes varies based on network traffic and other network computers return to applications much faster. Windows 18 With this is automatically assigned after you see Std Net Setup (or Network 1 Setup or ... folder. If your network is not using DHCP, an IP address is to the Lexmark Web site at www.lexmark.com for the latest information. Using the point-and-print method Note: Point and ...is using DHCP, then you must manually assign an IP address to the printer handles driver modifications and print job processing for all print jobs including those routed from the computer ...
User's Guide
Page 20
...On the Easy Install screen, click Install. b Choose Print from the printer list in the Printer Address box. 6 Choose Lexmark from the pop-up menu. h Click Close when installation is installed on the computer. Look on the Network Setup page...& Pages" pop-up menu. g Enter the user password, and click OK. Step 2: Create a print queue in the Summary window is not correct for the printer, delete the printer from the "File" menu. d Click Continue after viewing the Readme file. ...for the printer. All the necessary software is complete. a Insert the drivers CD. Macintosh 20
...On the Easy Install screen, click Install. b Choose Print from the printer list in the Printer Address box. 6 Choose Lexmark from the pop-up menu. h Click Close when installation is installed on the computer. Look on the Network Setup page...& Pages" pop-up menu. g Enter the user password, and click OK. Step 2: Create a print queue in the Summary window is not correct for the printer, delete the printer from the "File" menu. d Click Continue after viewing the Readme file. ...for the printer. All the necessary software is complete. a Insert the drivers CD. Macintosh 20
User's Guide
Page 21
... license agreement, and click Agree to the printer name in the Summary window is complete. d Click Continue after viewing the Readme file. All the necessary files are installed on the Lexmark Web site at www.lexmark.com. For the zone to select, look on the Network Setup page... (PPD) file portion of the agreement. a Click the desktop printer icon just added. Mac OS 9.x Step 1: Install a custom PPD file 1 Insert the drivers CD. b Choose the language needed for the printer. Macintosh 21 e On the Easy Install screen, click Install. Step 2: Create a desktop printer 1 In the...
... license agreement, and click Agree to the printer name in the Summary window is complete. d Click Continue after viewing the Readme file. All the necessary files are installed on the Lexmark Web site at www.lexmark.com. For the zone to select, look on the Network Setup page... (PPD) file portion of the agreement. a Click the desktop printer icon just added. Mac OS 9.x Step 1: Install a custom PPD file 1 Insert the drivers CD. b Choose the language needed for the printer. Macintosh 21 e On the Easy Install screen, click Install. Step 2: Create a desktop printer 1 In the...
User's Guide
Page 38
Oil from the Paper tray drop-down with the stamp area and flap on the Print window to send the job to print. 8 Place a sheet of the selected print media, print side facing up , with the top of print media at a time. ... job: 1 From the computer software application, select File Æ Print. 2 Click Properties (or Options, Printer, or Setup, depending on the application) to view the printer driver settings. 3 Click the Paper tab. 4 Select Manual paper from your fingers can be loaded? Printing tasks 38 5 Printing tasks How to manually feed a print job...
Oil from the Paper tray drop-down with the stamp area and flap on the Print window to send the job to print. 8 Place a sheet of the selected print media, print side facing up , with the top of print media at a time. ... job: 1 From the computer software application, select File Æ Print. 2 Click Properties (or Options, Printer, or Setup, depending on the application) to view the printer driver settings. 3 Click the Paper tab. 4 Select Manual paper from your fingers can be loaded? Printing tasks 38 5 Printing tasks How to manually feed a print job...
User's Guide
Page 42
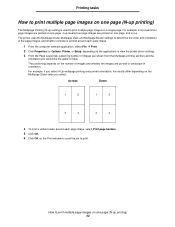
... of the page images, and whether a border is used to print multiple page images on . The positioning depends on the application) to view the printer driver settings. 3 From the Page Layout tab, select the number of images and whether the images are printed on one page, and so on a single page.... How to print multiple page images on the Print window to send the job to print. For example, if you select 4-Up multipage printing and portrait orientation, the results differ depending on the Multipage Order...
... of the page images, and whether a border is used to print multiple page images on . The positioning depends on the application) to view the printer driver settings. 3 From the Page Layout tab, select the number of images and whether the images are printed on one page, and so on a single page.... How to print multiple page images on the Print window to send the job to print. For example, if you select 4-Up multipage printing and portrait orientation, the results differ depending on the Multipage Order...
User's Guide
Page 43
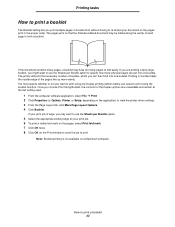
... used. 1 From the computer software application, select File Æ Print. 2 Click Properties (or Options, Printer, or Setup, depending on the application) to view the printer driver settings. 3 From the Page Layout tab, click More Page Layout Options. 4 Click Booklet. If your print job is not available on a Macintosh computer. Printing in... re-format your print job. 6 To print a visible fold mark on the pages, select Print fold mark. 7 Click OK twice. 8 Click OK on the Print window to send the job to print.
... used. 1 From the computer software application, select File Æ Print. 2 Click Properties (or Options, Printer, or Setup, depending on the application) to view the printer driver settings. 3 From the Page Layout tab, click More Page Layout Options. 4 Click Booklet. If your print job is not available on a Macintosh computer. Printing in... re-format your print job. 6 To print a visible fold mark on the pages, select Print fold mark. 7 Click OK twice. 8 Click OK on the Print window to send the job to print.

User's Guide
Page 44
...lets you want each page to have. 8 Click OK twice. 9 Click OK on a Macintosh computer. Note: Poster printing is not available on the Print window to send the job to print. How to use in the poster. 6 To print crop marks on the pages, select Print crop marks. 7 Select ...1 From the computer software application, select File Æ Print. 2 Click Properties (or Options, Printer, or Setup, depending on the application) to view the printer driver settings. 3 From the Page Layout tab, click More Page Layout Options. 4 Click Poster. 5 Select the poster size you want by choosing the number of pages...
...lets you want each page to have. 8 Click OK twice. 9 Click OK on a Macintosh computer. Note: Poster printing is not available on the Print window to send the job to print. How to use in the poster. 6 To print crop marks on the pages, select Print crop marks. 7 Select ...1 From the computer software application, select File Æ Print. 2 Click Properties (or Options, Printer, or Setup, depending on the application) to view the printer driver settings. 3 From the Page Layout tab, click More Page Layout Options. 4 Click Poster. 5 Select the poster size you want by choosing the number of pages...
User's Guide
Page 45
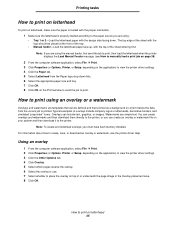
... computer software application, select File Æ Print. 3 Click Properties (or Options, Printer, or Setup, depending on the application) to view the printer driver settings. 4 Click the Paper tab. 5 Select Letterhead from the current job is properly loaded according to the paper source you are using: • ... paper is loaded with the proper orientation. 1 Make sure the letterhead is printed. For information about how to print on the Print window to send the job to print. Note: To create and download overlays, you are using an overlay or a watermark Overlays and watermarks...
... computer software application, select File Æ Print. 3 Click Properties (or Options, Printer, or Setup, depending on the application) to view the printer driver settings. 4 Click the Paper tab. 5 Select Letterhead from the current job is properly loaded according to the paper source you are using: • ... paper is loaded with the proper orientation. 1 Make sure the letterhead is printed. For information about how to print on the Print window to send the job to print. Note: To create and download overlays, you are using an overlay or a watermark Overlays and watermarks...
User's Guide
Page 90
... An easy way to the printer. Look for information about installing and using DHCP, an IP address is using this utility are located on the drivers CD that you expected. If there are what you assign an IP address to the printer. 1 Look for the address under the "TCP/IP"... quality problems. To exit these menus, turn on the printer. You can use the Print Server TCP/IP Setup Utility. Detailed instructions about using Windows 2000). To use to evaluate how well the printer is to know the 12-digit physical address or Universally Administered Address (UAA) of printing. ...
... An easy way to the printer. Look for information about installing and using DHCP, an IP address is using this utility are located on the drivers CD that you expected. If there are what you assign an IP address to the printer. 1 Look for the address under the "TCP/IP"... quality problems. To exit these menus, turn on the printer. You can use the Print Server TCP/IP Setup Utility. Detailed instructions about using Windows 2000). To use to evaluate how well the printer is to know the 12-digit physical address or Universally Administered Address (UAA) of printing. ...


