Quick Reference
Page 2
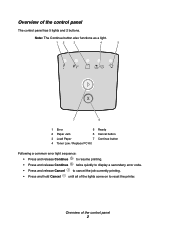
... 3 4 5 7 6 1 Error 5 Ready 2 Paper Jam 6 Cancel button 3 Load Paper 7 Continue button 4 Toner Low / Replace PC Kit Following a common error light sequence: • Press and release Continue to resume printing. • Press and release Continue twice quickly to display a secondary error code. • Press and release ...Cancel to cancel the job currently printing. • Press and hold Cancel until all of the control panel 2 Overview of the lights come on to reset the printer. Overview of the control panel The control panel has...
... 3 4 5 7 6 1 Error 5 Ready 2 Paper Jam 6 Cancel button 3 Load Paper 7 Continue button 4 Toner Low / Replace PC Kit Following a common error light sequence: • Press and release Continue to resume printing. • Press and release Continue twice quickly to display a secondary error code. • Press and release ...Cancel to cancel the job currently printing. • Press and hold Cancel until all of the control panel 2 Overview of the lights come on to reset the printer. Overview of the control panel The control panel has...
Quick Reference
Page 3
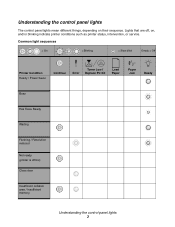
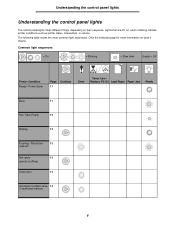
... different things, depending on , and/or blinking indicate printer conditions such as printer status, intervention, or service. Common light sequences = On = Blinking = Slow blink Empty = Off Printer Condition Ready / Power Saver Continue Toner Low / Error Replace PC Kit Load Paper Paper Jam Ready Busy ...
... different things, depending on , and/or blinking indicate printer conditions such as printer status, intervention, or service. Common light sequences = On = Blinking = Slow blink Empty = Off Printer Condition Ready / Power Saver Continue Toner Low / Error Replace PC Kit Load Paper Paper Jam Ready Busy ...

Quick Reference
Page 4
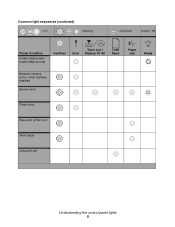
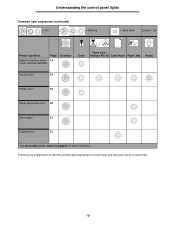
Common light sequences (continued) = On = Blinking = Slow blink Empty = Off Printer Condition Complex page Continue Toner Low / Error Replace PC Kit Load Paper Paper Jam Ready Cancel job/ Reset printer Load print media Load manual feeder Toner low Toner cartridge region mismatch Photoconductor kit life warning Replace photoconductor (printer hard stop) Programming engine code/ Programming system code Understanding the control panel lights 4
Common light sequences (continued) = On = Blinking = Slow blink Empty = Off Printer Condition Complex page Continue Toner Low / Error Replace PC Kit Load Paper Paper Jam Ready Cancel job/ Reset printer Load print media Load manual feeder Toner low Toner cartridge region mismatch Photoconductor kit life warning Replace photoconductor (printer hard stop) Programming engine code/ Programming system code Understanding the control panel lights 4
Quick Reference
Page 5
Common light sequences (continued) = On = Blinking = Slow blink Empty = Off Printer Condition Invalid engine code / Invalid network code Continue Toner Low / Error Replace PC Kit Load Paper Paper Jam Ready Network interface errors / Host interface disabled Service error Printer error Paper jam printer error Short paper Output bin full Understanding the control panel lights 5
Common light sequences (continued) = On = Blinking = Slow blink Empty = Off Printer Condition Invalid engine code / Invalid network code Continue Toner Low / Error Replace PC Kit Load Paper Paper Jam Ready Network interface errors / Host interface disabled Service error Printer error Paper jam printer error Short paper Output bin full Understanding the control panel lights 5

Quick Reference
Page 6
... 3 Press Continue as you loaded. button from the On the menu settings page: - The Load Paper, Toner Low / Replace PC Kit, Ready and Continue lights appear. 8 Release the Continue button. 9 Turn the printer off the printer, unplug the power cord from your computer 1 Click Start Æ Settings Æ ... Æ Properties. 4 Click Print Test Page. Verify the amount of paper you turn off and back on . 4 Keep pressing Continue until the lights cycle, then release the Continue button. 5 Close the front door. 6 Press Cancel. 7 Press Continue until the control panel cycles through all the...
... 3 Press Continue as you loaded. button from the On the menu settings page: - The Load Paper, Toner Low / Replace PC Kit, Ready and Continue lights appear. 8 Release the Continue button. 9 Turn the printer off the printer, unplug the power cord from your computer 1 Click Start Æ Settings Æ ... Æ Properties. 4 Click Print Test Page. Verify the amount of paper you turn off and back on . 4 Keep pressing Continue until the lights cycle, then release the Continue button. 5 Close the front door. 6 Press Cancel. 7 Press Continue until the control panel cycles through all the...
Quick Reference
Page 11
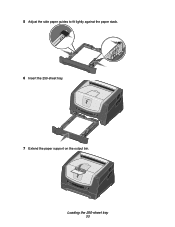
5 Adjust the side paper guides to fit lightly against the paper stack. 6 Insert the 250-sheet tray. 7 Extend the paper support on the output bin. Loading the 250-sheet tray 11
5 Adjust the side paper guides to fit lightly against the paper stack. 6 Insert the 250-sheet tray. 7 Extend the paper support on the output bin. Loading the 250-sheet tray 11

Quick Reference
Page 14
... door is open, all media is sent to cancel the job currently printing. Using the rear exit 14 A list of the printer. The Cancel job light sequence is especially useful for specialty media, such as transparencies, labels, card stock, or index cards. From a Windows computer 1 Click Start Æ Settings Æ Printers...
... door is open, all media is sent to cancel the job currently printing. Using the rear exit 14 A list of the printer. The Cancel job light sequence is especially useful for specialty media, such as transparencies, labels, card stock, or index cards. From a Windows computer 1 Click Start Æ Settings Æ Printers...

Quick Reference
Page 16
Clearing jams When a paper jam occurs, the printer stops and the control panel Paper Jam and Continue lights come on. Clearing jams 16 For more information, see the Software and Documentation CD that came with your printer. We recommend clearing the entire paper path when a paper jam occurs. 1 Remove all paper from the 150-sheet output bin. 2 If you are feeding paper from the 250-sheet tray, remove the tray. 3 Remove the jammed pages.
Clearing jams When a paper jam occurs, the printer stops and the control panel Paper Jam and Continue lights come on. Clearing jams 16 For more information, see the Software and Documentation CD that came with your printer. We recommend clearing the entire paper path when a paper jam occurs. 1 Remove all paper from the 150-sheet output bin. 2 If you are feeding paper from the 250-sheet tray, remove the tray. 3 Remove the jammed pages.
User's Guide
Page 3
... Storing supplies ...47 Tips on letterhead ...66 3 Contents Chapter 1: Printer overview 5 Chapter 2: Using the control panel 7 Overview of the control panel ...7 Understanding the control panel lights ...8 Primary codes ...11 Secondary errors ...22 Chapter 3: Understanding the printer configuration menus 37 Printing the Printer Settings Configuration sheet 37 Configuration menus overview ...38 Network...
... Storing supplies ...47 Tips on letterhead ...66 3 Contents Chapter 1: Printer overview 5 Chapter 2: Using the control panel 7 Overview of the control panel ...7 Understanding the control panel lights ...8 Primary codes ...11 Secondary errors ...22 Chapter 3: Understanding the printer configuration menus 37 Printing the Printer Settings Configuration sheet 37 Configuration menus overview ...38 Network...
User's Guide
Page 4
...photoconductor levels 78 Ordering a maintenance kit ...78 Recognizing the control panel light sequences 79 Changing the toner cartridge ...80 Changing the photoconductor kit ...82 Recycling Lexmark products ...84 Chapter 9: Troubleshooting 85 General problems ...85 Lexmark Status Messenger Utility ...86 Selecting printer operating mode ...86 Turning on ... notices ...93 Noise emission levels ...95 Product energy consumption ...95 Waste from Electrical and Electronic Equipment (WEEE) directive 96 Laser notice ...96 Statement of Limited Warranty for Lexmark E250d and E250dn 96 Index ...99 4
...photoconductor levels 78 Ordering a maintenance kit ...78 Recognizing the control panel light sequences 79 Changing the toner cartridge ...80 Changing the photoconductor kit ...82 Recycling Lexmark products ...84 Chapter 9: Troubleshooting 85 General problems ...85 Lexmark Status Messenger Utility ...86 Selecting printer operating mode ...86 Turning on ... notices ...93 Noise emission levels ...95 Product energy consumption ...95 Waste from Electrical and Electronic Equipment (WEEE) directive 96 Laser notice ...96 Statement of Limited Warranty for Lexmark E250d and E250dn 96 Index ...99 4
User's Guide
Page 7
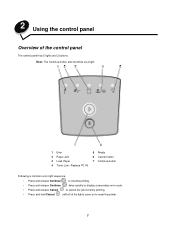
2 Using the control panel Overview of the lights come on to cancel the job currently printing. • Press and hold Cancel until all of the control panel The control panel has 5 lights and 2 buttons. Note: The Continue button also functions as a light. 1 Error 2 Paper Jam 3 Load Paper ...4 Toner Low / Replace PC Kit 5 Ready 6 Cancel button 7 Continue button Following a common error light sequence: • Press and release Continue to...
2 Using the control panel Overview of the lights come on to cancel the job currently printing. • Press and hold Cancel until all of the control panel The control panel has 5 lights and 2 buttons. Note: The Continue button also functions as a light. 1 Error 2 Paper Jam 3 Load Paper ...4 Toner Low / Replace PC Kit 5 Ready 6 Cancel button 7 Continue button Following a common error light sequence: • Press and release Continue to...
User's Guide
Page 8
The following table shows the most common light sequences. Common light sequences = On = Blinking = Slow blink Empty = Off Printer Condition Ready / Power Saver Page Continue 11 Error Toner Low / Replace PC Kit Load ...Flushing / Resolution 13 reduced Not ready 13 (printer is offline) Close door 14 Insufficient collation area 14 / Insufficient memory 8 Understanding the control panel lights Understanding the control panel lights The control panel lights mean different things, depending on what it means. Click the indicated page for more information on their sequence...
The following table shows the most common light sequences. Common light sequences = On = Blinking = Slow blink Empty = Off Printer Condition Ready / Power Saver Page Continue 11 Error Toner Low / Replace PC Kit Load ...Flushing / Resolution 13 reduced Not ready 13 (printer is offline) Close door 14 Insufficient collation area 14 / Insufficient memory 8 Understanding the control panel lights Understanding the control panel lights The control panel lights mean different things, depending on what it means. Click the indicated page for more information on their sequence...

User's Guide
Page 9
Understanding the control panel lights Common light sequences (continued) = On = Blinking = Slow blink Empty = Off Printer Condition Complex page Page Continue 14 Error Toner Low / Replace PC Kit Load Paper Paper Jam Ready Cancel job/ Reset printer 15 Load print media 15 Load manual feeder 16 Toner low 16 Toner cartridge region 17 mismatch Photoconductor kit life 17 warning Replace photoconductor 18 (printer hard stop) Programming engine 18 code/ Programming system code Invalid engine code / 19 Invalid network code 9
Understanding the control panel lights Common light sequences (continued) = On = Blinking = Slow blink Empty = Off Printer Condition Complex page Page Continue 14 Error Toner Low / Replace PC Kit Load Paper Paper Jam Ready Cancel job/ Reset printer 15 Load print media 15 Load manual feeder 16 Toner low 16 Toner cartridge region 17 mismatch Photoconductor kit life 17 warning Replace photoconductor 18 (printer hard stop) Programming engine 18 code/ Programming system code Invalid engine code / 19 Invalid network code 9
User's Guide
Page 10
Understanding the control panel lights Common light sequences (continued) = On = Blinking = Slow blink Empty = Off Printer Condition Page Network interface errors 19 / Host interface disabled Continue Error Toner Low / Replace PC Kit Load Paper Paper Jam Ready Service error 19 Printer error* 20 Paper jam printer error* 20 Short paper 21 Output bin full 21 *See Secondary error codes on page25 for more information. Following are explanations of what the primary light sequences or codes mean and what you can do to clear them. 10
Understanding the control panel lights Common light sequences (continued) = On = Blinking = Slow blink Empty = Off Printer Condition Page Network interface errors 19 / Host interface disabled Continue Error Toner Low / Replace PC Kit Load Paper Paper Jam Ready Service error 19 Printer error* 20 Paper jam printer error* 20 Short paper 21 Output bin full 21 *See Secondary error codes on page25 for more information. Following are explanations of what the primary light sequences or codes mean and what you can do to clear them. 10

User's Guide
Page 11
...Cancel to reset the printer. • Printing a directory, a font list, menu settings pages, or Print Quality Test Pages: - The Ready light is displayed as the pages print. Press and hold Cancel to reset the printer. Press and hold Cancel to clear. - Wait for the message ...a host interface: - Press and release Cancel to cancel printing. - The Busy message is on when printing stops. - Busy Light sequence: • Ready-Blinking What this light sequence means: • The printer is ready to stop processing. - Press and release Cancel to cancel the print job. -...
...Cancel to reset the printer. • Printing a directory, a font list, menu settings pages, or Print Quality Test Pages: - The Ready light is displayed as the pages print. Press and hold Cancel to reset the printer. Press and hold Cancel to clear. - Wait for the message ...a host interface: - Press and release Cancel to cancel printing. - The Busy message is on when printing stops. - Busy Light sequence: • Ready-Blinking What this light sequence means: • The printer is ready to stop processing. - Press and release Cancel to cancel the print job. -...
User's Guide
Page 12
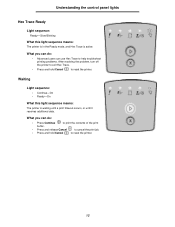
Understanding the control panel lights Hex Trace Ready Light sequence: Ready-Slow Blinking What this light sequence means: The printer is active. What you can use Hex Trace to help troubleshoot printing problems. After resolving the problem, turn off the printer ...; Press and release Cancel to cancel the print job. • Press and hold Cancel to reset the printer. 12 Waiting Light sequence: • Continue-On • Ready-On What this light sequence means: The printer is in the Ready mode, and Hex Trace is waiting until a print timeout occurs, or until it...
Understanding the control panel lights Hex Trace Ready Light sequence: Ready-Slow Blinking What this light sequence means: The printer is active. What you can use Hex Trace to help troubleshoot printing problems. After resolving the problem, turn off the printer ...; Press and release Cancel to cancel the print job. • Press and hold Cancel to reset the printer. 12 Waiting Light sequence: • Continue-On • Ready-On What this light sequence means: The printer is in the Ready mode, and Hex Trace is waiting until a print timeout occurs, or until it...
User's Guide
Page 13
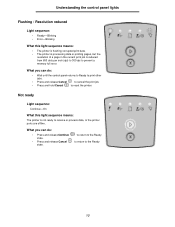
... state. • Press and release Cancel state. to return to the Ready to return to the Ready 13 Not ready Light sequence: Continue-On What this light sequence means: • The printer is flushing corrupted print data. • The printer is processing data or printing pages,...not ready to receive or process data, or the printer ports are offline. Understanding the control panel lights Flushing / Resolution reduced Light sequence: • Ready-Blinking • Error-Blinking What this light sequence means: The printer is reduced from 600 dots per inch (dpi) to 300 dpi to ...
... state. • Press and release Cancel state. to return to the Ready to return to the Ready 13 Not ready Light sequence: Continue-On What this light sequence means: • The printer is flushing corrupted print data. • The printer is processing data or printing pages,...not ready to receive or process data, or the printer ports are offline. Understanding the control panel lights Flushing / Resolution reduced Light sequence: • Ready-Blinking • Error-Blinking What this light sequence means: The printer is reduced from 600 dots per inch (dpi) to 300 dpi to ...
User's Guide
Page 14
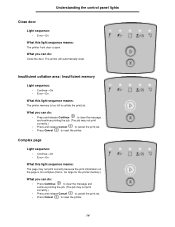
... page is too complex (that is, too large for the printer memory). Insufficient collation area / Insufficient memory Light sequence: • Continue-On • Error-On What this light sequence means: The printer memory is open. What you can do : Close the door. The printer will ...automatically reset. Understanding the control panel lights Close door Light sequence: • Error-On What this light sequence means: The printer front door is...
... page is too complex (that is, too large for the printer memory). Insufficient collation area / Insufficient memory Light sequence: • Continue-On • Error-On What this light sequence means: The printer memory is open. What you can do : Close the door. The printer will ...automatically reset. Understanding the control panel lights Close door Light sequence: • Error-On What this light sequence means: The printer front door is...
User's Guide
Page 15
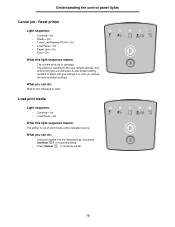
... into the indicated tray, and press Continue to resume printing. • Press Cancel to the user default settings. Understanding the control panel lights Cancel job / Reset printer Light sequence: • Continue-On • Ready-On • Toner Low/Replace PC Kit-On • Load Paper-On • Paper... Jam-On • Error-On What this light sequence means: The printer is resetting to reset the printer. 15 What you restore the factory default settings. Any active print jobs are canceled. A...
... into the indicated tray, and press Continue to resume printing. • Press Cancel to the user default settings. Understanding the control panel lights Cancel job / Reset printer Light sequence: • Continue-On • Ready-On • Toner Low/Replace PC Kit-On • Load Paper-On • Paper... Jam-On • Error-On What this light sequence means: The printer is resetting to reset the printer. 15 What you restore the factory default settings. Any active print jobs are canceled. A...

User's Guide
Page 16
... Changing the toner cartridge on page80 for help.) • Turn the printer back on. 16 Toner low Light sequence: • Continue-On • Toner Low/Replace PC Kit-On What this light sequence means: The printer prompts you to reset the printer. In addition, the toner in the manual feeder.... What you can do : • Press and release Continue to clear the light sequence and continue processing the print job. • Turn the printer off. • Remove the toner cartridge, and shake it to receive and ...
... Changing the toner cartridge on page80 for help.) • Turn the printer back on. 16 Toner low Light sequence: • Continue-On • Toner Low/Replace PC Kit-On What this light sequence means: The printer prompts you to reset the printer. In addition, the toner in the manual feeder.... What you can do : • Press and release Continue to clear the light sequence and continue processing the print job. • Turn the printer off. • Remove the toner cartridge, and shake it to receive and ...


