User's Guide
Page 4
...maintenance kit ...78 Recognizing the control panel light sequences 79 Changing the toner cartridge ...80 Changing the photoconductor kit ...82 Recycling Lexmark products ...84 Chapter 9: Troubleshooting 85 General problems ...85 Lexmark Status Messenger Utility ...86 Selecting printer operating mode ...86 Turning on Reduced Curl mode ...86 Print quality... notices ...93 Noise emission levels ...95 Product energy consumption ...95 Waste from Electrical and Electronic Equipment (WEEE) directive 96 Laser notice ...96 Statement of Limited Warranty for Lexmark E250d and E250dn 96 Index ...99 4
...maintenance kit ...78 Recognizing the control panel light sequences 79 Changing the toner cartridge ...80 Changing the photoconductor kit ...82 Recycling Lexmark products ...84 Chapter 9: Troubleshooting 85 General problems ...85 Lexmark Status Messenger Utility ...86 Selecting printer operating mode ...86 Turning on Reduced Curl mode ...86 Print quality... notices ...93 Noise emission levels ...95 Product energy consumption ...95 Waste from Electrical and Electronic Equipment (WEEE) directive 96 Laser notice ...96 Statement of Limited Warranty for Lexmark E250d and E250dn 96 Index ...99 4

Service Manual
Page 18
... yield toner cartridge n/a Photoconductor kit Up to 30,000 ² ¹ Declared value in accordance with ISO/IEC 19752 ² Based on approximately 5% coverage, actual yield may vary 4512-230 Lexmark E250dn ✔ ✔ optional optional 1,500 standard pages SWE 3,500 standard pages after market¹ n/a Up to 30,000 ² 1-4 Lexmark™ E250d and E250dn
... yield toner cartridge n/a Photoconductor kit Up to 30,000 ² ¹ Declared value in accordance with ISO/IEC 19752 ² Based on approximately 5% coverage, actual yield may vary 4512-230 Lexmark E250dn ✔ ✔ optional optional 1,500 standard pages SWE 3,500 standard pages after market¹ n/a Up to 30,000 ² 1-4 Lexmark™ E250d and E250dn
Service Manual
Page 32
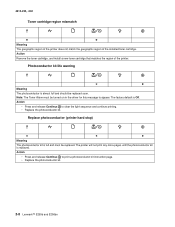
...replaced. Note: The Toner Alarm must be replaced soon. The printer will not print any more pages until the photoconductor kit is almost full and should be replaced. 4512-220, -230 Toner cartridge region mismatch z z Meaning The...message to clear the light sequence and continue printing. • Replace the photoconductor kit. Action • Press and release Continue to print a photoconductor kit instruction page. • Replace the photoconductor kit. 2-8 Lexmark™ E250d and E250dn Action Remove the toner cartridge, and install a new toner cartridge that ...
...replaced. Note: The Toner Alarm must be replaced soon. The printer will not print any more pages until the photoconductor kit is almost full and should be replaced. 4512-220, -230 Toner cartridge region mismatch z z Meaning The...message to clear the light sequence and continue printing. • Replace the photoconductor kit. Action • Press and release Continue to print a photoconductor kit instruction page. • Replace the photoconductor kit. 2-8 Lexmark™ E250d and E250dn Action Remove the toner cartridge, and install a new toner cartridge that ...

Service Manual
Page 70
... the print quality test pages: 1. Turn off . b. Four pages print to evenly distribute the toner. Use the test pages to expose the photoconductor resulting in printer service errors unless there is blank. Blank pages can be caused by the PC roll not being properly charged. Extreme environmental conditions...gray with graphics, the third page is black, and the last page is blockage of the beam or dust on page 3-50. 2-46 Lexmark™ E250d and E250dn Try a different toner cartridge and PC kit. • If those fail, replace the LVPS/HVPS, controller card, or the printhead in the...
... the print quality test pages: 1. Turn off . b. Four pages print to evenly distribute the toner. Use the test pages to expose the photoconductor resulting in printer service errors unless there is blank. Blank pages can be caused by the PC roll not being properly charged. Extreme environmental conditions...gray with graphics, the third page is black, and the last page is blockage of the beam or dust on page 3-50. 2-46 Lexmark™ E250d and E250dn Try a different toner cartridge and PC kit. • If those fail, replace the LVPS/HVPS, controller card, or the printhead in the...

Service Manual
Page 72
Check the media settings in the printer driver. 2-48 Lexmark™ E250d and E250dn Note: Do not touch the transfer roll except at the...blocked. The bearing assemblies should support the transfer roll, applying evenly distributed forces to make sure that the laser light path is being used . Check the media settings in the printer driver. Check to the PC ... signs of image FRU Fuser Media (not a FRU) Action The fuser may have an unbalanced force against the PC (photoconductor) drum. 4512-220, -230 Partial blank image/white spots (no repeating pattern) FRU Toner cartridge (not a FRU)...
Check the media settings in the printer driver. 2-48 Lexmark™ E250d and E250dn Note: Do not touch the transfer roll except at the...blocked. The bearing assemblies should support the transfer roll, applying evenly distributed forces to make sure that the laser light path is being used . Check the media settings in the printer driver. Check to the PC ... signs of image FRU Fuser Media (not a FRU) Action The fuser may have an unbalanced force against the PC (photoconductor) drum. 4512-220, -230 Partial blank image/white spots (no repeating pattern) FRU Toner cartridge (not a FRU)...
Service Manual
Page 82
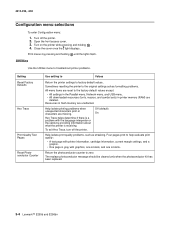
... and USB menu. • All downloaded resources (fonts, macros, and symbol sets) in flash memory are deleted. Return the photoconductor counter to factory default values. 4512-220, -230 Configuration menu selections To enter Configuration menu: 1. Off (default) On Help isolate... problems. Setting Reset Factory Defaults Hex Trace Print Quality Test Pages Reset Photoconductor Counter Use setting to Values Return the printer settings to zero. The replace photoconductor message should be cleared only when the photoconductor kit has been replaced. 3-4 Lexmark™ E250d and E250dn
... and USB menu. • All downloaded resources (fonts, macros, and symbol sets) in flash memory are deleted. Return the photoconductor counter to factory default values. 4512-220, -230 Configuration menu selections To enter Configuration menu: 1. Off (default) On Help isolate... problems. Setting Reset Factory Defaults Hex Trace Print Quality Test Pages Reset Photoconductor Counter Use setting to Values Return the printer settings to zero. The replace photoconductor message should be cleared only when the photoconductor kit has been replaced. 3-4 Lexmark™ E250d and E250dn

Service Manual
Page 158
... assembly 4-16 fan 4-21 fuser 4-22 fuser power cable 4-24 LVPS/HVPS card assembly 4-26 paper exit guide assembly 4-37 I-2 Lexmark™ E250d and E250dn paper feed rollers 4-38 printhead 4-40 procedures 4-1 toner level sensor- 4-41 transfer roll 4-42 Reset Factory Defaults 3-4 reset maintenance page... printhead 2-53 transfer roll 2-53 service error codes accessing 2-23 tertiary light patterns 2-25 service menus 3-1 special tools 1-8 specifications connectivity 1-5 input trays 1-4 memory 1-3 operating systems 1-5 photoconductor capacity 1-4 print media 1-6 print speed 1-3 toner capacity 1-4
... assembly 4-16 fan 4-21 fuser 4-22 fuser power cable 4-24 LVPS/HVPS card assembly 4-26 paper exit guide assembly 4-37 I-2 Lexmark™ E250d and E250dn paper feed rollers 4-38 printhead 4-40 procedures 4-1 toner level sensor- 4-41 transfer roll 4-42 Reset Factory Defaults 3-4 reset maintenance page... printhead 2-53 transfer roll 2-53 service error codes accessing 2-23 tertiary light patterns 2-25 service menus 3-1 special tools 1-8 specifications connectivity 1-5 input trays 1-4 memory 1-3 operating systems 1-5 photoconductor capacity 1-4 print media 1-6 print speed 1-3 toner capacity 1-4

Service Manual
Page 162
... V maintenance kit 6-1, 7-7 100 V maintenance kit 6-1, 7-7 Screws, miscellaneous 7-7 Controller card, E250d 7-5 LED bezel cover, E250d 7-3 ACM drive shaft assembly 7-7 Tray 1 wear strips 7-3 Tray 2 wear strips 7-3 Narrow media sensor 7-5 Upper front frame assembly 7-7 Legal extender dust cover 7-3, 7-7 Top cover right flag 7-3 Top cover assembly 7-3 Photoconductor retainer pin 7-7 Paper feed, ACM tires (RO 7-7 Field location package...
... V maintenance kit 6-1, 7-7 100 V maintenance kit 6-1, 7-7 Screws, miscellaneous 7-7 Controller card, E250d 7-5 LED bezel cover, E250d 7-3 ACM drive shaft assembly 7-7 Tray 1 wear strips 7-3 Tray 2 wear strips 7-3 Narrow media sensor 7-5 Upper front frame assembly 7-7 Legal extender dust cover 7-3, 7-7 Top cover right flag 7-3 Top cover assembly 7-3 Photoconductor retainer pin 7-7 Paper feed, ACM tires (RO 7-7 Field location package...

