
Setup Guide
Page 11
Make sure the support unit is listed under Installed Features (see page 34). 5 Insert the tray. When you install the optional 250-sheet drawer at a later time, be sure to verify the 250-sheet drawer is firmly in place. Note: If you complete setting up the printer, print a menu settings page to turn off the printer before installing it. 4 Align the printer with the front of the support unit and place it on top of the support unit. Install the optional 250-sheet drawer 4
Make sure the support unit is listed under Installed Features (see page 34). 5 Insert the tray. When you install the optional 250-sheet drawer at a later time, be sure to verify the 250-sheet drawer is firmly in place. Note: If you complete setting up the printer, print a menu settings page to turn off the printer before installing it. 4 Align the printer with the front of the support unit and place it on top of the support unit. Install the optional 250-sheet drawer 4

Setup Guide
Page 21
... each tray. The single-sheet front output door provides a straight-through paper path for special media, reducing curling and potential paper jams. The following table lists page numbers where you can increase your printer paper capacity with the optional 250-sheet tray. Source Tray 1 Optional 250-sheet tray Manual feed Capacity...
... each tray. The single-sheet front output door provides a straight-through paper path for special media, reducing curling and potential paper jams. The following table lists page numbers where you can increase your printer paper capacity with the optional 250-sheet tray. Source Tray 1 Optional 250-sheet tray Manual feed Capacity...

Setup Guide
Page 36
... name or type a unique name for local printing 29 Make sure you select the driver in the instructions. 5 Select your printer and driver from the list, and then click OK.
... name or type a unique name for local printing 29 Make sure you select the driver in the instructions. 5 Select your printer and driver from the list, and then click OK.

Setup Guide
Page 37
You are now ready to accept the license agreement. 4 Select Local Printer, and then click Next. 5 Make sure the correct printer and port are listed, and then click OK. When the Update Device Driver Wizard screen appears: 1 Insert the drivers CD. Click Next. 2 Click Install Printer Software. 3 Click Agree to ...
You are now ready to accept the license agreement. 4 Select Local Printer, and then click Next. 5 Make sure the correct printer and port are listed, and then click OK. When the Update Device Driver Wizard screen appears: 1 Insert the drivers CD. Click Next. 2 Click Install Printer Software. 3 Click Agree to ...

Setup Guide
Page 38
... you want to a USB-attached printer you must create a desktop printer icon (Macintosh 8.6-9.x) or create a queue in the USB Printer Selection list, make sure the USB cable is properly connected and the printer is complete. 2 Do one of your printer, and then click OK. Make... double-click the installer package for your computer. f Choose a default paper size. Your printer appears in a downloadable software package from Lexmark's Web site at www.lexmark.com. If your printer does not appear in Print Center (Macintosh OS X). 1 Install a printer PostScript Printer Description (PPD) file ...
... you want to a USB-attached printer you must create a desktop printer icon (Macintosh 8.6-9.x) or create a queue in the USB Printer Selection list, make sure the USB cable is properly connected and the printer is complete. 2 Do one of your printer, and then click OK. Make... double-click the installer package for your computer. f Choose a default paper size. Your printer appears in a downloadable software package from Lexmark's Web site at www.lexmark.com. If your printer does not appear in Print Center (Macintosh OS X). 1 Install a printer PostScript Printer Description (PPD) file ...

Setup Guide
Page 39
...printing on many UNIX and Linux platforms, such as a desktop printer. 1 Install a printer PostScript Printer Description (PPD) file on the Lexmark Web site at www.lexmark.com. 9 Specify a printer name, and then click Save. h On the Easy Install screen, click Install. i Click Close when ...installation is also available in the Printer List, you can quit Print Center. If your USB-attached printer appears in the Printer List, make changes. ...
...printing on many UNIX and Linux platforms, such as a desktop printer. 1 Install a printer PostScript Printer Description (PPD) file on the Lexmark Web site at www.lexmark.com. 9 Specify a printer name, and then click Save. h On the Easy Install screen, click Install. i Click Close when ...installation is also available in the Printer List, you can quit Print Center. If your USB-attached printer appears in the Printer List, make changes. ...

Setup Guide
Page 40
Visit the Lexmark Web site at www.lexmark.com for a complete list of supported UNIX and Linux platforms. Install drivers for Sun Solaris supports USB connections to Sun Ray appliances and Sun workstations. The driver package for local printing 33 in UNIX and Linux environments. All the printer driver packages support local printing using Lexmark printers in each package gives detailed instructions for installing and using a parallel connection.
Visit the Lexmark Web site at www.lexmark.com for a complete list of supported UNIX and Linux platforms. Install drivers for Sun Solaris supports USB connections to Sun Ray appliances and Sun workstations. The driver package for local printing 33 in UNIX and Linux environments. All the printer driver packages support local printing using Lexmark printers in each package gives detailed instructions for installing and using a parallel connection.

Setup Guide
Page 41
... light blinks, from top to print the page. 2 On the menu settings page: • Verify that the amount of memory installed is correctly listed under "Installed Features." Verify printer setup 34 If an option you loaded. Print a menu settings page for the sizes and types of paper you ...installed is not listed on the printer. Step 8: Verify printer setup Turning on the printer Printing a setup page 1 Plug one end of the printer cord into a properly...
... light blinks, from top to print the page. 2 On the menu settings page: • Verify that the amount of memory installed is correctly listed under "Installed Features." Verify printer setup 34 If an option you loaded. Print a menu settings page for the sizes and types of paper you ...installed is not listed on the printer. Step 8: Verify printer setup Turning on the printer Printing a setup page 1 Plug one end of the printer cord into a properly...

Setup Guide
Page 42
... staff Locating helpful information Note: The publications CD is shipped inside the Setup Guide. Launch the publications CD and browse the contents to see a complete list of full text searching, we have created catalog entries to users 35 Step 9: Distribute information to users Identifying printer users Several types of users may...
... staff Locating helpful information Note: The publications CD is shipped inside the Setup Guide. Launch the publications CD and browse the contents to see a complete list of full text searching, we have created catalog entries to users 35 Step 9: Distribute information to users Identifying printer users Several types of users may...

User's Reference
Page 15
From a Windows computer 1 Minimize all programs to cancel the job currently printing. A list of print jobs appears. 5 Select the job you are using to print the job. A list of available printers appears. 4 Double-click the printer you want . 4 Change Orientation to Landscape. 5 Click OK to close the Page ... Go back to the File menu and select Print. 7 From Paper Source, select Envelope. 8 Click Print to send the job to print. A list of print jobs appears. Canceling a print job 15 Printing Now print the envelope: 1 Load an envelope vertically, flap side down, with the stamp area...
From a Windows computer 1 Minimize all programs to cancel the job currently printing. A list of print jobs appears. 5 Select the job you are using to print the job. A list of available printers appears. 4 Double-click the printer you want . 4 Change Orientation to Landscape. 5 Click OK to close the Page ... Go back to the File menu and select Print. 7 From Paper Source, select Envelope. 8 Click Print to send the job to print. A list of print jobs appears. Canceling a print job 15 Printing Now print the envelope: 1 Load an envelope vertically, flap side down, with the stamp area...

User's Reference
Page 49
... set from the Local Printer Setup Utility (see Using the Local Printer Setup Utility). Understanding the operator panel lights Secondary error code light sequences for a list of current printer settings. • Press and hold Cancel to receive and process data. • The printer is in Power Saver mode. What you want...
... set from the Local Printer Setup Utility (see Using the Local Printer Setup Utility). Understanding the operator panel lights Secondary error code light sequences for a list of current printer settings. • Press and hold Cancel to receive and process data. • The printer is in Power Saver mode. What you want...

User's Reference
Page 50
... print cartridge is getting low. What you can do : • Send a print job. • Press and release Continue to print the menu settings page for a list of current printer settings. • Remove the print cartridge and shake it to extend the life of the cartridge. In addition, the toner in the...
... print cartridge is getting low. What you can do : • Send a print job. • Press and release Continue to print the menu settings page for a list of current printer settings. • Remove the print cartridge and shake it to extend the life of the cartridge. In addition, the toner in the...

User's Reference
Page 52
... flash, formatting flash, or programming flash: - The Busy message is displayed as fonts or macros, in flash memory. • The printer is printing a directory, font list, menu settings pages, or Print Quality Test Pages. The Ready/Data light is on when printing stops. Wait for the message to print. Ready/Data.... • The printer is storing resources, such as the pages print. Understanding the operator panel lights What this message is displayed. • Printing a directory, a font list, menu settings pages, or Print Quality Test Pages: -
... flash, formatting flash, or programming flash: - The Busy message is displayed as fonts or macros, in flash memory. • The printer is printing a directory, font list, menu settings pages, or Print Quality Test Pages. The Ready/Data light is on when printing stops. Wait for the message to print. Ready/Data.... • The printer is storing resources, such as the pages print. Understanding the operator panel lights What this message is displayed. • Printing a directory, a font list, menu settings pages, or Print Quality Test Pages: -

User's Reference
Page 53
... Paper Jam Error Press Continue Continue Cancel What this light sequence means: The printer is getting low. What you can do: • Printing a directory, a font list, menu settings pages, or Print Quality Test Pages: - Press and hold Cancel to reset the printer. Press and hold Cancel to reset the printer. •...
... Paper Jam Error Press Continue Continue Cancel What this light sequence means: The printer is getting low. What you can do: • Printing a directory, a font list, menu settings pages, or Print Quality Test Pages: - Press and hold Cancel to reset the printer. Press and hold Cancel to reset the printer. •...

User's Reference
Page 85
..., call 1-859-232-3000. If your printer? • Is the printer cover closed completely? For other information the service representative may need to the numbers listed on again. If you are able to print, press and release Continue to print a menu settings page, which...
..., call 1-859-232-3000. If your printer? • Is the printer cover closed completely? For other information the service representative may need to the numbers listed on again. If you are able to print, press and release Continue to print a menu settings page, which...

User's Reference
Page 87
... Trace Ready 59, 60 Insufficient collation area 62 Memory full 63 Not ready 50, 51 Offline 50, 51 Printing a directory 52 Printing a font list 52 Printing menu settings pages 52 Printing Print Quality Test Pages 52 Programming flash 52 Resetting printer 60 Restoring factory defaults 60 Standard bin full... full 63 Not ready 50, 51 Offline 50, 51 Print Cartridge error 58 Printer Top Cover Open 58 Printing a directory 52 Printing a font list 52 Printing menu settings pages 52 Printing Print Quality Test Pages 52 Programming flash 52 Ready/Data 50 Resetting printer 60 Restoring factory defaults 60...
... Trace Ready 59, 60 Insufficient collation area 62 Memory full 63 Not ready 50, 51 Offline 50, 51 Printing a directory 52 Printing a font list 52 Printing menu settings pages 52 Printing Print Quality Test Pages 52 Programming flash 52 Resetting printer 60 Restoring factory defaults 60 Standard bin full... full 63 Not ready 50, 51 Offline 50, 51 Print Cartridge error 58 Printer Top Cover Open 58 Printing a directory 52 Printing a font list 52 Printing menu settings pages 52 Printing Print Quality Test Pages 52 Programming flash 52 Ready/Data 50 Resetting printer 60 Restoring factory defaults 60...

Information Update
Page 4
3 Media output stacker capacity The media capacity for the output bin. This update lists the capacity for tray 1, the manual feed, and the optional 250-sheet tray is listed in the publications CD. Keep this update with the printer documentation. Media output stacker capacity 3 Media Output bin capacity Paper Face down: 100 sheets 20 lb paper Transparencies Face down: 5 sheets Note: Although tray 1 and the optional 250-sheet tray hold up to 10 transparencies, we recommend removing every 5 sheets from the output bin to keep them from sticking together.
3 Media output stacker capacity The media capacity for the output bin. This update lists the capacity for tray 1, the manual feed, and the optional 250-sheet tray is listed in the publications CD. Keep this update with the printer documentation. Media output stacker capacity 3 Media Output bin capacity Paper Face down: 100 sheets 20 lb paper Transparencies Face down: 5 sheets Note: Although tray 1 and the optional 250-sheet tray hold up to 10 transparencies, we recommend removing every 5 sheets from the output bin to keep them from sticking together.

Service Manual
Page 22
... problems. 7. 4500 Preface This manual contains maintenance procedures for individual FRUs. Parts Catalog contains illustrations and part numbers for service personnel. CAUTION: When you are listed in order to isolate failing field replaceable units (FRUs). 3. It is a danger from hazardous voltage in the area of the product where you see this...
... problems. 7. 4500 Preface This manual contains maintenance procedures for individual FRUs. Parts Catalog contains illustrations and part numbers for service personnel. CAUTION: When you are listed in order to isolate failing field replaceable units (FRUs). 3. It is a danger from hazardous voltage in the area of the product where you see this...
Service Manual
Page 26
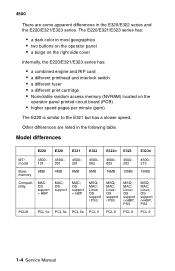
...a slower speed. OS support + HBP MAC; MAC; OS support MAC; Linux; Linux; OS support / PS3 MSQ; 4500 There are listed in the following table. MAC; Other differences are some apparent differences in most geographies • two buttons on the operator panel • ...a bulge on the right side cover Internally, the E220/E321/E323 series has: • a combined engine and RIP card • a different printhead and interlock switch • a different fuser •...
...a slower speed. OS support + HBP MAC; MAC; OS support MAC; Linux; Linux; OS support / PS3 MSQ; 4500 There are listed in the following table. MAC; Other differences are some apparent differences in most geographies • two buttons on the operator panel • ...a bulge on the right side cover Internally, the E220/E321/E323 series has: • a combined engine and RIP card • a different printhead and interlock switch • a different fuser •...

Service Manual
Page 138
Each of operation. The six modes are: • Normal printing • Demo printing • Diagnostics tests • Special function menu • Configuration • Hex Trace The mode entry table lists steps to enter and exit each mode. 4500-E320/E322 Printer operation modes The printer supports six distinct modes of the following operations may only be performed if the printer is in the correct operation mode. See "Printer modes summary table" on page 3-3 for details. 3-2 Service Manual
Each of operation. The six modes are: • Normal printing • Demo printing • Diagnostics tests • Special function menu • Configuration • Hex Trace The mode entry table lists steps to enter and exit each mode. 4500-E320/E322 Printer operation modes The printer supports six distinct modes of the following operations may only be performed if the printer is in the correct operation mode. See "Printer modes summary table" on page 3-3 for details. 3-2 Service Manual
