Quick Reference
Page 1
... second message, Replace Oil Coating Roll, is also displayed, where both the black cartridge and oil coating roll must replace the transfer belt (after pressing Select) to continue printing. 84 Photo Dev Life Warning It is time to replace one or more specified photodevelopers.... the fuser's life has expired, the display alternates between the 80 Belt Exhausted (or 80 Fuser/Belt Exhausted) and Select = Replace messages. You must be replaced to continue printing. P/N 12N0573 E.C. 548073 12N0573 * 12N0573* © Lexmark International, Inc. Canceling a print job To cancel a print job...
... second message, Replace Oil Coating Roll, is also displayed, where both the black cartridge and oil coating roll must replace the transfer belt (after pressing Select) to continue printing. 84 Photo Dev Life Warning It is time to replace one or more specified photodevelopers.... the fuser's life has expired, the display alternates between the 80 Belt Exhausted (or 80 Fuser/Belt Exhausted) and Select = Replace messages. You must be replaced to continue printing. P/N 12N0573 E.C. 548073 12N0573 * 12N0573* © Lexmark International, Inc. Canceling a print job To cancel a print job...
Setup Guide
Page 31
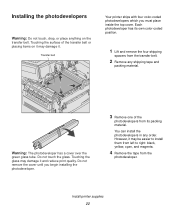
...place anything on it may be easier to install them from left to right: black, yellow, cyan, and magenta. 4 Remove the tape from the transfer belt. 2 Remove any order. Do not touch the glass. Touching the glass may damage it . Install printer supplies 22 Do not remove the cover until .... Warning: The photodeveloper has a cover over the green glass tube. You can install the photodevelopers in any shipping tape and packing material. Transfer belt Your printer ships with four color-coded photodevelopers which you begin installing the photodeveloper. 3 Remove one of the...
...place anything on it may be easier to install them from left to right: black, yellow, cyan, and magenta. 4 Remove the tape from the transfer belt. 2 Remove any order. Do not touch the glass. Touching the glass may damage it . Install printer supplies 22 Do not remove the cover until .... Warning: The photodeveloper has a cover over the green glass tube. You can install the photodevelopers in any shipping tape and packing material. Transfer belt Your printer ships with four color-coded photodevelopers which you begin installing the photodeveloper. 3 Remove one of the...
User's Reference
Page 4
Card stock ...46 Chapter 4: Using printer menus 48 Disabling operator panel menus 49 Enabling operator panel menus 49 Color Menu ...50 Finishing Menu 52 Infrared Menu ...55 Job Menu ...57 Network Menu ...59 Parallel Menu ...61 PCL Emul Menu 63 Paper Menu ...66 Fax Menu ...73 PostScript Menu 79 Serial Menu ...80 Setup Menu ...83 Supplies Menu 88 USB Menu ...90 Utilities Menu ...91 Chapter 5: Understanding printer messages 94 Chapter 6: Clearing paper jams 112 200 Paper Jam Pages Jammed (Check Areas A-F, T1-5, MPF 113 240 Paper Jam Check MP Feeder 129 24 Paper ...
Card stock ...46 Chapter 4: Using printer menus 48 Disabling operator panel menus 49 Enabling operator panel menus 49 Color Menu ...50 Finishing Menu 52 Infrared Menu ...55 Job Menu ...57 Network Menu ...59 Parallel Menu ...61 PCL Emul Menu 63 Paper Menu ...66 Fax Menu ...73 PostScript Menu 79 Serial Menu ...80 Setup Menu ...83 Supplies Menu 88 USB Menu ...90 Utilities Menu ...91 Chapter 5: Understanding printer messages 94 Chapter 6: Clearing paper jams 112 200 Paper Jam Pages Jammed (Check Areas A-F, T1-5, MPF 113 240 Paper Jam Check MP Feeder 129 24 Paper ...

User's Reference
Page 100
...8226; Press Go to clear the message and continue printing. • If a hardware failure, turn the printer off and back on while the transfer belt is open . The printer is experiencing a hardware failure. • Reestablish communication by deleted resources. Wait for the message to cancel the operation ... to delete all held jobs. • Press Stop to clear. Understanding printer messages 95 statistics stored on the printer while the transfer belt is deleting all job Wait for the message to clear. Close the printer front door to clear the message. The printer side ...
...8226; Press Go to clear the message and continue printing. • If a hardware failure, turn the printer off and back on while the transfer belt is open . The printer is experiencing a hardware failure. • Reestablish communication by deleted resources. Wait for the message to cancel the operation ... to delete all held jobs. • Press Stop to clear. Understanding printer messages 95 statistics stored on the printer while the transfer belt is deleting all job Wait for the message to clear. Close the printer front door to clear the message. The printer side ...

User's Reference
Page 114
... error message remains, the hard disk may be defective and require replacing. You can do not have a replacement transfer belt and fuser, order them now. Replace the transfer belt and fuser. If you do The printer detects an unformatted hard disk. • Press Go to clear the message... and continue printing. See also: Replacing the transfer belt; The printer detects an unsupported disk format. • Press Go to clear the message and continue printing. The Supplies message is displayed...
... error message remains, the hard disk may be defective and require replacing. You can do not have a replacement transfer belt and fuser, order them now. Replace the transfer belt and fuser. If you do The printer detects an unformatted hard disk. • Press Go to clear the message... and continue printing. See also: Replacing the transfer belt; The printer detects an unsupported disk format. • Press Go to clear the message and continue printing. The Supplies message is displayed...

User's Reference
Page 118
... unfused toner, which can stain garments. 200 Paper Jam Pages Jammed (Check Areas A-F, T1-5, MPF) 113 Check Areas A,B This message indicates a paper jam in the transfer belt, fuser, or output roller area. Photodeveloper Warning: Never touch the photodeveloper drum on , the second line of the toner cartridge.
... unfused toner, which can stain garments. 200 Paper Jam Pages Jammed (Check Areas A-F, T1-5, MPF) 113 Check Areas A,B This message indicates a paper jam in the transfer belt, fuser, or output roller area. Photodeveloper Warning: Never touch the photodeveloper drum on , the second line of the toner cartridge.

User's Reference
Page 119
Transfer belt Warning: Do not use any paper on how to close the top cover and front door, and then press Go. If a jam is no jam ... (Check Areas A-F, T1-5, MPF) 114 If the paper source was the multipurpose feeder, check the area between the multipurpose feeder and the transfer belt. This could cause permanent damage to the transfer belt. 3 Check the fuser area and top cover for additional jams. If there is present, continue with step 4. Clearing paper jams 2 Remove...
Transfer belt Warning: Do not use any paper on how to close the top cover and front door, and then press Go. If a jam is no jam ... (Check Areas A-F, T1-5, MPF) 114 If the paper source was the multipurpose feeder, check the area between the multipurpose feeder and the transfer belt. This could cause permanent damage to the transfer belt. 3 Check the fuser area and top cover for additional jams. If there is present, continue with step 4. Clearing paper jams 2 Remove...

User's Reference
Page 134
Warning: Do not touch, drop, or place anything on it may cause damage. 4 Close the top cover. 5 Press Go. Touching the surface of the multipurpose feeder, except when feeding banner paper (11.69 X 36 in the paper feed direction. Clear banner paper jams only in .). Transfer belt 240 Paper Jam Check MP Feeder 129 If the paper will not come out, proceed with step 2. 2 Open the top cover. 3 Remove the paper on the transfer belt. Clearing paper jams 240 Paper Jam Check MP Feeder 1 Slowly pull the jam straight out of the transfer belt or placing items on the transfer belt.
Warning: Do not touch, drop, or place anything on it may cause damage. 4 Close the top cover. 5 Press Go. Touching the surface of the multipurpose feeder, except when feeding banner paper (11.69 X 36 in the paper feed direction. Clear banner paper jams only in .). Transfer belt 240 Paper Jam Check MP Feeder 129 If the paper will not come out, proceed with step 2. 2 Open the top cover. 3 Remove the paper on the transfer belt. Clearing paper jams 240 Paper Jam Check MP Feeder 1 Slowly pull the jam straight out of the transfer belt or placing items on the transfer belt.
User's Reference
Page 141
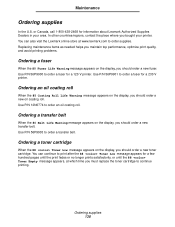
...should order a new toner cartridge. You can also visit the Lexmark online store at which time you should order a new transfer belt. Maintenance Ordering supplies In the U.S. Ordering a transfer belt When the 80 Belt Life Warning message appears on the display, you must replace the ...toner cartridge to order a fuser for information about Lexmark Authorized Supplies Dealers in your printer....
...should order a new toner cartridge. You can also visit the Lexmark online store at which time you should order a new transfer belt. Maintenance Ordering supplies In the U.S. Ordering a transfer belt When the 80 Belt Life Warning message appears on the display, you must replace the ...toner cartridge to order a fuser for information about Lexmark Authorized Supplies Dealers in your printer....

User's Reference
Page 142
... you there are supplies that need attention. The SUPPLIES status message appears on the second line of your toner cartridges, photodevelopers, fuser cleaner, fuser, and transfer belt. Open the SUPPLIES Menu to view the supplies that have the appropriate supply item, order one of these parts ensures peak printer performance and prevents...
... you there are supplies that need attention. The SUPPLIES status message appears on the second line of your toner cartridges, photodevelopers, fuser cleaner, fuser, and transfer belt. Open the SUPPLIES Menu to view the supplies that have the appropriate supply item, order one of these parts ensures peak printer performance and prevents...

User's Reference
Page 143
Storing supplies Store supplies in the box to send the old cartridge back to Lexmark. You can continue printing. The printer warranty does not cover damage caused by using refilled cartridges. To order finisher supplies (staples), see... box. If a prepaid shipping label is exhausted. Warning: Lexmark does not recommend refilling used supplies Lexmark's Operation ReSourceSM program lets you bought your printer for additional recycling information. Maintenance To prevent damage to your printer or its components, some replacement hardware parts, such as the transfer belt and the fuser.
Storing supplies Store supplies in the box to send the old cartridge back to Lexmark. You can continue printing. The printer warranty does not cover damage caused by using refilled cartridges. To order finisher supplies (staples), see... box. If a prepaid shipping label is exhausted. Warning: Lexmark does not recommend refilling used supplies Lexmark's Operation ReSourceSM program lets you bought your printer for additional recycling information. Maintenance To prevent damage to your printer or its components, some replacement hardware parts, such as the transfer belt and the fuser.

User's Reference
Page 148
... toner arm until it is free of hands, clothing, and other supply items, click one of the following headings: Removing the duplex unit Replacing the transfer belt Replacing the fuser Your printer monitors the life of its life, the printer displays 80 Fuser Exhausted.
... toner arm until it is free of hands, clothing, and other supply items, click one of the following headings: Removing the duplex unit Replacing the transfer belt Replacing the fuser Your printer monitors the life of its life, the printer displays 80 Fuser Exhausted.

User's Reference
Page 150
Transfer belt Replacing the fuser 145 Touching the surface of the transfer belt or placing items on the transfer belt. Maintenance 3 Turn off or unplug any optional devices connected to open the top cover. Warning: Do not touch, drop, or place anything on it may cause damage. 4 Complete the steps to the printer.
Transfer belt Replacing the fuser 145 Touching the surface of the transfer belt or placing items on the transfer belt. Maintenance 3 Turn off or unplug any optional devices connected to open the top cover. Warning: Do not touch, drop, or place anything on it may cause damage. 4 Complete the steps to the printer.
User's Reference
Page 157
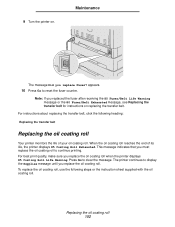
... replaced the fuser after receiving the 80 Fuser/Belt Life Warning message or the 80 Fuser/Belt Exhausted message, see Replacing the transfer belt for instructions on . 9 Turn the printer on replacing the transfer belt. For instructions about replacing the transfer belt, click the following steps or the instruction sheet... roll. Press Go to reset the fuser counter. To replace the oil coating roll, use the following heading: Replacing the transfer belt Replacing the oil coating roll Your printer monitors the life of its life, the printer displays 85 Coating Roll Exhausted. Replacing ...
... replaced the fuser after receiving the 80 Fuser/Belt Life Warning message or the 80 Fuser/Belt Exhausted message, see Replacing the transfer belt for instructions on . 9 Turn the printer on replacing the transfer belt. For instructions about replacing the transfer belt, click the following steps or the instruction sheet... roll. Press Go to reset the fuser counter. To replace the oil coating roll, use the following heading: Replacing the transfer belt Replacing the oil coating roll Your printer monitors the life of its life, the printer displays 85 Coating Roll Exhausted. Replacing ...
User's Reference
Page 158
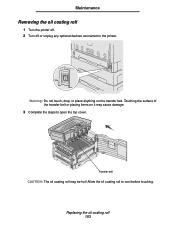
Replacing the oil coating roll 153 Transfer belt CAUTION: The oil coating roll may cause damage. 3 Complete the steps to open the top cover. Allow the oil coating roll to the printer. Touching the surface of the transfer belt or placing items on the transfer belt. Warning: Do not touch, drop, or place anything on it may be hot! Maintenance Removing the oil coating roll 1 Turn the printer off. 2 Turn off or unplug any optional devices connected to cool before touching.
Replacing the oil coating roll 153 Transfer belt CAUTION: The oil coating roll may cause damage. 3 Complete the steps to open the top cover. Allow the oil coating roll to the printer. Touching the surface of the transfer belt or placing items on the transfer belt. Warning: Do not touch, drop, or place anything on it may be hot! Maintenance Removing the oil coating roll 1 Turn the printer off. 2 Turn off or unplug any optional devices connected to cool before touching.

User's Reference
Page 161
... instruction sheet supplied with the transfer belt. When the transfer belt reaches the end of your transfer belt. The Supplies message appears on . Replacing the transfer belt 156 The printer continues to see 80 Belt Exhausted or 80 Belt Life Warning messages. To replace the transfer belt, use the following headings: Replacing the fuser Replacing the transfer belt Replacing the transfer belt Your printer monitors the...
... instruction sheet supplied with the transfer belt. When the transfer belt reaches the end of your transfer belt. The Supplies message appears on . Replacing the transfer belt 156 The printer continues to see 80 Belt Exhausted or 80 Belt Life Warning messages. To replace the transfer belt, use the following headings: Replacing the fuser Replacing the transfer belt Replacing the transfer belt Your printer monitors the...

User's Reference
Page 162
Press Select if you want to replace the transfer belt. Removing the transfer belt 1 Complete the steps in Preparing for maintenance. 2 Make sure the printer is displaying. Replacing the transfer belt 157 Press Select to replace the transfer belt now. Press Select to Replace Items. 3 Turn the printer ...Ready for Maintenance appears, followed by Power Off to replace the transfer belt. Press Go if you want to wait to replace the transfer belt. Press Go if you want to wait to replace the transfer belt. Maintenance Preparing for maintenance 1 Turn the printer on. 2 ...
Press Select if you want to replace the transfer belt. Removing the transfer belt 1 Complete the steps in Preparing for maintenance. 2 Make sure the printer is displaying. Replacing the transfer belt 157 Press Select to replace the transfer belt now. Press Select to Replace Items. 3 Turn the printer ...Ready for Maintenance appears, followed by Power Off to replace the transfer belt. Press Go if you want to wait to replace the transfer belt. Press Go if you want to wait to replace the transfer belt. Maintenance Preparing for maintenance 1 Turn the printer on. 2 ...

User's Reference
Page 163
Allow the printer to the printer. Touching the surface of the printer may cause damage. 4 Complete the steps to open the top cover. Maintenance 3 Turn off or unplug any optional devices connected to cool before touching. Warning: Do not touch, drop, or place anything on it may be hot! Replacing the transfer belt 158 Transfer belt CAUTION: The inside of the transfer belt or placing items on the transfer belt.
Allow the printer to the printer. Touching the surface of the printer may cause damage. 4 Complete the steps to open the top cover. Maintenance 3 Turn off or unplug any optional devices connected to cool before touching. Warning: Do not touch, drop, or place anything on it may be hot! Replacing the transfer belt 158 Transfer belt CAUTION: The inside of the transfer belt or placing items on the transfer belt.

User's Reference
Page 164
Maintenance 5 Loosen the thumbscrews on each side of the transfer belt cover. 6 Lift and remove the transfer belt cover. Replacing the transfer belt 159
Maintenance 5 Loosen the thumbscrews on each side of the transfer belt cover. 6 Lift and remove the transfer belt cover. Replacing the transfer belt 159

User's Reference
Page 165
Replacing the transfer belt 160 Maintenance 7 Loosen the thumbscrews on each side of the transfer belt. 8 Pull the transfer belt out.
Replacing the transfer belt 160 Maintenance 7 Loosen the thumbscrews on each side of the transfer belt. 8 Pull the transfer belt out.


