User's Guide
Page 4
... standard tray (Tray 1 67 Clearing a jam in the optional 500-sheet tray (Tray 2 68 Clearing jams behind the inner door ...69 Clearing jams under the fuser or fuser cover 71 Clearing jams between the fuser and the standard bin 73 Clearing a jam in the standard bin ...73 Clearing duplex path jams ...74 4
... standard tray (Tray 1 67 Clearing a jam in the optional 500-sheet tray (Tray 2 68 Clearing jams behind the inner door ...69 Clearing jams under the fuser or fuser cover 71 Clearing jams between the fuser and the standard bin 73 Clearing a jam in the standard bin ...73 Clearing duplex path jams ...74 4
User's Guide
Page 5
... ...78 Conserving supplies ...78 Ordering supplies and maintenance items ...79 Ordering toner cartridges ...79 Ordering a photoconductor unit ...80 Ordering a fuser ...80 Ordering a transfer belt ...80 Ordering a waste toner box ...80 Maintaining the printer for long-term storage 80 Storing supplies...media ...81 Storing the toner cartridges and photoconductor units 81 Replacing the toner cartridges ...81 Recycling Lexmark products ...83 Replacing the photoconductor units ...83 Replacing the fuser ...83 Replacing the waste toner box ...83 Replacing the transfer belt ...83 Cleaning the printhead...
... ...78 Conserving supplies ...78 Ordering supplies and maintenance items ...79 Ordering toner cartridges ...79 Ordering a photoconductor unit ...80 Ordering a fuser ...80 Ordering a transfer belt ...80 Ordering a waste toner box ...80 Maintaining the printer for long-term storage 80 Storing supplies...media ...81 Storing the toner cartridges and photoconductor units 81 Replacing the toner cartridges ...81 Recycling Lexmark products ...83 Replacing the photoconductor units ...83 Replacing the fuser ...83 Replacing the waste toner box ...83 Replacing the transfer belt ...83 Cleaning the printhead...
User's Guide
Page 36
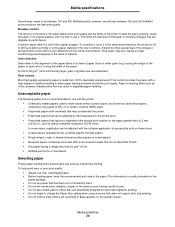
... environment is usually indicated on the paper package. • Do not use paper that has been cut or trimmed by the temperature in the printer fuser • Preprinted papers that can be between 150 and 250 Sheffield points produces the best print quality. Unacceptable paper The following papers are not recommended...
... environment is usually indicated on the paper package. • Do not use paper that has been cut or trimmed by the temperature in the printer fuser • Preprinted papers that can be between 150 and 250 Sheffield points produces the best print quality. Unacceptable paper The following papers are not recommended...
User's Guide
Page 65
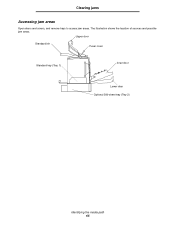
Clearing jams Accessing jam areas Open doors and covers, and remove trays to access jam areas. Upper door Standard bin Fuser cover Standard tray (Tray 1) Inner door Lower door Optional 500-sheet tray (Tray 2) Identifying the media path 65 The illustration shows the location of sources and possible jam areas.
Clearing jams Accessing jam areas Open doors and covers, and remove trays to access jam areas. Upper door Standard bin Fuser cover Standard tray (Tray 1) Inner door Lower door Optional 500-sheet tray (Tray 2) Identifying the media path 65 The illustration shows the location of sources and possible jam areas.
User's Guide
Page 66
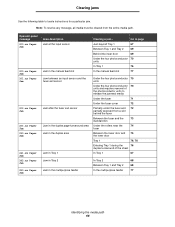
... Under the four photoconductor 70 units In Tray 1 76 In the manual feed slot 77 Jam between an input sensor and the fuser exit sensor Jam after the fuser exit sensor Jam in the duplex page-turnaround area Jam in the duplex area Jam in Tray 1 Under the four photoconductor 70... units to locate instructions for a particular jam. Clearing jams Use the following table to release the jammed media Under the fuser 71 Under the fuser cover 72 Partially under the fuser and 72 partially exposed from the entire media path. Operator panel message 200.xx Paper Jam 200.xx Paper Jam 201...
... Under the four photoconductor 70 units In Tray 1 76 In the manual feed slot 77 Jam between an input sensor and the fuser exit sensor Jam after the fuser exit sensor Jam in the duplex page-turnaround area Jam in the duplex area Jam in Tray 1 Under the four photoconductor 70... units to locate instructions for a particular jam. Clearing jams Use the following table to release the jammed media Under the fuser 71 Under the fuser cover 72 Partially under the fuser and 72 partially exposed from the entire media path. Operator panel message 200.xx Paper Jam 200.xx Paper Jam 201...
User's Guide
Page 71
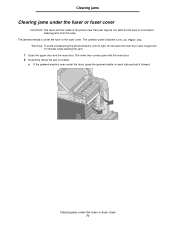
... a 201.xx Paper Jam. a If the jammed media is located. Clearing jams under the fuser or fuser cover CAUTION: The fuser and the inside of the printer near the fuser may be hot. Clearing jams Clearing jams under the fuser or fuser cover 71 The lower door comes open longer than 10 minutes while clearing this... area. The jammed media is under the fuser, grasp the jammed media on each side and pull it forward. Wait for the fuser to light, do not leave the inner door open with the inner door. 2 Determine where the jam is...
... a 201.xx Paper Jam. a If the jammed media is located. Clearing jams under the fuser or fuser cover CAUTION: The fuser and the inside of the printer near the fuser may be hot. Clearing jams Clearing jams under the fuser or fuser cover 71 The lower door comes open longer than 10 minutes while clearing this... area. The jammed media is under the fuser, grasp the jammed media on each side and pull it forward. Wait for the fuser to light, do not leave the inner door open with the inner door. 2 Determine where the jam is...
User's Guide
Page 72
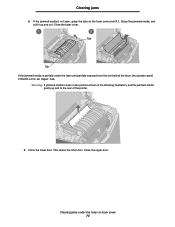
...pull the jammed media gently up and out. Close the fuser cover. 1 2 Tab Tab If the jammed media is partially under the fuser or fuser cover 72 Close the upper door. Clearing jams under the fuser and partially exposed from the slot behind the fuser, the operator panel indicates a 202.xx Paper Jam. Grasp... the jammed media, and pull it . Clearing jams b If the jammed media is not seen, grasp the tabs on the fuser cover and lift it up and...
...pull the jammed media gently up and out. Close the fuser cover. 1 2 Tab Tab If the jammed media is partially under the fuser or fuser cover 72 Close the upper door. Clearing jams under the fuser and partially exposed from the slot behind the fuser, the operator panel indicates a 202.xx Paper Jam. Grasp... the jammed media, and pull it . Clearing jams b If the jammed media is not seen, grasp the tabs on the fuser cover and lift it up and...
User's Guide
Page 73
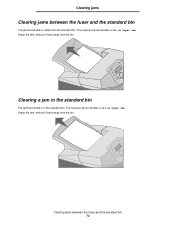
Grasp the jam, and pull it back away from the bin. Grasp the jam, and pull it back away from the standard bin. The operator panel indicates a 202.xx Paper Jam. Clearing jams between the fuser and the standard bin The jammed media is in the standard bin The jammed media is visible from the bin. The operator panel indicates a 203.xx Paper Jam. Clearing jams Clearing jams between the fuser and the standard bin 73 Clearing a jam in the standard bin.
Grasp the jam, and pull it back away from the bin. Grasp the jam, and pull it back away from the standard bin. The operator panel indicates a 202.xx Paper Jam. Clearing jams between the fuser and the standard bin The jammed media is in the standard bin The jammed media is visible from the bin. The operator panel indicates a 203.xx Paper Jam. Clearing jams Clearing jams between the fuser and the standard bin 73 Clearing a jam in the standard bin.
User's Guide
Page 74
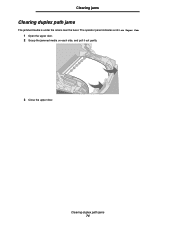
Clearing duplex path jams 74 The operator panel indicates a 203.xx Paper Jam. 1 Open the upper door. 2 Grasp the jammed media on each side, and pull it out gently. 3 Close the upper door. Clearing jams Clearing duplex path jams The jammed media is under the rollers near the fuser.
Clearing duplex path jams 74 The operator panel indicates a 203.xx Paper Jam. 1 Open the upper door. 2 Grasp the jammed media on each side, and pull it out gently. 3 Close the upper door. Clearing jams Clearing duplex path jams The jammed media is under the rollers near the fuser.
User's Guide
Page 80
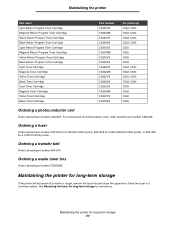
... C5200MS C5200YS C5200KS C5222CS C5222MS C5222YS C5222KS C5202CS C5202MS C5202YS C5202KS For printer(s) C522, C524 C522, C524 C522, C524 C522, C524 C520 C520 C520 C520 C522, C524 C522, C524 C522, C524 C522, C524 C520 C520 C520 C520 Ordering a photoconductor unit Order Lexmark part number C52030X. Ordering a fuser Order Lexmark part number 40X1400 for a 120V/50-60Hz printer, 40X1402 for a 220-240V...
... C5200MS C5200YS C5200KS C5222CS C5222MS C5222YS C5222KS C5202CS C5202MS C5202YS C5202KS For printer(s) C522, C524 C522, C524 C522, C524 C522, C524 C520 C520 C520 C520 C522, C524 C522, C524 C522, C524 C522, C524 C520 C520 C520 C520 Ordering a photoconductor unit Order Lexmark part number C52030X. Ordering a fuser Order Lexmark part number 40X1400 for a 120V/50-60Hz printer, 40X1402 for a 220-240V...
User's Guide
Page 83
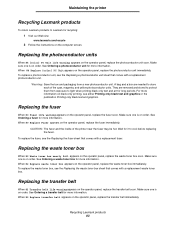
... belt life warning appears on the operator panel, replace the fuser soon. Recycling Lexmark products 83 Replacing the fuser When 80 Fuser life warning appears on the operator panel, replace the transfer belt soon. To replace the fuser, see the Replacing a photoconductor unit sheet that comes with ...-only text and art for it to Lexmark for recycling: 1 Visit our Web site: www.lexmark.com/recycle 2 Follow the instructions on order. Maintaining the printer Recycling Lexmark products To return Lexmark products to cool before replacing the fuser. When 82 Replace waste toner box appears...
... belt life warning appears on the operator panel, replace the fuser soon. Recycling Lexmark products 83 Replacing the fuser When 80 Fuser life warning appears on the operator panel, replace the transfer belt soon. To replace the fuser, see the Replacing a photoconductor unit sheet that comes with ...-only text and art for it to Lexmark for recycling: 1 Visit our Web site: www.lexmark.com/recycle 2 Follow the instructions on order. Maintaining the printer Recycling Lexmark products To return Lexmark products to cool before replacing the fuser. When 82 Replace waste toner box appears...
User's Guide
Page 86
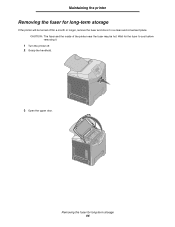
CAUTION: The fuser and the inside of the printer near the fuser may be turned off . 2 Grasp the handhold. 3 Open the upper door. Removing the fuser for a month or longer, remove the fuser and store it . 1 Turn the printer off for long-term storage 86 Maintaining the printer Removing the fuser for long-term storage If the printer will be hot. Wait for the fuser to cool before removing it in a clean and convenient place.
CAUTION: The fuser and the inside of the printer near the fuser may be turned off . 2 Grasp the handhold. 3 Open the upper door. Removing the fuser for a month or longer, remove the fuser and store it . 1 Turn the printer off for long-term storage 86 Maintaining the printer Removing the fuser for long-term storage If the printer will be hot. Wait for the fuser to cool before removing it in a clean and convenient place.
User's Guide
Page 87
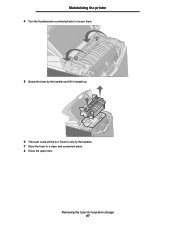
Removing the fuser for long-term storage 87 Maintaining the printer 4 Turn the thumbscrews counterclockwise to loosen them. 5 Grasp the fuser by the handles and lift it only by the handles. 7 Store the fuser in a clean and convenient place. 8 Close the upper door. Touch it straight up. 6 The fuser could still be hot.
Removing the fuser for long-term storage 87 Maintaining the printer 4 Turn the thumbscrews counterclockwise to loosen them. 5 Grasp the fuser by the handles and lift it only by the handles. 7 Store the fuser in a clean and convenient place. 8 Close the upper door. Touch it straight up. 6 The fuser could still be hot.
User's Guide
Page 88
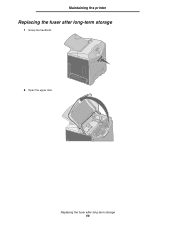
Maintaining the printer Replacing the fuser after long-term storage 88 Replacing the fuser after long-term storage 1 Grasp the handhold. 2 Open the upper door.
Maintaining the printer Replacing the fuser after long-term storage 88 Replacing the fuser after long-term storage 1 Grasp the handhold. 2 Open the upper door.
User's Guide
Page 89
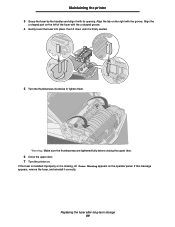
...the tab on the operator panel. Push it down until it is missing, 87 Fuser Missing appears on the right with its opening. If the fuser is installed improperly or it correctly. Replacing the fuser after long-term storage 89 Warning: Make sure the thumbscrews are tightened fully before ...door. 6 Close the upper door. 7 Turn the printer on the left of the fuser with the u-shaped groove. 4 Gently lower the fuser into place. Align the u-shaped part on . If this message appears, remove the fuser, and reinstall it is firmly seated. 5 Turn the thumbscrews clockwise to tighten them.
...the tab on the operator panel. Push it down until it is missing, 87 Fuser Missing appears on the right with its opening. If the fuser is installed improperly or it correctly. Replacing the fuser after long-term storage 89 Warning: Make sure the thumbscrews are tightened fully before ...door. 6 Close the upper door. 7 Turn the printer on the left of the fuser with the u-shaped groove. 4 Gently lower the fuser into place. Align the u-shaped part on . If this message appears, remove the fuser, and reinstall it is firmly seated. 5 Turn the thumbscrews clockwise to tighten them.
User's Guide
Page 93
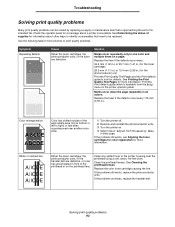
.... Use the following table to find solutions to print quality problems. Symptom Repeating defects Cause Either the toner cartridges, the photoconductor units, or the fuser are defective, or toner has accumulated in front of the appropriate area (top to bottom or left to be solved by replacing a supply or ... the toner cartridges 28.3 mm (1.11 in.) or 72.4 mm (2.85 in Settings. Marks occur down the page repeatedly in all colors: Replace the fuser if the defects occur every 116 mm (4.56 in the printer housing near the printhead using a soft, clean, lint-free cloth. White or colored line...
.... Use the following table to find solutions to print quality problems. Symptom Repeating defects Cause Either the toner cartridges, the photoconductor units, or the fuser are defective, or toner has accumulated in front of the appropriate area (top to bottom or left to be solved by replacing a supply or ... the toner cartridges 28.3 mm (1.11 in.) or 72.4 mm (2.85 in Settings. Marks occur down the page repeatedly in all colors: Replace the fuser if the defects occur every 116 mm (4.56 in the printer housing near the printhead using a soft, clean, lint-free cloth. White or colored line...

User's Guide
Page 94
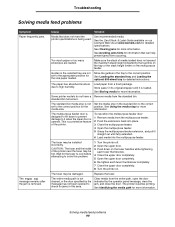
... toner cartridge causing the streaks. Make sure the printer Paper Type setting matches the type of media being used . The fuser may be empty. If media is not damp. Solving print quality problems 94 Load media from another tray. The toner cartridges... may be defective, empty, or worn. Replace the fuser. Troubleshooting Symptom Streaked horizontal lines ABCDE ABCDE ABCDE Cause Solution The toner cartridges may be defective or worn. Replace the transfer belt...
... toner cartridge causing the streaks. Make sure the printer Paper Type setting matches the type of media being used . The fuser may be empty. If media is not damp. Solving print quality problems 94 Load media from another tray. The toner cartridges... may be defective, empty, or worn. Replace the fuser. Troubleshooting Symptom Streaked horizontal lines ABCDE ABCDE ABCDE Cause Solution The toner cartridges may be defective or worn. Replace the transfer belt...

User's Guide
Page 95
...being used is set to the factory defaults. Make sure the Paper Type setting in the Paper Menu is wrong for customer support. The fuser is selected. Remove and reinstall the toner cartridges. Troubleshooting Symptom Cause Solution Print too light Color Saver in the Quality Menu Set Color ... Paper Texture from the printer driver before sending the job to print, or return the color settings to something other than Transparency. Replace the fuser. Replace the toner cartridges. in Settings could be set to Off. Make sure the media loaded in the Paper Menu is set to Rough...
...being used is set to the factory defaults. Make sure the Paper Type setting in the Paper Menu is wrong for customer support. The fuser is selected. Remove and reinstall the toner cartridges. Troubleshooting Symptom Cause Solution Print too light Color Saver in the Quality Menu Set Color ... Paper Texture from the printer driver before sending the job to print, or return the color settings to something other than Transparency. Replace the fuser. Replace the toner cartridges. in Settings could be set to Off. Make sure the media loaded in the Paper Menu is set to Rough...
User's Guide
Page 99
...tilt down on the fuser handles while tightening each fuser thumbscrew. 4 Close the upper door completely. 5 Open the upper door completely. 6 Re-tighten each fuser thumbscrew completely. 7 Close the upper door completely. 8 Turn the printer on our Lexmark Web site at www.lexmark.com for information ...that does not meet the printer specifications is opened. CAUTION: The fuser and the inside of media loaded does...
...tilt down on the fuser handles while tightening each fuser thumbscrew. 4 Close the upper door completely. 5 Open the upper door completely. 6 Re-tighten each fuser thumbscrew completely. 7 Close the upper door completely. 8 Turn the printer on our Lexmark Web site at www.lexmark.com for information ...that does not meet the printer specifications is opened. CAUTION: The fuser and the inside of media loaded does...

User's Guide
Page 140
...this product does not function as warranted during the warranty period, contact a Remarketer or Lexmark for Class I (1) laser products, and elsewhere is certified as a Class I laser product conforming to that user. Fuser Units, Transport Units, Paper Feed items, if any, and any other items for ... Limited Warranty for exchange is defaced, altered, in need of a repair not included in the U.S. If you present for Lexmark C520, C522, and C524 Lexmark International, Inc. The replacement may be hazardous. This limited warranty applies to this product only if it prepaid and suitably packaged...
...this product does not function as warranted during the warranty period, contact a Remarketer or Lexmark for Class I (1) laser products, and elsewhere is certified as a Class I laser product conforming to that user. Fuser Units, Transport Units, Paper Feed items, if any, and any other items for ... Limited Warranty for exchange is defaced, altered, in need of a repair not included in the U.S. If you present for Lexmark C520, C522, and C524 Lexmark International, Inc. The replacement may be hazardous. This limited warranty applies to this product only if it prepaid and suitably packaged...


