Setup Guide
Page 4
... 29 Step 8: Attach cables 32 Attaching a local cable 32 Attaching a network cable 34 Turning your printer on 35 Step 9: Install drivers for local printing 36 Windows 37 Macintosh 41 UNIX/Linux 42 Step 10: Verify printer setup 44 Printing a menu settings page 44 Printing a network setup page 45 Printing Quick Reference.../IP 47 Assigning a printer IP address 47 Verifying the IP settings 48 Configuring for Pull Printing 48 Step 12: Install drivers for network printing 49 Windows 49 Macintosh 53 UNIX/Linux 55 NetWare 56 Contents iii
... 29 Step 8: Attach cables 32 Attaching a local cable 32 Attaching a network cable 34 Turning your printer on 35 Step 9: Install drivers for local printing 36 Windows 37 Macintosh 41 UNIX/Linux 42 Step 10: Verify printer setup 44 Printing a menu settings page 44 Printing a network setup page 45 Printing Quick Reference.../IP 47 Assigning a printer IP address 47 Verifying the IP settings 48 Configuring for Pull Printing 48 Step 12: Install drivers for network printing 49 Windows 49 Macintosh 53 UNIX/Linux 55 NetWare 56 Contents iii

Setup Guide
Page 37
... can be attached to a network or directly to a computer to see if your printer locally using either a USB, parallel, or serial connection. Windows 98 SE, Windows Me, Windows 2000, and Windows XP operating systems support USB connections. Some UNIX, Linux, and Macintosh computers also support USB connections. Attach cables 32 A USB port is standard... 8: Attach cables CAUTION: Do not connect or disconnect a communication port, a teleport, or any other connector during a lightning storm. A USB port requires a USB cable such as Lexmark part number 12A2405 (2 m [6.5 ft]).
... can be attached to a network or directly to a computer to see if your printer locally using either a USB, parallel, or serial connection. Windows 98 SE, Windows Me, Windows 2000, and Windows XP operating systems support USB connections. Some UNIX, Linux, and Macintosh computers also support USB connections. Attach cables 32 A USB port is standard... 8: Attach cables CAUTION: Do not connect or disconnect a communication port, a teleport, or any other connector during a lightning storm. A USB port requires a USB cable such as Lexmark part number 12A2405 (2 m [6.5 ft]).
Setup Guide
Page 41
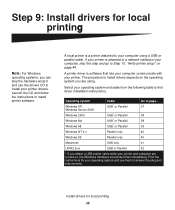
...the CD and follow the instructions to find driver installation instructions. Select your computer using . The procedure to a network instead of your printer drivers. Windows Server 2003 Windows 2000 Windows Me Windows 98 Cable USB* or Parallel USB* or Parallel USB* or Parallel USB* or Parallel Go to page... 37 38 38 39... Windows NT 4.x Parallel only 40 Windows 95 Parallel only 40 Macintosh USB only 41 UNIX/Linux USB or Parallel 42 * If you can skip the hardware wizard and use...
...the CD and follow the instructions to find driver installation instructions. Select your computer using . The procedure to a network instead of your printer drivers. Windows Server 2003 Windows 2000 Windows Me Windows 98 Cable USB* or Parallel USB* or Parallel USB* or Parallel USB* or Parallel Go to page... 37 38 38 39... Windows NT 4.x Parallel only 40 Windows 95 Parallel only 40 Macintosh USB only 41 UNIX/Linux USB or Parallel 42 * If you can skip the hardware wizard and use...

Setup Guide
Page 42
... or Windows Server 2003 with USB or parallel cable Note: Business versions of the custom driver, you will be created and appear in downloadable software packages on our Lexmark Web site at www.lexmark.com. Your printer has been thoroughly tested and is compatible with your computer ...and your computer. Drivers are also available in the Printers folder. Install drivers for this printer included. A separate printer object will need to refer to install the driver. Some versions of Windows....
... or Windows Server 2003 with USB or parallel cable Note: Business versions of the custom driver, you will be created and appear in downloadable software packages on our Lexmark Web site at www.lexmark.com. Your printer has been thoroughly tested and is compatible with your computer ...and your computer. Drivers are also available in the Printers folder. Install drivers for this printer included. A separate printer object will need to refer to install the driver. Some versions of Windows....
Setup Guide
Page 43
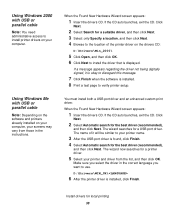
... Finish. 4 Select Automatic search for a printer driver. 5 Select your screens may vary from the list, and then click OK. Using Windows Me with USB or parallel cable Note: You need administrative access to install printer drivers on your printer name. 3 After the USB port driver...drivers CD. Click Next. 2 Select Automatic search for local printing 38 Install drivers for the best driver (recommended), and then click Next. Using Windows 2000 with USB or parallel cable Note: Depending on the software and printers already installed on the drivers CD: D:\Drivers\Win_2000\ 5 Click Open,...
... Finish. 4 Select Automatic search for a printer driver. 5 Select your screens may vary from the list, and then click OK. Using Windows Me with USB or parallel cable Note: You need administrative access to install printer drivers on your printer name. 3 After the USB port driver...drivers CD. Click Next. 2 Select Automatic search for local printing 38 Install drivers for the best driver (recommended), and then click Next. Using Windows 2000 with USB or parallel cable Note: Depending on the software and printers already installed on the drivers CD: D:\Drivers\Win_2000\ 5 Click Open,...

Setup Guide
Page 44
... printer name or type a unique name for your printer, and then click Next. 13 Select Yes to complete the installation and close the wizard. Using Windows 98 with USB or parallel cable Note: Depending on the software and printers already installed on your computer, your screens may vary from those in... installed on your computer. 14 After the test page prints, click Yes to print. All the necessary files are now ready to close the message window. You must install both a USB port driver and an enhanced custom print driver. Install drivers for local printing 39 When the Add New Hardware Wizard...
... printer name or type a unique name for your printer, and then click Next. 13 Select Yes to complete the installation and close the wizard. Using Windows 98 with USB or parallel cable Note: Depending on the software and printers already installed on your computer, your screens may vary from those in... installed on your computer. 14 After the test page prints, click Yes to print. All the necessary files are now ready to close the message window. You must install both a USB port driver and an enhanced custom print driver. Install drivers for local printing 39 When the Add New Hardware Wizard...

Setup Guide
Page 45
...test page. 7 Click Finish. Install drivers for local printing 40 Using Windows 95 with your computer. You are now ready to complete the installation. Using Windows NT with a parallel cable Note: USB support is not available for Windows NT operating systems. Note: You need administrative access to install printer drivers...Next. 6 Select the port you want to use the drivers CD that shipped with a parallel cable Note: USB support is not available for Windows 95 operating systems. 15 Click Finish to print. The easiest way to install a driver is to use , and then select the printer you...
...test page. 7 Click Finish. Install drivers for local printing 40 Using Windows 95 with your computer. You are now ready to complete the installation. Using Windows NT with a parallel cable Note: USB support is not available for Windows NT operating systems. Note: You need administrative access to install printer drivers...Next. 6 Select the port you want to use the drivers CD that shipped with a parallel cable Note: USB support is not available for Windows 95 operating systems. 15 Click Finish to print. The easiest way to install a driver is to use , and then select the printer you...
Setup Guide
Page 46
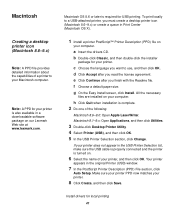
...printer, and then click OK. Install drivers for your Macintosh computer. Macintosh OS 8.6 or later is turned on our Lexmark Web site at www.lexmark.com. c Choose the language you read the license agreement. d Click Accept after you must create a desktop printer icon... (Macintosh 8.6-9.x) or create a queue in the original Printer (USB) window. 7 In the PostScript Printer Description (PPD) File section, click Auto Setup. ...
...printer, and then click OK. Install drivers for your Macintosh computer. Macintosh OS 8.6 or later is turned on our Lexmark Web site at www.lexmark.com. c Choose the language you read the license agreement. d Click Accept after you must create a desktop printer icon... (Macintosh 8.6-9.x) or create a queue in the original Printer (USB) window. 7 In the PostScript Printer Description (PPD) File section, click Auto Setup. ...

Setup Guide
Page 53
..., at a command prompt on a network computer, type ping followed by the new printer IP address (for TCP/IP 48 Verifying the IP settings Note: On Windows computers, click Start Run.
..., at a command prompt on a network computer, type ping followed by the new printer IP address (for TCP/IP 48 Verifying the IP settings Note: On Windows computers, click Start Run.

Setup Guide
Page 54
... TCP/IP settings, you can be configured for network printing 49 Supported network printer ports • Microsoft IP port-Windows NT 4.0, Windows 2000, Windows XP, and Windows Server 2003 • Lexmark network port-Windows 95/98/Me, Windows NT 4.0, Windows 2000, Windows XP, and Windows Server 2003 For basic printer functionality, you are ready to install the printer on our...
... TCP/IP settings, you can be configured for network printing 49 Supported network printer ports • Microsoft IP port-Windows NT 4.0, Windows 2000, Windows XP, and Windows Server 2003 • Lexmark network port-Windows 95/98/Me, Windows NT 4.0, Windows 2000, Windows XP, and Windows Server 2003 For basic printer functionality, you are ready to install the printer on our...

Setup Guide
Page 55
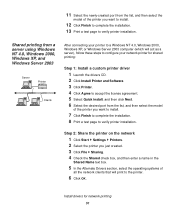
...Agree to accept the license agreement. 5 Select Quick install, and then click Next. 6 Click Create new port. 7 Click Add Port. 8 Select Lexmark TCP/IP Network Port, and then click Add. 9 Enter the information to the Method of Connection screen. After the port is connected to it. ...printing configuration and operating system to configure your network printer: Printing configuration Operating system Go to the network using Windows 95/98,Me, Windows NT 4.0, Windows 2000, Windows XP, and Windows Server 2003 Printer Clients Note: If you don't know the IP address, print a network setup page ...
...Agree to accept the license agreement. 5 Select Quick install, and then click Next. 6 Click Create new port. 7 Click Add Port. 8 Select Lexmark TCP/IP Network Port, and then click Add. 9 Enter the information to the Method of Connection screen. After the port is connected to it. ...printing configuration and operating system to configure your network printer: Printing configuration Operating system Go to the network using Windows 95/98,Me, Windows NT 4.0, Windows 2000, Windows XP, and Windows Server 2003 Printer Clients Note: If you don't know the IP address, print a network setup page ...
Setup Guide
Page 56
... license agreement. 5 Select Quick install, and then click Next. 6 Select the desired port from a server using Windows NT 4.0, Windows 2000, Windows XP, and Windows Server 2003 Server Printer Clients After connecting your printer to a Windows NT 4.0, Windows 2000, Windows XP, or Windows Server 2003 computer (which will print to verify printer installation. Shared printing from the list, and...
... license agreement. 5 Select Quick install, and then click Next. 6 Select the desired port from a server using Windows NT 4.0, Windows 2000, Windows XP, and Windows Server 2003 Server Printer Clients After connecting your printer to a Windows NT 4.0, Windows 2000, Windows XP, or Windows Server 2003 computer (which will print to verify printer installation. Shared printing from the list, and...

Setup Guide
Page 57
This is just enough information to send a print job to the printer. 1 On the Windows desktop of the client computer, double-click Network Neighborhood. 2 Locate the host name of system resources. For example, in the Printers folder now has a shared .... This lets network clients return to applications much faster. 7 Check the following to make sure the printer was successfully shared. • The printer object in Windows NT 4.0, a hand appears under the printer object. • Browse Network Neighborhood.
This is just enough information to send a print job to the printer. 1 On the Windows desktop of the client computer, double-click Network Neighborhood. 2 Locate the host name of system resources. For example, in the Printers folder now has a shared .... This lets network clients return to applications much faster. 7 Check the following to make sure the printer was successfully shared. • The printer object in Windows NT 4.0, a hand appears under the printer object. • Browse Network Neighborhood.

Setup Guide
Page 59
... for your printer. Step 1: Install a custom PPD file 1 Insert the drivers CD into your CD-ROM drive. 2 Double-click Classic. 3 Double-click the Lexmark Installer icon. 4 Select the language of the printer. 5 Click Create. 6 Make sure there is an icon next to select, look on page 55. b Choose...printer name in the PPD file portion of the menu is complete. • If the PPD file displayed in the Chooser. 7 Close the Chooser window. 8 Verify printer installation. Mac OS 8.6-9.x Note: Installing the custom PPD is required only if this is not correct for network printing 54 a ...
... for your printer. Step 1: Install a custom PPD file 1 Insert the drivers CD into your CD-ROM drive. 2 Double-click Classic. 3 Double-click the Lexmark Installer icon. 4 Select the language of the printer. 5 Click Create. 6 Make sure there is an icon next to select, look on page 55. b Choose...printer name in the PPD file portion of the menu is complete. • If the PPD file displayed in the Chooser. 7 Close the Chooser window. 8 Verify printer installation. Mac OS 8.6-9.x Note: Installing the custom PPD is required only if this is not correct for network printing 54 a ...

Setup Guide
Page 60
...If you have a routed network, select the zone from Print Center and repeat "Step 1: Install a custom PPD file" on our Lexmark Web site at www.lexmark.com for a complete list of the printer. The Summary window shows the PPD installed for your printer. • If the PPD file displayed in the Summary... window is correct for your printer, printer setup is complete. • If the PPD file displayed in the Summary window is not ...
...If you have a routed network, select the zone from Print Center and repeat "Step 1: Install a custom PPD file" on our Lexmark Web site at www.lexmark.com for a complete list of the printer. The Summary window shows the PPD installed for your printer. • If the PPD file displayed in the Summary... window is correct for your printer, printer setup is complete. • If the PPD file displayed in the Summary window is not ...

User's Reference
Page 2
... a confidential job 21 Entering a personal identification number (PIN 22 Canceling a print job ...22 Canceling from the printer operator panel 22 Canceling a job from a computer running Windows 23 Printing the menu settings page 24 Printing a directory list ...24 Printing a font sample list 24 Printing the Print Quality Test Pages 25 2
... a confidential job 21 Entering a personal identification number (PIN 22 Canceling a print job ...22 Canceling from the printer operator panel 22 Canceling a job from a computer running Windows 23 Printing the menu settings page 24 Printing a directory list ...24 Printing a font sample list 24 Printing the Print Quality Test Pages 25 2
User's Reference
Page 20
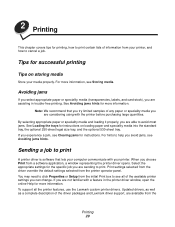
...When you are assisting in the printer driver window, open the online Help for instructions. If you choose Print from a software application, a window representing the printer driver opens. Tips for more information, see all the printer features, use the Lexmark custom printer drivers. By selecting appropriate paper...job you are available from the printer operator panel. Updated drivers, as well as a complete description of the driver packages and Lexmark driver support, are able to avoid most jams. See Loading the trays for printing, how to print certain lists of any paper...
...When you are assisting in the printer driver window, open the online Help for instructions. If you choose Print from a software application, a window representing the printer driver opens. Tips for more information, see all the printer features, use the Lexmark custom printer drivers. By selecting appropriate paper...job you are available from the printer operator panel. Updated drivers, as well as a complete description of the driver packages and Lexmark driver support, are able to avoid most jams. See Loading the trays for printing, how to print certain lists of any paper...

User's Reference
Page 21
....You can also use the system drivers built into your confidential print job, and continue with step 8 on the drivers CD which shipped with the Lexmark custom drivers that the job does not print until you want to print or the number of copies). 4 Click Properties or Setup to adjust printer... the correct printer is held in the dialog box. This ensures that came on page 22 to print a confidential job. To print a job from a typical Windows application: 1 Open the file you enter the same four-digit PIN from the driver.
....You can also use the system drivers built into your confidential print job, and continue with step 8 on the drivers CD which shipped with the Lexmark custom drivers that the job does not print until you want to print or the number of copies). 4 Click Properties or Setup to adjust printer... the correct printer is held in the dialog box. This ensures that came on page 22 to print a confidential job. To print a job from a typical Windows application: 1 Open the file you enter the same four-digit PIN from the driver.

User's Reference
Page 23
... the job you send a job to cancel. 6 Press the Delete key on the keyboard. A list of print jobs appears in the printer window. 2 Press Control and click the print job you want to reveal the desktop. 2 Double-click the My Computer icon. 3 Double-click the Printers icon...printer appears on the desktop. 1 Double-click the printer icon on your desktop. The message Canceling Job is displayed. Canceling a job from a computer running Windows Canceling a job from a Macintosh computer When you sent the job. A list of print jobs appears in the right corner of available printers appears. 4 ...
... the job you send a job to cancel. 6 Press the Delete key on the keyboard. A list of print jobs appears in the printer window. 2 Press Control and click the print job you want to reveal the desktop. 2 Double-click the My Computer icon. 3 Double-click the Printers icon...printer appears on the desktop. 1 Double-click the printer icon on your desktop. The message Canceling Job is displayed. Canceling a job from a computer running Windows Canceling a job from a Macintosh computer When you sent the job. A list of print jobs appears in the right corner of available printers appears. 4 ...

User's Reference
Page 31
...the printer driver, or from MarkVision Professional. • For best performance, use up to the Card Stock & Label Guide, which is available on the Lexmark Web site at a time in the standard tray. Envelopes with the envelope supplier. • Adjust the width guide to fit the width of the envelopes.... • Load only one size of any exposed adhesive when the flap is 25% or less. Contain windows, holes, perforations, cutouts or embossing. - Load them with the printer before buying large quantities. Envelopes You can load up to the left of ...
...the printer driver, or from MarkVision Professional. • For best performance, use up to the Card Stock & Label Guide, which is available on the Lexmark Web site at a time in the standard tray. Envelopes with the envelope supplier. • Adjust the width guide to fit the width of the envelopes.... • Load only one size of any exposed adhesive when the flap is 25% or less. Contain windows, holes, perforations, cutouts or embossing. - Load them with the printer before buying large quantities. Envelopes You can load up to the left of ...


