Setup Guide
Page 52
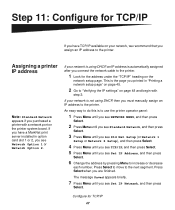
... MENU, and then press Select. 2 Press Menu until you see Standard Network, and then press Select. 3 Press Menu until you see Std Net Setup (or Network 1 Setup or Network 2 Setup), and then press Select. 4 Press Menu until you see TCP/IP, and then press Select. 5 Press Menu until you are finished. This is... you connect the network cable to the printer. 1 Look for the address under the "TCP/IP" heading on the network setup page. If your network is using DHCP, then you must manually assign an IP address to the printer. An easy way to do this is not using DHCP, an IP address...
... MENU, and then press Select. 2 Press Menu until you see Standard Network, and then press Select. 3 Press Menu until you see Std Net Setup (or Network 1 Setup or Network 2 Setup), and then press Select. 4 Press Menu until you see TCP/IP, and then press Select. 5 Press Menu until you are finished. This is... you connect the network cable to the printer. 1 Look for the address under the "TCP/IP" heading on the network setup page. If your network is using DHCP, then you must manually assign an IP address to the printer. An easy way to do this is not using DHCP, an IP address...
Quick Reference
Page 2
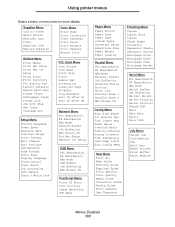
... Supplies Color Menu Print Mode Color Correction Toner Darkness Color Saver Color Balance Color Samples Manual Color Paper Menu Paper Source Paper Size Paper Type Custom Types Universal Setup Substitute Size Paper Weight Paper Loading Finishing Menu Duplex Duplex Bind Copies Blank Pages Collation...Setup Help Menu Print All Help Guide Printing Guide Supplies Guide Print Quality Color Quality Media Guide Connection Guide Moving Guide Print Defects Jam Clearance USB Menu PCL SmartSwitch PS SmartSwitch NPA Mode USB Buffer Job Buffering MAC Binary PS P/N 20K1046 E.C. 2K0125 © 2003 Lexmark...
... Supplies Color Menu Print Mode Color Correction Toner Darkness Color Saver Color Balance Color Samples Manual Color Paper Menu Paper Source Paper Size Paper Type Custom Types Universal Setup Substitute Size Paper Weight Paper Loading Finishing Menu Duplex Duplex Bind Copies Blank Pages Collation...Setup Help Menu Print All Help Guide Printing Guide Supplies Guide Print Quality Color Quality Media Guide Connection Guide Moving Guide Print Defects Jam Clearance USB Menu PCL SmartSwitch PS SmartSwitch NPA Mode USB Buffer Job Buffering MAC Binary PS P/N 20K1046 E.C. 2K0125 © 2003 Lexmark...
User's Reference
Page 133
... Supplies Life Replace Supplies Color Menu Print Mode Color Correction Toner Darkness Color Saver Color Balance Color Samples Manual Color Utilities Menu Print Menus Print Net Setup Print Net Setup Print Fonts Print Directory Prt Quality Pgs Factory Defaults Remove Held Jobs Format Flash Defragment Flash Format Disk ... LF Auto LF after CR Network Menu PCL SmartSwitch PS SmartSwitch NPA Mode Network Buffer Job Buffering MAC Binary PS Std Net Setup Network Setup USB Menu PCL SmartSwitch PS SmartSwitch NPA Mode USB Buffer Job Buffering MAC Binary PS PostScript Menu Print PS Error Font Priority ...
... Supplies Life Replace Supplies Color Menu Print Mode Color Correction Toner Darkness Color Saver Color Balance Color Samples Manual Color Utilities Menu Print Menus Print Net Setup Print Net Setup Print Fonts Print Directory Prt Quality Pgs Factory Defaults Remove Held Jobs Format Flash Defragment Flash Format Disk ... LF Auto LF after CR Network Menu PCL SmartSwitch PS SmartSwitch NPA Mode Network Buffer Job Buffering MAC Binary PS Std Net Setup Network Setup USB Menu PCL SmartSwitch PS SmartSwitch NPA Mode USB Buffer Job Buffering MAC Binary PS PostScript Menu Print PS Error Font Priority ...
User's Reference
Page 186
...tray linking 38 avoiding jams, hints 49 avoiding media jams 20 B Baud (Serial Menu) 159 binding, duplex 39 bitmapped fonts 100 Black & White Lock (Setup Menu) 162 Blank Pages (Finishing Menu) 139 buffer sizes, adjusting network 146 parallel 149 serial 161 USB 169 C Cancel Job (Job Menu) 143 canceling..., enabling 139 Color Balance (Color Menu) 134 Color Correction (Color Menu) 134 Color Menu 134 Color Balance 134 Color Correction 134 Color Samples 135 Manual Color 136 Print Mode 136 Toner Darkness 137 Color Quality (Help Menu) 142 Color Samples (Color Menu) 135 color, adjusting 134, 135, 136 ...
...tray linking 38 avoiding jams, hints 49 avoiding media jams 20 B Baud (Serial Menu) 159 binding, duplex 39 bitmapped fonts 100 Black & White Lock (Setup Menu) 162 Blank Pages (Finishing Menu) 139 buffer sizes, adjusting network 146 parallel 149 serial 161 USB 169 C Cancel Job (Job Menu) 143 canceling..., enabling 139 Color Balance (Color Menu) 134 Color Correction (Color Menu) 134 Color Menu 134 Color Balance 134 Color Correction 134 Color Samples 135 Manual Color 136 Print Mode 136 Toner Darkness 137 Color Quality (Help Menu) 142 Color Samples (Color Menu) 135 color, adjusting 134, 135, 136 ...

Service Manual
Page 92
...because printer memory used to store undeleted flash resources is allocated for one or more of job. Install additional printer memory. 2-14 Service Manual This message usually indicates too much memory is full. Delete fonts, macros, and other data in printer memory. Install additional memory. Press ... Memory Description Action Printer lacks memory needed to activate link buffer changes. • When Ready is displayed, enable Resource Save from the Setup Menu. To enable Resource Save after you get this message: • Make sure link buffers are set to Auto, and exit menus...
...because printer memory used to store undeleted flash resources is allocated for one or more of job. Install additional printer memory. 2-14 Service Manual This message usually indicates too much memory is full. Delete fonts, macros, and other data in printer memory. Install additional memory. Press ... Memory Description Action Printer lacks memory needed to activate link buffer changes. • When Ready is displayed, enable Resource Save from the Setup Menu. To enable Resource Save after you get this message: • Make sure link buffers are set to Auto, and exit menus...

Service Manual
Page 94
...Delete fonts, macros, and other data stored on it. Printer detects unformatted flash memory. Job may be defective and require replacing. 2-16 Service Manual Press Go to clear message and continue printing. Press Go to clear message and continue printing. Press Go to On in future: •... to clear message and continue printing. If error message remains, flash memory may not print correctly. To avoid this error in Setup Menu. • Install additional printer memory. You must install different flash memory before you can download any resources on flash memory.
...Delete fonts, macros, and other data stored on it. Printer detects unformatted flash memory. Job may be defective and require replacing. 2-16 Service Manual Press Go to clear message and continue printing. Press Go to clear message and continue printing. Press Go to On in future: •... to clear message and continue printing. If error message remains, flash memory may not print correctly. To avoid this error in Setup Menu. • Install additional printer memory. You must install different flash memory before you can download any resources on flash memory.
Service Manual
Page 224
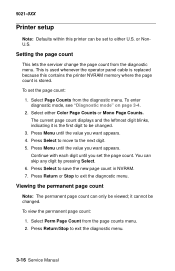
... Menu until you set the page count. Press Return or Stop to exit the diagnostic menu. 3-16 Service Manual Select either U.S. To enter diagnostic mode, see "Diagnostic mode" on page 3-4. 2. 5021-0XX Printer setup Note: Defaults within this contains the printer NVRAM memory where the page count is stored. Continue with each...
... Menu until you set the page count. Press Return or Stop to exit the diagnostic menu. 3-16 Service Manual Select either U.S. To enter diagnostic mode, see "Diagnostic mode" on page 3-4. 2. 5021-0XX Printer setup Note: Defaults within this contains the printer NVRAM memory where the page count is stored. Continue with each...

Service Manual
Page 228
... defaults To restore each of the printer settings contained in the EP setup menu to help correct print quality problems. 3-20 Service Manual Sometimes this is selected, the empty error log displays on the screen. 3. Select Clear Log from the printer setup menu. Press Return or Stop to the factory default values, press...
... defaults To restore each of the printer settings contained in the EP setup menu to help correct print quality problems. 3-20 Service Manual Sometimes this is selected, the empty error log displays on the screen. 3. Select Clear Log from the printer setup menu. Press Return or Stop to the factory default values, press...
Service Manual
Page 378
...process 1-35 charging process 1-29 developing process 1-32 exposing process 1-31 first transfer (drum) process 1-34 printer identification 1-17 printer setup parallel strobe adjustment 3-18 serial number 3-17 setting configuration ID 3-17 setting the page count 3-16 viewing page count 3-16 R ...roller clutch 4-36 cleaning roller cover 4-6 covers 4-17 developer drive assembly 4-32 developer motor 4-31 duplex unit assembly 4-13 I-2 Service Manual engine controller board 4-55 erase lamp 4-27 front cover assembly 4-19 front door interlock switch 4-29 fuser assembly 4-9 high voltage power supply...
...process 1-35 charging process 1-29 developing process 1-32 exposing process 1-31 first transfer (drum) process 1-34 printer identification 1-17 printer setup parallel strobe adjustment 3-18 serial number 3-17 setting configuration ID 3-17 setting the page count 3-16 viewing page count 3-16 R ...roller clutch 4-36 cleaning roller cover 4-6 covers 4-17 developer drive assembly 4-32 developer motor 4-31 duplex unit assembly 4-13 I-2 Service Manual engine controller board 4-55 erase lamp 4-27 front cover assembly 4-19 front door interlock switch 4-29 fuser assembly 4-9 high voltage power supply...

