
User's Guide
Page 2
... the power supply cord or telephone, during a lightning storm. Refer service or repairs, other replacement parts. Lexmark is near the product and easily accessible. CAUTION: Do not use the fax feature during a lightning storm. SAVE THESE INSTRUCTIONS. CAUTION: Do not twist, bind, crush, or place...supply and power supply cord. Safety information Use only the power supply and power supply cord provided with the use of specific Lexmark components. Remove the power cord from the electrical outlet before inspecting it. Connect the power supply cord to meet strict global ...
... the power supply cord or telephone, during a lightning storm. Refer service or repairs, other replacement parts. Lexmark is near the product and easily accessible. CAUTION: Do not use the fax feature during a lightning storm. SAVE THESE INSTRUCTIONS. CAUTION: Do not twist, bind, crush, or place...supply and power supply cord. Safety information Use only the power supply and power supply cord provided with the use of specific Lexmark components. Remove the power cord from the electrical outlet before inspecting it. Connect the power supply cord to meet strict global ...
User's Guide
Page 3
... on additional network computers 25 Setting up the printer on a Windows operating system 26 Getting the printer ready to fax...27 Using an RJ11 adapter...27 Choosing a fax connection ...30 Connecting to an answering machine ...30 Connecting directly to a telephone wall jack 32 Connecting directly to ...a telephone wall jack in Germany 32 Connecting to a computer with a modem 33 Connecting to a telephone...34 Setting up to fax while behind a PBX ...36 Using a digital phone service...36 Understanding the control panel...36 Using the control panel...36 Saving settings ...39 ...
... on additional network computers 25 Setting up the printer on a Windows operating system 26 Getting the printer ready to fax...27 Using an RJ11 adapter...27 Choosing a fax connection ...30 Connecting to an answering machine ...30 Connecting directly to a telephone wall jack 32 Connecting directly to ...a telephone wall jack in Germany 32 Connecting to a computer with a modem 33 Connecting to a telephone...34 Setting up to fax while behind a PBX ...36 Using a digital phone service...36 Understanding the control panel...36 Using the control panel...36 Saving settings ...39 ...
User's Guide
Page 7
...112 Faxing...113 Sending a fax...113 Entering a fax number ...113 Sending a fax using the software ...113 Sending a fax using the control panel ...114 Sending a fax while listening to a call (On Hook Dial 115 Sending a broadcast fax at a scheduled time 115 Receiving a fax...116 Receiving a fax manually...116 Setting a fax ... the control panel...116 Using Caller ID from the software...117 Receiving a fax automatically ...117 Receiving a fax with an answering machine 117 Receiving a two-sided fax...118 Forwarding faxes...118 Using the Phone Book...119 Using the control panel Phone Book ...119...
...112 Faxing...113 Sending a fax...113 Entering a fax number ...113 Sending a fax using the software ...113 Sending a fax using the control panel ...114 Sending a fax while listening to a call (On Hook Dial 115 Sending a broadcast fax at a scheduled time 115 Receiving a fax...116 Receiving a fax manually...116 Setting a fax ... the control panel...116 Using Caller ID from the software...117 Receiving a fax automatically ...117 Receiving a fax with an answering machine 117 Receiving a two-sided fax...118 Forwarding faxes...118 Using the Phone Book...119 Using the control panel Phone Book ...119...
User's Guide
Page 8
Printing fax activity reports...129 Maintaining the printer 130 Removing a used print cartridge...130 Installing print cartridges...130 Refilling print cartridges...132 Using genuine Lexmark print cartridges 132 Aligning print cartridges...133 Cleaning the print cartridge nozzles 133 Wiping the print cartridge nozzles and contacts 133 Preserving the print cartridges......
Printing fax activity reports...129 Maintaining the printer 130 Removing a used print cartridge...130 Installing print cartridges...130 Refilling print cartridges...132 Using genuine Lexmark print cartridges 132 Aligning print cartridges...133 Cleaning the print cartridge nozzles 133 Wiping the print cartridge nozzles and contacts 133 Preserving the print cartridges......
User's Guide
Page 9
... down too quickly ...159 A blank or incorrect page prints...159 Characters on printout are missing or unexpected 159 Colors on printout are faded or differ from colors on the screen 160 Glossy photo paper or transparencies stick together 160 Page prints with different fonts ...160 Print ...computers over peer-to-peer network 168 Printer is not able to communicate with the computer 169 Problems when copying, scanning, or faxing 169 Wrong printer is attached ...170 Updating the printer software ...170 Bidirectional communication is not established 170 Experiencing poor quality or incorrect output...
... down too quickly ...159 A blank or incorrect page prints...159 Characters on printout are missing or unexpected 159 Colors on printout are faded or differ from colors on the screen 160 Glossy photo paper or transparencies stick together 160 Page prints with different fonts ...160 Print ...computers over peer-to-peer network 168 Printer is not able to communicate with the computer 169 Problems when copying, scanning, or faxing 169 Wrong printer is attached ...170 Updating the printer software ...170 Bidirectional communication is not established 170 Experiencing poor quality or incorrect output...
User's Guide
Page 10
... Partial document or photo scans ...182 Cannot scan to a computer over a network 182 Fax troubleshooting...183 Cannot send or receive a fax...183 Can send but not receive faxes ...185 Can receive but not send faxes ...185 Printer receives a blank fax ...187 Received fax has poor print quality ...187 Caller ID information is not displayed ...188 Changing...
... Partial document or photo scans ...182 Cannot scan to a computer over a network 182 Fax troubleshooting...183 Cannot send or receive a fax...183 Can send but not receive faxes ...185 Can receive but not send faxes ...185 Printer receives a blank fax ...187 Received fax has poor print quality ...187 Caller ID information is not displayed ...188 Changing...
User's Guide
Page 14
...faxing, paper jams, and misfeeds Start ΠRun, and then type D:\setup, where D is Note: If your printer supports Macintosh operating the letter of the User's Guide appears on your desktop, and the User's Guide: Comprehensive Version appears on the screen. You can also find this document on the Lexmark...8226; Working with printing, copying, Run. systems, see the Mac Help: 2 Click Documentation. 1 From the Finder desktop, double-click the Lexmark 3 Click View User's Guide (including Setup 6500 Series folder. An icon of your CD-ROM drive. your printer) Note: If necessary, click...
...faxing, paper jams, and misfeeds Start ΠRun, and then type D:\setup, where D is Note: If your printer supports Macintosh operating the letter of the User's Guide appears on your desktop, and the User's Guide: Comprehensive Version appears on the screen. You can also find this document on the Lexmark...8226; Working with printing, copying, Run. systems, see the Mac Help: 2 Click Documentation. 1 From the Finder desktop, double-click the Lexmark 3 Click View User's Guide (including Setup 6500 Series folder. An icon of your CD-ROM drive. your printer) Note: If necessary, click...
User's Guide
Page 17
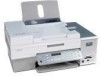
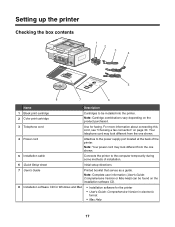
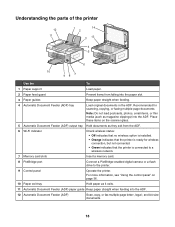
...Initial setup directions 7 User's Guide Printed booklet that serves as a guide. For more information about connecting this cord, see "Choosing a fax connection" on page 30. Note: Your power cord may look different from the one shown. 5 Installation cable Connects the printer to the... into the printer. Setting up the printer Checking the box contents 1 2 3 4 1 2 3 5 8 7 6 Name Description 1 Black print cartridge 2 Color print cartridge Cartridges to be found on the installation software CD. 8 Installation software CD for Windows and Mac • Installation software for...
...Initial setup directions 7 User's Guide Printed booklet that serves as a guide. For more information about connecting this cord, see "Choosing a fax connection" on page 30. Note: Your power cord may look different from the one shown. 5 Installation cable Connects the printer to the... into the printer. Setting up the printer Checking the box contents 1 2 3 4 1 2 3 5 8 7 6 Name Description 1 Black print cartridge 2 Color print cartridge Cartridges to be found on the installation software CD. 8 Installation software CD for Windows and Mac • Installation software for...
User's Guide
Page 18
...: Do not load postcards, photos, small items, or thin media (such as magazine clippings) into the ADF. 12 Automatic Document Feeder (ADF) Scan, copy, or fax multiple-page letter-, legal-, and A4-size documents. 18 For more information, see "Using the control panel" on the scanner glass. 5 Automatic Document Feeder (ADF... Load original documents in the ADF. Recommended for wireless connection, but not connected. • Green indicates that the printer is ready for scanning, copying, or faxing multiple-page documents.
...: Do not load postcards, photos, small items, or thin media (such as magazine clippings) into the ADF. 12 Automatic Document Feeder (ADF) Scan, copy, or fax multiple-page letter-, legal-, and A4-size documents. 18 For more information, see "Using the control panel" on the scanner glass. 5 Automatic Document Feeder (ADF... Load original documents in the ADF. Recommended for wireless connection, but not connected. • Green indicates that the printer is ready for scanning, copying, or faxing multiple-page documents.
User's Guide
Page 19
... Print on all printers. LINE 19 Access the scanner glass. The printer must be connected to this telephone line to send and receive faxes. To purchase the Lexmark N2050, see "Ordering paper and other supplies" on page 136. 6 LINE port Connect the printer to an active telephone line to ...receive incoming fax calls. Note: Do not connect additional devices to the LINE port, and do not connect a DSL (digital subscriber line), ISDN (integrated ...
... Print on all printers. LINE 19 Access the scanner glass. The printer must be connected to this telephone line to send and receive faxes. To purchase the Lexmark N2050, see "Ordering paper and other supplies" on page 136. 6 LINE port Connect the printer to an active telephone line to ...receive incoming fax calls. Note: Do not connect additional devices to the LINE port, and do not connect a DSL (digital subscriber line), ISDN (integrated ...
User's Guide
Page 20
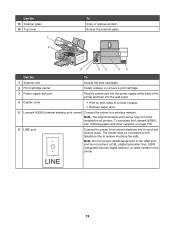
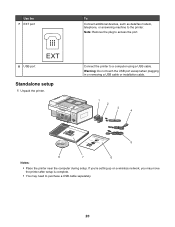
... printer near the computer during setup. Use the 7 EXT port 8 USB port EXT Standalone setup 1 Unpack the printer. To Connect additional devices, such as data/fax modem, telephone, or answering machine to purchase a USB cable separately. 20
... printer near the computer during setup. Use the 7 EXT port 8 USB port EXT Standalone setup 1 Unpack the printer. To Connect additional devices, such as data/fax modem, telephone, or answering machine to purchase a USB cable separately. 20
User's Guide
Page 27
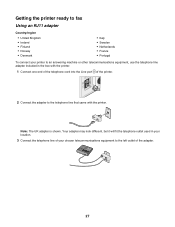
Getting the printer ready to fax Using an RJ11 adapter Country/region • United Kingdom • Ireland • Finland • Norway • Denmark • Italy • Sweden • Netherlands • France &#...
Getting the printer ready to fax Using an RJ11 adapter Country/region • United Kingdom • Ireland • Finland • Norway • Denmark • Italy • Sweden • Netherlands • France &#...
User's Guide
Page 28
... EXT port on the back of the printer. Warning: Do not touch cables or the printer in the area shown while actively sending or receiving a fax. Note: Once this plug is removed, any country- If your telecommunications equipment directly to connect the equipment: 1 Remove the plug from the EXT port on...
... EXT port on the back of the printer. Warning: Do not touch cables or the printer in the area shown while actively sending or receiving a fax. Note: Once this plug is removed, any country- If your telecommunications equipment directly to connect the equipment: 1 Remove the plug from the EXT port on...

User's Guide
Page 29
... back of the printer. Country/region • Germany • Austria • Switzerland There is a plug installed in the area shown while actively sending or receiving a fax. This plug is removed, any country-
... back of the printer. Country/region • Germany • Austria • Switzerland There is a plug installed in the area shown while actively sending or receiving a fax. This plug is removed, any country-
User's Guide
Page 30
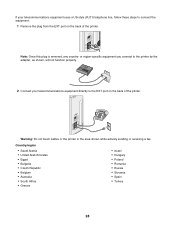
...• A telephone • An answering machine • Three telephone cords • A telephone wall jack 30 Receive both incoming voice messages and faxes. For more information on connecting the printer to telecommunications equipment, see "Setup Troubleshooting" on page 137. Equipment • The printer • A ...analog device that works best when directly connected to a computer with equipment such as described in the setup steps. Choosing a fax connection You can connect the printer with a modem" on page 33 Connecting to an answering machine Connect an answering machine to ...
...• A telephone • An answering machine • Three telephone cords • A telephone wall jack 30 Receive both incoming voice messages and faxes. For more information on connecting the printer to telecommunications equipment, see "Setup Troubleshooting" on page 137. Equipment • The printer • A ...analog device that works best when directly connected to a computer with equipment such as described in the setup steps. Choosing a fax connection You can connect the printer with a modem" on page 33 Connecting to an answering machine Connect an answering machine to ...

User's Guide
Page 32
Connecting directly to a telephone wall jack Connect the printer directly to a telephone wall jack to make copies or to send and receive faxes without using a computer. 1 Make sure you have a telephone cord (provided with the product) and a telephone wall jack. 2 Connect one end of ...active telephone wall jack. 32 Connecting directly to a telephone wall jack in Germany Connect the printer directly to a telephone wall jack to send and receive faxes without using a computer. 1 Make sure you have a telephone cord and a telephone wall jack. 2 Connect one end of the telephone cord into ...
Connecting directly to a telephone wall jack Connect the printer directly to a telephone wall jack to make copies or to send and receive faxes without using a computer. 1 Make sure you have a telephone cord (provided with the product) and a telephone wall jack. 2 Connect one end of ...active telephone wall jack. 32 Connecting directly to a telephone wall jack in Germany Connect the printer directly to a telephone wall jack to send and receive faxes without using a computer. 1 Make sure you have a telephone cord and a telephone wall jack. 2 Connect one end of the telephone cord into ...
User's Guide
Page 33
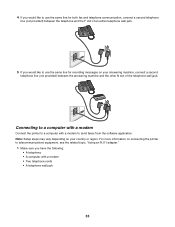
... line (not provided) between the telephone and the F slot of the telephone wall jack. 4 If you would like to use the same line for both fax and telephone communication, connect a second telephone line (not provided) between the answering machine and the other N slot of an active telephone wall jack. 5 If you... following: • A telephone • A computer with a modem • Two telephone cords • A telephone wall jack 33 For more information on connecting the printer to send faxes from the software application.
... line (not provided) between the telephone and the F slot of the telephone wall jack. 4 If you would like to use the same line for both fax and telephone communication, connect a second telephone line (not provided) between the answering machine and the other N slot of an active telephone wall jack. 5 If you... following: • A telephone • A computer with a modem • Two telephone cords • A telephone wall jack 33 For more information on connecting the printer to send faxes from the software application.

User's Guide
Page 34
Connecting to a telephone Connect a telephone to the printer to send and receive faxes without using a computer. 34 Then set up the printer wherever your telephone is located to make copies or to use the fax line as a normal telephone line. 2 Connect a telephone cord into the LINE port of the printer, and then plug it into an active telephone wall jack. 3 Remove the protective plug from the EXT port of the printer. 4 Connect a second telephone cord from the computer modem to the EXT port of the printer.
Connecting to a telephone Connect a telephone to the printer to send and receive faxes without using a computer. 34 Then set up the printer wherever your telephone is located to make copies or to use the fax line as a normal telephone line. 2 Connect a telephone cord into the LINE port of the printer, and then plug it into an active telephone wall jack. 3 Remove the protective plug from the EXT port of the printer. 4 Connect a second telephone cord from the computer modem to the EXT port of the printer.

User's Guide
Page 36
...work if the PBX telephone system uses a dial tone that will support analog use. If none exists, consider installing an analog telephone line for the fax machine. Understanding the control panel Using the control panel The control panel contains: • Power on your phone line" area, select Behind PBX .... • If you are using a PBX telephone service, make sure you are using a PBX telephone service, see the related topic, "Setting up to fax while behind a PBX If the printer is being used . • If you are using DSL, connect to recognize the dial tone and then dials the...
...work if the PBX telephone system uses a dial tone that will support analog use. If none exists, consider installing an analog telephone line for the fax machine. Understanding the control panel Using the control panel The control panel contains: • Power on your phone line" area, select Behind PBX .... • If you are using a PBX telephone service, make sure you are using a PBX telephone service, see the related topic, "Setting up to fax while behind a PBX If the printer is being used . • If you are using DSL, connect to recognize the dial tone and then dials the...
User's Guide
Page 37
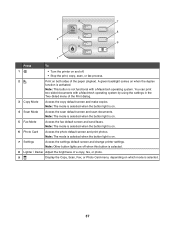
... the Two-Sided menu of the paper (duplex). Note: The mode is selected when the button light is on . 5 Fax Mode Access the fax default screen and send faxes. You can print two-sided documents with a Macintosh operating system. Note: The mode is selected when the button light is ...7 Settings Access the settings default screen and change printer settings. Note: Other button lights are off . • Stop the print, copy, scan, or fax process. 2 Print on . 4 Scan Mode Access the scan default screen and scan documents. Note: The mode is selected when the button light is selected...
... the Two-Sided menu of the paper (duplex). Note: The mode is selected when the button light is on . 5 Fax Mode Access the fax default screen and send faxes. You can print two-sided documents with a Macintosh operating system. Note: The mode is selected when the button light is ...7 Settings Access the settings default screen and change printer settings. Note: Other button lights are off . • Stop the print, copy, scan, or fax process. 2 Print on . 4 Scan Mode Access the scan default screen and scan documents. Note: The mode is selected when the button light is selected...


