
User's Guide
Page 6
... Maintaining print cartridges...95 Installing print cartridges...95 Removing a used print cartridge ...96 Refilling print cartridges...97 Using genuine Lexmark print cartridges...97 Aligning print cartridges ...98 Cleaning the print cartridge nozzles...98 Checking ink levels...99 Wiping the print ... printer power problems ...109 Removing and reinstalling the software ...109 Enabling the USB port in Windows ...110 Wireless troubleshooting...111 Wireless troubleshooting checklist ...111 Printing a network setup page ...112 Wireless configuration does not continue after the USB cable is attached...
... Maintaining print cartridges...95 Installing print cartridges...95 Removing a used print cartridge ...96 Refilling print cartridges...97 Using genuine Lexmark print cartridges...97 Aligning print cartridges ...98 Cleaning the print cartridge nozzles...98 Checking ink levels...99 Wiping the print ... printer power problems ...109 Removing and reinstalling the software ...109 Enabling the USB port in Windows ...110 Wireless troubleshooting...111 Wireless troubleshooting checklist ...111 Printing a network setup page ...112 Wireless configuration does not continue after the USB cable is attached...
User's Guide
Page 33
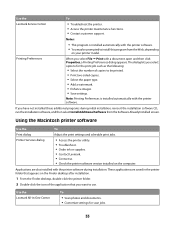
...dialog Printer Services dialog To Adjust the print settings and schedule print jobs. • Access the printer utility. • Troubleshoot. • Order ink or supplies. • Contact Lexmark. • Contact us. • Check the printer software version installed on the computer. Applications are saved in the printer...as the following: • Select the number of the application that you select options for scan jobs. 33 Use the Lexmark Service Center To • Troubleshoot the printer. • Access the printer maintenance functions. • Contact customer support.
...dialog Printer Services dialog To Adjust the print settings and schedule print jobs. • Access the printer utility. • Troubleshoot. • Order ink or supplies. • Contact Lexmark. • Contact us. • Check the printer software version installed on the computer. Applications are saved in the printer...as the following: • Select the number of the application that you select options for scan jobs. 33 Use the Lexmark Service Center To • Troubleshoot the printer. • Access the printer maintenance functions. • Contact customer support.

User's Guide
Page 43
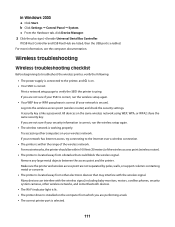
... the list, and then click Tools ΠLexmark Wireless Setup Utility. 43 The range of an ad hoc network is optional for use on a wireless network, insert the installation software CD, and then follow the instructions on the status of the Troubleshooting chapter. 20 In the "Confirm network key" ...the name you want to give your knowledge. 17 If necessary, clear the "The key is provided for your security keys" in the "Wireless troubleshooting" section of your wireless network) 15 If Network Authentication appears in a security key. 19 Write down the network name you chose so you can ...
... the list, and then click Tools ΠLexmark Wireless Setup Utility. 43 The range of an ad hoc network is optional for use on a wireless network, insert the installation software CD, and then follow the instructions on the status of the Troubleshooting chapter. 20 In the "Confirm network key" ...the name you want to give your knowledge. 17 If necessary, clear the "The key is provided for your security keys" in the "Wireless troubleshooting" section of your wireless network) 15 If Network Authentication appears in a security key. 19 Write down the network name you chose so you can ...

User's Guide
Page 104
... and earlier, click Start. 2 Click All Programs or Programs, and then select the printer program folder from the list. 3 Select Lexmark Service Center. SELECT A DIFFERENT LANGUAGE AFTER INITIAL SETUP In case the wrong language was set during initial setup, you can still change...and every time you reset the printer to printer maintenance tasks and customer support. Troubleshooting Using the printer troubleshooting software (Windows only) The Lexmark Service Center provides step-by-step troubleshooting help and contains links to factory default settings, you want appears on the ...
... and earlier, click Start. 2 Click All Programs or Programs, and then select the printer program folder from the list. 3 Select Lexmark Service Center. SELECT A DIFFERENT LANGUAGE AFTER INITIAL SETUP In case the wrong language was set during initial setup, you can still change...and every time you reset the printer to printer maintenance tasks and customer support. Troubleshooting Using the printer troubleshooting software (Windows only) The Lexmark Service Center provides step-by-step troubleshooting help and contains links to factory default settings, you want appears on the ...
User's Guide
Page 111
... cameras, other electronic devices that could block the wireless signal. Remove any large metal objects between the access point and the printer. Wireless troubleshooting Wireless troubleshooting checklist Before beginning to troubleshoot the wireless printer, verify the following: • The power supply is connected to the Internet over a wireless connection. • The printer is...
... cameras, other electronic devices that could block the wireless signal. Remove any large metal objects between the access point and the printer. Wireless troubleshooting Wireless troubleshooting checklist Before beginning to troubleshoot the wireless printer, verify the following: • The power supply is connected to the Internet over a wireless connection. • The printer is...
User's Guide
Page 143
... 37 installing printer on (Windows) 37 interference 50 networking overview 45 security information 51 signal strength 49 SSID 51 troubleshooting 111 types of wireless networks 48 wireless network compatibility 36 wireless print server not installed 125 wireless settings changing after installation... (Mac) 39 wireless setup information needed for 36 wireless signal strength 49 wireless signal absorption 50 wireless troubleshooting changing wireless settings after installation (Mac) 39 changing wireless settings after installation (Windows) 39 printer cannot connect to ...
... 37 installing printer on (Windows) 37 interference 50 networking overview 45 security information 51 signal strength 49 SSID 51 troubleshooting 111 types of wireless networks 48 wireless network compatibility 36 wireless print server not installed 125 wireless settings changing after installation... (Mac) 39 wireless setup information needed for 36 wireless signal strength 49 wireless signal absorption 50 wireless troubleshooting changing wireless settings after installation (Mac) 39 changing wireless settings after installation (Windows) 39 printer cannot connect to ...

C77x - Menus and Messages Guide
Page 80
... protected. Note: This menu item only appears if the hard disk is not write or read /write protected, is not set up MFP hardware and troubleshoot problems. Menu item Factory Defaults Remove Held Jobs Format Flash Job Acct Stat Activate Hex Trace Coverage Estimator Purpose Values and descriptions Returns the MFP...
... protected. Note: This menu item only appears if the hard disk is not write or read /write protected, is not set up MFP hardware and troubleshoot problems. Menu item Factory Defaults Remove Held Jobs Format Flash Job Acct Stat Activate Hex Trace Coverage Estimator Purpose Values and descriptions Returns the MFP...

C77x - Menus and Messages Guide
Page 128
... Man Env 85 Assign Manual Paper 85 Assign MP Feeder 85 Assign Tray [x] 85 Restore Defaults 86 View Factory Default 86 Tray Renumber, PCL 85 troubleshooting, settings control panel 5 software application overrides 5 U Units of Measure 26 Universal Paper Size 26 Universal Setup 26 USB Buffer 37 Use Multi-page TIFF E-mail...
... Man Env 85 Assign Manual Paper 85 Assign MP Feeder 85 Assign Tray [x] 85 Restore Defaults 86 View Factory Default 86 Tray Renumber, PCL 85 troubleshooting, settings control panel 5 software application overrides 5 U Units of Measure 26 Universal Paper Size 26 Universal Setup 26 USB Buffer 37 Use Multi-page TIFF E-mail...

C77x - User's Guide
Page 6
...Replacing the access cover plate ...77 Chapter 10: Maintaining the MFP 78 Determining the status of supplies ...79 Ordering supplies ...79 Recycling Lexmark products ...80 Cleaning the scanner glass and backing material 80 Cleaning the automatic document feeder ...81 Scanner registration ...82 Removing the scanner...91 Encrypting the hard disk ...97 Hard disk wiping ...98 Using the Restricted Server List function ...98 Chapter 13: Troubleshooting 99 Understanding MFP messages ...99 Online technical support ...99 Checking an unresponsive MFP ...99 Locating the port name and IP address ...99 6
...Replacing the access cover plate ...77 Chapter 10: Maintaining the MFP 78 Determining the status of supplies ...79 Ordering supplies ...79 Recycling Lexmark products ...80 Cleaning the scanner glass and backing material 80 Cleaning the automatic document feeder ...81 Scanner registration ...82 Removing the scanner...91 Encrypting the hard disk ...97 Hard disk wiping ...98 Using the Restricted Server List function ...98 Chapter 13: Troubleshooting 99 Understanding MFP messages ...99 Online technical support ...99 Checking an unresponsive MFP ...99 Locating the port name and IP address ...99 6
C77x - User's Guide
Page 99
... back on . c Touch Network Setup Page or Network Setup Page. Service messages also alert you to power the MFP off , wait at www.lexmark.com. For more information, see the Menus and Messages Guide on your intervention. This often fixes the problem. The address also appears on . &#...8226; The scanner cable is securely attached to temporarily recover from the service message error condition. Troubleshooting 99 Checking an unresponsive MFP If the MFP is not responding, first make sure: • The printer power cord is plugged into the ...
... back on . c Touch Network Setup Page or Network Setup Page. Service messages also alert you to power the MFP off , wait at www.lexmark.com. For more information, see the Menus and Messages Guide on your intervention. This often fixes the problem. The address also appears on . &#...8226; The scanner cable is securely attached to temporarily recover from the service message error condition. Troubleshooting 99 Checking an unresponsive MFP If the MFP is not responding, first make sure: • The printer power cord is plugged into the ...

C77x - User's Guide
Page 100
... right arrow to Text. network. Touch the right arrow to remove less background. • Adjust the Contrast setting under Copy Æ Options Æ Advanced Imaging. Troubleshooting Solving copy quality problems The following solutions will help solve scan problems. For additional information, see Copy tips. Symptom Unwanted background is too light or...
... right arrow to Text. network. Touch the right arrow to remove less background. • Adjust the Contrast setting under Copy Æ Options Æ Advanced Imaging. Troubleshooting Solving copy quality problems The following solutions will help solve scan problems. For additional information, see Copy tips. Symptom Unwanted background is too light or...

C77x - User's Guide
Page 101
... particles, or paper coatings. Replace the pick pad. The images on the fax I sent are Touch Options, then under Content, change the setting to transmit. Troubleshooting Solving fax problems The following solutions will increase the quality of the fax output. Symptom Solution The fax document takes a long Touch Options, then under...
... particles, or paper coatings. Replace the pick pad. The images on the fax I sent are Touch Options, then under Content, change the setting to transmit. Troubleshooting Solving fax problems The following solutions will increase the quality of the fax output. Symptom Solution The fax document takes a long Touch Options, then under...

C77x - User's Guide
Page 114
... 10 supplies recycling 80 T time stamp 23 toner cartridge recycling 80 transparencies loading input tray 57 transparencies, copying 24 tray linking 62 tray selection 25 troubleshooting settings software application overrides 8 U USB Direct interface 49 USB flash memory device 49 V verify print 54 W weight, paper 67 114
... 10 supplies recycling 80 T time stamp 23 toner cartridge recycling 80 transparencies loading input tray 57 transparencies, copying 24 tray linking 62 tray selection 25 troubleshooting settings software application overrides 8 U USB Direct interface 49 USB flash memory device 49 V verify print 54 W weight, paper 67 114

T64x - Menus and Messages Guide
Page 81
... not write or read /write No* protected, is installed containing held jobs from flash memory. Other menu items let you set up MFP hardware and troubleshoot problems. Menu item Purpose Values and descriptions Factory Defaults Returns the MFP settings to format the flash memory and leaves current resources stored in flash...
... not write or read /write No* protected, is installed containing held jobs from flash memory. Other menu items let you set up MFP hardware and troubleshoot problems. Menu item Purpose Values and descriptions Factory Defaults Returns the MFP settings to format the flash memory and leaves current resources stored in flash...

T64x - Menus and Messages Guide
Page 134
... Man Env 87 Assign Manual Paper 87 Assign MP Feeder 87 Assign Tray [x] 87 Restore Defaults 88 View Factory Default 88 Tray Renumber, PCL 87 troubleshooting, settings control panel 5 software application overrides 5 U Units of Measure 27 Universal Paper Size 27 Universal Setup 27 USB Buffer 38 Use Multi-page TIFF E-mail...
... Man Env 87 Assign Manual Paper 87 Assign MP Feeder 87 Assign Tray [x] 87 Restore Defaults 88 View Factory Default 88 Tray Renumber, PCL 87 troubleshooting, settings control panel 5 software application overrides 5 U Units of Measure 27 Universal Paper Size 27 Universal Setup 27 USB Buffer 38 Use Multi-page TIFF E-mail...

T64x - User's Guide
Page 6
Contents Chapter 13: Troubleshooting 109 Understanding MFP messages ...109 Online technical support ...109 Checking an unresponsive MFP ...109 Locating the port name and IP address ...109 Solving copy quality problems ...110 Solving scan quality problems ...110 Solving fax problems ...111 Solving paper feed problems ...111 Notices ...112 Conventions ...112 Electronic emission notices ...112 Other telecommunications notices ...117 ENERGY STAR ...119 Waste from Electrical and Electronic Equipment (WEEE) directive 119 Index ...120 6
Contents Chapter 13: Troubleshooting 109 Understanding MFP messages ...109 Online technical support ...109 Checking an unresponsive MFP ...109 Locating the port name and IP address ...109 Solving copy quality problems ...110 Solving scan quality problems ...110 Solving fax problems ...111 Solving paper feed problems ...111 Notices ...112 Conventions ...112 Electronic emission notices ...112 Other telecommunications notices ...117 ENERGY STAR ...119 Waste from Electrical and Electronic Equipment (WEEE) directive 119 Index ...120 6

T64x - User's Guide
Page 109
... equipment plugged into the outlet is working. • The printer is turned on our Lexmark Web site at least 10 seconds, and then turn the printer off and back on . This often fixes the problem. Troubleshooting 109 Once you have checked each of the MFP. Locating the port name and IP...printer back on to temporarily recover from the service message error condition. It may be possible to power the MFP off , wait at www.lexmark.com. 13 Troubleshooting Understanding MFP messages The MFP displays three types of the MFP home screen when the MFP is connected to a network. The address also ...
... equipment plugged into the outlet is working. • The printer is turned on our Lexmark Web site at least 10 seconds, and then turn the printer off and back on . This often fixes the problem. Troubleshooting 109 Once you have checked each of the MFP. Locating the port name and IP...printer back on to temporarily recover from the service message error condition. It may be possible to power the MFP off , wait at www.lexmark.com. 13 Troubleshooting Understanding MFP messages The MFP displays three types of the MFP home screen when the MFP is connected to a network. The address also ...

T64x - User's Guide
Page 110
... quality problems 110 when I • Touch Options, then under Content, change the setting to the • Touch Options, then under Resolution, decrease the output resolution. Troubleshooting Solving copy quality problems The following solutions will help solve scan problems. For additional information, see Copy tips. Black text is too big when I scan...
... quality problems 110 when I • Touch Options, then under Content, change the setting to the • Touch Options, then under Resolution, decrease the output resolution. Troubleshooting Solving copy quality problems The following solutions will help solve scan problems. For additional information, see Copy tips. Black text is too big when I scan...

T64x - User's Guide
Page 111
Troubleshooting Solving fax problems Note: Faxing is not shown If your telecommunications company to determine which pattern or switch setting to Standard. not clear. Original documents ...
Troubleshooting Solving fax problems Note: Faxing is not shown If your telecommunications company to determine which pattern or switch setting to Standard. not clear. Original documents ...

T64x - User's Guide
Page 123
... button 9 supplies recycling 90 T time stamp 22 toner cartridge recycling 90 transparencies loading input tray 56 transparencies, copying 23 tray linking 65 tray selection 24 troubleshooting settings software application overrides 8 U USB Direct interface 48 USB flash memory device 48 V verify print 53 W weight, paper 73 width guide 56 123
... button 9 supplies recycling 90 T time stamp 22 toner cartridge recycling 90 transparencies loading input tray 56 transparencies, copying 23 tray linking 65 tray selection 24 troubleshooting settings software application overrides 8 U USB Direct interface 48 USB flash memory device 48 V verify print 53 W weight, paper 73 width guide 56 123


