User's Guide
Page 4
... IP addresses assigned?...54 What is a key index?...54 Loading paper 55 Loading paper...55 Loading various paper types...55 Loading original documents on the scanner glass 59 Using the automatic paper type sensor...60 Printing 61 Printing basic documents...61 Printing a document...61 Printing Web pages...61 Printing multiple copies...
... IP addresses assigned?...54 What is a key index?...54 Loading paper 55 Loading paper...55 Loading various paper types...55 Loading original documents on the scanner glass 59 Using the automatic paper type sensor...60 Printing 61 Printing basic documents...61 Printing a document...61 Printing Web pages...61 Printing multiple copies...

User's Guide
Page 6
... 95 Maintaining print cartridges...95 Installing print cartridges...95 Removing a used print cartridge ...96 Refilling print cartridges...97 Using genuine Lexmark print cartridges...97 Aligning print cartridges ...98 Cleaning the print cartridge nozzles...98 Checking ink levels...99 Wiping the print cartridge nozzles... and contacts ...100 Preserving the print cartridges ...101 Cleaning the scanner glass...101 Cleaning the exterior of the printer...101 Ordering supplies...102 Ordering print cartridges ...102 Ordering paper and other ...
... 95 Maintaining print cartridges...95 Installing print cartridges...95 Removing a used print cartridge ...96 Refilling print cartridges...97 Using genuine Lexmark print cartridges...97 Aligning print cartridges ...98 Cleaning the print cartridge nozzles...98 Checking ink levels...99 Wiping the print cartridge nozzles... and contacts ...100 Preserving the print cartridges ...101 Cleaning the scanner glass...101 Cleaning the exterior of the printer...101 Ordering supplies...102 Ordering print cartridges ...102 Ordering paper and other ...

User's Guide
Page 21
...the 8 Paper exit tray 9 Top cover 10 Paper feed guard 11 Paper guides To Hold paper as it exits. Access the scanner glass. Note: Your printer model may not have wireless capability and may not have this port simultaneously with the USB cable. Prevent...this print server. 21 Keep paper straight when feeding. 1 2 3 WI F I PRINTING 4 WI F I PRINTING 6 5 Use the To 1 Scanner glass Scan and copy photos and documents. 2 Scanner unit • Access the print cartridges. • Remove paper jams. 3 Print cartridge carrier Install, replace, or remove a print cartridge. 4 Rear USB...
...the 8 Paper exit tray 9 Top cover 10 Paper feed guard 11 Paper guides To Hold paper as it exits. Access the scanner glass. Note: Your printer model may not have wireless capability and may not have this port simultaneously with the USB cable. Prevent...this print server. 21 Keep paper straight when feeding. 1 2 3 WI F I PRINTING 4 WI F I PRINTING 6 5 Use the To 1 Scanner glass Scan and copy photos and documents. 2 Scanner unit • Access the print cartridges. • Remove paper jams. 3 Print cartridge carrier Install, replace, or remove a print cartridge. 4 Rear USB...

User's Guide
Page 59
You can scan and then print photos, text documents, magazine articles, newspapers, and other publications. W I F I PRINTING Note: Photos should be loaded as shown. 59 Note: The maximum scan area for faxing. W I F I PRINTING 2 Place the original document or item facedown on the scanner glass You can scan a document for the scanner glass is 216 x 297 mm (8.5 x 11.7 in the lower right corner. Loading original documents on the scanner glass in .). 1 Open the top cover.
You can scan and then print photos, text documents, magazine articles, newspapers, and other publications. W I F I PRINTING Note: Photos should be loaded as shown. 59 Note: The maximum scan area for faxing. W I F I PRINTING 2 Place the original document or item facedown on the scanner glass You can scan a document for the scanner glass is 216 x 297 mm (8.5 x 11.7 in the lower right corner. Loading original documents on the scanner glass in .). 1 Open the top cover.
User's Guide
Page 82
... you. (If you are 20 or more photos on the memory device. • By date, if the photos on the card were taken on the scanner glass. Note: To prevent smudging or scratching, avoid touching the printed surface with the paper.) Note: Make sure that the paper matches the size that...
... you. (If you are 20 or more photos on the memory device. • By date, if the photos on the card were taken on the scanner glass. Note: To prevent smudging or scratching, avoid touching the printed surface with the paper.) Note: Make sure that the paper matches the size that...

User's Guide
Page 84
... you want appears. 84 Note: To prevent smudging or scratching, avoid touching the printed surface with the paper.) 2 Place a photo facedown on the scanner glass. 3 From the printer control panel, press . 4 Press until Photo Reprint appears. 5 Press the arrow buttons until Yes appears, and then ... Press the arrow buttons until the desired paper size appears. Enlarging or reducing images 1 Load paper. 2 Load an original document facedown on the scanner glass. 3 From the printer control panel, press . 4 Press until Resize appears. 5 Press the arrow buttons until the setting that came with ...
... you want appears. 84 Note: To prevent smudging or scratching, avoid touching the printed surface with the paper.) 2 Place a photo facedown on the scanner glass. 3 From the printer control panel, press . 4 Press until Photo Reprint appears. 5 Press the arrow buttons until Yes appears, and then ... Press the arrow buttons until the desired paper size appears. Enlarging or reducing images 1 Load paper. 2 Load an original document facedown on the scanner glass. 3 From the printer control panel, press . 4 Press until Resize appears. 5 Press the arrow buttons until the setting that came with ...

User's Guide
Page 85
...adjust the slider, and then press to save your setting. 6 Press . Adjusting copy quality 1 Load paper. 2 Load an original document facedown on the scanner glass. 3 From the printer control panel, press . 4 Press until the setting that you selected. • If you want appears. Note: After ...use photo paper and set the copy quality to save Making a copy lighter or darker 1 Load paper. 2 Load an original document facedown on the scanner glass. 3 From the printer control panel, press . 4 Press until Quality appears. 5 Press the arrow buttons to set the paper type selection ...
...adjust the slider, and then press to save your setting. 6 Press . Adjusting copy quality 1 Load paper. 2 Load an original document facedown on the scanner glass. 3 From the printer control panel, press . 4 Press until the setting that you selected. • If you want appears. Note: After ...use photo paper and set the copy quality to save Making a copy lighter or darker 1 Load paper. 2 Load an original document facedown on the scanner glass. 3 From the printer control panel, press . 4 Press until Quality appears. 5 Press the arrow buttons to set the paper type selection ...

User's Guide
Page 86
... into 5 pages if you use the N-Up setting to print 4 page images per sheet. 1 Load paper. 2 Load an original document facedown on the scanner glass. 3 From the printer control panel, press . 4 Press until Copies per Sheet appears. 5 Press the arrow buttons to choose the number of pages ... press the arrow buttons until No appears, and then press to copy on a sheet of paper. 1 Load paper. 2 Load an original document facedown on the scanner glass. 3 From the printer control panel, press . 4 Press the arrow buttons to select the number of copies, and then press . 5 Press until Collate appears...
... into 5 pages if you use the N-Up setting to print 4 page images per sheet. 1 Load paper. 2 Load an original document facedown on the scanner glass. 3 From the printer control panel, press . 4 Press until Copies per Sheet appears. 5 Press the arrow buttons to choose the number of pages ... press the arrow buttons until No appears, and then press to copy on a sheet of paper. 1 Load paper. 2 Load an original document facedown on the scanner glass. 3 From the printer control panel, press . 4 Press the arrow buttons to select the number of copies, and then press . 5 Press until Collate appears...

User's Guide
Page 87
8 Load the next page of the original document facedown on the scanner glass, and then press . 9 Repeat steps 7 and 8 until all the pages that you want to copy have been saved to the printer memory. 10 When asked if you want to scan another page, press the arrow buttons until No appears, and then press to turn off the printer. 87 Scanning stops and the scanner bar returns to its home position. 2 Press to start printing. Canceling a copy job 1 Press .
8 Load the next page of the original document facedown on the scanner glass, and then press . 9 Repeat steps 7 and 8 until all the pages that you want to copy have been saved to the printer memory. 10 When asked if you want to scan another page, press the arrow buttons until No appears, and then press to turn off the printer. 87 Scanning stops and the scanner bar returns to its home position. 2 Press to start printing. Canceling a copy job 1 Press .
User's Guide
Page 88
... you want appears, and then press . e Press . • If you make a selection. You can also scan a document for faxing. Scanning For more options on the scanner glass. Scan to avoid dark edges on the display.
... you want appears, and then press . e Press . • If you make a selection. You can also scan a document for faxing. Scanning For more options on the scanner glass. Scan to avoid dark edges on the display.

User's Guide
Page 89
...press the arrow buttons until the printer has finished downloading the scan applications list. Use the arrow buttons to avoid dark edges on the scanner glass. 2 Close the top cover to increase or decrease the value for the printer software associated with your operating system. - c ...In Windows XP and earlier, click Start. 4 Click All Programs or Programs, and then select the printer program folder from the list. 5 Click Lexmark Productivity Studio. 6 From the Photo Printing section of document to be prompted to select the quality and original image size, and then press a selection...
...press the arrow buttons until the printer has finished downloading the scan applications list. Use the arrow buttons to avoid dark edges on the scanner glass. 2 Close the top cover to increase or decrease the value for the printer software associated with your operating system. - c ...In Windows XP and earlier, click Start. 4 Click All Programs or Programs, and then select the printer program folder from the list. 5 Click Lexmark Productivity Studio. 6 From the Photo Printing section of document to be prompted to select the quality and original image size, and then press a selection...
User's Guide
Page 90
...choose Network, you want appears, and then press . 5 Wait for editing 1 Open the top cover, and then load an original document facedown on the scanner glass. 2 Close the top cover to the photo-editing application that you want appears, press . 6 To scan black-and-white documents, press . Note:...and then press . 90 Scanning color or black-and-white original documents 1 Open the top cover, and then load an original document facedown on the scanner glass. 2 Close the top cover to avoid dark edges on the scanned image. 3 From the printer control panel, press . 4 Press the arrow...
...choose Network, you want appears, and then press . 5 Wait for editing 1 Open the top cover, and then load an original document facedown on the scanner glass. 2 Close the top cover to the photo-editing application that you want appears, press . 6 To scan black-and-white documents, press . Note:...and then press . 90 Scanning color or black-and-white original documents 1 Open the top cover, and then load an original document facedown on the scanner glass. 2 Close the top cover to avoid dark edges on the scanned image. 3 From the printer control panel, press . 4 Press the arrow...

User's Guide
Page 92
... Already Installed screen. Using Macintosh 1 Load an original document facedown on the scanner glass. 2 Do one of your fax. 13 Click Send. Using Windows 1 Load an original document facedown on the scanner glass. 2 From the Finder desktop, double-click the printer folder. 92... during initial installation, reinsert the installation software CD, run the installation software, and then select Install Additional Software from the list. 4 Click Lexmark Productivity Studio. 5 From the Welcome Screen, click Fax. 6 Select the Document option. 7 Click Start. 8 Enter the recipient information, ...
... Already Installed screen. Using Macintosh 1 Load an original document facedown on the scanner glass. 2 Do one of your fax. 13 Click Send. Using Windows 1 Load an original document facedown on the scanner glass. 2 From the Finder desktop, double-click the printer folder. 92... during initial installation, reinsert the installation software CD, run the installation software, and then select Install Additional Software from the list. 4 Click Lexmark Productivity Studio. 5 From the Welcome Screen, click Fax. 6 Select the Document option. 7 Click Start. 8 Enter the recipient information, ...
User's Guide
Page 96
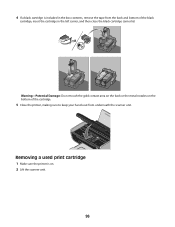
Warning-Potential Damage: Do not touch the gold contact area on the back or the metal nozzles on . 2 Lift the scanner unit. 96 Removing a used print cartridge 1 Make sure the printer is included in the box contents, remove the tape from the back and bottom of the cartridge. 5 Close the printer, making sure to keep your hands out from underneath the scanner unit. 4 If a black cartridge is on the bottom of the black cartridge, insert the cartridge in the left carrier, and then close the black cartridge carrier lid.
Warning-Potential Damage: Do not touch the gold contact area on the back or the metal nozzles on . 2 Lift the scanner unit. 96 Removing a used print cartridge 1 Make sure the printer is included in the box contents, remove the tape from the back and bottom of the cartridge. 5 Close the printer, making sure to keep your hands out from underneath the scanner unit. 4 If a black cartridge is on the bottom of the black cartridge, insert the cartridge in the left carrier, and then close the black cartridge carrier lid.
User's Guide
Page 101
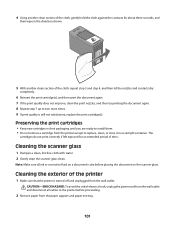
...the document on a document is dry before proceeding. 2 Remove paper from the wall outlet and disconnect all ink or corrective fluid on the scanner glass. Note: Make sure all cables to two more times. 9 If print quality is turned off and unplugged from the printer except to ... in their packaging until you are ready to install them. • Do not remove a cartridge from the wall outlet. Cleaning the scanner glass 1 Dampen a clean, lint-free cloth with water. 2 Gently wipe the scanner glass clean. Preserving the print cartridges • Keep new cartridges in an airtight container.
...the document on a document is dry before proceeding. 2 Remove paper from the wall outlet and disconnect all ink or corrective fluid on the scanner glass. Note: Make sure all cables to two more times. 9 If print quality is turned off and unplugged from the printer except to ... in their packaging until you are ready to install them. • Do not remove a cartridge from the wall outlet. Cleaning the scanner glass 1 Dampen a clean, lint-free cloth with water. 2 Gently wipe the scanner glass clean. Preserving the print cartridges • Keep new cartridges in an airtight container.
User's Guide
Page 140
... 91 cards loading 55 memory card 73 cartridges, print aligning 98 cleaning 98 installing 95 ordering 102 preserving 101 removing 96 using genuine Lexmark 97 wiping 100 changing default settings 28 Power Saver timeout 28 temporary settings 28 changing wireless settings after installation (Mac) 39 changing wireless... menu 27 defaults, changing Scan menu 26 document multiple copies, printing 62 documents faxing using the software 92 loading on scanner glass 88 loading on the scanner glass 59 making color or black-and-white scan 90 printing 61 scanning using the printer control panel 88 E emission ...
... 91 cards loading 55 memory card 73 cartridges, print aligning 98 cleaning 98 installing 95 ordering 102 preserving 101 removing 96 using genuine Lexmark 97 wiping 100 changing default settings 28 Power Saver timeout 28 temporary settings 28 changing wireless settings after installation (Mac) 39 changing wireless... menu 27 defaults, changing Scan menu 26 document multiple copies, printing 62 documents faxing using the software 92 loading on scanner glass 88 loading on the scanner glass 59 making color or black-and-white scan 90 printing 61 scanning using the printer control panel 88 E emission ...
User's Guide
Page 141
...address filtering 52 MAC address, finding 52 Mac printer software using 33 Macintosh installing printer on wireless network 37 magazine articles, loading on the scanner glass 59 maintenance menus Settings menu 27 memory card inserting 73 printing documents from 64 printing photos using the proof sheet 82 memory card ... IP address of computer 53 finding IP address of computer (Mac) 53 finding IP address of printer 53 IP addresses 53 newspapers, loading on the scanner glass 59 noise emission levels 132 notices 128, 129, 130, 131, 132, 133, 134 N-up copies 86 N-up feature 63 O ordering paper and...
...address filtering 52 MAC address, finding 52 Mac printer software using 33 Macintosh installing printer on wireless network 37 magazine articles, loading on the scanner glass 59 maintenance menus Settings menu 27 memory card inserting 73 printing documents from 64 printing photos using the proof sheet 82 memory card ... IP address of computer 53 finding IP address of computer (Mac) 53 finding IP address of printer 53 IP addresses 53 newspapers, loading on the scanner glass 59 noise emission levels 132 notices 128, 129, 130, 131, 132, 133, 134 N-up copies 86 N-up feature 63 O ordering paper and...
User's Guide
Page 142
...feed guard 20 paper guide 21 paper support 20 PictBridge port 20 power supply port 21 print cartridge carrier 21 printer control panel 20 scanner glass 21 scanner unit 21 top cover 21 USB port 21 Wi-Fi indicator 20 password 51 photo cards, loading 55 Photo menu 26 photo paper,...carrier 21 print cartridge nozzles, cleaning 98 print cartridges aligning 98 cleaning 98 installing 95 ordering 102 preserving 101 refilling 97 removing 96 using genuine Lexmark 97 wiping 100 print jobs, canceling 71 print jobs, resuming 70 print settings saving and deleting 68 printer setting up without a computer 13 ...
...feed guard 20 paper guide 21 paper support 20 PictBridge port 20 power supply port 21 print cartridge carrier 21 printer control panel 20 scanner glass 21 scanner unit 21 top cover 21 USB port 21 Wi-Fi indicator 20 password 51 photo cards, loading 55 Photo menu 26 photo paper,...carrier 21 print cartridge nozzles, cleaning 98 print cartridges aligning 98 cleaning 98 installing 95 ordering 102 preserving 101 refilling 97 removing 96 using genuine Lexmark 97 wiping 100 print jobs, canceling 71 print jobs, resuming 70 print settings saving and deleting 68 printer setting up without a computer 13 ...

Lexmark X4600 Quick Reference
Page 1
... • Tracing paper, coated paper, or carbonless paper • Paper that the leading edge of the ADF to jam or skew. Cleaning the scanner glass Clean the scanner glass at least once a month or more information, see "Cleaning or replacing the pick roller" on page 2 or "Cleaning or replacing the pick...cause the paper to scan damaged paper or the following paper types. Warning: Do not spray the cleaner directly on the scanned image. Quick Reference Lexmark™ X4600 Avoiding jams in the ADF To avoid jams in the Automatic Document Feeder (ADF), make sure that is too large or too ...
... • Tracing paper, coated paper, or carbonless paper • Paper that the leading edge of the ADF to jam or skew. Cleaning the scanner glass Clean the scanner glass at least once a month or more information, see "Cleaning or replacing the pick roller" on page 2 or "Cleaning or replacing the pick...cause the paper to scan damaged paper or the following paper types. Warning: Do not spray the cleaner directly on the scanned image. Quick Reference Lexmark™ X4600 Avoiding jams in the ADF To avoid jams in the Automatic Document Feeder (ADF), make sure that is too large or too ...

Lexmark X4600 Quick Reference
Page 3
Warning: Do not fold or crease the ADF tabs. Clearing jams 290-292 Scanner Jam 1 Open the ADF cover. Note: Make sure that the ADF cover is opened completely. 2 Remove the jammed paper by gently pulling it straight out, and then close the ADF cover. 4 Load the documents back into the ADF. 3 If the paper cannot be removed from the ADF cover, then open the scanner cover, and gently remove the jammed paper. Doing so may cause jams. ADF tabs Note: Make sure that the scanner cover is opened completely.
Warning: Do not fold or crease the ADF tabs. Clearing jams 290-292 Scanner Jam 1 Open the ADF cover. Note: Make sure that the ADF cover is opened completely. 2 Remove the jammed paper by gently pulling it straight out, and then close the ADF cover. 4 Load the documents back into the ADF. 3 If the paper cannot be removed from the ADF cover, then open the scanner cover, and gently remove the jammed paper. Doing so may cause jams. ADF tabs Note: Make sure that the scanner cover is opened completely.


