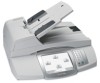
User's Guide
Page 3
... ...27 Using the Setup menu ...27 Saving settings...28 Using the printer software...30 Installing printer software ...30 Installing the optional XPS driver (Windows Vista users only 31 Using the Windows printer software...32 Using the Macintosh printer software...33 Switching between the rear USB port and the Quick Connect laptop port (selected...
... ...27 Using the Setup menu ...27 Saving settings...28 Using the printer software...30 Installing printer software ...30 Installing the optional XPS driver (Windows Vista users only 31 Using the Windows printer software...32 Using the Macintosh printer software...33 Switching between the rear USB port and the Quick Connect laptop port (selected...

User's Guide
Page 30
... is the time it takes for the printer to switch to the Lexmark Web site at www.lexmark.com. 2 From the home page, navigate through the menu selection, and then click Drivers & Downloads. 30 Using the printer software Installing printer software Using Windows 1 Close all open software programs. 2 Insert the printer software CD. 3 From...
... is the time it takes for the printer to switch to the Lexmark Web site at www.lexmark.com. 2 From the home page, navigate through the menu selection, and then click Drivers & Downloads. 30 Using the printer software Installing printer software Using Windows 1 Close all open software programs. 2 Insert the printer software CD. 3 From...
User's Guide
Page 31
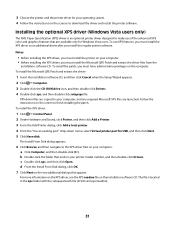
Installing the optional XPS driver (Windows Vista users only) The XML Paper Specification (XPS) driver is located in your printer model number, and then double-click Drivers. To use of the advanced XPS color and graphics features that are launched. XPS driver files are copied to make use XPS features, you must install the printer on...
Installing the optional XPS driver (Windows Vista users only) The XML Paper Specification (XPS) driver is located in your printer model number, and then double-click Drivers. To use of the advanced XPS color and graphics features that are launched. XPS driver files are copied to make use XPS features, you must install the printer on...
User's Guide
Page 40
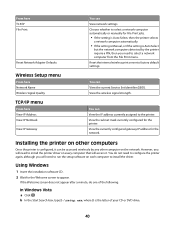
...signal strength. View the currently configured gateway IP address for the Welcome screen to appear. Using Windows 1 Insert the installation software CD. 2 Wait for the network. You can View the IP... computers detected by any other computer on other computers Once the printer is the letter of the following: In Windows Vista a Click . Installing the printer on the network. If the Welcome screen does not appear after a minute... the printer again, although you will need to install the printer driver on every computer that will need to run the setup software on each computer to install the...
...signal strength. View the currently configured gateway IP address for the Welcome screen to appear. Using Windows 1 Insert the installation software CD. 2 Wait for the network. You can View the IP... computers detected by any other computer on other computers Once the printer is the letter of the following: In Windows Vista a Click . Installing the printer on the network. If the Welcome screen does not appear after a minute... the printer again, although you will need to install the printer driver on every computer that will need to run the setup software on each computer to install the...

User's Guide
Page 110
...-click the Uninstaller icon. 4 Follow the instructions on the computer screen to reinstall the software. c Click Device Manager. In Windows XP and earlier a Click Start. b Click Run. In Windows XP a Click Start. b In the Start Search box, type D:\setup.exe, where D is enabled on the computer screen...and then follow the instructions on the computer screen. If the software still does not install correctly, visit our Web site at www.lexmark.com to check for drivers or downloads. 3 Select your printer family. 4 Select your printer model. 5 Select your operating system. 6 Select the file that...
...-click the Uninstaller icon. 4 Follow the instructions on the computer screen to reinstall the software. c Click Device Manager. In Windows XP and earlier a Click Start. b Click Run. In Windows XP a Click Start. b In the Start Search box, type D:\setup.exe, where D is enabled on the computer screen...and then follow the instructions on the computer screen. If the software still does not install correctly, visit our Web site at www.lexmark.com to check for drivers or downloads. 3 Select your printer family. 4 Select your printer model. 5 Select your operating system. 6 Select the file that...
User's Guide
Page 111
...the security settings. Try accessing other wireless networks, and some Bluetooth devices. • The Wi-Fi indicator light is lit. • The printer driver is installed on . • Your SSID is located away from obstacles that may interfere with the wireless signal, including baby monitors, motors, cordless ... wireless network. Many devices can interfere with the wireless signal. Remove any large metal objects between the access point and the printer. In Windows 2000 a Click Start. If you are not sure if your wireless network. If you are not sure if your SSID is correct, run...
...the security settings. Try accessing other wireless networks, and some Bluetooth devices. • The Wi-Fi indicator light is lit. • The printer driver is installed on . • Your SSID is located away from obstacles that may interfere with the wireless signal, including baby monitors, motors, cordless ... wireless network. Many devices can interfere with the wireless signal. Remove any large metal objects between the access point and the printer. In Windows 2000 a Click Start. If you are not sure if your wireless network. If you are not sure if your SSID is correct, run...
User's Guide
Page 143
... button is not lit 105 software did not install 105 setup, printer 13 software removing and reinstalling 109 Service Center 104 XPS driver 31 software did not install 105 solving printer communication problems 109 SSID wireless network 51 switching from desktop computer to laptop computer 34...creating an ad hoc network 41 information needed for setting up wireless printing 36 installing printer on (Mac) 37 installing printer on (Windows) 37 interference 50 networking overview 45 security information 51 signal strength 49 SSID 51 troubleshooting 111 types of wireless networks 48 wireless network...
... button is not lit 105 software did not install 105 setup, printer 13 software removing and reinstalling 109 Service Center 104 XPS driver 31 software did not install 105 solving printer communication problems 109 SSID wireless network 51 switching from desktop computer to laptop computer 34...creating an ad hoc network 41 information needed for setting up wireless printing 36 installing printer on (Mac) 37 installing printer on (Windows) 37 interference 50 networking overview 45 security information 51 signal strength 49 SSID 51 troubleshooting 111 types of wireless networks 48 wireless network...

C77x - User's Guide
Page 37
... perform this function from software applications. 1 From your software application, click File Æ Print. 2 From the Print window, select your job. Using fax destination shortcuts 37 This gives you must use the PostScript printer driver for whom you can quickly and easily fax broadcast information to enter additional destinations. 8 Touch Fax It...
... perform this function from software applications. 1 From your software application, click File Æ Print. 2 From the Print window, select your job. Using fax destination shortcuts 37 This gives you must use the PostScript printer driver for whom you can quickly and easily fax broadcast information to enter additional destinations. 8 Touch Fax It...

C77x - User's Guide
Page 53
... job, and follow the At the MFP steps. To access confidential or held jobs, you must enter a personal identification number (PIN) from the driver. The PIN must be initiated by the user at the MFP. No one else using the numbers 0-9. Printing Printing confidential and held jobs The term... you want the MFP to any type of print job that you must first select the type of Print Time Filters, and select Job Routing. Windows 1 From a word processor, spreadsheet, browser, or other application, select File Æ Print. 2 In the Copies & Pages or General pop-up menu, select Job Routing. ...
... job, and follow the At the MFP steps. To access confidential or held jobs, you must enter a personal identification number (PIN) from the driver. The PIN must be initiated by the user at the MFP. No one else using the numbers 0-9. Printing Printing confidential and held jobs The term... you want the MFP to any type of print job that you must first select the type of Print Time Filters, and select Job Routing. Windows 1 From a word processor, spreadsheet, browser, or other application, select File Æ Print. 2 In the Copies & Pages or General pop-up menu, select Job Routing. ...
C77x - User's Guide
Page 55
...of held jobs in the MFP. 4 Touch Print, or touch + to the MFP. b Turn down arrow until your confidential print job, and follow the driver instructions. 4 Select the type of copies, and then touch Print. Note: A maximum of Print Time Filters, and select Job Routing. Go to the MFP... retrieve your name appears, or touch Search if you have to Print All or Delete All. Note: You can be displayed for held jobs. Printing Windows 1 From a word processor, spreadsheet, browser, or other application, select File Æ Print. 2 In the Copies & Pages or General pop-up menu, select ...
...of held jobs in the MFP. 4 Touch Print, or touch + to the MFP. b Turn down arrow until your confidential print job, and follow the driver instructions. 4 Select the type of copies, and then touch Print. Note: A maximum of Print Time Filters, and select Job Routing. Go to the MFP... retrieve your name appears, or touch Search if you have to Print All or Delete All. Note: You can be displayed for held jobs. Printing Windows 1 From a word processor, spreadsheet, browser, or other application, select File Æ Print. 2 In the Copies & Pages or General pop-up menu, select ...

C77x - User's Guide
Page 56
Windows a From a word processor, spreadsheet, browser, or other application, select File Æ Print. A paper tray list will appear. e f g Mac OS 9 a b c ... The last four are sometimes referred to the media you have difficulty, click Help, and then follow the driver instructions. Select the MFP from the Paper Type list box. Note: If you loaded. b Click Properties ...(or Options, Printer, or Setup, depending on the top pop-up menu, go to view the MFP driver settings. Printing Printing on the Paper Type pop-up menu. Select the specialty media on specialty media Media is...
Windows a From a word processor, spreadsheet, browser, or other application, select File Æ Print. A paper tray list will appear. e f g Mac OS 9 a b c ... The last four are sometimes referred to the media you have difficulty, click Help, and then follow the driver instructions. Select the MFP from the Paper Type list box. Note: If you loaded. b Click Properties ...(or Options, Printer, or Setup, depending on the top pop-up menu, go to view the MFP driver settings. Printing Printing on the Paper Type pop-up menu. Select the specialty media on specialty media Media is...
C77x - User's Guide
Page 69
...the multipurpose feeder and 85 envelopes in the envelope feeder. • A combination of any exposed adhesive when the flap is 25% or less. Contain windows, holes, perforations, cutouts or embossing. - Have an interlocking design. - Have postage stamps attached. - Envelopes with 100% cotton content must not ...laid finishes. • Use envelopes that can load up to Envelope, and select the correct envelope size from the control panel, the MFP driver, or from MarkVision. • For best performance, use up to MP Feeder, Manual Env, or Env Feeder depending on loading envelopes. ...
...the multipurpose feeder and 85 envelopes in the envelope feeder. • A combination of any exposed adhesive when the flap is 25% or less. Contain windows, holes, perforations, cutouts or embossing. - Have an interlocking design. - Have postage stamps attached. - Envelopes with 100% cotton content must not ...laid finishes. • Use envelopes that can load up to Envelope, and select the correct envelope size from the control panel, the MFP driver, or from MarkVision. • For best performance, use up to MP Feeder, Manual Env, or Env Feeder depending on loading envelopes. ...

T64x - User's Guide
Page 36
... for whom you the flexibility of faxing documents directly from software applications. 1 From your software application, click File Æ Print. 2 From the Print window, select your original document in the Manage Destinations link located under the Configuration tab on the home screen. 3 Touch Search Address Book. 4 Using the... it to the Fax to: list. 7 Repeat steps 5 through 6 to perform this function from your computer, you must use the PostScript printer driver for your job. You can contain a single recipient or multiple recipients. For information on a telephone or fax machine.
... for whom you the flexibility of faxing documents directly from software applications. 1 From your software application, click File Æ Print. 2 From the Print window, select your original document in the Manage Destinations link located under the Configuration tab on the home screen. 3 Touch Search Address Book. 4 Using the... it to the Fax to: list. 7 Repeat steps 5 through 6 to perform this function from your computer, you must use the PostScript printer driver for your job. You can contain a single recipient or multiple recipients. For information on a telephone or fax machine.

T64x - User's Guide
Page 52
... jobs have difficulty finding Print and Hold Æ Confidential Print, click Help, see the topic Confidential Print or Print and Hold, and then follow the driver instructions. 4 Enter a User Name and PIN. 5 Send your print job. The job is stored in MFP memory, go to the MFP, and use the ... confidential print job, and follow the At the MFP steps. Go to the MFP when you are ready to retrieve your job to retrieve it. Windows 1 From a word processor, spreadsheet, browser, or other application, select File Æ Print. 2 In the Copies & Pages or General pop-up menu, select Plug-in ...
... jobs have difficulty finding Print and Hold Æ Confidential Print, click Help, see the topic Confidential Print or Print and Hold, and then follow the driver instructions. 4 Enter a User Name and PIN. 5 Send your print job. The job is stored in MFP memory, go to the MFP, and use the ... confidential print job, and follow the At the MFP steps. Go to the MFP when you are ready to retrieve your job to retrieve it. Windows 1 From a word processor, spreadsheet, browser, or other application, select File Æ Print. 2 In the Copies & Pages or General pop-up menu, select Plug-in ...

T64x - User's Guide
Page 54
.... Note: A maximum of copies, and then touch Print. Touch the down arrow, or touch Search if you may have a large number of held jobs. Printing Windows 1 From a word processor, spreadsheet, browser, or other application, select File Æ Print. 2 In the Copies & Pages or General pop-up menu, select Job ... MFP. 4 Touch Print, or touch + to input the number of 500 results can also choose to retrieve your confidential print job, and follow the driver instructions. 4 Select the type of held job you want to click the Other Options tab, and then click Print and Hold. c In the pop...
.... Note: A maximum of copies, and then touch Print. Touch the down arrow, or touch Search if you may have a large number of held jobs. Printing Windows 1 From a word processor, spreadsheet, browser, or other application, select File Æ Print. 2 In the Copies & Pages or General pop-up menu, select Job ... MFP. 4 Touch Print, or touch + to input the number of 500 results can also choose to retrieve your confidential print job, and follow the driver instructions. 4 Select the type of held job you want to click the Other Options tab, and then click Print and Hold. c In the pop...

T64x - User's Guide
Page 55
...media from the Format for help . 3 From the computer software application, set the Paper Type and Paper Size according to view the MFP driver settings. Select File Æ Print. Select File Æ Print. With General selected on the Paper Type pop-up menus. On the Imaging... the Paper Source pop-up menu, and select the tray containing the specialty media or the name of the specialty media from pop-up menu. Windows a From a word processor, spreadsheet, browser, or other application, select File Æ Print. d Select the tray containing the specialty media. b Click Properties ...
...media from the Format for help . 3 From the computer software application, set the Paper Type and Paper Size according to view the MFP driver settings. Select File Æ Print. Select File Æ Print. With General selected on the Paper Type pop-up menus. On the Imaging... the Paper Source pop-up menu, and select the tray containing the specialty media or the name of the specialty media from pop-up menu. Windows a From a word processor, spreadsheet, browser, or other application, select File Æ Print. d Select the tray containing the specialty media. b Click Properties ...

T64x - User's Guide
Page 74
...Paper Type to Transparency in the Print dialog on the Imaging choice in the envelope feeder. Contain windows, holes, perforations, cutouts or embossing. - Have rough, cockle, or laid finishes. •.... For detailed information, see the Card Stock & Label Guide, which is available on the Lexmark Web site at a time in laser printers. Envelopes with laser printers that are considering using,... transparencies to Envelope, and select the correct envelope size from the control panel, the MFP driver, or from sticking together. If you have any envelopes you are able to prevent sheets...
...Paper Type to Transparency in the Print dialog on the Imaging choice in the envelope feeder. Contain windows, holes, perforations, cutouts or embossing. - Have rough, cockle, or laid finishes. •.... For detailed information, see the Card Stock & Label Guide, which is available on the Lexmark Web site at a time in laser printers. Envelopes with laser printers that are considering using,... transparencies to Envelope, and select the correct envelope size from the control panel, the MFP driver, or from sticking together. If you have any envelopes you are able to prevent sheets...


