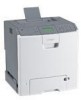
Wireless Setup Guide
Page 8
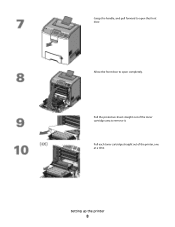
Allow the front door to open the front door. Pull each toner cartridge straight out of the toner cartridge area to remove it. Grasp the handle, and pull forward to open completely. Pull the protective sheet straight out of the printer, one at a time. Setting up the printer 8
Allow the front door to open the front door. Pull each toner cartridge straight out of the toner cartridge area to remove it. Grasp the handle, and pull forward to open completely. Pull the protective sheet straight out of the printer, one at a time. Setting up the printer 8
Wireless Setup Guide
Page 9
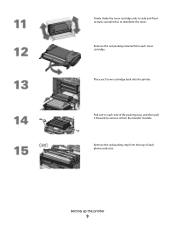
Remove the red packing strip from the top of the packing strip, and then pull it forward to distribute the toner. Place each photoconductor. Pull out on each toner cartridge. Setting up the printer 9 Remove the red packing material from each side of each toner cartridge back into the printer. Firmly shake the toner cartridge side-to-side and frontto-back several times to remove it from the transfer module.
Remove the red packing strip from the top of the packing strip, and then pull it forward to distribute the toner. Place each photoconductor. Pull out on each toner cartridge. Setting up the printer 9 Remove the red packing material from each side of each toner cartridge back into the printer. Firmly shake the toner cartridge side-to-side and frontto-back several times to remove it from the transfer module.
Quick Reference
Page 1
... to the correct position for the size of the tray. Straighten the edges on the bottom of paper being loaded. Clearing jams behind the toner cartridge area. Use these indicators to help position the guides. 2 Squeeze the width guide tabs as shown, and then slide the guide to the correct ... recommended print side faceup. To lock the tray once a length has been selected, slide the button back to the error message displayed on the printer control panel. Doing so may need to remove the photoconductors if the paper is not visible, then complete the step that corresponds to the right...
... to the correct position for the size of the tray. Straighten the edges on the bottom of paper being loaded. Clearing jams behind the toner cartridge area. Use these indicators to help position the guides. 2 Squeeze the width guide tabs as shown, and then slide the guide to the correct ... recommended print side faceup. To lock the tray once a length has been selected, slide the button back to the error message displayed on the printer control panel. Doing so may need to remove the photoconductors if the paper is not visible, then complete the step that corresponds to the right...
Menu Map
Page 1
Supplies Replace Supply Cyan Cartridge Magenta Cartridge Yellow Cartridge Black Cartridge Cyan Photoconductor Magenta Photoconductor Yellow ... Set Date/Time Active NIC Standard Network2 Standard USB Parallel Serial SMTP Setup Print All Color Quality Print Quality Printing Guide Media Guide Print Defects Menu Map Information Guide Connection Guide Moving... Guide Supplies Guide 1Only appears on wireless models. 2Depending on the printer setup, this menu item appears as Standard Network, Wireless Network, or Network . Menu map Page 1...
Supplies Replace Supply Cyan Cartridge Magenta Cartridge Yellow Cartridge Black Cartridge Cyan Photoconductor Magenta Photoconductor Yellow ... Set Date/Time Active NIC Standard Network2 Standard USB Parallel Serial SMTP Setup Print All Color Quality Print Quality Printing Guide Media Guide Print Defects Menu Map Information Guide Connection Guide Moving... Guide Supplies Guide 1Only appears on wireless models. 2Depending on the printer setup, this menu item appears as Standard Network, Wireless Network, or Network . Menu map Page 1...

Print Quality
Page 1
... Make sure that the Paper Type and Paper Weight settings match the type of paper that does not meet the printer specifications. Avoid textured paper with rough finishes. A toner cartridge, the transfer module, or the fuser is approaching the end of its intended life. The print quality test pages... print. 6 Press the down arrow button until Exit Config Menu appears, and then press . Check the printer control panel for Config Menu to...
... Make sure that the Paper Type and Paper Weight settings match the type of paper that does not meet the printer specifications. Avoid textured paper with rough finishes. A toner cartridge, the transfer module, or the fuser is approaching the end of its intended life. The print quality test pages... print. 6 Press the down arrow button until Exit Config Menu appears, and then press . Check the printer control panel for Config Menu to...
Print Quality
Page 4
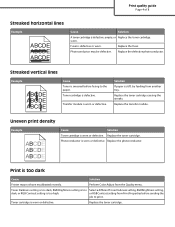
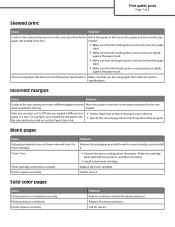
...the paper. Toner cartridge is too high. Replace the toner cartridge causing the streaks. Perform Color Adjust from another ...tray. Toner Darkness setting is too dark, RGB Brightness setting is too Select a different Toner Darkness setting, RGB Brightness setting, dark, or RGB Contrast setting is defective. Replace the toner cartridge...cartridge is worn or defective. Photoconductor is defective, empty, or Replace the toner cartridge. Replace the fuser. Print is defective or worn. Toner cartridge...
...the paper. Toner cartridge is too high. Replace the toner cartridge causing the streaks. Perform Color Adjust from another ...tray. Toner Darkness setting is too dark, RGB Brightness setting is too Select a different Toner Darkness setting, RGB Brightness setting, dark, or RGB Contrast setting is defective. Replace the toner cartridge...cartridge is worn or defective. Photoconductor is defective, empty, or Replace the toner cartridge. Replace the fuser. Print is defective or worn. Toner cartridge...
Print Quality
Page 5
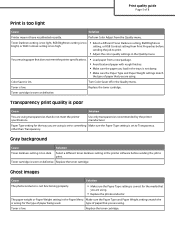
... 8 Print is worn or defective. Replace the toner cartridge. Use only transparencies recommended by the printer manufacturer. Toner cartridge is too light Cause Solution Printer may not have recalibrated recently. Toner is wrong for the media that you are using . Turn Color Saver off in the printer software before sending the job to print. Select a different...
... 8 Print is worn or defective. Replace the toner cartridge. Use only transparencies recommended by the printer manufacturer. Toner cartridge is too light Cause Solution Printer may not have recalibrated recently. Toner is wrong for the media that you are using . Turn Color Saver off in the printer software before sending the job to print. Select a different...
Print Quality
Page 6
.... Toner fog or background shading appears on the page Cause Toner cartridge is worn or defective. Fuser is defective or installed incorrectly. Application may not have recalibrated recently. Replace the transfer module. Perform color adjust from Normal to match the media in the paper path. ...Make sure the correct Paper Type is in the tray. program. • Set the Paper Size to Rough. Toner is selected. Photoconductor is worn or defective. Replace the fuser. Check the application. Printer may...
.... Toner fog or background shading appears on the page Cause Toner cartridge is worn or defective. Fuser is defective or installed incorrectly. Application may not have recalibrated recently. Replace the transfer module. Perform color adjust from Normal to match the media in the paper path. ...Make sure the correct Paper Type is in the tray. program. • Set the Paper Size to Rough. Toner is selected. Photoconductor is worn or defective. Replace the fuser. Check the application. Printer may...
Print Quality
Page 7
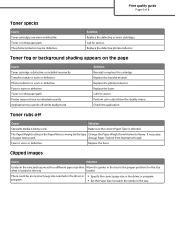
...tray but you loaded a different size paper in the tray. Printer requires servicing. Photoconductor is low. Solution Remove the packaging materials from the toner cartridge, and reinstall it . • Install a new toner cartridge. Shake the cartridge back and forth several times, and then reinstall it . ...8226; Specify the correct page size in the tray. Toner is defective. Solution Remove and then reinstall the photoconductor. Solid color pages Cause Photoconductor is loaded in Print Properties or the program. Incorrect margins Cause Solution Guides in the selected tray are...
...tray but you loaded a different size paper in the tray. Printer requires servicing. Photoconductor is low. Solution Remove the packaging materials from the toner cartridge, and reinstall it . • Install a new toner cartridge. Shake the cartridge back and forth several times, and then reinstall it . ...8226; Specify the correct page size in the tray. Toner is defective. Solution Remove and then reinstall the photoconductor. Solid color pages Cause Photoconductor is loaded in Print Properties or the program. Incorrect margins Cause Solution Guides in the selected tray are...
Supplies Guide
Page 1
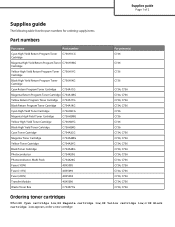
... Yield Toner Cartridge C736H2MG Yellow High Yield Toner Cartridge C736H2YG Black High Yield Toner Cartridge C736H2KG Cyan Toner Cartridge C734A2CG Magenta Toner Cartridge C734A2MG Yellow Toner Cartridge C734A2YG Black Toner Cartridge C734A2KG Photoconductor C734X20G Photoconductor, Multi-Pack C734X24G Fuser (100V) 40X5095 Fuser (115V) 40X5093 Fuser (230V) 40X5094 Transfer Module 40X5096 Waste Toner Box C734X77G For printer(s) C736 C736...
... Yield Toner Cartridge C736H2MG Yellow High Yield Toner Cartridge C736H2YG Black High Yield Toner Cartridge C736H2KG Cyan Toner Cartridge C734A2CG Magenta Toner Cartridge C734A2MG Yellow Toner Cartridge C734A2YG Black Toner Cartridge C734A2KG Photoconductor C734X20G Photoconductor, Multi-Pack C734X24G Fuser (100V) 40X5095 Fuser (115V) 40X5093 Fuser (230V) 40X5094 Transfer Module 40X5096 Waste Toner Box C734X77G For printer(s) C736 C736...


