

Setup Guide
Page 4
Step 6: Install printer supplies 38 Opening the top cover 38 Installing the photodevelopers 41 Installing the toner cartridges 44 Attaching the Quick Reference booklet sleeve 47 Attaching an adhesive operator panel overlay 48 Closing the top cover 49 Step 7: Load paper... 51 Loading the paper trays 52 Loading the multipurpose feeder 59 Loading the high-capacity feeder 63 Step 8: Verify printer setup 67 Turning...
Step 6: Install printer supplies 38 Opening the top cover 38 Installing the photodevelopers 41 Installing the toner cartridges 44 Attaching the Quick Reference booklet sleeve 47 Attaching an adhesive operator panel overlay 48 Closing the top cover 49 Step 7: Load paper... 51 Loading the paper trays 52 Loading the multipurpose feeder 59 Loading the high-capacity feeder 63 Step 8: Verify printer setup 67 Turning...

Setup Guide
Page 7
Remove all items from the box except the printer. Use the handholds on the side of the printer when lifting. Power cord Drivers CD Publications CD • Four toner cartridges • Four photodevelopers • Setup Guide • Lexmark C910 Publications CD • Quick Reference and sleeve • Drivers CD If any items are ready to...
Remove all items from the box except the printer. Use the handholds on the side of the printer when lifting. Power cord Drivers CD Publications CD • Four toner cartridges • Four photodevelopers • Setup Guide • Lexmark C910 Publications CD • Quick Reference and sleeve • Drivers CD If any items are ready to...

Setup Guide
Page 50
... right: black, yellow, cyan, and magenta. 2 Gently shake the toner cartridge to 8,000 pages. You must install the toner cartridges inside the top cover of the printer. However, it may be easier to install them from its own color-coded position. Waste toner arm Installing the toner cartridges Your printer ships with four color-coded starter toner...
... right: black, yellow, cyan, and magenta. 2 Gently shake the toner cartridge to 8,000 pages. You must install the toner cartridges inside the top cover of the printer. However, it may be easier to install them from its own color-coded position. Waste toner arm Installing the toner cartridges Your printer ships with four color-coded starter toner...
Setup Guide
Page 51
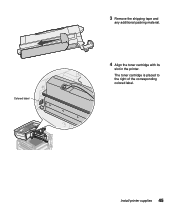
The toner cartridge is placed to the right of the corresponding colored label. Install printer supplies 45 Colored label 3 Remove the shipping tape and any additional packing material. 4 Align the toner cartridge with its slot in the printer.
The toner cartridge is placed to the right of the corresponding colored label. Install printer supplies 45 Colored label 3 Remove the shipping tape and any additional packing material. 4 Align the toner cartridge with its slot in the printer.

Setup Guide
Page 52
5 Slide the toner cartridge in until the cartridge is fully seated. 6 Push the waste toner arm onto the photodeveloper until it snaps into place. 7 Repeat steps 2 through 6 to install the remaining toner cartridges. 46 Install printer supplies
5 Slide the toner cartridge in until the cartridge is fully seated. 6 Push the waste toner arm onto the photodeveloper until it snaps into place. 7 Repeat steps 2 through 6 to install the remaining toner cartridges. 46 Install printer supplies

Setup Guide
Page 83
... • Users sending print jobs • Network printer administrators • Help desk personnel • Information Technology... catalog entries to help you find the information you need access to the information stored on the Lexmark C910 Publications CD includes: • Tips for successful printing • Ways to improve print quality... • Information about using the operator panel • Instructions for replacing print cartridges and other supply items • Solutions to common printing problems • Instructions for clearing jams Distribute ...
... • Users sending print jobs • Network printer administrators • Help desk personnel • Information Technology... catalog entries to help you find the information you need access to the information stored on the Lexmark C910 Publications CD includes: • Tips for successful printing • Ways to improve print quality... • Information about using the operator panel • Instructions for replacing print cartridges and other supply items • Solutions to common printing problems • Instructions for clearing jams Distribute ...

Setup Guide
Page 90
...31 MarkNet print server 31 memory cards 27 option cards 31 parallel interface card 31 photodevelopers 41 print servers 31 printer drivers 72 printer memory 27 supplies 38 toner cartridges 44 Tri-Port Adapter 31 USB/Parallel Interface Card 31 internal print server 31 introduction v IP address, setting ...70 IP settings, verifying 71 L labels paper tray 23 printing 51 Lexmark ABC Publications CD vi Lexmark Web site vi Linux 74 loading ...
...31 MarkNet print server 31 memory cards 27 option cards 31 parallel interface card 31 photodevelopers 41 print servers 31 printer drivers 72 printer memory 27 supplies 38 toner cartridges 44 Tri-Port Adapter 31 USB/Parallel Interface Card 31 internal print server 31 introduction v IP address, setting ...70 IP settings, verifying 71 L labels paper tray 23 printing 51 Lexmark ABC Publications CD vi Lexmark Web site vi Linux 74 loading ...
Setup Guide
Page 91
... print server installed in network models v installing 31 printer base 9 cabinet 9 lifting 11 memory v, 27 models v turning the power on 67 unpacking 1 printer drivers 72 printer location 3, 4, 5, 6, 7 printer view, front and rear 2 printer with high-capacity feeder 7 publications CD distributing 78 ...cartridges, installing 44 top cover closing 49 opening 38 transparencies 51 tray, exit 2 Tri-Port Adapter 31 turning on the printer 67 U UNIX 74 unpacking high-capacity feeder 15 memory cards 27 option cards 32 printer 1 USB 37 USB/Parallel Interface Card 31 W warranty 79 Web site, Lexmark...
... print server installed in network models v installing 31 printer base 9 cabinet 9 lifting 11 memory v, 27 models v turning the power on 67 unpacking 1 printer drivers 72 printer location 3, 4, 5, 6, 7 printer view, front and rear 2 printer with high-capacity feeder 7 publications CD distributing 78 ...cartridges, installing 44 top cover closing 49 opening 38 transparencies 51 tray, exit 2 Tri-Port Adapter 31 turning on the printer 67 U UNIX 74 unpacking high-capacity feeder 15 memory cards 27 option cards 32 printer 1 USB 37 USB/Parallel Interface Card 31 W warranty 79 Web site, Lexmark...

Quick Reference Guide
Page 9
...8226; Install a new photodeveloper. 85 Coating Roll Life Warning It is opened and closed, the message Did you replace transfer belt? Turn the printer back on. appears. Note: When the life of the coating roll has expired, 85 Coating Roll Exhausted appears. Message Action 81 Transfer Belt Exhausted... the printer off and check all cable connections. If the service message recurs, call for service and report the message number and description of the problem. 7 You must replace the coating roll to continue printing. 88 Toner Low It is time to replace one or more toner cartridges. &#...
...8226; Install a new photodeveloper. 85 Coating Roll Life Warning It is opened and closed, the message Did you replace transfer belt? Turn the printer back on. appears. Note: When the life of the coating roll has expired, 85 Coating Roll Exhausted appears. Message Action 81 Transfer Belt Exhausted... the printer off and check all cable connections. If the service message recurs, call for service and report the message number and description of the problem. 7 You must replace the coating roll to continue printing. 88 Toner Low It is time to replace one or more toner cartridges. &#...

Finisher Setup and User's Guide
Page 30
When the stapler has been filled and reinstalled, the printer clears the message. 26 Using finisher features Stapling The stapler is empty or Insert Staple Cartridge if the staple cartridge has been removed. The maximum number of sheets you can staple is: Paper weight Maximum 20 lb paper 30 ... 20 -28 lb plain paper. Values marked by an asterisk (*) are the factory default settings. The message Load Staples appears on the printer operator panel if the stapler is located inside the stapler door. Value Output Off* Does not staple print jobs. On Staples each print job...
When the stapler has been filled and reinstalled, the printer clears the message. 26 Using finisher features Stapling The stapler is empty or Insert Staple Cartridge if the staple cartridge has been removed. The maximum number of sheets you can staple is: Paper weight Maximum 20 lb paper 30 ... 20 -28 lb plain paper. Values marked by an asterisk (*) are the factory default settings. The message Load Staples appears on the printer operator panel if the stapler is located inside the stapler door. Value Output Off* Does not staple print jobs. On Staples each print job...

Finisher Setup and User's Guide
Page 39
...is missing. The staple holder is flush against the printer. Solution Remove the stack of paper from the specified bin. The hole punch box is displayed instead of the bin number. For instructions on replacing the staple cartridge, see "Hole punching" on page 26. Troubleshooting... Door alternates with Check Finisher Installation Empty Hole Punch Box Insert Hole Punch Box Load Staples Insert Staple Cartridge Clearing finisher messages Messages appear on the printer operator panel, clear paper and stapler jams, and resolve other finisher problems that may occur. For instructions...
...is missing. The staple holder is flush against the printer. Solution Remove the stack of paper from the specified bin. The hole punch box is displayed instead of the bin number. For instructions on replacing the staple cartridge, see "Hole punching" on page 26. Troubleshooting... Door alternates with Check Finisher Installation Empty Hole Punch Box Insert Hole Punch Box Load Staples Insert Staple Cartridge Clearing finisher messages Messages appear on the printer operator panel, clear paper and stapler jams, and resolve other finisher problems that may occur. For instructions...

Finisher Setup and User's Guide
Page 41
... for instructions. You cannot print requested envelopes. Punched holes are not The printer and finisher are trying to compensate for instructions. Move the finisher away from the printer. Install a new staple cartridge. The stapler is empty. You hole punched a printed job Move the ...alignment of the finisher with the finisher attached to the printer. Resend the envelope print job. The finisher can ...
... for instructions. You cannot print requested envelopes. Punched holes are not The printer and finisher are trying to compensate for instructions. Move the finisher away from the printer. Install a new staple cartridge. The stapler is empty. You hole punched a printed job Move the ...alignment of the finisher with the finisher attached to the printer. Resend the envelope print job. The finisher can ...

Finisher Setup and User's Guide
Page 68
...Box 32 Empty Hole Punch Box 35 Insert Hole Punch Box 35 Insert Staple Cartridge 35 Load Staples 26, 35 Requested Env Not Supported 35 64 Index O offsetting 25 options drawers 1 low profile printer stand 1 printer cabinet 1 other problems 36 output bins attaching 10 capacities 1 supported paper ...types 24 P paper jam label 21 paper jams 46 paper weights 26 printer stand 1 printing envelopes 38 problems finisher 36 frequent jams 36 other problems 36 solving 36 publications CD 3 R replacing a staple cartridge 26 S safety information located on inside front cover sleeve, finisher book 22 ...
...Box 32 Empty Hole Punch Box 35 Insert Hole Punch Box 35 Insert Staple Cartridge 35 Load Staples 26, 35 Requested Env Not Supported 35 64 Index O offsetting 25 options drawers 1 low profile printer stand 1 printer cabinet 1 other problems 36 output bins attaching 10 capacities 1 supported paper ...types 24 P paper jam label 21 paper jams 46 paper weights 26 printer stand 1 printing envelopes 38 problems finisher 36 frequent jams 36 other problems 36 solving 36 publications CD 3 R replacing a staple cartridge 26 S safety information located on inside front cover sleeve, finisher book 22 ...


