Setup Sheet
Page 2
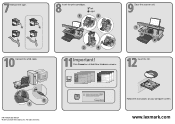
Close the scanner unit. 1 3 2 Insert the CD. 2 1 P/N 17M0270 EC 7M0024 © 2003 Lexmark International, Inc. Insert the print cartridges. 1 2 3 4 Important! Follow the instructions on all Add New Hardware screens. www.lexmark.com Connect the USB cable. All rights reserved. Click Cancel on your computer screen. Remove the tape.
Close the scanner unit. 1 3 2 Insert the CD. 2 1 P/N 17M0270 EC 7M0024 © 2003 Lexmark International, Inc. Insert the print cartridges. 1 2 3 4 Important! Follow the instructions on all Add New Hardware screens. www.lexmark.com Connect the USB cable. All rights reserved. Click Cancel on your computer screen. Remove the tape.
User's Guide
Page 3
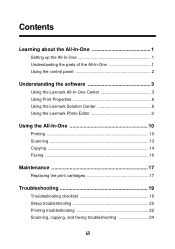
Contents Learning about the All-In-One 1 Setting up the All-In-One 1 Understanding the parts of the All-In-One 1 Using the control panel 2 Understanding the software 3 Using the Lexmark All-In-One Center 3 Using Print Properties 6 Using the Lexmark Solution Center 8 Using the Lexmark Photo Editor 9 Using the All-In-One 10 Printing 10 Scanning 13 Copying 14 Faxing 16 Maintenance 17 Replacing the print cartridges 17 Troubleshooting 19 Troubleshooting checklist 19 Setup troubleshooting 20 Printing troubleshooting 22 Scanning, copying, and faxing troubleshooting 24 iii
Contents Learning about the All-In-One 1 Setting up the All-In-One 1 Understanding the parts of the All-In-One 1 Using the control panel 2 Understanding the software 3 Using the Lexmark All-In-One Center 3 Using Print Properties 6 Using the Lexmark Solution Center 8 Using the Lexmark Photo Editor 9 Using the All-In-One 10 Printing 10 Scanning 13 Copying 14 Faxing 16 Maintenance 17 Replacing the print cartridges 17 Troubleshooting 19 Troubleshooting checklist 19 Setup troubleshooting 20 Printing troubleshooting 22 Scanning, copying, and faxing troubleshooting 24 iii
User's Guide
Page 5
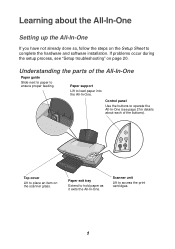
... All-In-One. Understanding the parts of the buttons). Top cover Lift to ensure proper feeding. Control panel Use the buttons to access the print cartridges. 1 Scanner unit Lift to operate the All-In-One (see "Setup troubleshooting" on the scanner glass. Paper support Lift to load paper into the All...
... All-In-One. Understanding the parts of the buttons). Top cover Lift to ensure proper feeding. Control panel Use the buttons to access the print cartridges. 1 Scanner unit Lift to operate the All-In-One (see "Setup troubleshooting" on the scanner glass. Paper support Lift to load paper into the All...
User's Guide
Page 7
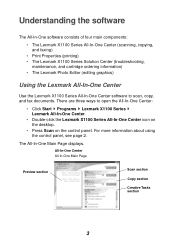
...-In-One Center (scanning, copying, and faxing) • Print Properties (printing) • The Lexmark X1100 Series Solution Center (troubleshooting, maintenance, and cartridge ordering information) • The Lexmark Photo Editor (editing graphics) Using the Lexmark All-In-One Center Use the Lexmark X1100 Series All-In-One Center software to open the All-In-One Center...
...-In-One Center (scanning, copying, and faxing) • Print Properties (printing) • The Lexmark X1100 Series Solution Center (troubleshooting, maintenance, and cartridge ordering information) • The Lexmark Photo Editor (editing graphics) Using the Lexmark All-In-One Center Use the Lexmark X1100 Series All-In-One Center software to open the All-In-One Center...
User's Guide
Page 12
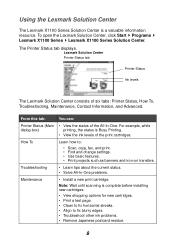
...-One problems. Maintenance • Install a new print cartridge. To open the Lexmark Solution Center, click Start Programs Lexmark X1100 Series Lexmark X1100 Series Solution Center. Using the Lexmark Solution Center The Lexmark X1100 Series Solution Center is a valuable information resource. Lexmark Solution Center Printer Status tab Printer Status Ink levels The Lexmark Solution Center consists of the All-In-One...
...-One problems. Maintenance • Install a new print cartridge. To open the Lexmark Solution Center, click Start Programs Lexmark X1100 Series Lexmark X1100 Series Solution Center. Using the Lexmark Solution Center The Lexmark X1100 Series Solution Center is a valuable information resource. Lexmark Solution Center Printer Status tab Printer Status Ink levels The Lexmark Solution Center consists of the All-In-One...
User's Guide
Page 21
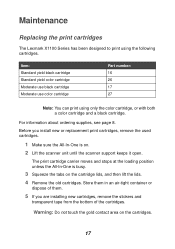
...: 16 26 17 27 Note: You can print using the following cartridges. For information about ordering supplies, see page 8. Maintenance Replacing the print cartridges The Lexmark X1100 Series has been designed to print using only the color cartridge, or with both a color cartridge and a black cartridge. Warning: Do not touch the gold contact area on the...
...: 16 26 17 27 Note: You can print using the following cartridges. For information about ordering supplies, see page 8. Maintenance Replacing the print cartridges The Lexmark X1100 Series has been designed to print using only the color cartridge, or with both a color cartridge and a black cartridge. Warning: Do not touch the gold contact area on the...
User's Guide
Page 22
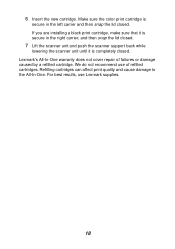
..., use of failures or damage caused by a refilled cartridge. Lexmark's All-In-One warranty does not cover repair of refilled cartridges. We do not recommend use Lexmark supplies. 18 6 Insert the new cartridge. Make sure the color print cartridge is completely closed . If you are installing a black print cartridge, make sure that it is secure in the...
..., use of failures or damage caused by a refilled cartridge. Lexmark's All-In-One warranty does not cover repair of refilled cartridges. We do not recommend use Lexmark supplies. 18 6 Insert the new cartridge. Make sure the color print cartridge is completely closed . If you are installing a black print cartridge, make sure that it is secure in the...
User's Guide
Page 23
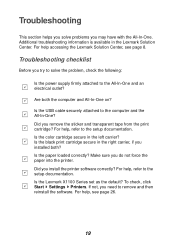
... see page 8. Is the paper loaded correctly? Is the Lexmark X1100 Series set as the default? To check, click Start Settings Printers. For help accessing the Lexmark Solution Center, see page 26. 19 Are both ? Is the black print cartridge secure in the right carrier, if you installed both the ...and All-In-One on? Is the color cartridge secure in the Lexmark Solution Center. Troubleshooting checklist Before you may have with the All-In-One. Did you do not force the paper into the printer. Make sure you install the printer software correctly? For help , refer to remove...
... see page 8. Is the paper loaded correctly? Is the Lexmark X1100 Series set as the default? To check, click Start Settings Printers. For help accessing the Lexmark Solution Center, see page 26. 19 Are both ? Is the black print cartridge secure in the right carrier, if you installed both the ...and All-In-One on? Is the color cartridge secure in the Lexmark Solution Center. Troubleshooting checklist Before you may have with the All-In-One. Did you do not force the paper into the printer. Make sure you install the printer software correctly? For help , refer to remove...
User's Guide
Page 25
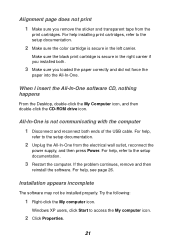
...the computer. Try the following: 1 Right-click the My computer icon. Windows XP users, click Start to the setup documentation. 2 Make sure the color cartridge is secure in the right carrier if you installed both ends of the USB cable. If the problem continues, remove and then reinstall the software... print 1 Make sure you loaded the paper correctly and did not force the paper into the All-In-One. Make sure the black print cartridge is not communicating with the computer 1 Disconnect and reconnect both . 3 Make sure you remove the sticker and transparent tape from the electrical wall...
...the computer. Try the following: 1 Right-click the My computer icon. Windows XP users, click Start to the setup documentation. 2 Make sure the color cartridge is secure in the right carrier if you installed both ends of the USB cable. If the problem continues, remove and then reinstall the software... print 1 Make sure you loaded the paper correctly and did not force the paper into the All-In-One. Make sure the black print cartridge is not communicating with the computer 1 Disconnect and reconnect both . 3 Make sure you remove the sticker and transparent tape from the electrical wall...
User's Guide
Page 27
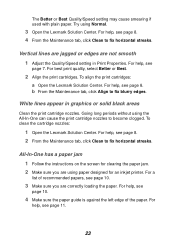
...-In-One has a paper jam 1 Follow the instructions on the screen for an inkjet printer. To clean the cartridge nozzles: 1 Open the Lexmark Solution Center. For help , see page 11. 23 Going long periods without using Normal. 3 Open the Lexmark Solution Center. For help , see page 8. The Better or Best Quality/Speed setting may... paper. For help , see page 8. 4 From the Maintenance tab, click Clean to fix horizontal streaks. Try using the All-In-One can cause the print cartridge nozzles to fix blurry edges. To align the print cartridges: a Open the Lexmark Solution Center.
...-In-One has a paper jam 1 Follow the instructions on the screen for an inkjet printer. To clean the cartridge nozzles: 1 Open the Lexmark Solution Center. For help , see page 11. 23 Going long periods without using Normal. 3 Open the Lexmark Solution Center. For help , see page 8. The Better or Best Quality/Speed setting may... paper. For help , see page 8. 4 From the Maintenance tab, click Clean to fix horizontal streaks. Try using the All-In-One can cause the print cartridge nozzles to fix blurry edges. To align the print cartridges: a Open the Lexmark Solution Center.
User's Guide
Page 33
... more printing ideas 6 I Want To menu 6 ink cartridges viewing ink levels of 8 ink levels viewing 8 inkjet paper 10 iron-on transfers 10 printing 6 L labels 10 Lexmark All-In-One Center 3 opening 3 using 3 Lexmark Solution Center 8 Advanced tab 9 Contact Information tab 9 How To tab 8 Maintenance tab 8 opening 8 Printer Status tab 8 Troubleshooting tab 8 loading paper 10...
... more printing ideas 6 I Want To menu 6 ink cartridges viewing ink levels of 8 ink levels viewing 8 inkjet paper 10 iron-on transfers 10 printing 6 L labels 10 Lexmark All-In-One Center 3 opening 3 using 3 Lexmark Solution Center 8 Advanced tab 9 Contact Information tab 9 How To tab 8 Maintenance tab 8 opening 8 Printer Status tab 8 Troubleshooting tab 8 loading paper 10...
User's Guide
Page 34
... 13 poor quality printing 22 posters printing 6 Power button 2 Preview Now button 13 Preview section Preview Now button 13 Print/Copy preview 4 Scan preview 4 print cartridges viewing ink levels of 8 Print Layout tab 7 Print Properties 6 I Want To menu 6 opening 6 Options menu 7 Paper Setup tab 7 Print Layout tab 7 Quality/Copies tab 7 Save...
... 13 poor quality printing 22 posters printing 6 Power button 2 Preview Now button 13 Preview section Preview Now button 13 Print/Copy preview 4 Scan preview 4 print cartridges viewing ink levels of 8 Print Layout tab 7 Print Properties 6 I Want To menu 6 opening 6 Options menu 7 Paper Setup tab 7 Print Layout tab 7 Quality/Copies tab 7 Save...

