User's Guide
Page 4
...Toner waste container ...62 Fuser and ITU ...62 Recycling Lexmark products ...63 Chapter 5: Clearing paper jams 64 Identifying ...71 Clearing image transfer unit jams ...73 If you still need help ...77 Chapter 6: Administrative support 78 Adjusting operator panel brightness and contrast 78 Disabling operator panel menus ...78 Enabling operator panel... Coverage Estimator ...85 Size sensing ...85 Configuring printer alerts ...86 Chapter 7: Troubleshooting 87 Online customer support ...87 Calling for service ...87 Checking an unresponsive printer ...87 Printing multi-language PDFs ...87 Solving...
...Toner waste container ...62 Fuser and ITU ...62 Recycling Lexmark products ...63 Chapter 5: Clearing paper jams 64 Identifying ...71 Clearing image transfer unit jams ...73 If you still need help ...77 Chapter 6: Administrative support 78 Adjusting operator panel brightness and contrast 78 Disabling operator panel menus ...78 Enabling operator panel... Coverage Estimator ...85 Size sensing ...85 Configuring printer alerts ...86 Chapter 7: Troubleshooting 87 Online customer support ...87 Calling for service ...87 Checking an unresponsive printer ...87 Printing multi-language PDFs ...87 Solving...

User's Guide
Page 6
... material. 2 Place the drawer in the bars. Leveling feet Installing a 2000-sheet drawer 6 c Screw the bars into place using four screws (two screws for your printer. 3 If you must install a 500-sheet drawer between the duplex unit and the 2000-sheet drawer. a Place the two stabilizing bars on the bottom of...
... material. 2 Place the drawer in the bars. Leveling feet Installing a 2000-sheet drawer 6 c Screw the bars into place using four screws (two screws for your printer. 3 If you must install a 500-sheet drawer between the duplex unit and the 2000-sheet drawer. a Place the two stabilizing bars on the bottom of...

User's Guide
Page 8
Installing and removing options Installing a 500-sheet drawer Your printer supports up to the positioning posts on the lower drawer. To install it on another drawer: a Align the holes in the location you have an optional ... drawer, you are installing a 500-sheet drawer on another 500-sheet drawer, or continue with Installing a duplex unit. Warning: If you have chosen for your printer, or install it is seated securely on the other drawer. 3 If you can only add one additional 500-sheet drawer.
Installing and removing options Installing a 500-sheet drawer Your printer supports up to the positioning posts on the lower drawer. To install it on another drawer: a Align the holes in the location you have an optional ... drawer, you are installing a 500-sheet drawer on another 500-sheet drawer, or continue with Installing a duplex unit. Warning: If you have chosen for your printer, or install it is seated securely on the other drawer. 3 If you can only add one additional 500-sheet drawer.
User's Guide
Page 9
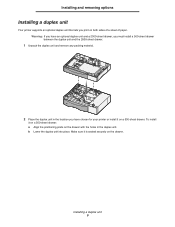
.... To install it on a 500-sheet drawer: a Align the positioning posts on the drawer with the holes in the location you have chosen for your printer or install it is seated securely on both sides of a sheet of paper. Make sure it on a 500-sheet drawer. Installing a duplex unit 9 Warning: If.... 1 Unpack the duplex unit and remove any packing material. 2 Place the duplex unit in the duplex unit. Installing and removing options Installing a duplex unit Your printer supports an optional duplex unit that lets you print on the drawer.
.... To install it on a 500-sheet drawer: a Align the positioning posts on the drawer with the holes in the location you have chosen for your printer or install it is seated securely on both sides of a sheet of paper. Make sure it on a 500-sheet drawer. Installing a duplex unit 9 Warning: If.... 1 Unpack the duplex unit and remove any packing material. 2 Place the duplex unit in the duplex unit. Installing and removing options Installing a duplex unit Your printer supports an optional duplex unit that lets you print on the drawer.

User's Guide
Page 11
...Warning: The output expander tray is designed to disengage from the output expander. 3 Align the mounting brackets on the bottom of the printer, and then lower the output expander into place. Do not use it immediately. Otherwise, the edges of print material only. Installing... could damage tabletops or fabrics. 1 Unpack the output expander and remove any packing material. 2 Remove the printer top cover. Installing and removing options Installing an output expander Your printer supports an optional output expander that lets you unpack the output expander, install it as a shelf;
...Warning: The output expander tray is designed to disengage from the output expander. 3 Align the mounting brackets on the bottom of the printer, and then lower the output expander into place. Do not use it immediately. Otherwise, the edges of print material only. Installing... could damage tabletops or fabrics. 1 Unpack the output expander and remove any packing material. 2 Remove the printer top cover. Installing and removing options Installing an output expander Your printer supports an optional output expander that lets you unpack the output expander, install it as a shelf;

User's Guide
Page 13
excess weight may damage it as a shelf; Warning: The mailbox is designed to 500 sheets of the printer, and then lower the mailbox into place. Installing a 5-bin mailbox 13 Do not use it . 3 Align the mounting brackets on the bottom ... of the mounting brackets could damage tabletops or fabrics. 1 Unpack the mailbox and remove any packing material. 2 Remove the printer top cover. Installing and removing options Installing a 5-bin mailbox Your printer supports a 5-bin mailbox that lets you unpack the mailbox, install it immediately. Otherwise, the edges of print material only.
excess weight may damage it as a shelf; Warning: The mailbox is designed to 500 sheets of the printer, and then lower the mailbox into place. Installing a 5-bin mailbox 13 Do not use it . 3 Align the mounting brackets on the bottom ... of the mounting brackets could damage tabletops or fabrics. 1 Unpack the mailbox and remove any packing material. 2 Remove the printer top cover. Installing and removing options Installing a 5-bin mailbox Your printer supports a 5-bin mailbox that lets you unpack the mailbox, install it immediately. Otherwise, the edges of print material only.

User's Guide
Page 15
...detailed installation instructions. If you are installing memory or option cards sometime after setting up the printer, turn them off as well and unplug any other devices connected to install. See the information...printer off and unplug the power cord before continuing. Installing memory and option cards CAUTION: If you have any cables going to the printer. Option card connector Firmware and flash memory card connectors Memory card connector Hard disk connector Installing a StapleSmart finisher 15 Installing and removing options Installing a StapleSmart finisher Your printer supports...
...detailed installation instructions. If you are installing memory or option cards sometime after setting up the printer, turn them off as well and unplug any other devices connected to install. See the information...printer off and unplug the power cord before continuing. Installing memory and option cards CAUTION: If you have any cables going to the printer. Option card connector Firmware and flash memory card connectors Memory card connector Hard disk connector Installing a StapleSmart finisher 15 Installing and removing options Installing a StapleSmart finisher Your printer supports...
User's Guide
Page 17
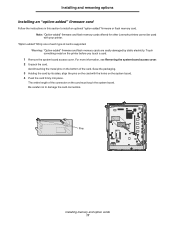
...damage the card connectors. Avoid touching the metal pins on the bottom of the connector on the card with your printer. "Option-added" fiOnly one of each type of card is supported. Be careful not to install an optional "option-added" firmware or flash memory card. Note: "Option-added..." firmware and flash memory cards offered for other Lexmark printers cannot be used with the holes on the printer before you touch a card. 1 Remove the...
...damage the card connectors. Avoid touching the metal pins on the bottom of the connector on the card with your printer. "Option-added" fiOnly one of each type of card is supported. Be careful not to install an optional "option-added" firmware or flash memory card. Note: "Option-added..." firmware and flash memory cards offered for other Lexmark printers cannot be used with the holes on the printer before you touch a card. 1 Remove the...

User's Guide
Page 20
...these options. 1 Remove the system board access cover. Installing memory and option cards 20 Installing and removing options Installing an option card Your printer has one expansion card slot that covers the connector slot, and then lift the plate off. For more information, see Removing the system ...board access cover. 2 Remove the screw from the metal plate that supports a number of the option card must fit through the connector slot. 5 Push the option card firmly into the option card connector. Warning: Option ...
...these options. 1 Remove the system board access cover. Installing memory and option cards 20 Installing and removing options Installing an option card Your printer has one expansion card slot that covers the connector slot, and then lift the plate off. For more information, see Removing the system ...board access cover. 2 Remove the screw from the metal plate that supports a number of the option card must fit through the connector slot. 5 Push the option card firmly into the option card connector. Warning: Option ...

User's Guide
Page 27
... two-toned green and red LED is busy, idle, processing a job, or requires operator intervention. When navigating through text that will appear if the printer is required Navigation buttons The Up and Down buttons are also used to move within a screen, such as moving from one line at a time. ... the operator panel is used to initiate action on the back of options will not be in a USB flash memory device and print PDF and supported graphic files (.gif, .jpeg, .jpg, .bmp, .png, .tiff, .tif, .pcx, and .dcx files). Printing Operator panel buttons Button Back Menu Stop Indicator...
... two-toned green and red LED is busy, idle, processing a job, or requires operator intervention. When navigating through text that will appear if the printer is required Navigation buttons The Up and Down buttons are also used to move within a screen, such as moving from one line at a time. ... the operator panel is used to initiate action on the back of options will not be in a USB flash memory device and print PDF and supported graphic files (.gif, .jpeg, .jpg, .bmp, .png, .tiff, .tif, .pcx, and .dcx files). Printing Operator panel buttons Button Back Menu Stop Indicator...

User's Guide
Page 29
...USB flash memory devices, see the Lexmark Web site at www.lexmark.com. Note: • If you insert the memory device when the printer requires attention such as well. Select Continue, and your job prints after the other jobs, the message Printer Busy appears. Printing from a ... a document from a USB flash memory device 29 Note: Supported graphic types are not supported. • You cannot print encrypted files or files without printing permissions. Note the following when using a USB flash memory device with the printer USB Direct Interface: • USB devices must be compatible with...
...USB flash memory devices, see the Lexmark Web site at www.lexmark.com. Note: • If you insert the memory device when the printer requires attention such as well. Select Continue, and your job prints after the other jobs, the message Printer Busy appears. Printing from a ... a document from a USB flash memory device 29 Note: Supported graphic types are not supported. • You cannot print encrypted files or files without printing permissions. Note the following when using a USB flash memory device with the printer USB Direct Interface: • USB devices must be compatible with...

User's Guide
Page 32
... memory or hard disk installed. The printer returns to the network. Consult a system support person for your printer: 1 Make sure the printer is on and the Ready message appears. 2 Press on the network setup page, and confirm that the printer is installed, Print Net1 Setup appears ...Press until Reports appears. 4 Press . 5 Press until Print Directory appears. 6 Press . To print a listing: 1 Make sure the printer is activated on the display. Note: If an optional MarkNet N8000 series internal print server is connected to the Ready state after the directory...
... memory or hard disk installed. The printer returns to the network. Consult a system support person for your printer: 1 Make sure the printer is on and the Ready message appears. 2 Press on the network setup page, and confirm that the printer is installed, Print Net1 Setup appears ...Press until Reports appears. 4 Press . 5 Press until Print Directory appears. 6 Press . To print a listing: 1 Make sure the printer is activated on the display. Note: If an optional MarkNet N8000 series internal print server is connected to the Ready state after the directory...
User's Guide
Page 36
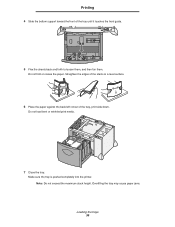
Make sure the tray is pushed completely into the printer. Printing 4 Slide the bottom support toward the front of the tray, print side down. Do not load bent or wrinkled print media. 7 Close the tray. Do not fold or crease the paper. Overfilling the tray may cause paper jams. Loading the trays 36 Straighten the edges of the stack on a level surface. 6 Place the paper against the back left corner of the tray until it touches the front guide. 5 Flex the sheets back and forth to loosen them, and then fan them. Note: Do not exceed the maximum stack height.
Make sure the tray is pushed completely into the printer. Printing 4 Slide the bottom support toward the front of the tray, print side down. Do not load bent or wrinkled print media. 7 Close the tray. Do not fold or crease the paper. Overfilling the tray may cause paper jams. Loading the trays 36 Straighten the edges of the stack on a level surface. 6 Place the paper against the back left corner of the tray until it touches the front guide. 5 Flex the sheets back and forth to loosen them, and then fan them. Note: Do not exceed the maximum stack height.

User's Guide
Page 50
Storing paper Use the following guidelines when selecting preprinted forms and letterhead paper for the printer: • Use grain long papers for best results for electrophotographic printing. • Do not forget to 230°C (446°F) without melting or ... Preprinted papers such as letterhead must withstand temperatures of paper packages. • Store paper in doubt, contact the paper supplier. Use inks that does not support auto size sensing. • Do not remove trays while a job is usually indicated on top of 230°C (446°F) without melting or releasing...
Storing paper Use the following guidelines when selecting preprinted forms and letterhead paper for the printer: • Use grain long papers for best results for electrophotographic printing. • Do not forget to 230°C (446°F) without melting or ... Preprinted papers such as letterhead must withstand temperatures of paper packages. • Store paper in doubt, contact the paper supplier. Use inks that does not support auto size sensing. • Do not remove trays while a job is usually indicated on top of 230°C (446°F) without melting or releasing...

User's Guide
Page 54
... Guide, available on standard and optional sources, including the media sizes available from the Paper Size menu, and supported weights. unsupported Optional finisher Media size Dimensions A3 297 x 420 mm 8 8 8 8 8 8 8 ...Universal** 69.85 x 127 mm to 11.69 x 48 in.) * Supported as selected paper with size sensing † - Media sizes and support 500-sheet trays Multi-purpose feeder Optional high capacity feeder Optional duplex unit Optional...be used, select the next larger size. supported without size sensing* 8- supported with tray size sensing turned off in ...
... Guide, available on standard and optional sources, including the media sizes available from the Paper Size menu, and supported weights. unsupported Optional finisher Media size Dimensions A3 297 x 420 mm 8 8 8 8 8 8 8 ...Universal** 69.85 x 127 mm to 11.69 x 48 in.) * Supported as selected paper with size sensing † - Media sizes and support 500-sheet trays Multi-purpose feeder Optional high capacity feeder Optional duplex unit Optional...be used, select the next larger size. supported without size sensing* 8- supported with tray size sensing turned off in ...

User's Guide
Page 55
... 3 3 3 3 8 8 3 33 3 Card stock 3 3 8 3 8 8 8 33 3 Transparencies 3 3 8 8 8 8 8 33 8 Paper and Vinyl 3 labels 3 8 3 8 8 8 33 8 Identifying media sources and specifications 55 Standard Offset Staple Media specifications Media sizes and support (continued) 500-sheet trays Multi-purpose feeder Optional high capacity feeder Optional duplex unit Optional envelope drawer Optional banner tray Optional 5-bin mailbox Standard Offset...
... 3 3 3 3 8 8 3 33 3 Card stock 3 3 8 3 8 8 8 33 3 Transparencies 3 3 8 8 8 8 8 33 8 Paper and Vinyl 3 labels 3 8 3 8 8 8 33 8 Identifying media sources and specifications 55 Standard Offset Staple Media specifications Media sizes and support (continued) 500-sheet trays Multi-purpose feeder Optional high capacity feeder Optional duplex unit Optional envelope drawer Optional banner tray Optional 5-bin mailbox Standard Offset...

User's Guide
Page 56
... 199 g/m2 (110 lb) Not recommended Not supported 203 g/m2 (125 lb) 203 g/m2 (125 lb) Not supported Not supported Cover 216 g/m2 (80 lb) 216 g/m2 (80 lb) Not supported Not supported Transparencies2 Laser printer 161 to 169 g/m2 161 to 169 g/m2 Not supported (43 to 45lb bond) (43 to 45lb ...bond) Not supported Labels-maximum2,4 Paper 180 g/m2 (48 lb bond...
... 199 g/m2 (110 lb) Not recommended Not supported 203 g/m2 (125 lb) 203 g/m2 (125 lb) Not supported Not supported Cover 216 g/m2 (80 lb) 216 g/m2 (80 lb) Not supported Not supported Transparencies2 Laser printer 161 to 169 g/m2 161 to 169 g/m2 Not supported (43 to 45lb bond) (43 to 45lb ...bond) Not supported Labels-maximum2,4 Paper 180 g/m2 (48 lb bond...

User's Guide
Page 57
... 75 g/m2 (20 lb bond) is limited to simplex printing only at less than 60% relative humidity. 2 This paper weight in any source is not supported for duplex (two-sided) printing. 3 For 60 to 176 g/m2(16 to 47 lb bond) paper, grain long fibers are recommended. For papers heavier ...than 176 g/m2 (47 lb bond), grain short is recommended. 4 Pressure sensitive area must enter the printer first. 5 100% cotton content maximum weight is 90.2g/m2 (24 lb) bond. 6 105 g/m2 (28 lb bond) envelopes are limited to 25% cotton content...
... 75 g/m2 (20 lb bond) is limited to simplex printing only at less than 60% relative humidity. 2 This paper weight in any source is not supported for duplex (two-sided) printing. 3 For 60 to 176 g/m2(16 to 47 lb bond) paper, grain long fibers are recommended. For papers heavier ...than 176 g/m2 (47 lb bond), grain short is recommended. 4 Pressure sensitive area must enter the printer first. 5 100% cotton content maximum weight is 90.2g/m2 (24 lb) bond. 6 105 g/m2 (28 lb bond) envelopes are limited to 25% cotton content...

User's Guide
Page 58
...m2 (65 176 g/m2 (65 Not supported lb) lb) 199 g/m2 (110 lb) 199 g/m2 (110 Not supported lb) 203 g/m2 (125 lb) 203 g/m2 (125 Not supported lb) Cover 216 g/m2 (80 lb) Not supported 216 g/m2 (80 216 g/m2 (80 Not supported lb) lb) Transparencies2 Laser printer 161 to 169 g/m2 (43 to 45lb... bond)4,5 Not supported 161 to 169 g/ 161 to 169 g/ m2...
...m2 (65 176 g/m2 (65 Not supported lb) lb) 199 g/m2 (110 lb) 199 g/m2 (110 Not supported lb) 203 g/m2 (125 lb) 203 g/m2 (125 Not supported lb) Cover 216 g/m2 (80 lb) Not supported 216 g/m2 (80 216 g/m2 (80 Not supported lb) lb) Transparencies2 Laser printer 161 to 169 g/m2 (43 to 45lb... bond)4,5 Not supported 161 to 169 g/ 161 to 169 g/ m2...

User's Guide
Page 59
supported 8- unsupported Media type Optional Optional Optional 500-sheet Multipurpose 2000-sheet envelope banner tray feeder tray drawer tray Paper 500 100 sheets* 2000* 8 8 sheets* Card ...
supported 8- unsupported Media type Optional Optional Optional 500-sheet Multipurpose 2000-sheet envelope banner tray feeder tray drawer tray Paper 500 100 sheets* 2000* 8 8 sheets* Card ...


