Hardware Maintenance Manual
Page 5
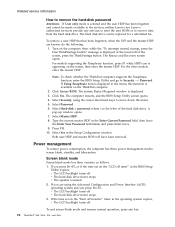
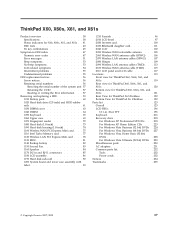
...X61, and X61s . . 41 FRU tests 43 Fn key combinations 45 Symptom-to-FRU index 47 Numeric error codes 47 Error messages 51 Beep symptoms 53 No-beep symptoms 53 LCD-related symptoms 54 Intermittent problems 55 Undetermined problems 55 FRU replacement notices 56 Screw notices 56 © Copyright Lenovo... 2110 LCD panel and LCD cable 117 Locations 119 Front view for ThinkPad X60, X60s, X61, and X61s 119 Rear view for ThinkPad X60, X60s, X61, and X61s 120 Bottom view for ThinkPad X60, X60s, X61, and X61s 121 Rear View for ThinkPad X6 UltraBase . . . . 122 Bottom View for ThinkPad X6 ...
...X61, and X61s . . 41 FRU tests 43 Fn key combinations 45 Symptom-to-FRU index 47 Numeric error codes 47 Error messages 51 Beep symptoms 53 No-beep symptoms 53 LCD-related symptoms 54 Intermittent problems 55 Undetermined problems 55 FRU replacement notices 56 Screw notices 56 © Copyright Lenovo... 2110 LCD panel and LCD cable 117 Locations 119 Front view for ThinkPad X60, X60s, X61, and X61s 119 Rear view for ThinkPad X60, X60s, X61, and X61s 120 Bottom view for ThinkPad X60, X60s, X61, and X61s 121 Rear View for ThinkPad X6 UltraBase . . . . 122 Bottom View for ThinkPad X6 ...
Hardware Maintenance Manual
Page 34
...information How to remove the hard-disk password Attention: If User only mode is selected and the user HDP has been forgotten and cannot be replaced for a scheduled fee. then enter the master HDP. The system Restart Required window is muted. 2. Click Yes. A pop-up window ... Lenovo authorized servicers provide any key. 28 ThinkPad® X60, X60s, X61, and X61s The Rescue and Recovery screen opens. For models supporting the Passphrase function, press F1 while HDP icon is available on the "Turn off monitor" timer in the BIOS Setup Utility expires, v The LCD backlight turns off ...
...information How to remove the hard-disk password Attention: If User only mode is selected and the user HDP has been forgotten and cannot be replaced for a scheduled fee. then enter the master HDP. The system Restart Required window is muted. 2. Click Yes. A pop-up window ... Lenovo authorized servicers provide any key. 28 ThinkPad® X60, X60s, X61, and X61s The Rescue and Recovery screen opens. For models supporting the Passphrase function, press F1 while HDP icon is available on the "Turn off monitor" timer in the BIOS Setup Utility expires, v The LCD backlight turns off ...
Hardware Maintenance Manual
Page 40
...AND DEVICE TESTS v LENOVO TROUBLESHOOTING v CENTER v SYSTEM REPORTS v UPDATES AND SUPPORT Power system checkout To verify a symptom, do the following: 34 ThinkPad® X60, X60s, X61, and X61s Select one of ...check the power cord of the ac adapter for Windows This product is used, replace the port replicator. If you troubleshoot and resolve problems related to ″Checking... not charge during operation, go to your computer. Checkout guide v PNPISA Info v SMBIOS Info v VESA LCD Info v Hardware Events Log Utility v Run External Tests v Surface Scan Hard Disk v Benchmark System v...
...AND DEVICE TESTS v LENOVO TROUBLESHOOTING v CENTER v SYSTEM REPORTS v UPDATES AND SUPPORT Power system checkout To verify a symptom, do the following: 34 ThinkPad® X60, X60s, X61, and X61s Select one of ...check the power cord of the ac adapter for Windows This product is used, replace the port replicator. If you troubleshoot and resolve problems related to ″Checking... not charge during operation, go to your computer. Checkout guide v PNPISA Info v SMBIOS Info v VESA LCD Info v Hardware Events Log Utility v Run External Tests v Surface Scan Hard Disk v Benchmark System v...
Hardware Maintenance Manual
Page 43
...X61, and X61s . . 41 FRU tests 43 Fn key combinations 45 Symptom-to-FRU index 47 Numeric error codes 47 Error messages 51 Beep symptoms 53 No-beep symptoms 53 LCD-related symptoms 54 Intermittent problems 55 Undetermined problems 55 FRU replacement... LCD panel and LCD cable 117 Locations 119 Front view for ThinkPad X60, X60s, X61, and X61s 119 Rear view for ThinkPad X60, X60s, X61, and X61s 120 Bottom view for ThinkPad X60, X60s, X61, and X61s 121 Rear View for ThinkPad X6 UltraBase . . . . 122 Bottom View for ThinkPad ... 234 Trademarks 235 © Copyright Lenovo 2007, 2008 37
...X61, and X61s . . 41 FRU tests 43 Fn key combinations 45 Symptom-to-FRU index 47 Numeric error codes 47 Error messages 51 Beep symptoms 53 No-beep symptoms 53 LCD-related symptoms 54 Intermittent problems 55 Undetermined problems 55 FRU replacement... LCD panel and LCD cable 117 Locations 119 Front view for ThinkPad X60, X60s, X61, and X61s 119 Rear view for ThinkPad X60, X60s, X61, and X61s 120 Bottom view for ThinkPad X60, X60s, X61, and X61s 121 Rear View for ThinkPad X6 UltraBase . . . . 122 Bottom View for ThinkPad ... 234 Trademarks 235 © Copyright Lenovo 2007, 2008 37
Hardware Maintenance Manual
Page 49
...problem, continue with the following: v Interactive Tests --> Mouse (continued) ThinkPad X60, X60s, X61, and X61s 43 Interactive Tests --> Video Modem, MDC1.5 1. Conexant Smart Modem Dialtone ...and on the screen for each FRU. Power Diagnostics --> ThinkPad Devices --> AC Adapter, Battery 1 (Battery 2) LCD unit 1. Interactive Tests --> Keyboard TrackPoint or pointing If ...any physical shock to the TrackPointing Stick. Make sure the modem is not a hardware problem. Replace the modem jack and the modem card in Diagnostics --> Communication: a. PC Card slot Diagnostics ...
...problem, continue with the following: v Interactive Tests --> Mouse (continued) ThinkPad X60, X60s, X61, and X61s 43 Interactive Tests --> Video Modem, MDC1.5 1. Conexant Smart Modem Dialtone ...and on the screen for each FRU. Power Diagnostics --> ThinkPad Devices --> AC Adapter, Battery 1 (Battery 2) LCD unit 1. Interactive Tests --> Keyboard TrackPoint or pointing If ...any physical shock to the TrackPointing Stick. Make sure the modem is not a hardware problem. Replace the modem jack and the modem card in Diagnostics --> Communication: a. PC Card slot Diagnostics ...
Hardware Maintenance Manual
Page 60
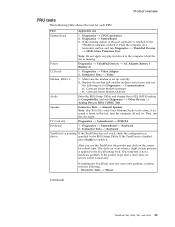
...LCD assembly. 54 ThinkPad® X60, X60s, X61, and X61s v LCD contrast cannot be adjusted. Horizontal or vertical lines displayed on , and a blank LCD during POST. LCD assembly. 3. Symptom-to-FRU index LCD-related symptoms Important: The TFT LCD for "LCD-related symptoms." 2. One pixel consists of defective pixels required for LCD replacement on (white or color.) 3. v LCD... LCD should be replaced if the number of missing, discolored, or lighted dots in sequence System board. 1. v LCD screen unreadable. Reseat the LCD connectors. 2. Reseat all LCD connectors. 3. Lenovo ...
...LCD assembly. 54 ThinkPad® X60, X60s, X61, and X61s v LCD contrast cannot be adjusted. Horizontal or vertical lines displayed on , and a blank LCD during POST. LCD assembly. 3. Symptom-to-FRU index LCD-related symptoms Important: The TFT LCD for "LCD-related symptoms." 2. One pixel consists of defective pixels required for LCD replacement on (white or color.) 3. v LCD... LCD should be replaced if the number of missing, discolored, or lighted dots in sequence System board. 1. v LCD screen unreadable. Reseat the LCD connectors. 2. Reseat all LCD connectors. 3. Lenovo ...
Hardware Maintenance Manual
Page 61
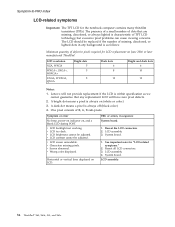
...time of the failure is detected, do with a hardware defect, such as cosmic radiation, electrostatic discharge, or software errors. LCD assembly ThinkPad X60, X60s, X61, and X61s 55 Undetermined problems If the diagnostic tests did not identify the adapter or device that has failed, if wrong devices are ...the diagnostic test for damage. Hard disk drive f. Remove or disconnect all attached devices are installed, or if the system simply is detected, replace the FRU shown by the computer. PC Cards 4. Verify that the power supply being used at least 10 times. 2. If the problem does...
...time of the failure is detected, do with a hardware defect, such as cosmic radiation, electrostatic discharge, or software errors. LCD assembly ThinkPad X60, X60s, X61, and X61s 55 Undetermined problems If the diagnostic tests did not identify the adapter or device that has failed, if wrong devices are ...the diagnostic test for damage. Hard disk drive f. Remove or disconnect all attached devices are installed, or if the system simply is detected, replace the FRU shown by the computer. PC Cards 4. Verify that the power supply being used at least 10 times. 2. If the problem does...

Hardware Maintenance Manual
Page 77
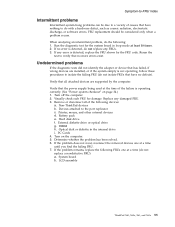
Press down and gently lift upper case up, as shown in steps 3 and 4 , to remove upper case. 3 4 3 When installing: Follow the steps below to make sure that the upper case is installed firmly. 1 2 ThinkPad X60, X60s, X61, and X61s 71 Removing and replacing a FRU Note: Open the LCD at least 150 degrees.
Press down and gently lift upper case up, as shown in steps 3 and 4 , to remove upper case. 3 4 3 When installing: Follow the steps below to make sure that the upper case is installed firmly. 1 2 ThinkPad X60, X60s, X61, and X61s 71 Removing and replacing a FRU Note: Open the LCD at least 150 degrees.

Hardware Maintenance Manual
Page 92
Then release the antenna cables in order: v "1010 Battery pack" on page 60 v "1050 Keyboard" on page 65 v "1060 Upper case" on page 69 v "1100 Wireless WAN PCI Express Mini card" on page 75 v "1120 Wireless LAN PCI Express Mini card" on page 78 Before removing LCD assembly, detach the connector 4 . Removing and replacing a FRU 1180 LCD assembly For access, remove following FRUs, in steps 6 to 9 . 11 4 2 3 Step 1 Screw (quantity) M2 × 3.5 mm, wafer-head, nylon-coated (2) (continued) Color Silver Torque 0.196 Nm (2 kgfcm) 86 ThinkPad® X60, X60s, X61, and X61s
Then release the antenna cables in order: v "1010 Battery pack" on page 60 v "1050 Keyboard" on page 65 v "1060 Upper case" on page 69 v "1100 Wireless WAN PCI Express Mini card" on page 75 v "1120 Wireless LAN PCI Express Mini card" on page 78 Before removing LCD assembly, detach the connector 4 . Removing and replacing a FRU 1180 LCD assembly For access, remove following FRUs, in steps 6 to 9 . 11 4 2 3 Step 1 Screw (quantity) M2 × 3.5 mm, wafer-head, nylon-coated (2) (continued) Color Silver Torque 0.196 Nm (2 kgfcm) 86 ThinkPad® X60, X60s, X61, and X61s
Hardware Maintenance Manual
Page 93
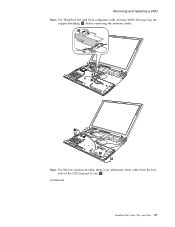
Removing and replacing a FRU Note: For ThinkPad X61 and X61s computers with wireless WAN, first peel up the copper shielding 5 before removing the antenna cables. 5 66 6 6 66 7 8 9 Note: For 802.11n wireless models, there is an additional white cable from the left side of the LCD instead of one 7 . (continued) ThinkPad X60, X60s, X61, and X61s 87
Removing and replacing a FRU Note: For ThinkPad X61 and X61s computers with wireless WAN, first peel up the copper shielding 5 before removing the antenna cables. 5 66 6 6 66 7 8 9 Note: For 802.11n wireless models, there is an additional white cable from the left side of the LCD instead of one 7 . (continued) ThinkPad X60, X60s, X61, and X61s 87
Hardware Maintenance Manual
Page 96
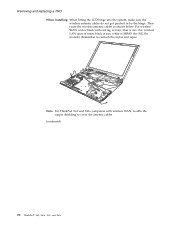
... below. black is MIMO (for 802.11n models). white is aux; Remember to reattach the mylar and tapes. 1 2 3 Note: For ThinkPad X61 and X61s computers with red tag is aux. For wireless WAN: red or black with wireless WAN, re-affix the copper shielding to cover the antenna cables.... (continued) 90 ThinkPad® X60, X60s, X61, and X61s blue is main; For wireless LAN: gray is main; Removing and replacing a FRU When installing: When fitting the LCD hinge into the system, make sure the wireless antenna cables do not get ...
... below. black is MIMO (for 802.11n models). white is aux; Remember to reattach the mylar and tapes. 1 2 3 Note: For ThinkPad X61 and X61s computers with red tag is aux. For wireless WAN: red or black with wireless WAN, re-affix the copper shielding to cover the antenna cables.... (continued) 90 ThinkPad® X60, X60s, X61, and X61s blue is main; For wireless LAN: gray is main; Removing and replacing a FRU When installing: When fitting the LCD hinge into the system, make sure the wireless antenna cables do not get ...

Hardware Maintenance Manual
Page 97
Removing and replacing a FRU When installing: Make sure to position the LCD cable properly and reattach the mylar and tape. The LCD cable switch should fit in its slot 7 . 55 4 7 6 ThinkPad X60, X60s, X61, and X61s 91
Removing and replacing a FRU When installing: Make sure to position the LCD cable properly and reattach the mylar and tape. The LCD cable switch should fit in its slot 7 . 55 4 7 6 ThinkPad X60, X60s, X61, and X61s 91

Hardware Maintenance Manual
Page 98
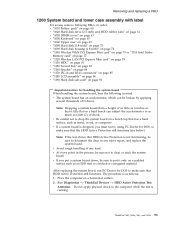
For 1.8-inch hard disk drive For 2.5-inch hard disk drive 92 ThinkPad® X60, X60s, X61, and X61s Removing and replacing a FRU 1190 Hard disk sub-card For access, remove following FRUs, in order: v "1010 Battery pack" on page 60 v "1020 Hard disk drive (2.5-inch) and ... Hard disk (1.8-inch)" on page 73 v "1090 Hard disk housing (1.8-inch)" on page 74 v "1170 DC-in and RJ-11 connectors" on page 85 v "1180 LCD assembly" on page 86 Note: The hard disk sub-card is different for 2.5-inch hard disk drives and 1.8-inch hard disk drives.
For 1.8-inch hard disk drive For 2.5-inch hard disk drive 92 ThinkPad® X60, X60s, X61, and X61s Removing and replacing a FRU 1190 Hard disk sub-card For access, remove following FRUs, in order: v "1010 Battery pack" on page 60 v "1020 Hard disk drive (2.5-inch) and ... Hard disk (1.8-inch)" on page 73 v "1090 Hard disk housing (1.8-inch)" on page 74 v "1170 DC-in and RJ-11 connectors" on page 85 v "1180 LCD assembly" on page 86 Note: The hard disk sub-card is different for 2.5-inch hard disk drives and 1.8-inch hard disk drives.
Hardware Maintenance Manual
Page 99
...hard bench can be broken by applying several thousands of any reject report, and replace the system board. ThinkPad X60, X60s, X61, and X61s 93 v At every point in mind. Run Diagnostics --> ThinkPad Devices --> HDD Active Protection Test. After replacing the system board, run PC-Doctor for DOS to drop or stack the system... v "1150 Second Fan" on page 83 v "1160 Speaker" on page 84 v "1170 DC-in and RJ-11 connectors" on page 85 v "1180 LCD assembly" on page 86 v "1190 Hard disk sub-card" on page 92 Important notices for handling the system board When handling the system board, bear...
...hard bench can be broken by applying several thousands of any reject report, and replace the system board. ThinkPad X60, X60s, X61, and X61s 93 v At every point in mind. Run Diagnostics --> ThinkPad Devices --> HDD Active Protection Test. After replacing the system board, run PC-Doctor for DOS to drop or stack the system... v "1150 Second Fan" on page 83 v "1160 Speaker" on page 84 v "1170 DC-in and RJ-11 connectors" on page 85 v "1180 LCD assembly" on page 86 v "1190 Hard disk sub-card" on page 92 Important notices for handling the system board When handling the system board, bear...
Hardware Maintenance Manual
Page 102
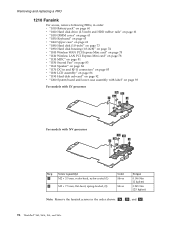
Removing and replacing a FRU 1210 Fansink For access, remove following FRUs, in order: v "1010 Battery pack" on page 60 v "1020 Hard disk drive (2.5-inch) and HDD...81 v "1150 Second Fan" on page 83 v "1160 Speaker" on page 84 v "1170 DC-in and RJ-11 connectors" on page 85 v "1180 LCD assembly" on page 86 v "1190 Hard disk sub-card" on page 92 v "1200 System board and lower case assembly with label" on page 93 For...Color Silver Silver Torque 0.196 Nm (2 kgfcm) 0.245 Nm (2.5 kgfcm) Note: Remove the fansink screws in the order shown: 3a , 3b , and 3c . 96 ThinkPad® X60, X60s, X61, and X61s
Removing and replacing a FRU 1210 Fansink For access, remove following FRUs, in order: v "1010 Battery pack" on page 60 v "1020 Hard disk drive (2.5-inch) and HDD...81 v "1150 Second Fan" on page 83 v "1160 Speaker" on page 84 v "1170 DC-in and RJ-11 connectors" on page 85 v "1180 LCD assembly" on page 86 v "1190 Hard disk sub-card" on page 92 v "1200 System board and lower case assembly with label" on page 93 For...Color Silver Silver Torque 0.196 Nm (2 kgfcm) 0.245 Nm (2.5 kgfcm) Note: Remove the fansink screws in the order shown: 3a , 3b , and 3c . 96 ThinkPad® X60, X60s, X61, and X61s

Hardware Maintenance Manual
Page 103
Removing and replacing a FRU 2010 LCD bezel For access, remove following FRUs, in order: v "1010 Battery pack" on page 60 v "1050 Keyboard" on page 65 v "1060 Upper case" on page 69 v "... 75 v "1120 Wireless LAN PCI Express Mini card" on page 78 v "1170 DC-in and RJ-11 connectors" on page 85 v "1180 LCD assembly" on page 86 For SPWG LCD 1 1 1 2 2 2 Step 2 Screw (quantity) M2.5 × 5 mm, wafer-head, nylon-coated (3) Color Black Torque 0.294 Nm (3 kgfcm) Note: The adhesive on the bezel...
Removing and replacing a FRU 2010 LCD bezel For access, remove following FRUs, in order: v "1010 Battery pack" on page 60 v "1050 Keyboard" on page 65 v "1060 Upper case" on page 69 v "... 75 v "1120 Wireless LAN PCI Express Mini card" on page 78 v "1170 DC-in and RJ-11 connectors" on page 85 v "1180 LCD assembly" on page 86 For SPWG LCD 1 1 1 2 2 2 Step 2 Screw (quantity) M2.5 × 5 mm, wafer-head, nylon-coated (3) Color Black Torque 0.294 Nm (3 kgfcm) Note: The adhesive on the bezel...

Hardware Maintenance Manual
Page 104
therefore, remove the covering from the bezel to route the antenna cables properly. For TMD LCD 1 1 1 1 1 1 1 (continued) 98 ThinkPad® X60, X60s, X61, and X61s Be careful to expose the adhesive, and then place the top edge under the frame, then push the bezel down and secure with the latches firmly. Removing and replacing a FRU 3 3 3 3 When installing: The replacement bezel should have adhesive pre-applied;
therefore, remove the covering from the bezel to route the antenna cables properly. For TMD LCD 1 1 1 1 1 1 1 (continued) 98 ThinkPad® X60, X60s, X61, and X61s Be careful to expose the adhesive, and then place the top edge under the frame, then push the bezel down and secure with the latches firmly. Removing and replacing a FRU 3 3 3 3 When installing: The replacement bezel should have adhesive pre-applied;

Hardware Maintenance Manual
Page 106
Removing and replacing a FRU 2020 Inverter card For access, remove following FRUs, in order: v "1010 Battery pack" on page 60 v "1050 Keyboard" on page 65 v "1060 Upper case" ... page 75 v "1120 Wireless LAN PCI Express Mini card" on page 78 v "1170 DC-in and RJ-11 connectors" on page 85 v "1180 LCD assembly" on page 86 v "2010 LCD bezel" on page 97 1 2 Step 1 Screw (quantity) M2 × 2.5 mm, wafer-head, nylon-coated (1) Color Silver Torque 0.1568 Nm (1.6 kgfcm) 4 3 When installing...
Removing and replacing a FRU 2020 Inverter card For access, remove following FRUs, in order: v "1010 Battery pack" on page 60 v "1050 Keyboard" on page 65 v "1060 Upper case" ... page 75 v "1120 Wireless LAN PCI Express Mini card" on page 78 v "1170 DC-in and RJ-11 connectors" on page 85 v "1180 LCD assembly" on page 86 v "2010 LCD bezel" on page 97 1 2 Step 1 Screw (quantity) M2 × 2.5 mm, wafer-head, nylon-coated (1) Color Silver Torque 0.1568 Nm (1.6 kgfcm) 4 3 When installing...

Hardware Maintenance Manual
Page 107
Removing and replacing a FRU 2030 Bluetooth daughter card Note: The following FRUs, in order: v "1010 Battery pack" on page 60 v "1050 Keyboard" on page 65 v "1060 Upper case" ... v "1170 DC-in and RJ-11 connectors" on page 85 v "1180 LCD assembly" on page 86 v "2010 LCD bezel" on page 97 v "2020 Inverter card" on page 100 When installing: Make sure that the connector is attached firmly. ThinkPad X60, X60s, X61, and X61s 101 For access, remove following procedures are for models with Bluetooth.
Removing and replacing a FRU 2030 Bluetooth daughter card Note: The following FRUs, in order: v "1010 Battery pack" on page 60 v "1050 Keyboard" on page 65 v "1060 Upper case" ... v "1170 DC-in and RJ-11 connectors" on page 85 v "1180 LCD assembly" on page 86 v "2010 LCD bezel" on page 97 v "2020 Inverter card" on page 100 When installing: Make sure that the connector is attached firmly. ThinkPad X60, X60s, X61, and X61s 101 For access, remove following procedures are for models with Bluetooth.
Hardware Maintenance Manual
Page 108
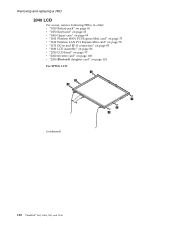
Removing and replacing a FRU 2040 LCD For access, remove following FRUs, in order: v "1010 Battery pack" on page 60 v "1050 Keyboard" on page 65 v "1060 Upper case" on page 69 v "1100 Wireless WAN PCI Express Mini card" on page 75 v "1120 Wireless LAN PCI Express Mini card" on page 78 v "1170 DC-in and RJ-11 connectors" on page 85 v "1180 LCD assembly" on page 86 v "2010 LCD bezel" on page 97 v "2020 Inverter card" on page 100 v "2030 Bluetooth daughter card" on page 101 For SPWG LCD 1 1 1 1 1 1 (continued) 102 ThinkPad® X60, X60s, X61, and X61s
Removing and replacing a FRU 2040 LCD For access, remove following FRUs, in order: v "1010 Battery pack" on page 60 v "1050 Keyboard" on page 65 v "1060 Upper case" on page 69 v "1100 Wireless WAN PCI Express Mini card" on page 75 v "1120 Wireless LAN PCI Express Mini card" on page 78 v "1170 DC-in and RJ-11 connectors" on page 85 v "1180 LCD assembly" on page 86 v "2010 LCD bezel" on page 97 v "2020 Inverter card" on page 100 v "2030 Bluetooth daughter card" on page 101 For SPWG LCD 1 1 1 1 1 1 (continued) 102 ThinkPad® X60, X60s, X61, and X61s


