User Manual
Page 5
... to remove the hard-disk password . . . . 59 Power management 60 Screen blank mode 60 Sleep (Standby) mode 60 Hibernation mode 61 © Copyright Lenovo 2008, 2009 Symptom-to-FRU index 62 Numeric error codes 62 Error messages 66 Beep symptoms 67 No-beep symptoms 67 LCD-related symptoms 68...unit 78 Retaining the UUID 78 Reading or writing the ECA information . . . 79 Removing and replacing a FRU . . . . 81 Before servicing ThinkPad X301 82 1010 Battery pack 83 1020 Optical drive or second battery or travel cover 84 1030 Solid state drive (SSD) or hard disk drive (HDD 85 1040 DIMM...
... to remove the hard-disk password . . . . 59 Power management 60 Screen blank mode 60 Sleep (Standby) mode 60 Hibernation mode 61 © Copyright Lenovo 2008, 2009 Symptom-to-FRU index 62 Numeric error codes 62 Error messages 66 Beep symptoms 67 No-beep symptoms 67 LCD-related symptoms 68...unit 78 Retaining the UUID 78 Reading or writing the ECA information . . . 79 Removing and replacing a FRU . . . . 81 Before servicing ThinkPad X301 82 1010 Battery pack 83 1020 Optical drive or second battery or travel cover 84 1030 Solid state drive (SSD) or hard disk drive (HDD 85 1040 DIMM...

User Manual
Page 16
...Do not disassemble a standby battery, recharge it, throw it into your eyes or on after FRU replacement, make sure all screws, springs, and other small parts are in place and are present after washing. 8 ThinkPad X301 Hardware Maintenance Manual DANGER The lithium battery can cause electrical shorts. ...Use only the battery in the appropriate parts listing....
...Do not disassemble a standby battery, recharge it, throw it into your eyes or on after FRU replacement, make sure all screws, springs, and other small parts are in place and are present after washing. 8 ThinkPad X301 Hardware Maintenance Manual DANGER The lithium battery can cause electrical shorts. ...Use only the battery in the appropriate parts listing....

User Manual
Page 17
Safety information 9 DANGER Though the main batteries have low voltage, a shorted or grounded battery can produce enough current to burn personnel or combustible materials. DANGER Unless hot swap is allowed for the FRU being replaced, do not remove the plastic cover that protects the lower part of the inverter card. DANGER To avoid shock, do as follows before removing it: power off the computer, unplug all power cords from electrical outlets, remove the battery pack, and disconnect any interconnecting cables.
Safety information 9 DANGER Though the main batteries have low voltage, a shorted or grounded battery can produce enough current to burn personnel or combustible materials. DANGER Unless hot swap is allowed for the FRU being replaced, do not remove the plastic cover that protects the lower part of the inverter card. DANGER To avoid shock, do as follows before removing it: power off the computer, unplug all power cords from electrical outlets, remove the battery pack, and disconnect any interconnecting cables.

User Manual
Page 60
...adapter may different from the one of the total power remaining when installed in the computer. 52 ThinkPad X301 Hardware Maintenance Manual Power system checkout To verify a symptom, do the following: v Replace the system board. Connect the AC adapter. 4. If you suspect a power problem, see the...problem persists, go to "FRU tests" on , check the power cord of the AC adapter cable. Checking operational charging To check whether the battery charges properly during operation, go to "Checking operational charging" To check the AC adapter, do the following : 1. If the voltage is ...
...adapter may different from the one of the total power remaining when installed in the computer. 52 ThinkPad X301 Hardware Maintenance Manual Power system checkout To verify a symptom, do the following: v Replace the system board. Connect the AC adapter. 4. If you suspect a power problem, see the...problem persists, go to "FRU tests" on , check the power cord of the AC adapter cable. Checking operational charging To check whether the battery charges properly during operation, go to "Checking operational charging" To check the AC adapter, do the following : 1. If the voltage is ...

User Manual
Page 61
... a moment (but do the following: 1. If the resistance is not correct, replace the battery pack. Remove the battery pack (see "1080 Backup battery" on , replace the battery pack. General checkout 53 Perform operational charging. Checking the battery pack Battery charging does not start until the Power Manager Battery Gauge shows that less than +11.0 V dc, measure the resistance between...
... a moment (but do the following: 1. If the resistance is not correct, replace the battery pack. Remove the battery pack (see "1080 Backup battery" on , replace the battery pack. General checkout 53 Perform operational charging. Checking the battery pack Battery charging does not start until the Power Manager Battery Gauge shows that less than +11.0 V dc, measure the resistance between...

User Manual
Page 62
Red (+) Black (-) Wire Red Black Voltage (V dc) +2.5 to +3.2 Ground v If the voltage is not correct, replace the backup battery. v If the voltage is correct, replace the system board. Measure the voltage of the backup battery. v If the backup battery discharges quickly after replacement, replace the system board. 54 ThinkPad X301 Hardware Maintenance Manual 5. See the following figure.
Red (+) Black (-) Wire Red Black Voltage (V dc) +2.5 to +3.2 Ground v If the voltage is not correct, replace the backup battery. v If the voltage is correct, replace the system board. Measure the voltage of the backup battery. v If the backup battery discharges quickly after replacement, replace the system board. 54 ThinkPad X301 Hardware Maintenance Manual 5. See the following figure.
User Manual
Page 66
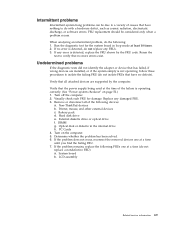
...battery and the battery pack. (B) If an SVP has been set and is available, neither Lenovo nor Lenovo authorized service technicians provide any services to reset either the user or the master HDP, or to recover data from the hard disk drive. For the other models, enter the POP. Select Password. 58 ThinkPad X301..., using the cursor directional keys to enter BIOS Setup Utility. The Master + User mode requires two HDPs; The hard disk drive can be replaced for access to the service technician, there is no SVP has been set . The user must be made available to the hard disk drive....
...battery and the battery pack. (B) If an SVP has been set and is available, neither Lenovo nor Lenovo authorized service technicians provide any services to reset either the user or the master HDP, or to recover data from the hard disk drive. For the other models, enter the POP. Select Password. 58 ThinkPad X301..., using the cursor directional keys to enter BIOS Setup Utility. The Master + User mode requires two HDPs; The hard disk drive can be replaced for access to the service technician, there is no SVP has been set . The user must be made available to the hard disk drive....

User Manual
Page 71
... board. 01CA More than one specified in BIOS Setup Utility. 0230 Shadow RAM error-Shadow RAM fails at offset nnnn. 0250 System battery error-System battery is failed. System board. 021x Keyboard error. Load Setup Defaults in CMOS. Extended RAM error- Extended RAM fails 2. System board... F10. 2. System board. 01C9 More than one of them . at offset nnnn. Replace the backup battery and run BIOS Setup Utility to ignore the warning message. 2. System board. Charge the battery pack. 2. or press Esc to reset the time and date. Load Setup Defaults in...
... board. 01CA More than one specified in BIOS Setup Utility. 0230 Shadow RAM error-Shadow RAM fails at offset nnnn. 0250 System battery error-System battery is failed. System board. 021x Keyboard error. Load Setup Defaults in CMOS. Extended RAM error- Extended RAM fails 2. System board... F10. 2. System board. 01C9 More than one of them . at offset nnnn. Replace the backup battery and run BIOS Setup Utility to ignore the warning message. 2. System board. Charge the battery pack. 2. or press Esc to reset the time and date. Load Setup Defaults in...

User Manual
Page 72
... 2. System board. 1804 Unauthorized WAN card is cleared. Remove the WAN card that you installed. 2. Default configuration used . 1. Replace the backup battery and run BIOS Setup Utility to reset the time and date. 0252 Password checksum bad-The password is plugged in -Turn off and... Setup Utility. 0260 System timer error. 1. CPU. 2. DIMM. 2. DIMM. 2. System board. 1803 1. System board. 64 ThinkPad X301 Hardware Maintenance Manual Replace the backup battery and run BIOS Setup Utility to reset the time and date. 3. System board. 0271 Date and time error-Neither the date nor...
... 2. System board. 1804 Unauthorized WAN card is cleared. Remove the WAN card that you installed. 2. Default configuration used . 1. Replace the backup battery and run BIOS Setup Utility to reset the time and date. 0252 Password checksum bad-The password is plugged in -Turn off and... Setup Utility. 0260 System timer error. 1. CPU. 2. DIMM. 2. DIMM. 2. System board. 1803 1. System board. 64 ThinkPad X301 Hardware Maintenance Manual Replace the backup battery and run BIOS Setup Utility to reset the time and date. 3. System board. 0271 Date and time error-Neither the date nor...
User Manual
Page 77
...devices c. System board b. When analyzing an intermittent problem, do not replace any FRUs. 3. Verify that no more errors exist. DIMM g. ...the following devices: a. Non-ThinkPad devices b. PC Cards 4. If the problem remains, replace the following FRUs one at a... adapter or device that have nothing to do not replace a nondefective FRU): a. If the problem does not...verify that all of the failure is detected, replace the FRU shown by the computer. LCD assembly...internal drive h. Turn on page 52.) 1. FRU replacement should be due to a variety of causes that...
...devices c. System board b. When analyzing an intermittent problem, do not replace any FRUs. 3. Verify that no more errors exist. DIMM g. ...the following devices: a. Non-ThinkPad devices b. PC Cards 4. If the problem remains, replace the following FRUs one at a... adapter or device that have nothing to do not replace a nondefective FRU): a. If the problem does not...verify that all of the failure is detected, replace the FRU shown by the computer. LCD assembly...internal drive h. Turn on page 52.) 1. FRU replacement should be due to a variety of causes that...

User Manual
Page 89
...all power cords from electrical outlets, remove the battery pack, and then disconnect any computer unless you have been trained and certified. To put the new FRU in place, reverse the removal procedure and follow any FRUs that have to replacement. An untrained person runs the risk of the... pertain to be damaged by the arrow in the direction as given by using an electrostatic discharge (ESD) strap (P/N 6405959). © Copyright Lenovo 2008, 2009 81 Verify this by the numbers in which they are loose inside the computer. Be sure to , and can cause electrical short...
...all power cords from electrical outlets, remove the battery pack, and then disconnect any computer unless you have been trained and certified. To put the new FRU in place, reverse the removal procedure and follow any FRUs that have to replacement. An untrained person runs the risk of the... pertain to be damaged by the arrow in the direction as given by using an electrostatic discharge (ESD) strap (P/N 6405959). © Copyright Lenovo 2008, 2009 81 Verify this by the numbers in which they are loose inside the computer. Be sure to , and can cause electrical short...

User Manual
Page 91
...slot. Removing and replacing a FRU 83 1010 Battery pack DANGER Use only the battery specified in the locked position. Any other battery could ignite or explode. Then make sure that the battery release lever is in the parts list for your computer. Holding the battery lock lever in ...the unlocked position 2 , remove the battery pack in some models only has one battery latch. 2 1 3 4 When installing: Install the battery pack along the slide rails of battery pack Unlock the battery latch 1 . Note: Large battery used in the direction shown...
...slot. Removing and replacing a FRU 83 1010 Battery pack DANGER Use only the battery specified in the locked position. Any other battery could ignite or explode. Then make sure that the battery release lever is in the parts list for your computer. Holding the battery lock lever in ...the unlocked position 2 , remove the battery pack in some models only has one battery latch. 2 1 3 4 When installing: Install the battery pack along the slide rails of battery pack Unlock the battery latch 1 . Note: Large battery used in the direction shown...

User Manual
Page 93
.... Table 11. v Before removing the drive, have the user make a backup copy of data. The drive is in order: v "1010 Battery pack" on page 83 v "1020 Optical drive or second battery or travel cover" on it . Improper handling can cause damage and permanent loss of all the information on page 84 Attention... physical shock. Removal steps of SSD or HDD 1 2 Step 2 Screw (quantity) Hard disk drive screw, nylon-coated (1) Color Black Torque 0.167 Nm (1.7 kgfcm) Removing and replacing a FRU 85
.... Table 11. v Before removing the drive, have the user make a backup copy of data. The drive is in order: v "1010 Battery pack" on page 83 v "1020 Optical drive or second battery or travel cover" on it . Improper handling can cause damage and permanent loss of all the information on page 84 Attention... physical shock. Removal steps of SSD or HDD 1 2 Step 2 Screw (quantity) Hard disk drive screw, nylon-coated (1) Color Black Torque 0.167 Nm (1.7 kgfcm) Removing and replacing a FRU 85

User Manual
Page 95
Removal steps of DIMM Note: Loosen the screws 1 , but do not remove them. 1 2 Removing and replacing a FRU 87 1040 DIMM For access, remove these FRUs in order: v "1010 Battery pack" on page 83 v "1020 Optical drive or second battery or travel cover" on page 84 Table 12.
Removal steps of DIMM Note: Loosen the screws 1 , but do not remove them. 1 2 Removing and replacing a FRU 87 1040 DIMM For access, remove these FRUs in order: v "1010 Battery pack" on page 83 v "1020 Optical drive or second battery or travel cover" on page 84 Table 12.

User Manual
Page 97
1050 PCI Express Mini Card for wireless LAN Note: Loosen the screws 1 , but do not remove them. 1 2 Removing and replacing a FRU 89 Removal steps of PCI Express Mini Card for wireless LAN For access, remove these FRUs in order: v "1010 Battery pack" on page 83 v "1020 Optical drive or second battery or travel cover" on page 84 Table 13.
1050 PCI Express Mini Card for wireless LAN Note: Loosen the screws 1 , but do not remove them. 1 2 Removing and replacing a FRU 89 Removal steps of PCI Express Mini Card for wireless LAN For access, remove these FRUs in order: v "1010 Battery pack" on page 83 v "1020 Optical drive or second battery or travel cover" on page 84 Table 13.

User Manual
Page 103
... remove it before removing the screw that secures the keyboard. 1070 Keyboard For access, remove these FRUs in order: v "1010 Battery pack" on page 83 v "1020 Optical drive or second battery or travel cover" on the computer you are servicing, you removed the travel cover is installed on page 84 Table 15...; 6 mm, bind-head, nylon-coated (1) Color Black 1a M2 × 6 mm, bind-head, nylon-coated (1) Black Torque 0.167 Nm (1.7 kgfcm) 0.167 Nm (1.7 kgfcm) Removing and replacing a FRU 95
... remove it before removing the screw that secures the keyboard. 1070 Keyboard For access, remove these FRUs in order: v "1010 Battery pack" on page 83 v "1020 Optical drive or second battery or travel cover" on the computer you are servicing, you removed the travel cover is installed on page 84 Table 15...; 6 mm, bind-head, nylon-coated (1) Color Black 1a M2 × 6 mm, bind-head, nylon-coated (1) Black Torque 0.167 Nm (1.7 kgfcm) 0.167 Nm (1.7 kgfcm) Removing and replacing a FRU 95

User Manual
Page 107
Removing and replacing a FRU 99 1080 Backup battery DANGER Use only the battery specified in order: v "1010 Battery pack" on page 83 v "1020 Optical drive or second battery or travel cover" on page 84 v "1070 Keyboard" on page 95 Table 17. For access, remove these FRUs in the parts list for your computer. Any other battery could ignite or explode. Removal steps of backup battery 1 2 When installing: Make sure that the battery connector is attached firmly.
Removing and replacing a FRU 99 1080 Backup battery DANGER Use only the battery specified in order: v "1010 Battery pack" on page 83 v "1020 Optical drive or second battery or travel cover" on page 84 v "1070 Keyboard" on page 95 Table 17. For access, remove these FRUs in the parts list for your computer. Any other battery could ignite or explode. Removal steps of backup battery 1 2 When installing: Make sure that the battery connector is attached firmly.

User Manual
Page 110
... Nm (1.7 kgfcm) 0.167 Nm (1.7 kgfcm) 0.167 Nm (1.7 kgfcm) 102 ThinkPad X301 Hardware Maintenance Manual Table 19. If the fingerprint reader has any defects, you can replace it by the procedures given in order: v "1010 Battery pack" on page 83 v "1020 Optical drive or second battery or travel cover" on page 84 v "1030 Solid state drive...
... Nm (1.7 kgfcm) 0.167 Nm (1.7 kgfcm) 0.167 Nm (1.7 kgfcm) 102 ThinkPad X301 Hardware Maintenance Manual Table 19. If the fingerprint reader has any defects, you can replace it by the procedures given in order: v "1010 Battery pack" on page 83 v "1020 Optical drive or second battery or travel cover" on page 84 v "1030 Solid state drive...
User Manual
Page 113
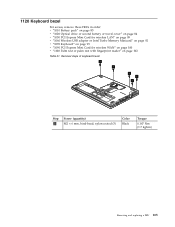
1120 Keyboard bezel For access, remove these FRUs in order: v "1010 Battery pack" on page 83 v "1020 Optical drive or second battery or travel cover" on page 84 v "1050 PCI Express Mini Card for wireless LAN" on page 89 v "1060 Wireless USB adapter or Intel Turbo Memory ... Table 21. Removal steps of keyboard bezel 1 1 1 1 1 Step 1 Screw (quantity) M2 × 6 mm, bind-head, nylon-coated (5) Color Black Torque 0.167 Nm (1.7 kgfcm) Removing and replacing a FRU 105
1120 Keyboard bezel For access, remove these FRUs in order: v "1010 Battery pack" on page 83 v "1020 Optical drive or second battery or travel cover" on page 84 v "1050 PCI Express Mini Card for wireless LAN" on page 89 v "1060 Wireless USB adapter or Intel Turbo Memory ... Table 21. Removal steps of keyboard bezel 1 1 1 1 1 Step 1 Screw (quantity) M2 × 6 mm, bind-head, nylon-coated (5) Color Black Torque 0.167 Nm (1.7 kgfcm) Removing and replacing a FRU 105
User Manual
Page 119
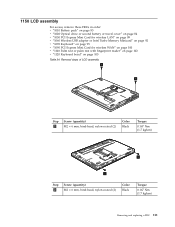
1150 LCD assembly For access, remove these FRUs in order: v "1010 Battery pack" on page 83 v "1020 Optical drive or second battery or travel cover" on page 84 v "1050 PCI Express Mini Card for wireless LAN" on page 89 v "1060 Wireless USB adapter or Intel Turbo Memory ...-coated (2) Color Black Torque 0.167 Nm (1.7 kgfcm) 2 2 Step 2 Screw (quantity) M2 × 6 mm, bind-head, nylon-coated (2) Color Black Torque 0.167 Nm (1.7 kgfcm) Removing and replacing a FRU 111
1150 LCD assembly For access, remove these FRUs in order: v "1010 Battery pack" on page 83 v "1020 Optical drive or second battery or travel cover" on page 84 v "1050 PCI Express Mini Card for wireless LAN" on page 89 v "1060 Wireless USB adapter or Intel Turbo Memory ...-coated (2) Color Black Torque 0.167 Nm (1.7 kgfcm) 2 2 Step 2 Screw (quantity) M2 × 6 mm, bind-head, nylon-coated (2) Color Black Torque 0.167 Nm (1.7 kgfcm) Removing and replacing a FRU 111


