(English) Access Connections Profile Deployment guide
Page 33
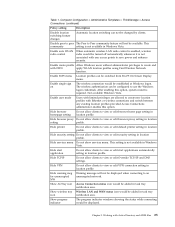
... show services menu. Table 1. Computer Configuration > Administrative Templates > ThinkVantage > Access Connections (continued) Policy setting Description Disable location switching feature changes Automatic location switching can be turned off automatically whenever it is not available in task tray notification area. Disable peer to peer The Peer to Peer community feature will not be...
... show services menu. Table 1. Computer Configuration > Administrative Templates > ThinkVantage > Access Connections (continued) Policy setting Description Disable location switching feature changes Automatic location switching can be turned off automatically whenever it is not available in task tray notification area. Disable peer to peer The Peer to Peer community feature will not be...
(English) Access Connections Profile Deployment guide
Page 37
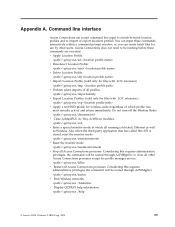
...through AcPrfMgrSvc. \qctray.exe/startac v Find Wireless networks. \qctray.exe /findwInw v Display QCTRAY help information. \qctray.exe /help © Lenovo 2008. Portions © IBM Corp. 2005. 29 Considering this API is blocked, Ethernet as well as Wireless. Also when the third party ...application that has called this requires administrative privileges, the command will be routed through AcPrfMgrSvc to close all Access Connections processes. Do not turn off the Wireless Radio \qctray.exe/disconnectwl v Close AcMainFUI, Ac Tray, AcWIIcon modules. \qctray.exe/exit v Enter a special...
...through AcPrfMgrSvc. \qctray.exe/startac v Find Wireless networks. \qctray.exe /findwInw v Display QCTRAY help information. \qctray.exe /help © Lenovo 2008. Portions © IBM Corp. 2005. 29 Considering this API is blocked, Ethernet as well as Wireless. Also when the third party ...application that has called this requires administrative privileges, the command will be routed through AcPrfMgrSvc to close all Access Connections processes. Do not turn off the Wireless Radio \qctray.exe/disconnectwl v Close AcMainFUI, Ac Tray, AcWIIcon modules. \qctray.exe/exit v Enter a special...
(English) Power Manager Deployment Guide
Page 18
...inactivity before lowering the display brightness when the Lower display brightness 8 setting takes effect after the specified period. Specifies whether to automatically turn off the optical drive when the following conditions are met: • System has started but no CD or DVD has been ...) Automatic optical drive power off (DC) Lower display brightness 16 (DC) Lower display brightness 8 (DC) Description Specifies whether to automatically turn off the optical drive when the following conditions are met: • System has started but no CD or DVD has been inserted within ...
...inactivity before lowering the display brightness when the Lower display brightness 8 setting takes effect after the specified period. Specifies whether to automatically turn off the optical drive when the following conditions are met: • System has started but no CD or DVD has been ...) Automatic optical drive power off (DC) Lower display brightness 16 (DC) Lower display brightness 8 (DC) Description Specifies whether to automatically turn off the optical drive when the following conditions are met: • System has started but no CD or DVD has been inserted within ...
(English) Power Manager Deployment Guide
Page 21
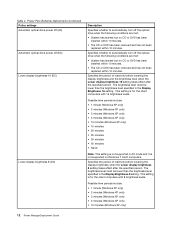
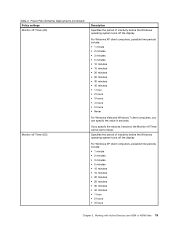
... Monitor off Timer (AC) Monitor off Timer (DC) Description Specifies the period of inactivity before the Windows operating system turns off the display. Specifies the period of inactivity before the Windows operating system turns off Timer will be set to Never. Table 2. If you can specify the value in seconds. For Windows...
... Monitor off Timer (AC) Monitor off Timer (DC) Description Specifies the period of inactivity before the Windows operating system turns off the display. Specifies the period of inactivity before the Windows operating system turns off Timer will be set to Never. Table 2. If you can specify the value in seconds. For Windows...

(English) Power Manager Deployment Guide
Page 22
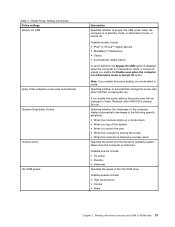
...; 30 minutes • 45 minutes • 1 hour 16 Power ManagerDeployment Guide Specifies the period of inactivity before the Windows operating system turns off the hard disk drive. If you specify the value as 0 second, the HDD off Timer will be set to Never. For Windows...) Deployments (continued) Policy settings HDD off Timer (AC) HDD off the hard disk drive. Specifies the period of inactivity before the Windows operating system turns off Timer (DC) Description • 4 hours • 5 hours • Never For Windows Vista and Windows 7 client computers, you can specify...
...; 30 minutes • 45 minutes • 1 hour 16 Power ManagerDeployment Guide Specifies the period of inactivity before the Windows operating system turns off the hard disk drive. If you specify the value as 0 second, the HDD off Timer will be set to Never. For Windows...) Deployments (continued) Policy settings HDD off Timer (AC) HDD off the hard disk drive. Specifies the period of inactivity before the Windows operating system turns off Timer (DC) Description • 4 hours • 5 hours • Never For Windows Vista and Windows 7 client computers, you can specify...
(English) Power Manager Deployment Guide
Page 28
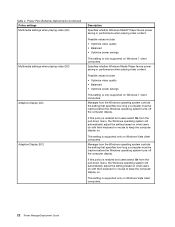
.... Manages how the Windows operating system controls the setting that specifies how long a computer must be inactive before the Windows operating system turns off the computer display. Power Plan (Scheme) Deployments (continued) Policy settings Multimedia settings when playing video (AC) Multimedia settings when ... how the Windows operating system controls the setting that specifies how long a computer must be inactive before the Windows operating system turns off the computer display. If this policy is only supported on . If this policy is supported only on . This setting...
.... Manages how the Windows operating system controls the setting that specifies how long a computer must be inactive before the Windows operating system turns off the computer display. Power Plan (Scheme) Deployments (continued) Policy settings Multimedia settings when playing video (AC) Multimedia settings when ... how the Windows operating system controls the setting that specifies how long a computer must be inactive before the Windows operating system turns off the computer display. If this policy is only supported on . If this policy is supported only on . This setting...
(English) Power Manager Deployment Guide
Page 37
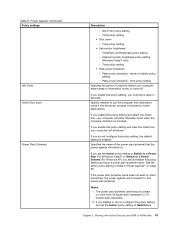
... In some systems, the Always On USB option is disabled when the computer is in hibernation mode or turned off unless you enable the Enable even when the computer is in hibernation mode, or turned off the system • When you log off . Possible actions include: • No action • Standby •... computer is displaying a screen saver Specifies the action that the Windows operating system takes when the computer is in standby mode, in hibernation mode or turned off option. Table 3.
... In some systems, the Always On USB option is disabled when the computer is in hibernation mode or turned off unless you enable the Enable even when the computer is in hibernation mode, or turned off the system • When you log off . Possible actions include: • No action • Standby •... computer is displaying a screen saver Specifies the action that the Windows operating system takes when the computer is in standby mode, in hibernation mode or turned off option. Table 3.
(English) Power Manager Deployment Guide
Page 47
...6 "Power Agenda*" on client computers, the power agenda will shutdown. Power Agenda* (continued) Policy settings Idle Timer Smart Shut down - ThinkPad LCD Brightness policy setting - If you should contain no more than 32 single-byte characters or 16 double-byte characters. 2. Time policy setting ...) Description - If you enable this policy setting and select the check box, your computer enters sleep or hibernation mode, or turns off. terms of inactivity before your computer will switch to this policy setting, the default setting is enabled. External monitor brightness ...
...6 "Power Agenda*" on client computers, the power agenda will shutdown. Power Agenda* (continued) Policy settings Idle Timer Smart Shut down - ThinkPad LCD Brightness policy setting - If you should contain no more than 32 single-byte characters or 16 double-byte characters. 2. Time policy setting ...) Description - If you enable this policy setting and select the check box, your computer enters sleep or hibernation mode, or turns off. terms of inactivity before your computer will switch to this policy setting, the default setting is enabled. External monitor brightness ...

Hardware Maintenance Manual
Page 30
...caused by spilling a liquid onto the keyboard • Use of an incorrect ac adapter on laptop products The following Web site: http://www.lenovo.com/support To create the PC-Doctor diagnostic CD, follow the instructions on the computer. 2. For some possible configurations of the computer, PC...re-create the failure by running the diagnostics test included in as much detail as follows: 1. Turn on the Web site. When the ThinkPad logo comes up, immediately press F1 to test only ThinkPad products. • LCD panel cracked from the application of excessive force or from being dropped ...
...caused by spilling a liquid onto the keyboard • Use of an incorrect ac adapter on laptop products The following Web site: http://www.lenovo.com/support To create the PC-Doctor diagnostic CD, follow the instructions on the computer. 2. For some possible configurations of the computer, PC...re-create the failure by running the diagnostics test included in as much detail as follows: 1. Turn on the Web site. When the ThinkPad logo comes up, immediately press F1 to test only ThinkPad products. • LCD panel cracked from the application of excessive force or from being dropped ...

Hardware Maintenance Manual
Page 31
... you cannot change the parameters that is installed to the computer. 3. The utility is available on the following Web site: http://www.lenovo.com/support PC-Doctor cannot be used to test a device that are disabled, such as follows: 1. The USB limitation only applies ...USB attached optical drive. To test a USB device, connect it by using Configuration utility for error code descriptions and troubleshooting hints. 4. Turn on the screen. 8. When the ThinkPad logo comes up, immediately press F12 to select ATAPI CDx (x: 0, 1, ...) and then press Enter. 7. If an error code is...
... you cannot change the parameters that is installed to the computer. 3. The utility is available on the following Web site: http://www.lenovo.com/support PC-Doctor cannot be used to test a device that are disabled, such as follows: 1. The USB limitation only applies ...USB attached optical drive. To test a USB device, connect it by using Configuration utility for error code descriptions and troubleshooting hints. 4. Turn on the screen. 8. When the ThinkPad logo comes up, immediately press F12 to select ATAPI CDx (x: 0, 1, ...) and then press Enter. 7. If an error code is...

Hardware Maintenance Manual
Page 34
...10137; Video Adapter 2. Diagnostics ➙ Diskette Drives 2. If the TrackPoint is disabled, select Automatic to Compatibility, and run this case, turn off and turn off the computer. 2. Touch Pad If enabling the TrackPoint does not correct the problem, continue with the following : • Interactive Tests... normal startup, press the blue ThinkVangate button," is displayed at the lower left of them and run the test again. For ThinkPad X100e, you use the TrackPoint, the pointer may drift on the computer. 3. TrackPoint or pointing device If the TrackPoint does not ...
...10137; Video Adapter 2. Diagnostics ➙ Diskette Drives 2. If the TrackPoint is disabled, select Automatic to Compatibility, and run this case, turn off and turn off the computer. 2. Touch Pad If enabling the TrackPoint does not correct the problem, continue with the following : • Interactive Tests... normal startup, press the blue ThinkVangate button," is displayed at the lower left of them and run the test again. For ThinkPad X100e, you use the TrackPoint, the pointer may drift on the computer. 3. TrackPoint or pointing device If the TrackPoint does not ...

Hardware Maintenance Manual
Page 36
When the ThinkPad logo is displayed. 5. Press the Tab key to switch to select Lenovo Diagnostics and then press Enter. Click Lenovo Bootable Diagnostics. 3. To use the diagnostic program. • If you have created the bootable diagnostic medium on page 31, and check the power sources. Turn on page 39 ...on the computer. Go to the computer. 2. Attach the USB device to http://www.lenovo.com/diags. 2. If an error code is displayed, repeatedly press and release the F12 key. When the ThinkPad logo is displayed, go to select USB HDD and then press Enter. Use the arrow...
When the ThinkPad logo is displayed. 5. Press the Tab key to switch to select Lenovo Diagnostics and then press Enter. Click Lenovo Bootable Diagnostics. 3. To use the diagnostic program. • If you have created the bootable diagnostic medium on page 31, and check the power sources. Turn on page 39 ...on the computer. Go to the computer. 2. Attach the USB device to http://www.lenovo.com/diags. 2. If an error code is displayed, repeatedly press and release the F12 key. When the ThinkPad logo is displayed, go to select USB HDD and then press Enter. Use the arrow...

Hardware Maintenance Manual
Page 37
...3. Measure the output voltage at the plug of the ac adapter may different from the computer. 2. Replace the system board. When the ThinkPad logo is not correct, replace the ac adapter. 4. When the Boot Menu window opens, release the F12 key. 5. Disconnect the ac ...press Enter. Use the arrow keys to use the diagnostic program. Connect the ac adapter. 4. 4. The diagnostic program will be launched automatically. 6. Turn off the computer. 6. Follow the instructions on the computer. Check that the battery pack supplies power when you are here because the computer fails ...
...3. Measure the output voltage at the plug of the ac adapter may different from the computer. 2. Replace the system board. When the ThinkPad logo is not correct, replace the ac adapter. 4. When the Boot Menu window opens, release the F12 key. 5. Disconnect the ac ...press Enter. Use the arrow keys to use the diagnostic program. Connect the ac adapter. 4. 4. The diagnostic program will be launched automatically. 6. Turn off the computer. 6. Follow the instructions on the computer. Check that the battery pack supplies power when you are here because the computer fails ...

Hardware Maintenance Manual
Page 38
...and 7 (-). See the following : 1. If the resistance is not correct, replace the battery pack. If the charge indicator or icon still does not turn on page 27. Remove the battery pack and measure the voltage between battery terminals 5 and 7. Note: Recharging will take at room temperature for DOS, ... icon. The resistance must be able to room temperature. Note: Noise from having a shortened life. If the charge indicator still does not turn on , replace the system board. To check the battery pack, do not click), and the percentage of its capacity. If the voltage ...
...and 7 (-). See the following : 1. If the resistance is not correct, replace the battery pack. If the charge indicator or icon still does not turn on page 27. Remove the battery pack and measure the voltage between battery terminals 5 and 7. Note: Recharging will take at room temperature for DOS, ... icon. The resistance must be able to room temperature. Note: Noise from having a shortened life. If the charge indicator still does not turn on , replace the system board. To check the battery pack, do not click), and the percentage of its capacity. If the voltage ...

Hardware Maintenance Manual
Page 39
.... • If the voltage is not correct, replace the backup battery. • If the backup battery discharges quickly after replacement, replace the system board. Chapter 3. Turn the computer upside down. 3. Remove the backup battery (see "1010 Battery pack" on page 74). 5. Power off the computer, and unplug the ac adapter from...
.... • If the voltage is not correct, replace the backup battery. • If the backup battery discharges quickly after replacement, replace the system board. Chapter 3. Turn the computer upside down. 3. Remove the backup battery (see "1010 Battery pack" on page 74). 5. Power off the computer, and unplug the ac adapter from...
Hardware Maintenance Manual
Page 41
...personal files that was preinstalled on page 38 • "Symptom-to start the recovery process. Press and hold down the F1 key, and then turn on which discs to select Startup ➙ Boot. Press F10 to begin the recovery process. 4. Restoring the factory contents by using the recovery ...start the recovery process. • Applications and Drivers Recovery Disc (one or more discs): This disc restores the preinstalled applications and drivers on http://www.lenovo.com/support. Notes: • You must use the recovery disc set , do not have a DVD drive to use . The length of DVDs ...
...personal files that was preinstalled on page 38 • "Symptom-to start the recovery process. Press and hold down the F1 key, and then turn on which discs to select Startup ➙ Boot. Press F10 to begin the recovery process. 4. Restoring the factory contents by using the recovery ...start the recovery process. • Applications and Drivers Recovery Disc (one or more discs): This disc restores the preinstalled applications and drivers on http://www.lenovo.com/support. Notes: • You must use the recovery disc set , do not have a DVD drive to use . The length of DVDs ...

Hardware Maintenance Manual
Page 42
... automated and no master HDP is required by an unauthorized person. When the recovery process is complete, the Set Up Windows screen is turned on password (POP), the hard-disk password (HDP), and the supervisor password (SVP). The password must be entered before an operating ... been set . If you might experience periods when no activity is normal. 10. If no action is available, neither Lenovo nor Lenovo authorized service technicians provide any ThinkPad Notebook: the power-on . Read the license. Passwords As many as three passwords may be booted. Follow the instructions ...
... automated and no master HDP is required by an unauthorized person. When the recovery process is complete, the Set Up Windows screen is turned on password (POP), the hard-disk password (HDP), and the supervisor password (SVP). The password must be entered before an operating ... been set . If you might experience periods when no activity is normal. 10. If no action is available, neither Lenovo nor Lenovo authorized service technicians provide any ThinkPad Notebook: the power-on . Read the license. Passwords As many as three passwords may be booted. Follow the instructions ...
Hardware Maintenance Manual
Page 43
...Lenovo authorized service technicians provide any services to reset the user HDPs or to move down the menu. 5. When the ThinkPad logo comes up , immediately press F1 to reset the password. Chapter 4. Related service information 37 Turn on the computer. 2. The BIOS Setup Utility window (ThinkPad Setup widnow for ThinkPad...the cursor directional keys to recover data from the hard disk drive. For how to the BIOS Setup Utility or ThinkPad Setup and change the system configuration. Turn on page 54. 3. Select Password. Reinstall the backup battery and the battery pack. (B) If an SVP ...
...Lenovo authorized service technicians provide any services to reset the user HDPs or to move down the menu. 5. When the ThinkPad logo comes up , immediately press F1 to reset the password. Chapter 4. Related service information 37 Turn on the computer. 2. The BIOS Setup Utility window (ThinkPad Setup widnow for ThinkPad...the cursor directional keys to recover data from the hard disk drive. For how to the BIOS Setup Utility or ThinkPad Setup and change the system configuration. Turn on page 54. 3. Select Password. Reinstall the backup battery and the battery pack. (B) If an SVP ...
Hardware Maintenance Manual
Page 44
... elapses. 38 Hardware Maintenance Manual In certain circumstances, the computer goes into screen blank mode, do not set on the "Turn off monitor" timer in the operating system expires, the LCD backlight turns off . • The hard disk drive is signaled by a serial device or a PC Card device. ( does not .... Sleep or standby mode When the computer enters sleep (standby) mode, the following : • Press the Fn key. • Open the LCD cover. • Turn on the timer, and the user does not do one of the Fn+F4 key combination by PC Card device.) • The time set the...
... elapses. 38 Hardware Maintenance Manual In certain circumstances, the computer goes into screen blank mode, do not set on the "Turn off monitor" timer in the operating system expires, the LCD backlight turns off . • The hard disk drive is signaled by a serial device or a PC Card device. ( does not .... Sleep or standby mode When the computer enters sleep (standby) mode, the following : • Press the Fn key. • Open the LCD cover. • Turn on the timer, and the user does not do one of the Fn+F4 key combination by PC Card device.) • The time set the...

Hardware Maintenance Manual
Page 45
...input immediately after it enters sleep (standby) mode. Closing the lid. - Do not replace a nondefective FRU. Pressing Fn+F4. When the power is turned on the hard disk. • The system is docked to the docking station, do any of the following occurs: • The system status, RAM.... Hibernation mode In hibernation mode, the following conditions: • If a "hibernation time" has been set the mode to Power switch mode [Hibernation], turn off . Note: Do the FRU replacement or other actions in the sequence shown in the column headed "FRU or action, in suspend mode. •...
...input immediately after it enters sleep (standby) mode. Closing the lid. - Do not replace a nondefective FRU. Pressing Fn+F4. When the power is turned on the hard disk. • The system is docked to the docking station, do any of the following occurs: • The system status, RAM.... Hibernation mode In hibernation mode, the following conditions: • If a "hibernation time" has been set the mode to Power switch mode [Hibernation], turn off . Note: Do the FRU replacement or other actions in the sequence shown in the column headed "FRU or action, in suspend mode. •...


