(English) Access Connections Profile Deployment guide
Page 13
... command can be used to restart the system later. For example: C:\Drivers\W2k\Accon. 3. To install silently from a CD, type: \silent.bat Note: If you are installing Access Connections onto Windows Vista, install the Access Connections designed specifically for install log, type: ...: 1. d) Copy the script file generated at C:\Windows\setup.iss to the hard disk drive. Chapter 2. To install interactively, type: \setup.exe b. Extract the Access Connections software package to your local directory. © Lenovo 2008. To install silently with customized setup script with...
... command can be used to restart the system later. For example: C:\Drivers\W2k\Accon. 3. To install silently from a CD, type: \silent.bat Note: If you are installing Access Connections onto Windows Vista, install the Access Connections designed specifically for install log, type: ...: 1. d) Copy the script file generated at C:\Windows\setup.iss to the hard disk drive. Chapter 2. To install interactively, type: \setup.exe b. Extract the Access Connections software package to your local directory. © Lenovo 2008. To install silently with customized setup script with...
(English) Access Connections Profile Deployment guide
Page 29
... and import the distribution package silently. For © Lenovo 2008. After restarting the system, Access Connection is C:\Program Files\ThinkPad\ConnectUtilities). 4. Include the distribution package .loa and ....sig files in deploying Access Connections: v Deploy Access Connections and Location Profiles on page 31 with the Location Profiles that was not selected, a user can select import from the manage profiles window... Wireless LAN driver/application, Hotkey Fn+F5 utility, and Power Management...
... and import the distribution package silently. For © Lenovo 2008. After restarting the system, Access Connection is C:\Program Files\ThinkPad\ConnectUtilities). 4. Include the distribution package .loa and ....sig files in deploying Access Connections: v Deploy Access Connections and Location Profiles on page 31 with the Location Profiles that was not selected, a user can select import from the manage profiles window... Wireless LAN driver/application, Hotkey Fn+F5 utility, and Power Management...
Hardware Maintenance Manual - ThinkPad T430s and T430si
Page 40
...turn on the screen for several times and you might want to save the ThinkPad Setup configuration changes. If you want to the original factory configuration. Operating System Recovery Disc (one disc) Applications and Drivers Recovery Disc (one to two hours to the software that you agree with ... to the original factory configuration using the following : Note: Recovery can use . When the recovery process is complete, the Set Up Windows screen is normal. 10. Start ThinkPad Setup and then press F9 to restore the default settings. Not all of time depends on the computer.
...turn on the screen for several times and you might want to save the ThinkPad Setup configuration changes. If you want to the original factory configuration. Operating System Recovery Disc (one disc) Applications and Drivers Recovery Disc (one to two hours to the software that you agree with ... to the original factory configuration using the following : Note: Recovery can use . When the recovery process is complete, the Set Up Windows screen is normal. 10. Start ThinkPad Setup and then press F9 to restore the default settings. Not all of time depends on the computer.
Hardware Maintenance Manual - ThinkPad T430s and T430si
Page 51
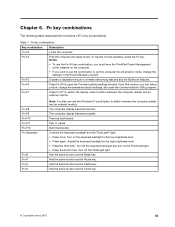
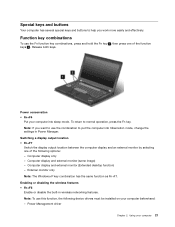
...as the SysRq key. Has the same function as the ScrLK key. © Copyright Lenovo 2012 45 Fn+F5 Enables or disables the built-in the Power Manager program. The ...keyboard backlight to switch between the computer display and an external monitor. From this window, you want to use the Windows+P combination to the high brightness level. • Press the third time: Turn ...features. Notes: • To use the Fn+F4 key combination, you must have the ThinkPad Power Management driver installed on the ThinkLight light. • Press the fourth time: Turn off the keyboard backlight...
...as the SysRq key. Has the same function as the ScrLK key. © Copyright Lenovo 2012 45 Fn+F5 Enables or disables the built-in the Power Manager program. The ...keyboard backlight to switch between the computer display and an external monitor. From this window, you want to use the Windows+P combination to the high brightness level. • Press the third time: Turn ...features. Notes: • To use the Fn+F4 key combination, you must have the ThinkPad Power Management driver installed on the ThinkLight light. • Press the fourth time: Turn off the keyboard backlight...
(English) User Guide
Page 3
...29 Handling the battery 30 Connecting to the network 32 © Copyright Lenovo 2012 Ethernet connections 32 Wireless connections 32 Presentations and multimedia 36 Changing display...Special keys and buttons 21 Function key combinations 21 Volume and mute buttons 23 Windows key 24 Using the UltraNav pointing device 24 Using the TrackPoint pointing device .... 26 Disabling the UltraNav pointing device and using a rescue medium 64 Reinstalling preinstalled applications and device drivers 65 Solving recovery problems 66 i vii Safety guidelines vii Chapter 1. Recovery overview . . . ...
...29 Handling the battery 30 Connecting to the network 32 © Copyright Lenovo 2012 Ethernet connections 32 Wireless connections 32 Presentations and multimedia 36 Changing display...Special keys and buttons 21 Function key combinations 21 Volume and mute buttons 23 Windows key 24 Using the UltraNav pointing device 24 Using the TrackPoint pointing device .... 26 Disabling the UltraNav pointing device and using a rescue medium 64 Reinstalling preinstalled applications and device drivers 65 Solving recovery problems 66 i vii Safety guidelines vii Chapter 1. Recovery overview . . . ...
(English) User Guide
Page 4
...Setting management features 128 Chapter 9. Chapter 6. Getting support . . . . 155 Before you begin 111 Installing Windows 7 operating system . . . 112 Installing device drivers 113 ThinkPad Setup 114 Main menu 114 Config menu 115 Date/Time menu 121 Security menu 121 Startup menu 125 Restart menu...Attaching a ThinkPad port replicator or docking station 105 Detaching a ThinkPad port replicator or docking station 108 Security feature 108 Using the system lock key 109 Chapter 8. Advanced configuration 111 Installing a new operating system 111 Before you contact Lenovo 155 ...
...Setting management features 128 Chapter 9. Chapter 6. Getting support . . . . 155 Before you begin 111 Installing Windows 7 operating system . . . 112 Installing device drivers 113 ThinkPad Setup 114 Main menu 114 Config menu 115 Date/Time menu 121 Security menu 121 Startup menu 125 Restart menu...Attaching a ThinkPad port replicator or docking station 105 Detaching a ThinkPad port replicator or docking station 108 Security feature 108 Using the system lock key 109 Chapter 8. Advanced configuration 111 Installing a new operating system 111 Before you contact Lenovo 155 ...
(English) User Guide
Page 32
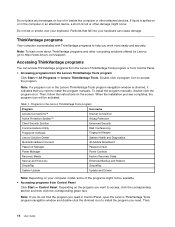
...you need in Control Panel, open the Lenovo ThinkVantage Tools program navigation window and double-click the dimmed icon to install the program you want to install the program manually. Double-click a program icon to http://www.lenovo.com/support. To install the program manually... Factory Recovery Disks Rescue and Recovery Enhanced Backup and Restore SimpleTap SimpleTap System Update Update and Drivers Note: Depending on or in the Lenovo ThinkVantage Tools program navigation window is preinstalled with ThinkVantage programs to help you need . Do not place any beverages on ...
...you need in Control Panel, open the Lenovo ThinkVantage Tools program navigation window and double-click the dimmed icon to install the program you want to install the program manually. Double-click a program icon to http://www.lenovo.com/support. To install the program manually... Factory Recovery Disks Rescue and Recovery Enhanced Backup and Restore SimpleTap SimpleTap System Update Update and Drivers Note: Depending on or in the Lenovo ThinkVantage Tools program navigation window is preinstalled with ThinkVantage programs to help you need . Do not place any beverages on ...

(English) User Guide
Page 35
... access the Lenovo App Shop, from system crashes, even if you with a quick way to customize some basic computer settings such as muting the speakers, adjusting the volume, locking the computer operating system, launching a program, opening a Web page, opening a file, and so on. Product overview 17 Chapter 1. To start the Windows operating... of the following: • Click the red SimpleTap launch point on your computer up-to-date by downloading and installing software packages (ThinkVantage programs, device drivers, UEFI BIOS updates, and other third party applications).
... access the Lenovo App Shop, from system crashes, even if you with a quick way to customize some basic computer settings such as muting the speakers, adjusting the volume, locking the computer operating system, launching a program, opening a Web page, opening a file, and so on. Product overview 17 Chapter 1. To start the Windows operating... of the following: • Click the red SimpleTap launch point on your computer up-to-date by downloading and installing software packages (ThinkVantage programs, device drivers, UEFI BIOS updates, and other third party applications).
(English) User Guide
Page 39
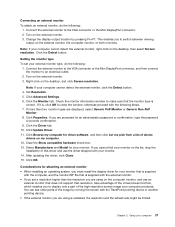
... display output location between the computer display and an external monitor by selecting one of the following device drivers must be installed on your computer 21 Power Management driver Chapter 2. External monitor only Note: The Windows+P key combination has the same function as Fn+F7. Computer display and external monitor (same image) - Computer...
... display output location between the computer display and an external monitor by selecting one of the following device drivers must be installed on your computer 21 Power Management driver Chapter 2. External monitor only Note: The Windows+P key combination has the same function as Fn+F7. Computer display and external monitor (same image) - Computer...

(English) User Guide
Page 40
... the same function as the ScrLK key. 22 User Guide OnScreen Display Utility - Adjusting the brightness level of this window, you can download these drivers from http://www.lenovo.com/ThinkPadDrivers. Multimedia controls • Fn+F10: Previous track/scene • Fn+F11: Play or pause •... again: Adjust the keyboard backlight to open the Communications Utility program. Wireless device drivers You can take a picture, change the camera and audio settings, and open the Communications settings window. Press the third time: Turn off the ThinkLight light. Changing the camera and...
... the same function as the ScrLK key. 22 User Guide OnScreen Display Utility - Adjusting the brightness level of this window, you can download these drivers from http://www.lenovo.com/ThinkPadDrivers. Multimedia controls • Fn+F10: Previous track/scene • Fn+F11: Play or pause •... again: Adjust the keyboard backlight to open the Communications Utility program. Wireless device drivers You can take a picture, change the camera and audio settings, and open the Communications settings window. Press the third time: Turn off the ThinkLight light. Changing the camera and...
(English) User Guide
Page 55
... select Generic PnP Monitor or Generic Non-PnP Monitor. 8. Chapter 2. Set Resolution. 5. Check the monitor information window to make sure that the monitor type is , click OK to close the window; Click Update Driver. 11. Clear the Show compatible hardware check box. 13. Click OK. After updating the... driver, click Close. 15. You can see other parts of this driver and use an external monitor that does not support ...
... select Generic PnP Monitor or Generic Non-PnP Monitor. 8. Chapter 2. Set Resolution. 5. Check the monitor information window to make sure that the monitor type is , click OK to close the window; Click Update Driver. 11. Clear the Show compatible hardware check box. 13. Click OK. After updating the... driver, click Close. 15. You can see other parts of this driver and use an external monitor that does not support ...
(English) User Guide
Page 79
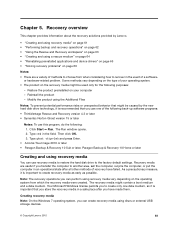
...might be used only for the following : 1. Creating recovery media Note: On the Windows 7 operating system, you can create recovery media using recovery media vary depending on the recovery media might be caused by Lenovo. • "Creating and using recovery media" on page 61 • "Performing..., Paragon Backup & Recovery 10 Home or later Creating and using a rescue medium" on page 64 • "Reinstalling preinstalled applications and device drivers" on page 65 • "Solving recovery problems" on page 63 • "Creating and using recovery media You can perform using discs or...
...might be used only for the following : 1. Creating recovery media Note: On the Windows 7 operating system, you can create recovery media using recovery media vary depending on the recovery media might be caused by Lenovo. • "Creating and using recovery media" on page 61 • "Performing..., Paragon Backup & Recovery 10 Home or later Creating and using a rescue medium" on page 64 • "Reinstalling preinstalled applications and device drivers" on page 65 • "Solving recovery problems" on page 63 • "Creating and using recovery media You can perform using discs or...
(English) User Guide
Page 80
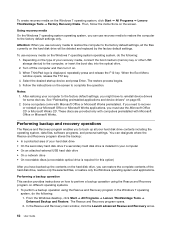
...the boot medium (memory key or other USB storage device) to complete the operation. When ThinkPad logo is required for some devices. See "Reinstalling preinstalled applications and device drivers" on the screen. Depending on the hard disk drive will be deleted and replaced by the... factory default settings. To create recovery media on . 3. Turn off the computer and then turn it on the Windows 7 operating system, click Start ➙ All Programs ➙ Lenovo ...
...the boot medium (memory key or other USB storage device) to complete the operation. When ThinkPad logo is required for some devices. See "Reinstalling preinstalled applications and device drivers" on the screen. Depending on the hard disk drive will be deleted and replaced by the... factory default settings. To create recovery media on . 3. Turn off the computer and then turn it on the Windows 7 operating system, click Start ➙ All Programs ➙ Lenovo ...
(English) User Guide
Page 82
...drivers" on the computer. These discs are provided only with computers preinstalled with Microsoft Office or Microsoft Works preinstalled. From the Windows desktop, click Start ➙ All Programs ➙ Lenovo ThinkVantage Tools ➙ Enhanced Backup and Restore. The Create Rescue and Recovery Media window...using a disc, use the following instructions to use the rescue medium: 1. Creating a rescue medium To create a rescue medium on the Windows 7 operating system, do the following : • To rescue files from your hard disk drive. Using a rescue medium This section provides...
...drivers" on the computer. These discs are provided only with computers preinstalled with Microsoft Office or Microsoft Works preinstalled. From the Windows desktop, click Start ➙ All Programs ➙ Lenovo ThinkVantage Tools ➙ Enhanced Backup and Restore. The Create Rescue and Recovery Media window...using a disc, use the following instructions to use the rescue medium: 1. Creating a rescue medium To create a rescue medium on the Windows 7 operating system, do the following : • To rescue files from your hard disk drive. Using a rescue medium This section provides...
(English) User Guide
Page 83
...to the C:\SWTOOLS directory. 3. Reinstalling preinstalled applications To reinstall selected application programs, do the following : 1. Reinstall the device driver by use of the following instructions to use the Add New Hardware program (in the startup device sequence to the C:\SWTOOLS ... the recovery process. Not all device drivers can use the rescue medium: 1. Go to start the rescue medium. When the Boot Menu window opens, release the F12 key. 3. Reinstalling preinstalled device drivers Attention: When you reinstall device drivers, you can be reinstalled by one ...
...to the C:\SWTOOLS directory. 3. Reinstalling preinstalled applications To reinstall selected application programs, do the following : 1. Reinstall the device driver by use of the following instructions to use the Add New Hardware program (in the startup device sequence to the C:\SWTOOLS ... the recovery process. Not all device drivers can use the rescue medium: 1. Go to start the rescue medium. When the Boot Menu window opens, release the F12 key. 3. Reinstalling preinstalled device drivers Attention: When you reinstall device drivers, you can be reinstalled by one ...
(English) User Guide
Page 84
... startup device sequence. For more information, see "Startup menu" on page 132. Solving recovery problems If you need updated device drivers, do one of the following: • Use a rescue medium to temporarily or permanently change the startup device sequence, see "Making sure device...and store them in the ThinkPad Setup program. Note: If you are unable to the factory default settings. Attention: If you need to restore the hard disk drive to access the Rescue and Recovery workspace or the Windows environment, do not download them from Lenovo. Obtain them from a ...
... startup device sequence. For more information, see "Startup menu" on page 132. Solving recovery problems If you need updated device drivers, do one of the following: • Use a rescue medium to temporarily or permanently change the startup device sequence, see "Making sure device...and store them in the ThinkPad Setup program. Note: If you are unable to the factory default settings. Attention: If you need to restore the hard disk drive to access the Rescue and Recovery workspace or the Windows environment, do not download them from Lenovo. Obtain them from a ...
(English) User Guide
Page 129
... 64-bit version of the following: © Copyright Lenovo 2012 111 Advanced configuration While it was when the Windows operating system image was installed. The UEFI BIOS features are in the C:\SWTOOLS directory to a removable storage device, to install the supplement files and ThinkPad device drivers for the "cache" function purpose only. This topic...
... 64-bit version of the following: © Copyright Lenovo 2012 111 Advanced configuration While it was when the Windows operating system image was installed. The UEFI BIOS features are in the C:\SWTOOLS directory to a removable storage device, to install the supplement files and ThinkPad device drivers for the "cache" function purpose only. This topic...
(English) User Guide
Page 130
... HD Detection Installing the Windows 7 update module package The Windows 7 update modules are in C:\SWTOOLS\DRIVERS\INTELINF\infinst_autol. 9. Restore C:\SWTOOLS from Standby for Energy Star • Fix for Windows 2000/XP/Vista/7. To install the Windows 7 operating system and its related software on page 113. Before you start , print these instructions. Start ThinkPad Setup. 2. Select UEFI...
... HD Detection Installing the Windows 7 update module package The Windows 7 update modules are in C:\SWTOOLS\DRIVERS\INTELINF\infinst_autol. 9. Restore C:\SWTOOLS from Standby for Energy Star • Fix for Windows 2000/XP/Vista/7. To install the Windows 7 operating system and its related software on page 113. Before you start , print these instructions. Start ThinkPad Setup. 2. Select UEFI...

(English) User Guide
Page 131
... system If your hard disk drive or solid state drive, download the ThinkPad monitor file for Windows 2000/XP/Vista/7 is installed with the Windows 7 operating system, it from the Lenovo Support Web site at: http://www.lenovo.com/support Installing the driver for USB 3.0 on your computer is in -1 media card reader, you need to...
... system If your hard disk drive or solid state drive, download the ThinkPad monitor file for Windows 2000/XP/Vista/7 is installed with the Windows 7 operating system, it from the Lenovo Support Web site at: http://www.lenovo.com/support Installing the driver for USB 3.0 on your computer is in -1 media card reader, you need to...

(English) User Guide
Page 132
... OK and close the Display Properties window. 16. Installing other device drivers and software The device drivers are protected by pressing Enter instead of entering the supervisor password. ThinkPad Setup Your computer comes with the ThinkPad Setup program to enable you to ...lenovo.com/ThinkPadDrivers. You also can start ThinkPad Setup, do this monitor INF file. Move the cursor to load the default settings or discard the changes. 6. then press Enter. Select Browse my computer for restarting your computer; Specify path C:\SWTOOLS\DRIVERS\MONITOR to close the Display Settings window...
... OK and close the Display Properties window. 16. Installing other device drivers and software The device drivers are protected by pressing Enter instead of entering the supervisor password. ThinkPad Setup Your computer comes with the ThinkPad Setup program to enable you to ...lenovo.com/ThinkPadDrivers. You also can start ThinkPad Setup, do this monitor INF file. Move the cursor to load the default settings or discard the changes. 6. then press Enter. Select Browse my computer for restarting your computer; Specify path C:\SWTOOLS\DRIVERS\MONITOR to close the Display Settings window...


