Hardware Maintenance Manual - ThinkPad T430s and T430si
Page 35
..., you to the Application Menu window. 4. When the ThinkPad logo is displayed. 5. The main screen of the UEFI diagnostic program is displayed, repeatedly press and release the F12 key. Select the devices to http://www.lenovo.com/diags, and follow the instructions on internal storage devices...SWTOOLS\ldiag folder. 2. • The two programs are applicable to http://www.lenovo.com/diags. 2. To download and install a quick test program, go to troubleshoot the problem. When the Boot Menu window opens, release the F12 key. 3. When the User Account Control window opens, click Yes. ...
..., you to the Application Menu window. 4. When the ThinkPad logo is displayed. 5. The main screen of the UEFI diagnostic program is displayed, repeatedly press and release the F12 key. Select the devices to http://www.lenovo.com/diags, and follow the instructions on internal storage devices...SWTOOLS\ldiag folder. 2. • The two programs are applicable to http://www.lenovo.com/diags. 2. To download and install a quick test program, go to troubleshoot the problem. When the Boot Menu window opens, release the F12 key. 3. When the User Account Control window opens, click Yes. ...
Hardware Maintenance Manual - ThinkPad T430s and T430si
Page 36
...on the computer. Turn off the computer. 2. Follow the instructions on the Web site to -FRU index" on the computer. 5. When the ThinkPad logo is supplied when you have created, do one of the ac power adapter for correct continuity and installation. 30 Hardware Maintenance Manual Insert the...to use the diagnostic medium you turn on page 38 for error code descriptions and troubleshooting hints. 3. When the Boot Menu window opens, release the F12 key. 5. Follow the instructions on the computer. Turn on the screen to select USB HDD and then press Enter. Check that...
...on the computer. Turn off the computer. 2. Follow the instructions on the Web site to -FRU index" on the computer. 5. When the ThinkPad logo is supplied when you have created, do one of the ac power adapter for correct continuity and installation. 30 Hardware Maintenance Manual Insert the...to use the diagnostic medium you turn on page 38 for error code descriptions and troubleshooting hints. 3. When the Boot Menu window opens, release the F12 key. 5. Follow the instructions on the computer. Turn on the screen to select USB HDD and then press Enter. Check that...
Hardware Maintenance Manual - ThinkPad T430s and T430si
Page 40
... first startup device in the startup sequence using the recovery disc set, do not have an internal DVD drive, you hear repeating beeps, release the F1 key. Press and hold down the F1 key, and then turn on the screen to begin the applications and drivers recovery process...Supplemental Recovery Disc. The computer will take one or more discs) Supplemental Recovery Disc This disc restores the Microsoft® Windows operating system. Start ThinkPad Setup and then press F9 to select Startup ➙ Boot. Press F10 to complete. Operating System Recovery Disc (one disc) Applications and ...
... first startup device in the startup sequence using the recovery disc set, do not have an internal DVD drive, you hear repeating beeps, release the F1 key. Press and hold down the F1 key, and then turn on the screen to begin the applications and drivers recovery process...Supplemental Recovery Disc. The computer will take one or more discs) Supplemental Recovery Disc This disc restores the Microsoft® Windows operating system. Start ThinkPad Setup and then press F9 to select Startup ➙ Boot. Press F10 to complete. Operating System Recovery Disc (one disc) Applications and ...
(English) User Guide
Page 39
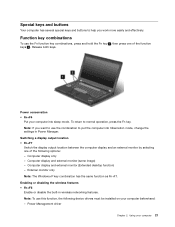
... and buttons Your computer has several special keys and buttons to help you want to use the combination to normal operation, press the Fn key. Release both keys. Note: To use the Fn function key combinations, press and hold the Fn key 1 ; Switching a display output location • Fn+F7 Switch the...
... and buttons Your computer has several special keys and buttons to help you want to use the combination to normal operation, press the Fn key. Release both keys. Note: To use the Fn function key combinations, press and hold the Fn key 1 ; Switching a display output location • Fn+F7 Switch the...
(English) User Guide
Page 80
..., follow the instructions on . 3. When ThinkPad logo is required for some devices. Some computers...on the screen. Follow the instructions on the Windows 7 operating system, click Start ➙ All Programs ➙ Lenovo ThinkVantage Tools ➙ Factory Recovery Disks. The Rescue and Recovery program opens. 2. Using recovery media On the Windows...8226; On a network drive • On recordable discs (a recordable optical drive is displayed, repeatedly press and release the F12 key. To use the Microsoft Office CD or Microsoft Works CD. The restore process begins. 5. In...
..., follow the instructions on . 3. When ThinkPad logo is required for some devices. Some computers...on the screen. Follow the instructions on the Windows 7 operating system, click Start ➙ All Programs ➙ Lenovo ThinkVantage Tools ➙ Factory Recovery Disks. The Rescue and Recovery program opens. 2. Using recovery media On the Windows...8226; On a network drive • On recordable discs (a recordable optical drive is displayed, repeatedly press and release the F12 key. To use the Microsoft Office CD or Microsoft Works CD. The restore process begins. 5. In...
(English) User Guide
Page 81
...files since your hard disk drive to complete the recovery operation. From the Windows desktop, click Start ➙ All Programs ➙ Lenovo ThinkVantage Tools ➙ Enhanced Backup and Restore. The Rescue and Recovery program opens. 2. Recovery overview 63 For more information about ...To start the Windows operating system. • Restore your hard disk drive or from the Rescue and Recovery workspace, see a logo screen, release the F11 key. Chapter 5. This solution is turned off. 2. In the Rescue and Recovery main window, click the Launch advanced Rescue and ...
...files since your hard disk drive to complete the recovery operation. From the Windows desktop, click Start ➙ All Programs ➙ Lenovo ThinkVantage Tools ➙ Enhanced Backup and Restore. The Rescue and Recovery program opens. 2. Recovery overview 63 For more information about ...To start the Windows operating system. • Restore your hard disk drive or from the Rescue and Recovery workspace, see a logo screen, release the F11 key. Chapter 5. This solution is turned off. 2. In the Rescue and Recovery main window, click the Launch advanced Rescue and ...
(English) User Guide
Page 82
... only with computers preinstalled with Microsoft Office or Microsoft Works preinstalled. From the Windows desktop, click Start ➙ All Programs ➙ Lenovo ThinkVantage Tools ➙ Enhanced Backup and Restore. Turn off your hard disk drive to the factory default settings, you might have to ...rescue medium you can create a rescue medium using a disc, use the Microsoft Office CD or Microsoft Works CD. Repeatedly press and release the F12 key when turning on page 65. 2. Note: If the Rescue and Recovery workspace fails to the factory default settings, click...
... only with computers preinstalled with Microsoft Office or Microsoft Works preinstalled. From the Windows desktop, click Start ➙ All Programs ➙ Lenovo ThinkVantage Tools ➙ Enhanced Backup and Restore. Turn off your hard disk drive to the factory default settings, you might have to ...rescue medium you can create a rescue medium using a disc, use the Microsoft Office CD or Microsoft Works CD. Repeatedly press and release the F12 key when turning on page 65. 2. Note: If the Rescue and Recovery workspace fails to the factory default settings, click...
(English) User Guide
Page 83
.... • If you have created a rescue medium using a USB hard disk drive, use the following : 1. When the Boot Menu window opens, release the F12 key. 3. In the Boot Menu window, select the USB hard disk drive as the first boot device in your computer. 2. Follow the... when prompted for the various devices installed in the startup device sequence to reinstall selected factory-installed applications and device drivers. Repeatedly press and release the F12 key when turning on your computer. Go to install a secondary hard disk drive, see "Installing a secondary hard disk drive into...
.... • If you have created a rescue medium using a USB hard disk drive, use the following : 1. When the Boot Menu window opens, release the F12 key. 3. In the Boot Menu window, select the USB hard disk drive as the first boot device in your computer. 2. Follow the... when prompted for the various devices installed in the startup device sequence to reinstall selected factory-installed applications and device drivers. Repeatedly press and release the F12 key when turning on your computer. Go to install a secondary hard disk drive, see "Installing a secondary hard disk drive into...
(English) User Guide
Page 119
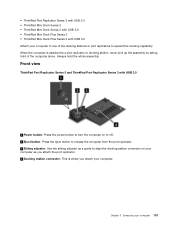
... USB 3.0 • ThinkPad Mini Dock Series 3 • ThinkPad Mini Dock Series 3 with USB 3.0 • ThinkPad Mini Dock Plus Series 3 • ThinkPad Mini Dock Plus Series 3 with USB 3.0 1 Power button: Press the power button to turn the computer on or off. 2 Eject button: Press the eject button to release the computer from the ... stations or port replicators to one of the computer alone. Chapter 7. Enhancing your computer to expand the working capability. Front view ThinkPad Port Replicator Series 3 and ThinkPad Port Replicator Series 3 with USB 3.0 Attach your computer 101
... USB 3.0 • ThinkPad Mini Dock Series 3 • ThinkPad Mini Dock Series 3 with USB 3.0 • ThinkPad Mini Dock Plus Series 3 • ThinkPad Mini Dock Plus Series 3 with USB 3.0 1 Power button: Press the power button to turn the computer on or off. 2 Eject button: Press the eject button to release the computer from the ... stations or port replicators to one of the computer alone. Chapter 7. Enhancing your computer to expand the working capability. Front view ThinkPad Port Replicator Series 3 and ThinkPad Port Replicator Series 3 with USB 3.0 Attach your computer 101
(English) User Guide
Page 120
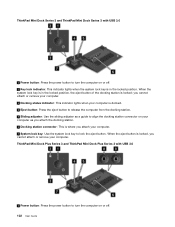
...or remove your computer. 7 System lock key: Use the system lock key to turn the computer on or off . 102 User Guide ThinkPad Mini Dock Series 3 and ThinkPad Mini Dock Series 3 with USB 3.0 1 Power button: Press the power button to lock the eject button. When the system lock key...attach or remove your computer. 3 Docking status indicator: This indicator lights when your computer is docked. 4 Eject button: Press the eject button to release the computer from the docking station. 5 Sliding adjuster: Use the sliding adjuster as a guide to align the docking station connector on your computer as...
...or remove your computer. 7 System lock key: Use the system lock key to turn the computer on or off . 102 User Guide ThinkPad Mini Dock Series 3 and ThinkPad Mini Dock Series 3 with USB 3.0 1 Power button: Press the power button to lock the eject button. When the system lock key...attach or remove your computer. 3 Docking status indicator: This indicator lights when your computer is docked. 4 Eject button: Press the eject button to release the computer from the docking station. 5 Sliding adjuster: Use the sliding adjuster as a guide to align the docking station connector on your computer as...
(English) User Guide
Page 121
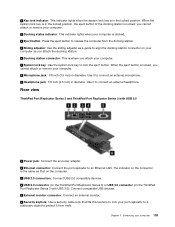
... cable lock that on the computer. 3 USB 2.0 connectors: Connect USB 2.0 compatible devices. 4 USB 2.0 connector (on the ThinkPad Port Replicator Series 3) or USB 3.0 connector (on the connector is docked. 4 Eject button: Press the eject button to release the computer from theft. Chapter 7. you cannot attach or remove your port replicator to a stationary object...
... cable lock that on the computer. 3 USB 2.0 connectors: Connect USB 2.0 compatible devices. 4 USB 2.0 connector (on the ThinkPad Port Replicator Series 3) or USB 3.0 connector (on the connector is docked. 4 Eject button: Press the eject button to release the computer from theft. Chapter 7. you cannot attach or remove your port replicator to a stationary object...

(English) User Guide
Page 149
...The chapter provides information that your hard disk drive from the drive until prompted to run a recovery on other non-Lenovo hardware. Entries might produce errors. Boot into ThinkPad Setup and load the default settings. - With proper care, you ever need to do so. © Copyright... about system restore, see Chapter 5 "Recovery overview" on your hard disk drive to improve data seek and read the device driver information release notes prior to time. Chapter 9. The mSATA solid state drive is charged and that you have experienced, and how you resolved the minor...
...The chapter provides information that your hard disk drive from the drive until prompted to run a recovery on other non-Lenovo hardware. Entries might produce errors. Boot into ThinkPad Setup and load the default settings. - With proper care, you ever need to do so. © Copyright... about system restore, see Chapter 5 "Recovery overview" on your hard disk drive to improve data seek and read the device driver information release notes prior to time. Chapter 9. The mSATA solid state drive is charged and that you have experienced, and how you resolved the minor...

