(English) Power Manager Deployment Guide
Page 28
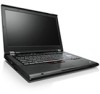
... On from the pull-down menu, the Windows operating system will automatically adjust the setting based on what users do with their keyboard or mouse to keep the computer display on Windows Vista client computers. 22 Power ManagerDeployment Guide This setting is only supported on ... users select On from the pull-down menu, the Windows operating system will automatically adjust the setting based on what users do with their keyboard or mouse to keep the computer display on Windows 7 client computers. Possible values include: • Optimize video quality • Balanced &#...
... On from the pull-down menu, the Windows operating system will automatically adjust the setting based on what users do with their keyboard or mouse to keep the computer display on Windows Vista client computers. 22 Power ManagerDeployment Guide This setting is only supported on ... users select On from the pull-down menu, the Windows operating system will automatically adjust the setting based on what users do with their keyboard or mouse to keep the computer display on Windows 7 client computers. Possible values include: • Optimize video quality • Balanced &#...
(Simplified Chinese) Lenovo AutoLock Deployment Guide
Page 12
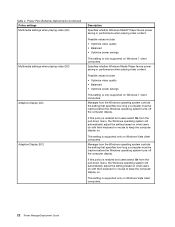
...22312;运行 Active Directory gpedit.msc C:\Windows\PolicyDefinitions ADMX 文件。 5 Lenovo ThinkVantage 6. 展开 Lenovo ThinkVantage AutoLock 常规设置 AutoLock Lenovo ThinkVantage 组件 ➙ AutoLock Windows 7 表 1 策略设...;置 描述 Define second(s) to display notification Define Lenovo AutoLock execution AutoLock。 Define second(s) to begin camera detection from when the keyboard or mouse is not in use Define the behavior when the ...
...22312;运行 Active Directory gpedit.msc C:\Windows\PolicyDefinitions ADMX 文件。 5 Lenovo ThinkVantage 6. 展开 Lenovo ThinkVantage AutoLock 常规设置 AutoLock Lenovo ThinkVantage 组件 ➙ AutoLock Windows 7 表 1 策略设...;置 描述 Define second(s) to display notification Define Lenovo AutoLock execution AutoLock。 Define second(s) to begin camera detection from when the keyboard or mouse is not in use Define the behavior when the ...

(Japanese) Lenovo AutoLock Deployment Guide
Page 13
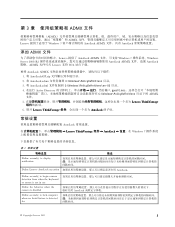
表 1 Define second(s) to display notification 説明 Define Lenovo AutoLock execution Define second(s) to begin camera detection from when the keyboard or mouse is not in use AutoLock Define the behavior when the camera is disabled AutoLock Define second(s) to lock computer when no facial feature is detected for Turn off the automatic lock function 2 while a second display is connected AutoLock Display notification before the computer automatically locks 6 Lenovo AutoLock
表 1 Define second(s) to display notification 説明 Define Lenovo AutoLock execution Define second(s) to begin camera detection from when the keyboard or mouse is not in use AutoLock Define the behavior when the camera is disabled AutoLock Define second(s) to lock computer when no facial feature is detected for Turn off the automatic lock function 2 while a second display is connected AutoLock Display notification before the computer automatically locks 6 Lenovo AutoLock
(English) Lenovo AutoLock Deployment Guide
Page 13
... be downloaded from when the keyboard or mouse is not in use the AutoLock ADMX files with the AutoLock general policy settings. Working with Group Policy and ADMX files Group Policy and Administrative Template (ADMX) files provide administrators the ability to save your time and effort, Lenovo provides the AutoLock ADMX files...
... be downloaded from when the keyboard or mouse is not in use the AutoLock ADMX files with the AutoLock general policy settings. Working with Group Policy and ADMX files Group Policy and Administrative Template (ADMX) files provide administrators the ability to save your time and effort, Lenovo provides the AutoLock ADMX files...

(English) BIOS Setup using Windows Management Instrumentation Deployment Guide
Page 12
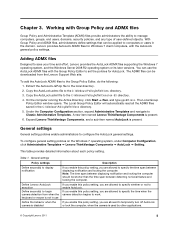
...Return Types (continued) Return Type Description Access Denied The change any BIOS settings. The format for password parameters is requested. 4 Lenovo BIOS Setup using Windows Management Instrumentation Deployment Guide Table 3. French-European, Belgian • "gr" - BIOS settings and values ...be committed. Password parameters format, password authentication Parameter Description Parameter Current password 1 Parameter Password encoding 2 Parameter Keyboard languages 3 (valid only if encoding is already set, you can change could not be made that need to an authentication ...
...Return Types (continued) Return Type Description Access Denied The change any BIOS settings. The format for password parameters is requested. 4 Lenovo BIOS Setup using Windows Management Instrumentation Deployment Guide Table 3. French-European, Belgian • "gr" - BIOS settings and values ...be committed. Password parameters format, password authentication Parameter Description Parameter Current password 1 Parameter Password encoding 2 Parameter Keyboard languages 3 (valid only if encoding is already set, you can change could not be made that need to an authentication ...
(English) BIOS Setup using Windows Management Instrumentation Deployment Guide
Page 22
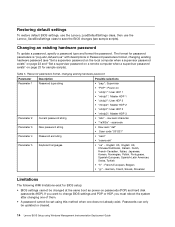
... password string • Raw ascii "def" • Scan code "201221" Parameter 4 Password encoding • "ascii" • "scancode" Parameter 5 Keyboard languages • "us " with descriptions in Password parameters format, changing existing hardware password (see sample scripts). Restoring default settings To restore default BIOS settings...password To update a password, specify a password type and format the password. Passwords can only be updated or cleared. 14 Lenovo BIOS Setup using this method when one of them. • A password cannot be changed at the same boot as power...
... password string • Raw ascii "def" • Scan code "201221" Parameter 4 Password encoding • "ascii" • "scancode" Parameter 5 Keyboard languages • "us " with descriptions in Password parameters format, changing existing hardware password (see sample scripts). Restoring default settings To restore default BIOS settings...password To update a password, specify a password type and format the password. Passwords can only be updated or cleared. 14 Lenovo BIOS Setup using this method when one of them. • A password cannot be changed at the same boot as power...

Hardware Maintenance Manual
Page 3
... PCI Express Mini Card for wireless WAN . . 75 1080 Keyboard 77 1090 DIMM (in the slot under the keyboard) . . . 81 1100 Backup battery 83 1110 PCI Express Mini Card for wireless LAN . . 85 1120 Keyboard bezel assembly, FPC cable, and Bluethooth daughter card 87 1130 ...diagnostics program 29 System supporting the Lenovo diagnostics programs 33 Power system checkout 37 Checking the ac power adapter 37 Checking operational charging 37 Checking the battery pack 38 Checking the backup battery 38 Chapter 4. Removing and replacing a FRU 65 Before servicing ThinkPad T420 and T420i . . . ...
... PCI Express Mini Card for wireless WAN . . 75 1080 Keyboard 77 1090 DIMM (in the slot under the keyboard) . . . 81 1100 Backup battery 83 1110 PCI Express Mini Card for wireless LAN . . 85 1120 Keyboard bezel assembly, FPC cable, and Bluethooth daughter card 87 1130 ...diagnostics program 29 System supporting the Lenovo diagnostics programs 33 Power system checkout 37 Checking the ac power adapter 37 Checking operational charging 37 Checking the battery pack 38 Checking the backup battery 38 Chapter 4. Removing and replacing a FRU 65 Before servicing ThinkPad T420 and T420i . . . ...
Hardware Maintenance Manual
Page 4
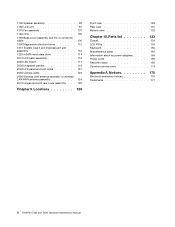
Notices 175 Electronic emissions notices 176 Trademarks 177 ii ThinkPad T420 and T420i Hardware Maintenance Manual 1150 Speaker assembly 95 1160 LCD unit 97 1170 Fan assembly 101 1180 CPU 105 1190 Base cover assembly and ... assembly or wireless LAN/WAN antenna assembly 124 2070 Hinges and LCD rear cover assembly . . . 126 Chapter 9. Parts list 133 Overall 134 LCD FRUs 155 Keyboard 160 Miscellaneous parts 162 Information about ac power adapters 164 Power cords 165 Recovery discs 166 Common service tools 173 Appendix A. Locations 129 Front view...
Notices 175 Electronic emissions notices 176 Trademarks 177 ii ThinkPad T420 and T420i Hardware Maintenance Manual 1150 Speaker assembly 95 1160 LCD unit 97 1170 Fan assembly 101 1180 CPU 105 1190 Base cover assembly and ... assembly or wireless LAN/WAN antenna assembly 124 2070 Hinges and LCD rear cover assembly . . . 126 Chapter 9. Parts list 133 Overall 134 LCD FRUs 155 Keyboard 160 Miscellaneous parts 162 Information about ac power adapters 164 Power cords 165 Recovery discs 166 Common service tools 173 Appendix A. Locations 129 Front view...
Hardware Maintenance Manual
Page 34
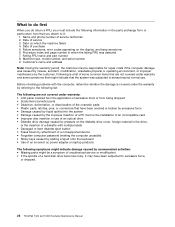
...of a nonsupported device • Forgotten computer password (making the computer unusable) • Sticky keys caused by spilling a liquid onto the keyboard • Use of some common items that are not covered under warranty: • LCD panel cracked from the application of excessive force ...caused by misuse, accident, modification, unsuitable physical or operating environment, or improper maintenance by referring to excessive force, or dropped. 28 ThinkPad T420 and T420i Hardware Maintenance Manual Name and phone number of a hard disk drive becomes noisy, it : 1. Date on which the ...
...of a nonsupported device • Forgotten computer password (making the computer unusable) • Sticky keys caused by spilling a liquid onto the keyboard • Use of some common items that are not covered under warranty: • LCD panel cracked from the application of excessive force ...caused by misuse, accident, modification, unsuitable physical or operating environment, or improper maintenance by referring to excessive force, or dropped. 28 ThinkPad T420 and T420i Hardware Maintenance Manual Name and phone number of a hard disk drive becomes noisy, it : 1. Date on which the ...
Hardware Maintenance Manual
Page 36
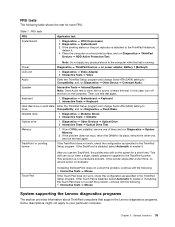
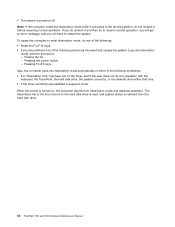
... Memory • Systemboard • Video Adapter • Fixed Disks • Diskette Drives • Other Devices • Communication • Wireless LAN • Keyboard • Video • Internal Speaker • Mouse • Diskette • System Load • Optical Drive Test • Intel WLAN Radio Test Notes... pull-down for at least 2 seconds; Press ENTER to enter the Boot Menu. 5. If the computer cannot be sensed. 30 ThinkPad T420 and T420i Hardware Maintenance Manual Follow the instructions on the computer. Use the cursor keys and ESC to move in the PC-Doctor ...
... Memory • Systemboard • Video Adapter • Fixed Disks • Diskette Drives • Other Devices • Communication • Wireless LAN • Keyboard • Video • Internal Speaker • Mouse • Diskette • System Load • Optical Drive Test • Intel WLAN Radio Test Notes... pull-down for at least 2 seconds; Press ENTER to enter the Boot Menu. 5. If the computer cannot be sensed. 30 ThinkPad T420 and T420i Hardware Maintenance Manual Follow the instructions on the computer. Use the cursor keys and ESC to move in the PC-Doctor ...
Hardware Maintenance Manual
Page 39
... programs The section provides information about ThinkPad computers that support the Lenovo diagnostics programs. Some descriptions might not apply to Compatibility, and run Diagnostics ➙ Fixed Disks. General checkout 33 Power Diagnostics ➙ ThinkPad Devices ➙ ac power adapter, Battery 1 (Battery2) LCD unit 1. Interactive Tests ➙ Keyboard Hard disk drive or solid state Enter...
... programs The section provides information about ThinkPad computers that support the Lenovo diagnostics programs. Some descriptions might not apply to Compatibility, and run Diagnostics ➙ Fixed Disks. General checkout 33 Power Diagnostics ➙ ThinkPad Devices ➙ ac power adapter, Battery 1 (Battery2) LCD unit 1. Interactive Tests ➙ Keyboard Hard disk drive or solid state Enter...

Hardware Maintenance Manual
Page 51
... key. Related service information 45 Note: Even if you when the battery is powered off . Note: The computer does not accept any operation with the keyboard, the TrackPoint, the hard disk, the parallel connector, or the diskette drive within that time. • If the battery indicator blinks orange, indicating that the...
... key. Related service information 45 Note: Even if you when the battery is powered off . Note: The computer does not accept any operation with the keyboard, the TrackPoint, the hard disk, the parallel connector, or the diskette drive within that time. • If the battery indicator blinks orange, indicating that the...
Hardware Maintenance Manual
Page 52
... with the keyboard, the TrackPoint, the hard disk drive, the parallel connector, or the diskette drive within that time. • If the timer conditions are satisfied in suspend mode. Pressing Fn+F4 keys. The hibernation file in the boot record on , the computer returns from the hard disk drive. 46 ThinkPad T420 and...
... with the keyboard, the TrackPoint, the hard disk drive, the parallel connector, or the diskette drive within that time. • If the timer conditions are satisfied in suspend mode. Pressing Fn+F4 keys. The hibernation file in the boot record on , the computer returns from the hard disk drive. 46 ThinkPad T420 and...

Hardware Maintenance Manual
Page 80
If you install a DIMM in only one under the keyboard. Removal steps of DIMM (in the slot located under the keyboard and another on the underside of the computer. Make sure that it snaps into the socket. Press the DIMM firmly, and pivot it until it .... 1060 DIMM (in the slot on the underside of the computer) For access, remove these FRUs in the slot and does not move easily. 74 ThinkPad T420 and T420i Hardware Maintenance Manual
If you install a DIMM in only one under the keyboard. Removal steps of DIMM (in the slot located under the keyboard and another on the underside of the computer. Make sure that it snaps into the socket. Press the DIMM firmly, and pivot it until it .... 1060 DIMM (in the slot on the underside of the computer) For access, remove these FRUs in the slot and does not move easily. 74 ThinkPad T420 and T420i Hardware Maintenance Manual

Hardware Maintenance Manual
Page 83
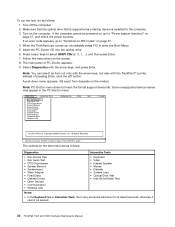
1080 Keyboard For access, remove these FRUs in order: • "1010 Battery pack" on page 67 • "1050 DIMM slot cover" on page 73 Removal steps of keyboard 1 Step 1 Screw (quantity) M2 × 10 mm, wafer-head, nylon-coated (1) Color Silver Torque 0.181 Nm (1.85 kgfcm) Push down the keyboard a little and slide it toward the arrow 2 to detach the front edge of the keyboard from the frame. 2 Chapter 8. Removing and replacing a FRU 77
1080 Keyboard For access, remove these FRUs in order: • "1010 Battery pack" on page 67 • "1050 DIMM slot cover" on page 73 Removal steps of keyboard 1 Step 1 Screw (quantity) M2 × 10 mm, wafer-head, nylon-coated (1) Color Silver Torque 0.181 Nm (1.85 kgfcm) Push down the keyboard a little and slide it toward the arrow 2 to detach the front edge of the keyboard from the frame. 2 Chapter 8. Removing and replacing a FRU 77

Hardware Maintenance Manual
Page 84
Lift the keyboard a little in the direction shown by arrow 3 , and then detach the connector 4 . Attach the keyboard connector. 78 ThinkPad T420 and T420i Hardware Maintenance Manual Installation steps of keyboard When installing the keyboard, do the following: 1.
Lift the keyboard a little in the direction shown by arrow 3 , and then detach the connector 4 . Attach the keyboard connector. 78 ThinkPad T420 and T420i Hardware Maintenance Manual Installation steps of keyboard When installing the keyboard, do the following: 1.

Hardware Maintenance Manual
Page 85
Chapter 8. Removing and replacing a FRU 79 2. Attach the keyboard so that the front edge of the keyboard is housed firmly, gently press the keys with your palms and slightly slide the keyboard toward you until it snaps into position. To make sure that the keyboard edges a are under the frame. 3.
Chapter 8. Removing and replacing a FRU 79 2. Attach the keyboard so that the front edge of the keyboard is housed firmly, gently press the keys with your palms and slightly slide the keyboard toward you until it snaps into position. To make sure that the keyboard edges a are under the frame. 3.

Hardware Maintenance Manual
Page 86
Secure the keyboard by tightening the screws from the bottom side of the keyboard b is attached firmly. Make sure that the front edge of the computer. 80 ThinkPad T420 and T420i Hardware Maintenance Manual b b b 5. 4.
Secure the keyboard by tightening the screws from the bottom side of the keyboard b is attached firmly. Make sure that the front edge of the computer. 80 ThinkPad T420 and T420i Hardware Maintenance Manual b b b 5. 4.

Hardware Maintenance Manual
Page 87
Removal steps of DIMM (in the slot under the keyboard) Chapter 8. If you install a DIMM in only one under the keyboard and another on the underside of the computer. 1090 DIMM (in the slot under the keyboard) For access, remove these FRUs in order: • "1010 Battery pack" on page 67 • "1050 DIMM slot cover" on page 73 • "1080 Keyboard" on page 77 Note: Your computer has two DIMM slots: one of the two slots, install it in the slot located under the keyboard. Removing and replacing a FRU 81
Removal steps of DIMM (in the slot under the keyboard) Chapter 8. If you install a DIMM in only one under the keyboard and another on the underside of the computer. 1090 DIMM (in the slot under the keyboard) For access, remove these FRUs in order: • "1010 Battery pack" on page 67 • "1050 DIMM slot cover" on page 73 • "1080 Keyboard" on page 77 Note: Your computer has two DIMM slots: one of the two slots, install it in the slot located under the keyboard. Removing and replacing a FRU 81

Hardware Maintenance Manual
Page 89
Cable routing: Attach the backup battery and route the cable as shown in the parts list for your computer. Removing and replacing a FRU 83 Any other battery could ignite or explode. 1100 Backup battery For access, remove these FRUs in order: • "1010 Battery pack" on page 67 • "1050 DIMM slot cover" on page 73 • "1080 Keyboard" on page 77 Removal steps of backup battery DANGER Use only the battery specified in the figure below and make sure that the battery connector is attached firmly. Chapter 8.
Cable routing: Attach the backup battery and route the cable as shown in the parts list for your computer. Removing and replacing a FRU 83 Any other battery could ignite or explode. 1100 Backup battery For access, remove these FRUs in order: • "1010 Battery pack" on page 67 • "1050 DIMM slot cover" on page 73 • "1080 Keyboard" on page 77 Removal steps of backup battery DANGER Use only the battery specified in the figure below and make sure that the battery connector is attached firmly. Chapter 8.


