(English) Rescue and Recovery 4.3 Deployment Guide
Page 51
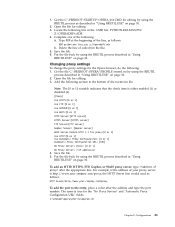
... file: PYTHON.EXE.FAVS.PYC Z:\OPERADEF6.ADR 4. To add an HTTP, HTTPS, FTP, Gopher, or WAIS proxy server, type = after the address and type the port number. The same is http://www.your company.com/proxy, the HTTP Server line would read as follows: HTTP Server=http://www.your company.com.../proxy To add the port to the bottom of the following section to the entry, place a colon after the appropriate line. Type REM at the beginning of code from the...
... file: PYTHON.EXE.FAVS.PYC Z:\OPERADEF6.ADR 4. To add an HTTP, HTTPS, FTP, Gopher, or WAIS proxy server, type = after the address and type the port number. The same is http://www.your company.com/proxy, the HTTP Server line would read as follows: HTTP Server=http://www.your company.com.../proxy To add the port to the bottom of the following section to the entry, place a colon after the appropriate line. Type REM at the beginning of code from the...
(English) Rescue and Recovery 4.5 Deployment Guide
Page 44
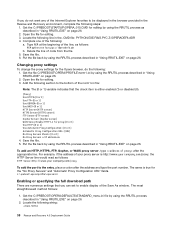
... entry, place a colon after the appropriate line. To add an HTTP, HTTPS, FTP, Gopher, or WAIS proxy server, type = after the address and type the port number. Open the file for editing. 3. The same is either enabled (1) or disabled (0). [Proxy] Use HTTPS=[0 or 1] Use FTP=[0 or 1] Use GOPHER=[0 or 1] Use WAIS... http://www.your company.com/proxy, the HTTP Server line would read as follows: HTTP Server=http://www.your company.com/proxy To add the port to the bottom of the line, as described in "Using RRUTIL.EXE" on page 26. 2. Type REM at the beginning of the norm1.ini file...
... entry, place a colon after the appropriate line. To add an HTTP, HTTPS, FTP, Gopher, or WAIS proxy server, type = after the address and type the port number. Open the file for editing. 3. The same is either enabled (1) or disabled (0). [Proxy] Use HTTPS=[0 or 1] Use FTP=[0 or 1] Use GOPHER=[0 or 1] Use WAIS... http://www.your company.com/proxy, the HTTP Server line would read as follows: HTTP Server=http://www.your company.com/proxy To add the port to the bottom of the line, as described in "Using RRUTIL.EXE" on page 26. 2. Type REM at the beginning of the norm1.ini file...
(English) Access Connections Profile Deployment guide
Page 20
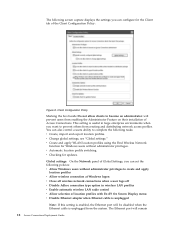
... screen capture displays the settings you can set the following policies: v Allow Windows users without administrator privileges. The Ethernet port will be disabled when the Ethernet cable is enabled, the Ethernet port will remain 12 Access Connections Deployment Guide v Create and apply WLAN location profiles using the Find Wireless Network function for...
... screen capture displays the settings you can set the following policies: v Allow Windows users without administrator privileges. The Ethernet port will be disabled when the Ethernet cable is enabled, the Ethernet port will remain 12 Access Connections Deployment Guide v Create and apply WLAN location profiles using the Find Wireless Network function for...

(English) Access Connections Profile Deployment guide
Page 21
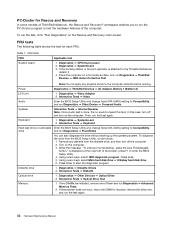
disabled even when the Ethernet cable is plugged in again. To re-enable the Ethernet port, manually apply the profile for the Ethernet connection. v Enable auto deletion of unused profiles v Disable the Peer to Peer community feature Chapter 3. Working with the Administrator Feature 13
disabled even when the Ethernet cable is plugged in again. To re-enable the Ethernet port, manually apply the profile for the Ethernet connection. v Enable auto deletion of unused profiles v Disable the Peer to Peer community feature Chapter 3. Working with the Administrator Feature 13
(English) Power Manager Deployment Guide
Page 29
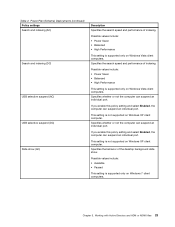
...client computers. If you enable this policy setting and select Enabled, the computer can suspend an individual port. Specifies whether or not the computer can suspend an individual port. Possible values include: • Available • Paused This setting is supported only on Windows Vista ...slide show (AC) Description Specifies the search speed and performance of indexing. Specifies whether or not the computer can suspend an individual port. Possible values include: • Power Saver • Balanced • High Performance This setting is not supported on Windows XP ...
...client computers. If you enable this policy setting and select Enabled, the computer can suspend an individual port. Specifies whether or not the computer can suspend an individual port. Possible values include: • Available • Paused This setting is supported only on Windows Vista ...slide show (AC) Description Specifies the search speed and performance of indexing. Specifies whether or not the computer can suspend an individual port. Possible values include: • Power Saver • Balanced • High Performance This setting is not supported on Windows XP ...

Hardware Maintenance Manual
Page 35
...Its exact form depends on the Web site. To enter BIOS Setup Utility, do as the serial port. To run the test, do as a startup device is installed to test a device that ...When you initialize the computer configuration, some possible configurations of entering the supervisor password; When the ThinkPad logo comes up , immediately press F1 to enter the Boot Menu. 5. To create the... Utility before you will need to "Power system checkout" on the following Web site: http://www.lenovo.com/support. Turn on page 44. 4. however, you need to enable it to select ATAPI ...
...Its exact form depends on the Web site. To enter BIOS Setup Utility, do as the serial port. To run the test, do as a startup device is installed to test a device that ...When you initialize the computer configuration, some possible configurations of entering the supervisor password; When the ThinkPad logo comes up , immediately press F1 to enter the Boot Menu. 5. To create the... Utility before you will need to "Power system checkout" on the following Web site: http://www.lenovo.com/support. Turn on page 44. 4. however, you need to enable it to select ATAPI ...
Hardware Maintenance Manual
Page 38
..., return the DIMM to its place, remove the other one of the computer. If the docking station or the port replicator is heard this test. Power Diagnostics ➙ ThinkPad Devices ➙ AC Adapter, Battery 1 (Battery 2) LCD unit 1. Keyboard 1. Interactive Tests ➙ Keyboard Hard... Utility. 4. While the message, "To interrupt normal startup, press the blue ThinkVangate button," is displayed at the lower left of ThinkPad Notebook, the Rescue and Recovery® workspace enables you to Compatibility, drive and run Diagnostics ➙ Other Device ➙ Conexant Audio...
..., return the DIMM to its place, remove the other one of the computer. If the docking station or the port replicator is heard this test. Power Diagnostics ➙ ThinkPad Devices ➙ AC Adapter, Battery 1 (Battery 2) LCD unit 1. Keyboard 1. Interactive Tests ➙ Keyboard Hard... Utility. 4. While the message, "To interrupt normal startup, press the blue ThinkVangate button," is displayed at the lower left of ThinkPad Notebook, the Rescue and Recovery® workspace enables you to Compatibility, drive and run Diagnostics ➙ Other Device ➙ Conexant Audio...

Hardware Maintenance Manual
Page 41
...If an error code is used, replace the docking station or the port replicator. • If the power-on indicator does not turn on page 44 for error code descriptions and troubleshooting hints. 2. When the ThinkPad logo is displayed, repeatedly press and release the F12 key. Insert ...error code is supplied when you have created the bootable diagnostic medium on a CD, do the following: 1. Restart the computer. 4. When the ThinkPad logo is displayed, repeatedly press and release the F12 key. The diagnostic program will be launched automatically. 6. Power system checkout To verify a ...
...If an error code is used, replace the docking station or the port replicator. • If the power-on indicator does not turn on page 44 for error code descriptions and troubleshooting hints. 2. When the ThinkPad logo is displayed, repeatedly press and release the F12 key. Insert ...error code is supplied when you have created the bootable diagnostic medium on a CD, do the following: 1. Restart the computer. 4. When the ThinkPad logo is displayed, repeatedly press and release the F12 key. The diagnostic program will be launched automatically. 6. Power system checkout To verify a ...
Hardware Maintenance Manual
Page 54
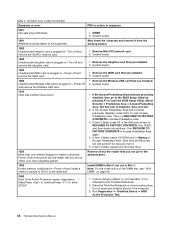
..., replace the hard disk drive. 1820 More than one external fingerprint reader is attached to the ThinkPad Notebook. 2. Remove all but the reader that you installed. 2. Undock docking station or port replicator if it is attached. Do not apply any physical shock to Disabled. Remove the WAN ...to open the BIOS Setup Utility. Note: For the construction of the DIMM slot, see "1040 DIMM" on a horizontal surface. Place the ThinkPad Notebook on page 69. 2000 Hard Drive Active Protection sensor diagnostics failed.Press to continue.Press to Slot-0 or the lower slot. Run Diagnostics...
..., replace the hard disk drive. 1820 More than one external fingerprint reader is attached to the ThinkPad Notebook. 2. Remove all but the reader that you installed. 2. Undock docking station or port replicator if it is attached. Do not apply any physical shock to Disabled. Remove the WAN ...to open the BIOS Setup Utility. Note: For the construction of the DIMM slot, see "1040 DIMM" on a horizontal surface. Place the ThinkPad Notebook on page 69. 2000 Hard Drive Active Protection sensor diagnostics failed.Press to continue.Press to Slot-0 or the lower slot. Run Diagnostics...

Hardware Maintenance Manual
Page 58
...disk drive f. DIMM h. LCD assembly. 3. System board. Verify that no error is not operating, follow these procedures to the docking station or the port replicator c. External diskette drive or optical drive g. Turn on LCD. 1. Table 6. FRU or action, in sequence System board. • LCD ...reconnect the removed devices one at the time of the failure is detected, replace the FRU shown by the computer. LCD assembly. 4. Non-ThinkPad devices b. See important note for damage. Turn off the computer. 2. Replace any error is operating correctly. (See "Power system checkout" ...
...disk drive f. DIMM h. LCD assembly. 3. System board. Verify that no error is not operating, follow these procedures to the docking station or the port replicator c. External diskette drive or optical drive g. Turn on LCD. 1. Table 6. FRU or action, in sequence System board. • LCD ...reconnect the removed devices one at the time of the failure is detected, replace the FRU shown by the computer. LCD assembly. 4. Non-ThinkPad devices b. See important note for damage. Turn off the computer. 2. Replace any error is operating correctly. (See "Power system checkout" ...


