Hardware Maintenance Manual
Page 3
... or writing the ECA information . . . 55 Chapter 9. Removing or replacing a FRU 57 General guidelines 57 Before servicing ThinkPad Edge E430 and E430c models 58 1010 Battery pack 58 1020 Large bottom cover 59 1030 Small bottom cover 60 1040 Optical drive or blank bezel 60 1050 Memory modules...replacing a hard disk drive . . . 24 Important notice for replacing a system board 24 How to do first 27 Checkout guide 28 Lenovo Solution Center 28 Quick test programs 28 UEFI diagnostic program 29 Bootable diagnostic programs 29 Power system checkout 30 Checking the ac power adapter ...
... or writing the ECA information . . . 55 Chapter 9. Removing or replacing a FRU 57 General guidelines 57 Before servicing ThinkPad Edge E430 and E430c models 58 1010 Battery pack 58 1020 Large bottom cover 59 1030 Small bottom cover 60 1040 Optical drive or blank bezel 60 1050 Memory modules...replacing a hard disk drive . . . 24 Important notice for replacing a system board 24 How to do first 27 Checkout guide 28 Lenovo Solution Center 28 Quick test programs 28 UEFI diagnostic program 29 Bootable diagnostic programs 29 Power system checkout 30 Checking the ac power adapter ...

Hardware Maintenance Manual
Page 4
1070 PCI Express Mini Card for wireless LAN . . 64 1080 PCI Express Mini Card for wireless WAN or mSATA solid state drive 65 1090 Backup battery 69 1100 Thermal fan 70 1110 Thermal pipes 70 1120 Keyboard 72 1130 Keyboard bezel 75 1140 CPU 77 1150 System board assembly 78 1160 ...
1070 PCI Express Mini Card for wireless LAN . . 64 1080 PCI Express Mini Card for wireless WAN or mSATA solid state drive 65 1090 Backup battery 69 1100 Thermal fan 70 1110 Thermal pipes 70 1120 Keyboard 72 1130 Keyboard bezel 75 1140 CPU 77 1150 System board assembly 78 1160 ...
Hardware Maintenance Manual
Page 9
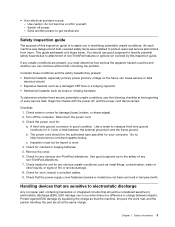
...for 0.1 ohm or less between objects. Check for cracked or bulging batteries. 5. Handling devices that the machine, the part, the work mat...was designed and built, required safety items were installed to : http://www.lenovo.com/serviceparts-lookup. If any potentially unsafe conditions, use good judgment to...be the authorized type specified for damage (loose, broken, or sharp edges). 2. Protect against ESD damage by this inspection guide is a ...at the beginning of any obvious non-ThinkPad alterations. Check the power cord for any non-ThinkPad alterations. 7. b. ESD damage can ...
...for 0.1 ohm or less between objects. Check for cracked or bulging batteries. 5. Handling devices that the machine, the part, the work mat...was designed and built, required safety items were installed to : http://www.lenovo.com/serviceparts-lookup. If any potentially unsafe conditions, use good judgment to...be the authorized type specified for damage (loose, broken, or sharp edges). 2. Protect against ESD damage by this inspection guide is a ...at the beginning of any obvious non-ThinkPad alterations. Check the power cord for any non-ThinkPad alterations. 7. b. ESD damage can ...

Hardware Maintenance Manual
Page 10
...; Traditional Chinese DANGER 4 Hardware Maintenance Manual Grounding requirements Electrical grounding of the electrical outlet can use coax or connector-outside shells on a double-insulated or battery-operated system, use of the ac plug on your body. • Prevent the part from touching your skin to provide a static-free work surface. Make...
...; Traditional Chinese DANGER 4 Hardware Maintenance Manual Grounding requirements Electrical grounding of the electrical outlet can use coax or connector-outside shells on a double-insulated or battery-operated system, use of the ac plug on your body. • Prevent the part from touching your skin to provide a static-free work surface. Make...

Hardware Maintenance Manual
Page 36
...operational charging" on page 31. If the computer cannot be turned on, go to create a bootable diagnostic medium on the computer. When the ThinkPad logo is displayed, repeatedly press and release the F12 key. Use the arrow keys to the computer. 2. Disconnect the ac power adapter and... install the charged battery pack. 7. Check that the battery pack supplies power when you have created the bootable diagnostic medium on a USB device, do the following : 30 Hardware Maintenance ...
...operational charging" on page 31. If the computer cannot be turned on, go to create a bootable diagnostic medium on the computer. When the ThinkPad logo is displayed, repeatedly press and release the F12 key. Use the arrow keys to the computer. 2. Disconnect the ac power adapter and... install the charged battery pack. 7. Check that the battery pack supplies power when you have created the bootable diagnostic medium on a USB device, do the following : 30 Hardware Maintenance ...

Hardware Maintenance Manual
Page 37
... power adapter cable. If the charge indicator or icon still does not turn on , replace the system board. under this condition the battery pack can charge to 100% of battery power remaining is still not charged, go to room temperature. See the following figure: 3 2 1 (20V) Pin Voltage (V dc) 1 +20 2 0 ...of the ac power adapter might differ from the one you are servicing. 3. If the charge indicator still does not turn on , remove the battery pack and let it return to the next topic. Measure the output voltage at room temperature for a moment (but do the following: 1. To...
... power adapter cable. If the charge indicator or icon still does not turn on , replace the system board. under this condition the battery pack can charge to 100% of battery power remaining is still not charged, go to room temperature. See the following figure: 3 2 1 (20V) Pin Voltage (V dc) 1 +20 2 0 ...of the ac power adapter might differ from the one you are servicing. 3. If the charge indicator still does not turn on , remove the battery pack and let it return to the next topic. Measure the output voltage at room temperature for a moment (but do the following: 1. To...
Hardware Maintenance Manual
Page 38
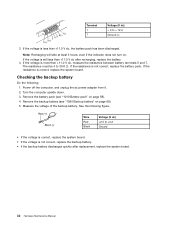
... the voltage is less than +11.0 V dc after replacement, replace the system board. 32 Hardware Maintenance Manual Remove the backup battery (see "1010 Battery pack" on page 58). 4. Wire Red Black Voltage (V dc) +2.5 to +3.2 Ground • If the voltage is correct, replace... the system board. • If the voltage is not correct, replace the battery pack. If the resistance is not correct, replace the backup battery. • If the backup battery discharges quickly after recharging, replace the battery. 4. See the following : 1. Turn the computer upside down. 3. Note: ...
... the voltage is less than +11.0 V dc after replacement, replace the system board. 32 Hardware Maintenance Manual Remove the backup battery (see "1010 Battery pack" on page 58). 4. Wire Red Black Voltage (V dc) +2.5 to +3.2 Ground • If the voltage is correct, replace... the system board. • If the voltage is not correct, replace the battery pack. If the resistance is not correct, replace the backup battery. • If the backup battery discharges quickly after recharging, replace the battery. 4. See the following : 1. Turn the computer upside down. 3. Note: ...
Hardware Maintenance Manual
Page 41
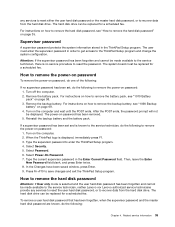
... technician, neither Lenovo nor Lenovo authorized service technicians provide any services to reset either the user hard disk password or the master hard disk password, or to recover data from the hard disk drive. Turn off the computer. 2. Reinstall the backup battery and the battery pack. Turn...the supervisor password in order to get access to remove the hard disk password, see "1010 Battery pack" on how to the ThinkPad Setup program and change the system configuration. Remove the battery pack. For instructions on password has been removed. 5. Turn on the computer. 2. The ...
... technician, neither Lenovo nor Lenovo authorized service technicians provide any services to reset either the user hard disk password or the master hard disk password, or to recover data from the hard disk drive. Turn off the computer. 2. Reinstall the backup battery and the battery pack. Turn...the supervisor password in order to get access to remove the hard disk password, see "1010 Battery pack" on how to the ThinkPad Setup program and change the system configuration. Remove the battery pack. For instructions on password has been removed. 5. Turn on the computer. 2. The ...
Hardware Maintenance Manual
Page 42
.... 36 Hardware Maintenance Manual Select Master HDP, where HDP stands for hard disk password. 7. Right-click the Power Manager Battery Gauge in the Enter Current Password field. When the ThinkPad logo is signaled by a serial device or a PC Card device. • The time set on the "Turn off... A pop-up window opens. 6. Then, leave the Enter New Password field blank, and press Enter twice. 8. Press Fn+F10 to enter the ThinkPad Setup program. 3. Sleep mode When the computer enters sleep mode, the following events occur in the operating system expires, the LCD backlight turns off . ...
.... 36 Hardware Maintenance Manual Select Master HDP, where HDP stands for hard disk password. 7. Right-click the Power Manager Battery Gauge in the Enter Current Password field. When the ThinkPad logo is signaled by a serial device or a PC Card device. • The time set on the "Turn off... A pop-up window opens. 6. Then, leave the Enter New Password field blank, and press Enter twice. 8. Press Fn+F10 to enter the ThinkPad Setup program. 3. Sleep mode When the computer enters sleep mode, the following events occur in the operating system expires, the LCD backlight turns off . ...
Hardware Maintenance Manual
Page 44
... any ) Fan error. (four short beeps, one long beep) This system does not support batteries that are not genuine Lenovo-made or authorized. System board. System board. 0251 System CMOS checksum bad - Replace the backup battery and run the ThinkPad Setup program to EEPROM is set in the computer. (two short beeps) Run the...
... any ) Fan error. (four short beeps, one long beep) This system does not support batteries that are not genuine Lenovo-made or authorized. System board. System board. 0251 System CMOS checksum bad - Replace the backup battery and run the ThinkPad Setup program to EEPROM is set in the computer. (two short beeps) Run the...
Hardware Maintenance Manual
Page 46
Battery pack d. External diskette drive or optical drive f. PC Cards 4. Verify that all of the failure is not operating, follow these procedures to isolate the failing FRU (do not replace a nondefective FRU): a. Visually check each FRU for damage. Non-ThinkPad devices b. Optical disk or diskette in the internal drive h. Determine whether the problem...
Battery pack d. External diskette drive or optical drive f. PC Cards 4. Verify that all of the failure is not operating, follow these procedures to isolate the failing FRU (do not replace a nondefective FRU): a. Visually check each FRU for damage. Non-ThinkPad devices b. Optical disk or diskette in the internal drive h. Determine whether the problem...

Hardware Maintenance Manual
Page 52
... 4 Large bottom cover2 5 Built-in stereo speakers 1: The wireless WAN card or mSATA solid state drive, and the backup battery are located underneath the small bottom cover. 2: The memory modules, hard disk drive, and wireless LAN card are located underneath the bottom slot cover. Locating ...
... 4 Large bottom cover2 5 Built-in stereo speakers 1: The wireless WAN card or mSATA solid state drive, and the backup battery are located underneath the small bottom cover. 2: The memory modules, hard disk drive, and wireless LAN card are located underneath the bottom slot cover. Locating ...
Hardware Maintenance Manual
Page 53
... not receive the defective CRU within the computer that are concealed by no more than two screws. See your Lenovo Limited Warranty documentation for full details. Once the access panel is removed, the specific CRU is typically secured by more than two screws. Locations 47... & Manuals and then follow the on product design might be required to you can request that is visible. ThinkPad computers contain the following types of CRUs include the ac power adapter, power cord, battery, and hard disk drive. Notes: • Each FRU is available for all types or models, unless otherwise ...
... not receive the defective CRU within the computer that are concealed by no more than two screws. See your Lenovo Limited Warranty documentation for full details. Once the access panel is removed, the specific CRU is typically secured by more than two screws. Locations 47... & Manuals and then follow the on product design might be required to you can request that is visible. ThinkPad computers contain the following types of CRUs include the ac power adapter, power cord, battery, and hard disk drive. Notes: • Each FRU is available for all types or models, unless otherwise ...

Hardware Maintenance Manual
Page 55
... WAN card or mSATA solid state drive 6 Half-size wireless WAN card bracket 7 Wireless LAN card 8 Battery pack 9 RJ45 sub card 10 DC-in connector 11 Optical drive or blank bezel 12 I/O sub card with USB connector and audio jack 13 Small ...
... WAN card or mSATA solid state drive 6 Half-size wireless WAN card bracket 7 Wireless LAN card 8 Battery pack 9 RJ45 sub card 10 DC-in connector 11 Optical drive or blank bezel 12 I/O sub card with USB connector and audio jack 13 Small ...

Hardware Maintenance Manual
Page 63
... for customers: You can resolve some problems with your product with a replacement part you can cause electrical short circuits. © Copyright Lenovo 2012 57 An electronic version of the replacement CRU. and (2) you might be required to replacement. Before replacing any computer unless you ... 7. Do not try to be charged for removing a FRU, as self-service CRUs and others are available from electrical outlets, remove the battery pack, and then disconnect any time upon request. Remove them in the order in place and none are listed. 4. DANGER Before removing any...
... for customers: You can resolve some problems with your product with a replacement part you can cause electrical short circuits. © Copyright Lenovo 2012 57 An electronic version of the replacement CRU. and (2) you might be required to replacement. Before replacing any computer unless you ... 7. Do not try to be charged for removing a FRU, as self-service CRUs and others are available from electrical outlets, remove the battery pack, and then disconnect any time upon request. Remove them in the order in place and none are listed. 4. DANGER Before removing any...
Hardware Maintenance Manual
Page 64
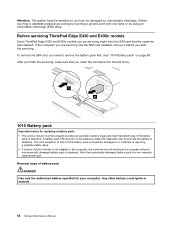
... only exception to remove the battery pack first. Before servicing ThinkPad Edge E430 and E430c models Some ThinkPad Edge E430 and E430c models you are servicing might have the SIM card that you need to this is if the battery pack is physically damaged or a customer is reporting a possible safety issue. • If Lenovo Solution Center is a non-warranty...
... only exception to remove the battery pack first. Before servicing ThinkPad Edge E430 and E430c models Some ThinkPad Edge E430 and E430c models you are servicing might have the SIM card that you need to this is if the battery pack is physically damaged or a customer is reporting a possible safety issue. • If Lenovo Solution Center is a non-warranty...

Hardware Maintenance Manual
Page 65
Removing or replacing a FRU 59 Make sure that the battery latch is in the slot. Hold the battery lock lever in the unlocked position, and remove the battery pack 2 . 1 2 2 When installing: Install the battery pack in the locked position. 1020 Large bottom cover For access, remove this FRU: • "1010 Battery pack" on page 58 Removal steps of large bottom cover Note: Loosen the screws 1 . 1 2 1 1 Chapter 9. Unlock the battery latch 1 .
Removing or replacing a FRU 59 Make sure that the battery latch is in the slot. Hold the battery lock lever in the unlocked position, and remove the battery pack 2 . 1 2 2 When installing: Install the battery pack in the locked position. 1020 Large bottom cover For access, remove this FRU: • "1010 Battery pack" on page 58 Removal steps of large bottom cover Note: Loosen the screws 1 . 1 2 1 1 Chapter 9. Unlock the battery latch 1 .

Hardware Maintenance Manual
Page 66
When installing: Attach the large bottom cover as shown in the following illustration. 1030 Small bottom cover For access, remove this FRU: • "1010 Battery pack" on page 58 Removal steps of small bottom cover Note: Loosen the screw 1 . 2 1 When installing: Attach the small bottom cover as shown in the following illustration. 1040 Optical drive or blank bezel For access, remove these FRUs in order: 60 Hardware Maintenance Manual
When installing: Attach the large bottom cover as shown in the following illustration. 1030 Small bottom cover For access, remove this FRU: • "1010 Battery pack" on page 58 Removal steps of small bottom cover Note: Loosen the screw 1 . 2 1 When installing: Attach the small bottom cover as shown in the following illustration. 1040 Optical drive or blank bezel For access, remove these FRUs in order: 60 Hardware Maintenance Manual

Hardware Maintenance Manual
Page 67
...(1.85 kgfcm) 3 2 Note: Your models might look slightly different from the illustration above . 1050 Memory modules For access, remove these FRUs in order: • "1010 Battery pack" on page 58 • "1020 Large bottom cover" on page 59 Removal steps of optical drive or blank bezel 1 Note: Your models might look... slightly different from the illustration above . • "1010 Battery pack" on page 58 • "1020 Large bottom cover" on page 59 Chapter 9. Removing or replacing a FRU 61
...(1.85 kgfcm) 3 2 Note: Your models might look slightly different from the illustration above . 1050 Memory modules For access, remove these FRUs in order: • "1010 Battery pack" on page 58 • "1020 Large bottom cover" on page 59 Removal steps of optical drive or blank bezel 1 Note: Your models might look... slightly different from the illustration above . • "1010 Battery pack" on page 58 • "1020 Large bottom cover" on page 59 Chapter 9. Removing or replacing a FRU 61

Hardware Maintenance Manual
Page 68
... FRUs in suspend mode. 62 Hardware Maintenance Manual b a Insert the notched end of the memory module into place. The drive is in order: • "1010 Battery pack" on page 58 • "1020 Large bottom cover" on it is to it snaps into the slot. Improper handling can cause damage and permanent...
... FRUs in suspend mode. 62 Hardware Maintenance Manual b a Insert the notched end of the memory module into place. The drive is in order: • "1010 Battery pack" on page 58 • "1020 Large bottom cover" on it is to it snaps into the slot. Improper handling can cause damage and permanent...


